Introduction
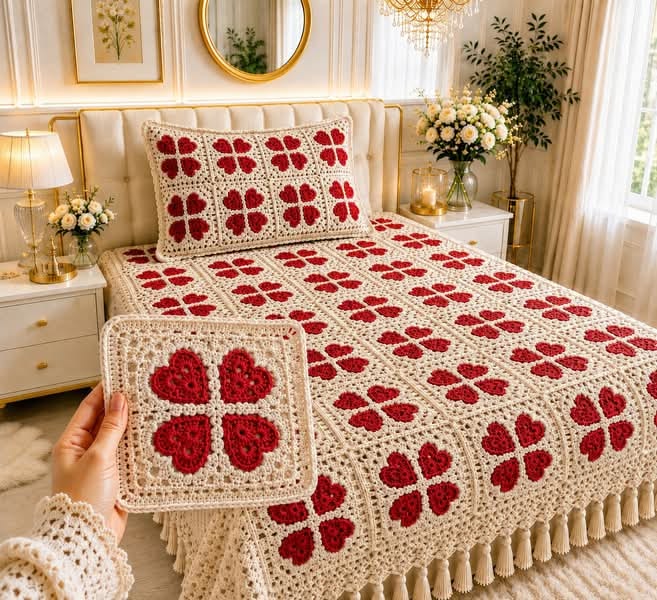
Four red hearts must meet at the center without their rounded lobes colliding at the corners of the square. This red four heart granny square crochet bedspread solves that geometry with individually shaped heart motifs mounted on a cream openwork block. Use DK yarn and a 4 mm hook for approximately 19–21 cm squares. The full design includes 72 motifs, cream joining, a lace border, tassel fringe, and a matching pillow.
The Design: What Makes This Four-Heart Square Different
Most heart granny squares place one large heart in the center. This block uses four smaller hearts, each rotated ninety degrees so its point faces inward. The resulting shape reads as a four-petal flower or clover from across the room, while the individual hearts remain visible at close range. A cream center crossing separates the red pieces and prevents the motif from becoming one solid disk. The outer field is intentionally flatter than the center, making the four heart granny square pattern easier to join into a large bedspread. Small open spaces between the cream stitches also keep a seventy-two-square blanket from becoming excessively dense. One common mistake is sewing the hearts too far from the center. Even a 10 mm gap between their points can break the four-leaf silhouette and make the square look like four unrelated appliqués.
Project Info at a Glance
| Skill Level | Time | Finished Size | Hook | Best For |
|---|---|---|---|---|
| Intermediate | 90–120 hours | Approx. 175 × 205 cm | 4.0 mm | Full bedspread, queen topper, matching pillow set |
Materials and Tools
Yarn
- Warm cream / ivory — DK #3 — approximately 1,500–1,850 g — square backgrounds, joining, border, tassels, and pillow field
- Deep red / crimson — DK #3 — approximately 700–850 g — four heart motifs in every square and pillow details
A smooth acrylic, cotton-acrylic, or washable wool blend works better than fuzzy yarn because the heart outlines depend on visible stitch definition. Use the same red dye lot across the complete project; repeating 288 hearts makes even small color changes noticeable.
Tools
- 4.0 mm crochet hook
- 4.5 mm hook for joining if required
- Yarn needle
- Sharp scissors
- Locking stitch markers
- Blocking mats
- Rust-resistant pins
- Measuring tape
- Kitchen scale
- 20 cm square blocking template
- 10–12 cm cardboard tassel template
Abbreviations
MR — magic ring
sc — single crochet
hdc — half double crochet
dc — double crochet
tr — treble crochet
dtr — double treble crochet
sl st — slip stitch
ch — chain
sp — space
ch-sp — chain space
RS — right side
WS — wrong side
Decreases are used only while shaping the flat heart pieces; work them loosely enough that the outer heart edge remains flat after blocking.
Pattern — Step by Step
This is an original photo-matched construction using four separately crocheted hearts on a cream granny-style base. Make one complete sample square and block it before committing to the full bedspread.
Red Heart Appliqué — Make 4 Per Square
Yarn: deep red.
R1: 12 dc in MR (12)
Join with sl st.
R2: ch 1, sc in first st, hdc in next st, 5 dc in next st, 2 hdc, sc, 2 hdc, 5 dc in next st, hdc, sc.
Join at the lower center.
R3: ch 1, sc in next 2 sts, 2 hdc in next st, 2 dc in each of next 3 sts, hdc in next 2 sts, sc in next 2 sts, ch 2, sc in same center-lower point, sc in next 2 sts, hdc in next 2 sts, 2 dc in each of next 3 sts, 2 hdc in next st, sc in final 2 sts.
Join.
R4: sc evenly around the complete heart, placing 3 sc in the lower ch-2 point and sl st into the center dip between the two upper lobes.
Fasten off with a 25 cm sewing tail.
Block each heart to approximately 6.5–7 cm high and 6–6.5 cm wide.
Make four identical hearts for every square.
Cream Square Center
Yarn: warm cream.
R1: 12 dc in MR (12)
Join with sl st.
R2: ch 3, dc in same stitch, 2 dc in every stitch around (24)
Join.
First Square-Conversion Round
Mark four equally spaced corner positions.
R3: work dc across each side.
At each marked corner work:
(2 dc, ch 2, 2 dc)
Continue around.
Join with sl st.
Openwork Round
R4: ch 1, sc in same stitch.
*ch 3, skip 2 sts, sc in next st* across each side.
At each corner work:
(sc, ch 4, sc)
Repeat around.
Join.
Cream Cluster Round
R5: work 3 dc in every side ch-3 space.
At each corner ch-4 space work:
(3 dc, ch 2, 3 dc)
Join.
Second Openwork Round
R6: ch 1, sc in same stitch.
*ch 3, skip 2 sts, sc in next st* around each side.
At each corner work:
(sc, ch 4, sc)
Join.
Solid Expansion Round
R7: work 3 dc in every ch-3 space.
At each corner ch-4 space work:
(3 dc, ch 2, 3 dc)
Join.
Third Openwork Round
R8: ch 1.
Sc in first stitch.
*ch 2, skip 1 st, sc in next st* across each side.
At each corner work:
(sc, ch 3, sc)
Join.
Outer Square Frame
R9: work 2 hdc in each ch-2 space.
At every corner ch-3 space work:
(2 hdc, ch 2, 2 hdc)
Join.
Firming Round
R10: sc in each stitch around.
At every corner work:
(2 sc, ch 2, 2 sc)
Join.
Fasten off.
Block the cream base to approximately 19–21 cm square.
Positioning the Four Hearts
Place the blocked cream square RS up.
Position one red heart at the top with its point facing the square center.
Rotate the second heart ninety degrees clockwise and position it on the right.
Place the third heart at the bottom with its point facing upward.
Position the final heart on the left.
The four tips should stop approximately 4–6 mm from the exact square center.
Leave approximately 5–8 mm of visible cream between adjacent upper lobes.
Pin all four hearts before sewing any one piece permanently.
Attaching the Hearts
Using each red sewing tail, whipstitch through the outer loops of the appliqué and the cream stitches directly beneath it.
Do not pull tightly enough to cup the square.
Work completely around every heart.
Bury the yarn tail through the WS of the cream field.
Repeat for all four motifs.
Cream Center Cross
Yarn: cream.
Cut a 50 cm strand.
Using the yarn needle, work one short vertical line between the upper and lower heart points.
Work a matching horizontal line between the left and right heart points.
The crossing should occupy approximately 10–15 mm at the exact motif center.
Secure on the WS.
Bedspread Layout
Make 72 complete four-heart squares.
Arrange them:
8 squares across × 9 squares long
At a blocked width of 20 cm:
8 × 20 cm = 160 cm before joining and border.
9 × 20 cm = 180 cm before joining and border.
A substantial 7–10 cm perimeter increases the final dimensions to approximately 174–180 × 194–200 cm.
If a deeper mattress drop is required, use nine squares across or add additional cream border rounds rather than making individual squares significantly larger.
Batch-Making the 288 Hearts
The fastest accurate workflow is to treat the appliqués as a separate production stage.
Make the first 12 hearts and block them together.
Stack the finished pieces and compare the lower point, lobe height, and total width.
Once the dimensions remain consistent, work the remaining hearts in batches of 24.
Do not sew hearts onto unblocked cream squares.
A square that grows by even 8 mm during blocking changes the apparent spacing between the four motifs.
Flat Joining Method
Yarn: cream.
Block all 72 squares before joining.
Arrange the complete 8 × 9 layout on a large clean surface.
Place the first two squares RS up with their edges touching.
Insert the hook through the outer loop of the corresponding stitch on each block.
Work one loose sl st through both loops.
Continue across the complete edge.
Repeat until eight squares form one horizontal strip.
Make nine strips.
Join the strips vertically using the same method.
At four-square intersections, work through the corner spaces once rather than repeatedly stitching into the junction.
The cream seam should remain visible as a narrow line without forming a raised ridge.
Bedspread Border
Border Round 1 — Cream Foundation
Yarn: cream.
Sc evenly around the complete joined bedspread.
Work 3 sc into every outer corner.
Count opposite sides.
Their stitch totals should match.
Border Round 2 — Open Mesh
Ch 1.
*sc in next st, ch 3, skip 2 sts* around.
At every corner work:
(sc, ch 5, sc)
Border Round 3 — Cream Clusters
Work 3 dc into every ch-3 space.
At each corner ch-5 space work:
(3 dc, ch 2, 3 dc)
Border Round 4 — Lace Openwork
*ch 4, skip 2 sts, sc in next st* around.
At corners work ch 6.
Border Round 5 — Shell Foundation
In each ch-4 space work:
(sc, 5 dc, sc)
At every corner work:
(sc, 7 dc, sc)
Border Round 6 — Scalloped Finish
Across each 5-dc shell work:
sl st, sc, hdc, (dc, ch 2, dc) in the center stitch, hdc, sc, sl st.
Repeat around.
Fasten off.
Tassel Fringe
The reference uses long cream tassels along the lower edge and visible side edges.
Cut a piece of cardboard approximately 12 cm high.
Wrap cream yarn around the template eight times for each tassel.
Cut the strands along one edge.
Fold the group in half.
Insert a crochet hook through one border opening and pull the folded center partly through.
Pass all loose ends through the loop.
Pull evenly.
For a more structured tassel, wrap one separate yarn strand around the bundle approximately 15 mm below the attachment point and knot securely.
Trim each tassel to approximately 10–11 cm finished length.
Space tassels approximately 7–9 cm apart.
Do not add a tassel at every single shell; that density can pull the lace border downward.
Matching Pillow Front
The pillow in the photograph repeats the four-heart square in a larger rectangular arrangement.
For a bed pillow approximately 70–75 cm wide, make:
4 squares across × 2 squares high = 8 squares.
Join the eight blocks with the same cream flat seam used on the bedspread.
Work two or three cream border rounds around the rectangle before constructing the back.
Pillow Border Round 1
Sc evenly around.
Work 3 sc at each corner.
Pillow Border Round 2
*ch 3, skip 2 sts, sc in next st* around.
Work ch 5 at corners.
Pillow Border Round 3
Work 3 dc into each ch-3 space.
At corners work:
(3 dc, ch 2, 3 dc)
Fasten off.
Pillow Back
Make two overlapping cream rectangles.
Chain to match the blocked width of the completed pillow front.
Work rows of hdc until the first panel measures approximately two-thirds of the pillow height.
Make a second identical piece.
Overlap the two back panels by approximately 12–15 cm.
Place them WS against the pillow front.
Sc around all four edges through both layers.
Insert the pillow form through the envelope opening.
Assembly
- Make and block the first four red hearts, then place them on one cream test square to confirm the center spacing before producing the remaining motifs.
- Complete 288 heart appliqués and 72 cream square bases, weaving in all non-sewing yarn tails before the final blocking stage.
- Block every cream square to 19–21 cm with no more than approximately 5 mm difference between completed pieces.
- Pin four hearts onto every block with their points 4–6 mm from the center, then stitch each appliqué around its complete perimeter.
- Arrange eight squares across and nine squares long, checking that every four-heart motif has the same orientation.
- Join the squares into nine horizontal strips, then connect the strips vertically with loose cream slip stitches.
- Measure the two diagonals of the complete field; correct seam tension when they differ by more than approximately 2 cm.
- Work the six cream border rounds and shape each corner before beginning any fringe attachment.
- Attach evenly spaced 10–11 cm cream tassels and construct the matching 4 × 2 square pillow using the same joining method.
- Weave remaining tails through several WS directional changes, steam or wet block only the flat cream sections, and reshape every red heart by hand after drying.
The completed bedspread should display four distinct red hearts inside every cream square, with the inward-facing points forming one balanced central four-leaf motif.
7 Technical Tips
- Heart-point separation: Points spaced more than approximately 10 mm from one another break the clover shape. Keep each point 4–6 mm from the square center before sewing.
- Heart cupping: An appliqué stretched during attachment pulls the cream field into a shallow bowl. Block every red heart before sewing and attach it at its relaxed 6–7 cm size.
- Uneven lobes: One upper lobe even 5 mm taller than the other becomes obvious when four hearts meet. Compare each heart against the first blocked sample before assigning it to a square.
- Join contraction: Tight cream slip stitches can reduce an eight-square row by several centimeters. Change from a 4 mm to a 4.5 mm joining hook if the completed strip loses more than about 2 cm.
- Border ruffling: Excess stitches in Border Round 1 multiply through the shell rows. Count opposite edges and make their stitch totals equal before beginning the open mesh.
- Tassel pulling: Tassels attached less than approximately 5 cm apart can drag the border downward. Keep 7–9 cm spacing and trim all bundles to the same 10–11 cm length.
- Center twisting: Sewing one heart before pinning the remaining three can shift the entire motif off-axis. Position and pin all four pieces first, then sew opposite hearts in pairs.
How the Four-Heart Geometry Works
The motif depends on rotation rather than a complicated central stitch pattern.
Each heart is identical. The top piece points downward, the right piece points left, the lower piece points upward, and the left piece points right.
The points create the center. The rounded lobes create the outer petals.
That arrangement explains why spacing is more important here than on a conventional one-heart square. A single heart can shift several millimeters without changing the overall motif. Four hearts magnify the same error because every point and lobe has a neighboring reference.
Use the square’s diagonal lines as placement guides. The center dip of each heart should align approximately with one of the four square sides.
Keeping the Cream Background Flat
The bedspread contains substantial appliqué work, so the background itself should remain relatively flat.
Openwork rounds reduce weight and give the heart motifs visual separation. Solid rounds near the outer edge strengthen the block where the joining stitches will be placed.
After R10, lay the cream block on a table.
All four corners should touch the surface without being pinned.
If the center rises, additional circumference may be required in an earlier round. If the outer edge waves, too many stitches have been added.
Correct those issues on the test motif rather than relying on aggressive blocking across 72 squares.
Choosing the Red
The photograph uses a saturated red rather than pink, burgundy, or rust.
A medium-to-deep crimson gives enough contrast against warm cream while keeping individual crochet stitches visible.
Very dark burgundy can make the heart lobes visually merge, particularly in low indoor light. A bright scarlet creates stronger contrast but changes the vintage bedspread character.
Whatever shade is selected, use the same red across the pillow.
The matching color repetition is what connects the pillow and bedspread despite their different overall proportions.
Calculating Another Bed Size
Use the blocked square measurement rather than an unblocked crochet measurement.
At 20 cm per motif:
- 6 squares = 120 cm
- 7 squares = 140 cm
- 8 squares = 160 cm
- 9 squares = 180 cm
- 10 squares = 200 cm
Add approximately 14–20 cm to both dimensions when using a 7–10 cm border.
An eight-square width therefore finishes near 174–180 cm.
If a deeper side drop is required, nine squares across gives approximately 194–200 cm after the same border.
Measure the mattress width, length, and desired drop before deciding how many rows to make.
Estimating Yarn from One Finished Square
Published heart-square patterns vary considerably in size and yarn use, so weighing the photo-matched sample is more reliable than scaling directly from a smaller reference.
Finish and block one square with all four red hearts attached.
Weigh the cream base separately if possible and record the red weight of four hearts.
For example, if one square requires:
- 22 g cream
- 10 g red
Then 72 motifs require approximately:
1,584 g cream before joining, border, pillow, and tassels.
720 g red before the pillow.
Add at least 15% to cream for seams and the lace border. Add more when the tassels and matching pillow are included.
Making the Tassels Uniform
The fringe is highly visible because it hangs below an otherwise geometric bedspread.
Use one rigid template for every bundle.
Count the same number of wraps each time. Eight wraps produce a moderate tassel in DK yarn; ten or twelve create a heavier fringe.
Attach all tassels before trimming.
Lay the blanket flat with the fringe extending beyond the edge of a table, then cut the ends to one consistent line.
Do not trim individual tassels immediately after attaching them because slight differences become more obvious once the entire row is complete.
Keeping the Joining Grid Straight
The cream seams function as visible lines between the red motifs.
Start by joining horizontal strips rather than adding squares in random directions.
After each completed eight-square strip, measure its total width.
The strips should remain within approximately 1 cm of one another.
When the nine horizontal units match, connect them vertically.
This sequence makes it easier to locate a tension problem before it affects the complete bedspread.
Matching the Pillow to the Bedspread
The photo uses the same four-heart module on the pillow rather than introducing another floral design.
An arrangement of four blocks across and two high reproduces the long rectangular pillow proportions visible at the head of the bed.
Keep the pillow border simpler than the bedspread border. The bed already has a strong tassel treatment, so a three-round cream frame is sufficient around the pillow.
If making square cushions instead, use a 2 × 2 arrangement and continue cream border rounds until the front matches the selected insert.
Competition Gap
Current heart-granny competition is dominated by one-heart motifs, smaller baby blankets, Valentine’s projects, bags, and individual squares. Four-heart crochet motifs exist, but they are less commonly developed into a complete coordinated bed set.
This photograph combines a repeated four-heart block, full bed dimensions, high-contrast red and cream yarn, a matching modular pillow, openwork cream construction, scalloped framing, and long tassels.
That gives the project a clearer distinction than another standard heart granny square blanket. The heart itself remains familiar, but rotating four copies around one center produces a different large-scale pattern when dozens of squares are joined.
Finishing Checks
Spread the bedspread on a flat floor or bed before the final blocking.
Measure both diagonals. Their difference should remain below approximately 2 cm.
Inspect every square from several feet away. Four red hearts should read as one balanced motif rather than four separate red patches.
Check the seams next. No cream join should pull two adjacent corners toward one another.
Run along the fringe and confirm consistent spacing.
Finally, flatten the cream field by hand and reshape each heart lobe so the center dip and lower point remain clearly defined.
Conclusion
Start with one blocked square and four finished hearts before calculating the entire red four heart granny square crochet bedspread. The test block establishes heart spacing, square size, yarn consumption, joining width, and the final number of motifs required for the mattress. Once the geometry is correct, batch the red hearts separately and build the cream squares to one fixed blocking template. Join all 72 motifs before working the lace and tassel border. Save one close-up of the four-heart center for Pinterest and share the finished bed-and-pillow set on Instagram with #FourHeartCrochetBedspread. Would you keep the hearts deep red or make a second version in burgundy?









