Introduction
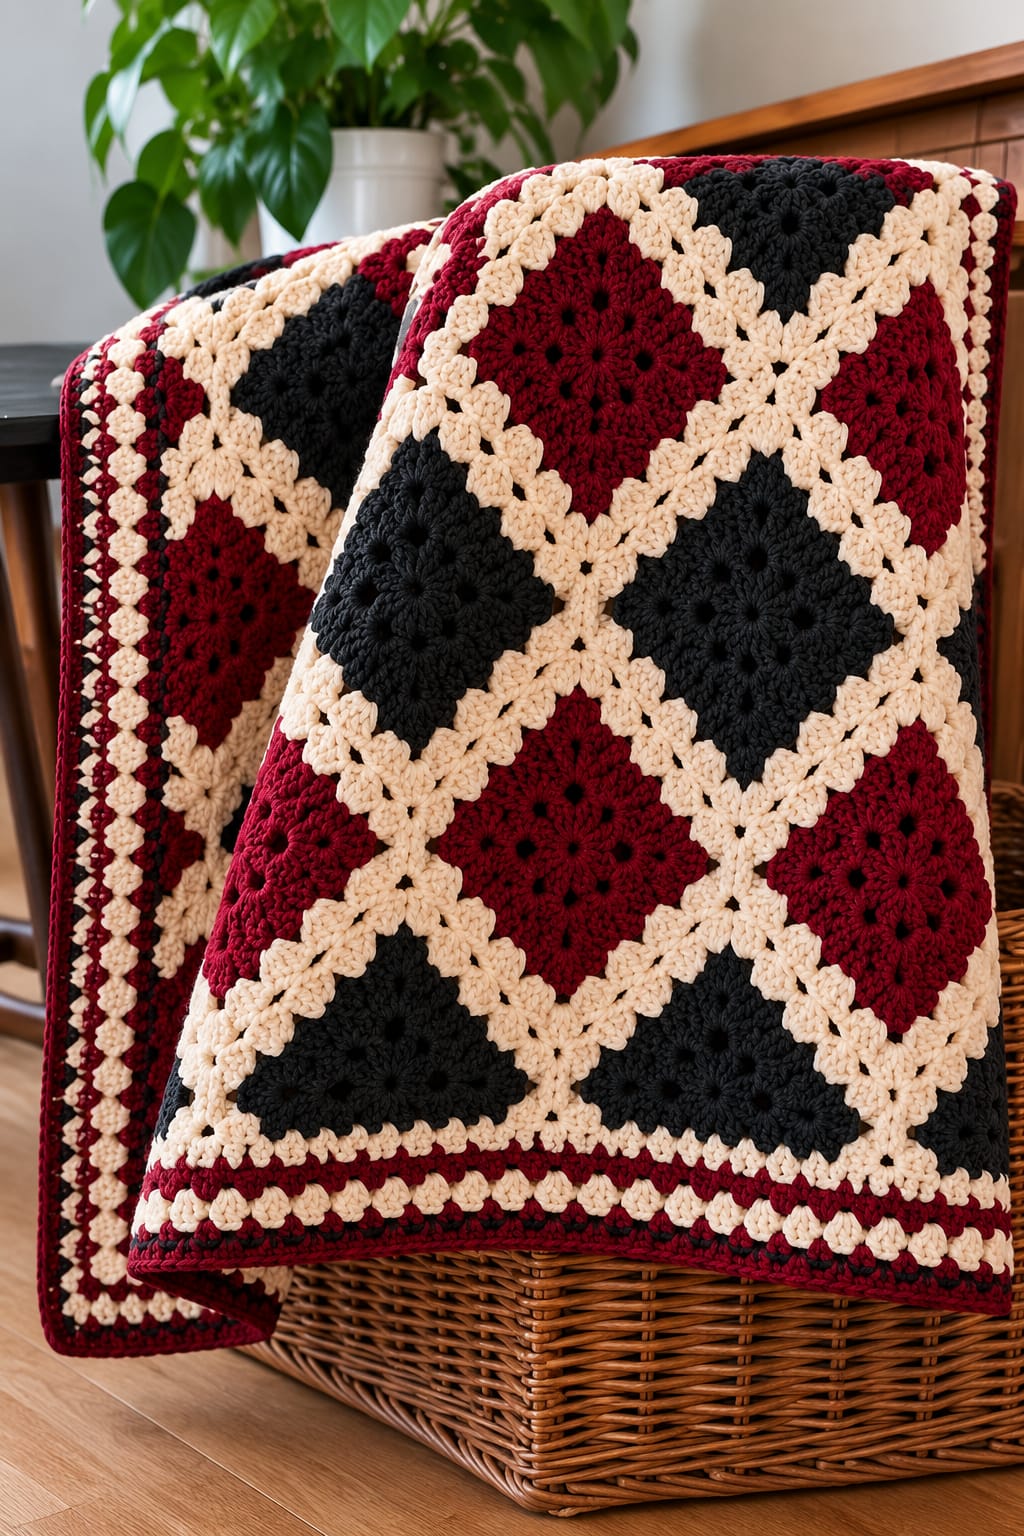
Black squares make every uneven cream join visible, so the joining grid has to be treated as part of the design rather than an afterthought. This granny square crochet blanket pattern combines deep red and black floral-style squares with cream joining rounds and a layered red, cream, and black border. Worked in worsted-weight yarn with a 5.0 mm hook, it produces a graphic throw suitable for a sofa, bed, or folded display.
The Design: What Makes This Granny Square Blanket Different
The blanket depends on contrast. Individual motifs are worked in either deep red or black, while cream surrounds every square and forms the visible diagonal-looking lattice between motifs. That light joining color prevents adjacent dark squares from merging into one continuous surface.
Each motif also uses a denser center than a basic three-round granny square. Cluster groups radiate from the middle before the final cream rounds convert the shape into a consistent square. Alternating red and black creates the strongest repeat without requiring complicated color changes inside every motif.
The border repeats all three colors. Narrow dark-red and black lines anchor the outside edge, while cream shell groups connect the edging visually to the joining lattice. A frequent problem with a red and black crochet blanket is inconsistent square size; even a 5 mm difference becomes visible after several rows are joined.
Project Info at a Glance
| Skill Level | Time | Finished Size | Hook | Best For |
|---|---|---|---|---|
| Intermediate | 24–32 hours | Approx. 120 × 150 cm | 5.0 mm | Sofa throw, bed throw, guest room blanket |
A 5.0 mm hook is a documented pairing for worsted-weight granny squares. Published examples place a four-round square at roughly 10–11.5 cm, although the exact measurement changes with yarn and tension. The dimensions in this project are a target for the photo-inspired blanket rather than measurements taken directly from the image.
Materials and Tools
Yarn
- Warm cream — worsted/Aran #4 — approximately 900–1,100 g for square borders, joins, and blanket edging.
- Deep red or burgundy — worsted/Aran #4 — approximately 600–750 g.
- Black — worsted/Aran #4 — approximately 550–700 g.
The quantities are estimates for a throw approximately 120 × 150 cm. Published granny-square throws can require roughly 2,000–2,500 yards in total, while exact consumption depends on square dimensions, joining method, border width, and yarn construction.
Tools
- 5.0 mm crochet hook
- Tapestry needle
- Scissors
- Locking stitch markers
- Measuring tape
- Blocking mats
- Rust-resistant blocking pins
Abbreviations
- MR — magic ring
- ch — chain
- sc — single crochet
- hdc — half double crochet
- dc — double crochet
- tr — treble crochet
- sl st — slip stitch
- sp — space
- st/sts — stitch/stitches
- RS — right side
- WS — wrong side
- FO — fasten off
Invisible decreases are not used in this flat modular blanket because shaping is controlled through cluster placement and corner chain spaces.
Gauge and Square Size
Make one complete test square before producing the blanket quantity. With worsted yarn and a 5.0 mm hook, target approximately 14–15 cm per finished motif after the cream border round and blocking.
The precise number is less important than consistency. Every square in the project must finish at the same measurement.
If the test motif measures 14 cm and the blanket contains eight squares across, the motif field alone will measure about 112 cm before the exterior border. Additional joining width and border rounds bring the finished throw close to the 120 cm target.
Pattern — Step by Step
This is an original photo-inspired construction. It uses a floral granny motif rather than reproducing a specific published blanket pattern. Make half of the motifs in deep red and half in black, then add the same cream outer rounds to every square.
Deep Red Granny Square — Make 40
Yarn: deep red and cream. Use a 5.0 mm hook.
Round 1 — Center
With deep red, make an MR.
R1: Ch 3, work 2 dc into MR, ch 2. *3 dc into MR, ch 2.* Repeat three more times. Join with sl st to top of beginning ch 3.
You should have four 3-dc groups separated by four ch-2 spaces.
Round 2 — First Expansion
Sl st into first ch-2 space.
R2: Ch 3, 2 dc, ch 2, 3 dc in same corner space. Ch 1.
In each remaining corner work:
(3 dc, ch 2, 3 dc), ch 1.
Join with sl st.
Each corner now contains two granny clusters.
Round 3 — Floral Expansion
Sl st into first corner.
R3: Work (3 dc, ch 2, 3 dc) in the corner. Ch 1, 3 dc in next side space, ch 1.
Repeat around, working (3 dc, ch 2, 3 dc) in every corner and one 3-dc cluster in every side space.
Join with sl st.
Round 4 — Larger Red Motif
R4: Sl st to corner. Work (3 dc, ch 2, 3 dc) in corner.
Ch 1, 3 dc in each ch-1 side space, placing ch 1 between adjacent groups.
Repeat around and join.
Fasten off deep red.
Round 5 — Cream Frame
Join cream in any corner space.
R5: Ch 3, 2 dc, ch 2, 3 dc in same corner.
Ch 1. Work 3 dc in every ch-1 side space, ch 1 between groups.
At each corner work (3 dc, ch 2, 3 dc).
Join with sl st.
Round 6 — Cream Squaring Round
R6: Sl st into corner.
Work (3 dc, ch 2, 3 dc) in the corner.
Ch 1, then work a 3-dc cluster into each side space with ch 1 between groups.
Repeat around.
Join and fasten off, leaving a 20 cm tail if the square will be sewn to neighboring motifs.
Black Granny Square — Make 40
Yarn: black and cream. Use a 5.0 mm hook.
Work exactly the same six-round construction as the red square.
R1: Four 3-dc clusters in MR with ch-2 spaces.
R2: Two clusters in every corner with ch 2 between the corner groups.
R3: Add one side cluster between each corner.
R4: Continue the granny-square expansion in black.
R5: Change to cream and work the first framing round.
R6: Work the final cream squaring round.
Fasten off.
Measure the first black square against a completed red square before making the remaining motifs. Both must have matching dimensions.
Optional Denser Floral Center
The motifs in the photograph have a fuller center than a very open traditional granny square. If a denser appearance is wanted, replace R1 with the following center.
Alternative R1: Make MR. Ch 3, work 15 dc into ring. Join. (16 dc)
Alternative R2: *Ch 3, skip 1 st, sl st into next st.* Repeat eight times around.
Alternative R3: Into each ch-3 space work (sc, hdc, 3 dc, hdc, sc).
Fasten off or continue by distributing the eight petal groups into four corner sections.
This variation creates a flower-like center before the motif is squared with ordinary granny clusters.
Blocking the Squares
Block all 80 motifs before joining. Do not rely on the joining process to correct inconsistent squares.
Pin one reference square to the target measurement, such as 14 × 14 cm. Position the four corners first, then pin the midpoint of every side.
Open the cream chain spaces without stretching the red or black center.
Block the remaining motifs to the same dimensions.
Allow every square to dry completely before removing the pins.
Blanket Layout
A photo-inspired throw can be arranged as 8 squares across × 10 squares long, giving 80 motifs.
| Row | Square Sequence |
|---|---|
| 1 | Red, Black, Red, Black, Red, Black, Red, Black |
| 2 | Black, Red, Black, Red, Black, Red, Black, Red |
| 3 | Repeat Row 1 |
| 4 | Repeat Row 2 |
| 5–10 | Continue alternating the two layouts |
Arrange every square on a clean floor or large table before joining. Photograph the final layout so individual motifs can be returned to the correct position if the stacks are moved.
Cream Flat Slip-Stitch Join
The cream join is visually important because it creates the light lattice seen between the dark motifs.
Place two squares side by side with right sides facing upward.
Join cream yarn through the corresponding corner spaces.
Insert the hook through the back loop of one square and the back loop of the corresponding stitch on the second square.
Yarn over and complete a slip stitch.
Continue across both squares, matching every stitch and chain space.
Keep the joining yarn loose. A tight slip-stitch seam will pull the squares upward and create ridges.
Join all motifs into horizontal rows first. Next, join those rows vertically.
Alternative Cream Granny Join
For a wider cream lattice, use granny clusters instead of a flat slip-stitch seam.
Place two squares with the right sides facing upward.
Join cream to both corresponding corner spaces.
Work a 3-dc cluster into the first square’s side space, then sl st into the corresponding space on the second square.
Move to the next space and repeat.
This produces a wider decorative join and increases the overall blanket dimensions.
Use the same joining method throughout the project. Mixing seam styles creates inconsistent spacing.
First Blanket Border Round
Yarn: cream.
Join cream at any outer corner.
Border R1: Ch 1, sc evenly around the entire blanket.
Work 3 sc into each outer corner.
At every square junction, reduce excess stitches if the edge begins to flare. The border should lie flat before decorative rounds are added.
Join with sl st.
Deep Red Border Round
Change to deep red.
Border R2: Ch 1, sc in each st around, working 3 sc in each corner stitch.
Join with sl st.
Border R3: Ch 2, hdc in each st around. Work 3 hdc in each corner.
Join and fasten off.
Cream Granny Border
Join cream at a corner.
Border R4: Ch 3, 2 dc in same corner, ch 2, 3 dc in same corner.
*Skip 2 sts, work 3 dc in next st.* Repeat across each side.
At every corner work:
(3 dc, ch 2, 3 dc).
Adjust the spacing by one stitch near a corner if necessary rather than forcing an uneven repeat.
Join with sl st.
Black Accent Border
Change to black.
Border R5: Ch 1, sc in each dc and each chain space around.
Work 3 sc in every corner.
Join with sl st.
This narrow black line separates the cream decorative round from the final red edge.
Decorative Cream Shell Border
Shell borders are documented finishing options for granny-square blankets. A foundation sc round helps stabilize the edge before the shells are worked.
Join cream.
Border R6: Ch 1, sc around, maintaining 3 sc in each corner.
Border R7: *Skip 2 sts, work 5 dc in next st, skip 2 sts, sl st in next st.* Repeat along each side.
Adjust the repeat near each corner so a complete shell lands at the corner rather than splitting the shell between two sides.
Join with sl st.
Final Burgundy Edge
Join deep red at any corner.
Border R8: Ch 1, sc in each stitch around.
At the top of each cream shell, work (sc, ch 2, sc) if a slightly pointed edge is wanted.
Keep the remaining stitches as ordinary sc.
Join and fasten off.
Weave the finishing tail through at least 5 cm of deep-red stitches, reverse direction, then trim.
Adjusting the Blanket Size
The modular construction makes resizing simpler than changing the stitch count inside every square.
For a lap blanket, arrange approximately 6 × 8 squares. At a blocked square size of 14 cm, the motif field measures roughly 84 × 112 cm before joining and border width are added.
For the photo-inspired throw, use 8 × 10 squares.
For a larger bed blanket, increase the layout to 10 × 12 squares or more.
Make an equal number of red and black motifs when both blanket dimensions contain an even number of squares. For layouts with an odd total, one color will require one additional motif.
Color Placement
The strongest arrangement alternates black and red like a checkerboard. Cream should remain consistent around every motif rather than appearing only around selected squares.
Do not place large groups of black squares together unless a deliberately asymmetric layout is wanted. The black areas have greater visual weight than the cream lattice and can make one side of the blanket appear darker.
Deep burgundy works better than a bright primary red for the photographed palette. It provides strong contrast against cream while remaining close in value to black.
An ivory or warm cream produces a softer grid than pure optical white. Use one dye lot for the cream yarn because it appears in every seam and border.
Assembly
- Complete one red and one black test square, block both to the same measurement, and adjust hook size before making the full quantity.
- Crochet 40 red motifs and 40 black motifs, adding identical cream framing rounds to every square.
- Weave in center and color-change tails, then block all 80 squares to approximately 14 × 14 cm.
- Arrange the motifs in an 8 × 10 checkerboard layout and photograph the complete arrangement before moving any pieces.
- Join the eight squares in each horizontal row with cream yarn, keeping every seam at the same tension.
- Join the ten completed rows vertically, matching all square intersections before fastening the seam.
- Work one cream leveling round around the entire blanket and correct any edge that begins to flare.
- Add the red, cream, black, and shell border rounds in sequence while maintaining square corners.
- Weave every remaining tail through matching-color stitches and reverse direction once before trimming.
- Block the completed blanket flat, align all motif columns, square the corners, and allow it to dry completely before folding.
The finished blanket should show an alternating field of deep-red and black motifs, an uninterrupted cream lattice, and a multicolor border that repeats the palette without overpowering the square centers.
7 Technical Tips for a Better Granny Square Blanket
- Mismatched squares: A difference of even 5 mm per motif accumulates across eight squares. Block every red and black square to the same measurement before joining.
- Twisting motifs: Repeatedly working every round in the same direction can make some granny squares lean. Turn after selected rounds or begin subsequent rounds in different corners when the motif starts twisting.
- Tight cream seams: A slip-stitch join worked more tightly than the squares causes raised channels. Keep the joining loops approximately the same height as an ordinary slip stitch made during the motif.
- Misaligned intersections: Joining long rows without markers can shift one square by several stitches. Clip a marker through every corner intersection before crocheting the vertical seam.
- Ruffled border: Excess stitches along the perimeter create waves that blocking may not correct. Work a leveling sc round first and reduce stitches around bulky square junctions.
- Loose center holes: A poorly closed magic ring can enlarge after repeated washing. Leave at least a 12 cm starting tail, weave it in securely, and reverse direction before trimming.
- Visible cream tails: Dark red and black motifs make loose cream ends conspicuous. Weave each cream tail through at least 4–5 cm of cream stitches rather than carrying it into a dark motif.
Why a 5.0 mm Hook Works for This Blanket
A 5.0 mm hook is a common pairing for medium-weight granny-square projects. One published worsted-weight guide measures a four-round granny square at approximately 4.5 inches with a 5 mm hook, while another published blanket uses worsted yarn, a 5 mm hook, and four-round squares measuring about 4 inches.
The exact result still depends on tension. A crocheter who works tightly may need 5.5 mm to obtain a flat, flexible motif. Someone with loose tension may prefer 4.5 mm.
Make the decision from the blocked test square rather than the hook number alone. The finished motif should lie flat without stiff edges or oversized holes between clusters.
Keeping Granny Squares Square
Check the corners after every round. Each corner must receive the complete corner group, and the same chain count should separate its two clusters.
If a motif begins leaning clockwise, turning the work for alternating rounds can counteract the rotational pull. Starting successive rounds in different corners is another established method for reducing twist.
Blocking can correct mild distortion, but it cannot repair a missing corner cluster. Count four corners before fastening off each motif.
Stack finished squares in groups of ten. Comparing each new motif with the stack makes size drift easier to detect before dozens of mismatched squares have been completed.
Choosing Yarn for the Blanket
Worsted and DK are both widely used for granny-square blankets. A published DK shell-border blanket uses a 4.0 mm hook and reports four rounds at 12 × 12 cm, while worsted examples commonly use approximately 5.0 mm hooks.
Worsted yarn is a practical match for this design because the black and burgundy clusters remain substantial against the cream joining grid. It also reduces the number of motifs required for a full-size throw compared with finer yarn.
Acrylic works well for a washable everyday blanket. Wool blends add warmth and elasticity, while cotton creates heavier fabric with strong stitch definition.
Use the same yarn line for all three colors when possible. Matching fiber and thickness reduces differences in square dimensions after washing.
Alternative Color Combinations
The geometry does not depend on red and black. For a softer version, substitute charcoal for black and dusty rose for burgundy while retaining the cream joining color.
An autumn palette can use rust and dark brown motifs with oatmeal joins. For a higher-contrast monochrome version, alternate charcoal and light gray squares with ivory framing.
Another option is to keep all centers burgundy and alternate cream and black only in later rounds. That produces more color changes per square but reduces the checkerboard effect.
Whatever palette is selected, keep one light joining color consistent throughout the project. The continuous lattice is a major structural feature of the design.
Border Construction Notes
A border should be added only after the joined blanket lies flat. If the motif field already ripples, adding decorative shells will increase the problem.
Begin with a plain sc round because it provides a controlled stitch count for later rounds. Published shell-border instructions commonly use a leveling round before working groups such as five double crochet stitches into one border stitch.
Place a marker in every corner before beginning the shell round. Adjust the final repeat on each side if necessary so the shell arrangement meets the corner cleanly.
The final burgundy round adds weight to the outside edge and repeats the strongest color from the motif field.
Care and Washing
Follow the care instructions printed on the yarn label. Different acrylic, wool, and cotton yarns require different washing temperatures and drying methods.
When washing a joined granny-square blanket for the first time, inspect the magic-ring centers and joining intersections afterward. Those locations carry more structural stress than ordinary cluster stitches.
Reshape the blanket while damp. Align the cream joining grid first, then square the border.
Avoid hanging a wet blanket from one edge. The weight of the water can stretch the upper squares and seams unevenly.
Finishing the Red Black and Cream Granny Square Blanket
Inspect the blanket from several feet away after the final blocking. The red and black motifs should alternate consistently, the cream lattice should form continuous lines through every junction, and the outer border should lie flat without pulling the corner squares inward. Correct a loose joining stitch before trimming any remaining tails.
This granny square crochet blanket pattern works because the palette and construction repeat predictably: dark floral centers, cream framing, alternating placement, and a border that uses all three colors. Make two test squares first and record their blocked measurements before producing the remaining motifs.
Share the finished blanket on Pinterest or Instagram with #RedBlackGrannyBlanket. For this specific design, would you keep the black squares or replace them with charcoal gray?









