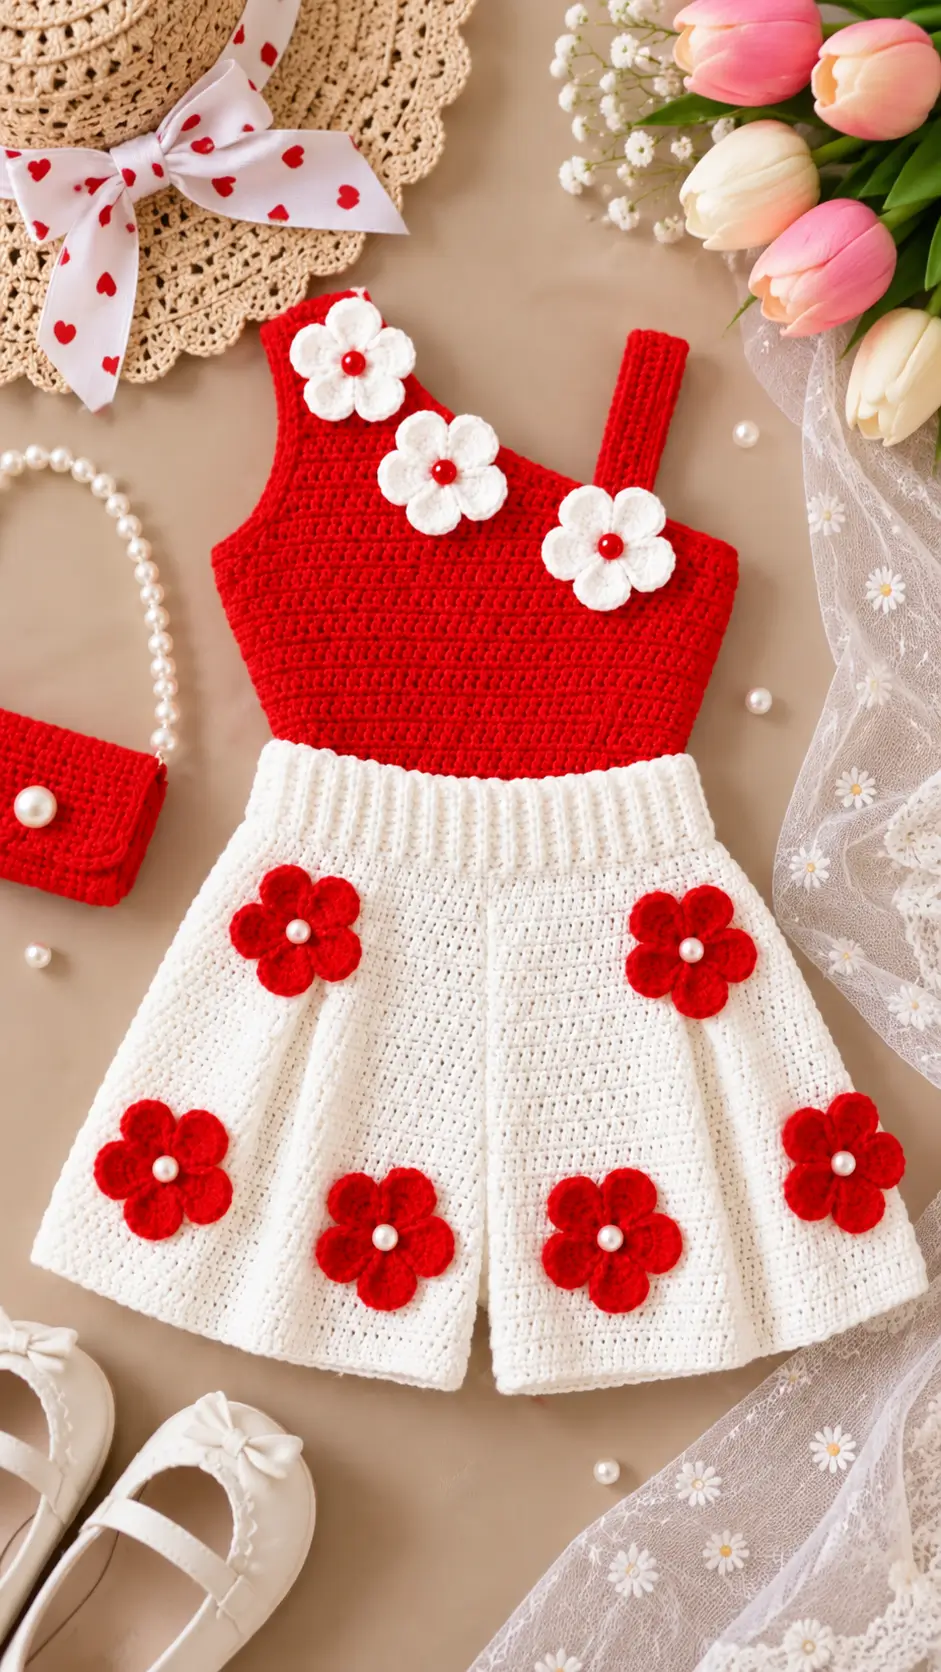
Three white flowers climbing an asymmetrical red neckline define this dress before the skirt even begins. This red and white crochet flower dress uses DK yarn, a 3.5 mm hook, a ribbed waistband and contrasting five-petal appliqués. The photo-inspired version targets roughly 48 cm in length and an intermediate skill level. Its separate flower motifs also provide a practical way to use small quantities of leftover DK yarn.
The Design: What Makes This Flower Dress Different
The asymmetrical bodice is the first structural decision. Instead of a conventional round yoke, the upper edge rises toward one shoulder, while two narrow straps preserve support without visually flattening the diagonal line.
Next comes the waistband. Vertical ribbing separates the dense red upper section from the flared white skirt, preventing the two large color blocks from reading as one uninterrupted panel. The crochet flower dress pattern then repeats color in reverse: white flowers sit on red; red flowers sit on white.
Finally, the skirt uses controlled increases rather than a heavily gathered join. That produces the broad A-line shape visible in the reference.
A common mistake in a girls crochet dress pattern of this type is attaching heavy flowers before checking drape. Oversized motifs can pull the skirt out of line.
Project Info at a Glance
| Skill Level | Time | Finished Size | Hook | Best For |
|---|---|---|---|---|
| Intermediate | 10–14 hours | Approx. 48 cm length | 3.5 mm | Child-size summer or occasion dress |
The 48 cm length is a practical size-4 target. Actual fit should always be checked against the intended wearer’s chest, shoulder-to-waist and total dress measurements.
Materials and Tools
Yarn
- White DK/#3 yarn – approximately 150 g
- Red DK/#3 yarn – approximately 100 g
A smooth cotton, cotton-blend or acrylic DK yarn works well because the stitch definition remains clear across the bodice, waistband and flower appliqués. Use the same yarn family for both colors when possible so the red and white sections behave similarly after washing.
Tools
- 3.5 mm crochet hook
- Yarn needle
- Scissors
- 4–6 stitch markers
- Measuring tape
- Blocking pins
- Pearl-look sew-on beads or embroidered flower centers
For garments intended for small children, embroidered flower centers are preferable to detachable beads that could become loose.
Abbreviations
- MR – magic ring
- ch – chain
- sc – single crochet
- hdc – half double crochet
- dc – double crochet
- tr – treble crochet
- sl st – slip stitch
- BLO – back loop only
- st/sts – stitch/stitches
- inc – increase
- dec – decrease
An invisible decrease is mainly useful for closed three-dimensional crochet pieces. This dress relies instead on garment shaping, controlled increases and carefully positioned decreases.
Gauge and Sizing
Start with a gauge target of approximately 18 dc x 9 rows = 10 x 10 cm using DK yarn and a 3.5 mm hook.
The photo-inspired pattern targets approximately a size 4, with a finished length close to 48 cm. Because children’s measurements vary considerably, age should not be the only sizing reference.
Measure the intended wearer before beginning. Check the chest circumference, shoulder-to-waist length and desired skirt length. Make a gauge swatch, wash or block it as the finished dress will be treated, then measure it again.
Red and White Crochet Flower Dress Pattern
This is a photo-inspired construction rather than a transcription of the original maker’s pattern. Adjust the garment to the intended wearer’s measurements.
Red Bodice
Yarn: Red DK/#3
Ch 58 loosely.
Row 1: Dc in 4th ch from hook and each ch across. Turn. (56 dc)
Rows 2–4: Ch 3, dc across. Turn. (56)
Row 5: Ch 3, dc in next 53 sts, dc2tog. Turn. (55)
Row 6: Ch 3, dc across. (55)
Row 7: Ch 3, dc in next 52 sts, dc2tog. (54)
Row 8: Dc across. (54)
Row 9: Dc across to final 2 sts, dc2tog. (53)
Row 10: Dc across. (53)
Continue the decrease sequence at the neckline edge until the upper section develops the required diagonal shape. Aim for approximately 13–14 cm from the lower bodice edge to the upper neckline area, adjusting according to the child’s torso measurement.
Check the width against the intended chest measurement before closing the bodice. Garment gauge matters more than an assumed age label.
Fasten off and leave approximately 20 cm of yarn for seaming.
Left Shoulder Strap
Yarn: Red DK/#3
Ch 9.
Row 1: Sc in second ch from hook and across. (8)
Rows 2–26: Ch 1, turn, sc across. (8)
Measure the strap against the garment before fastening off. It should connect the front and back without being stretched tightly.
Fasten off. Leave a 20 cm sewing tail.
Right Shoulder Strap
Yarn: Red DK/#3
Repeat the instructions for the left shoulder strap.
The asymmetrical appearance comes primarily from the neckline and strap positioning. Pin both straps before permanently sewing them so the bodice can be checked for balance.
White Ribbed Waistband
Yarn: White DK/#3
Ch 13.
Row 1: Sc in second ch from hook and across. (12)
Row 2: Ch 1, turn, sc BLO across. (12)
Rows 3 onward: Repeat Row 2 until the strip fits around the lower edge of the bodice.
The ribbing should run vertically when the waistband is attached. Do not stretch the strip aggressively while measuring because excessive tension can gather the red bodice.
Join the short ends with slip stitches or mattress stitch.
White Flared Skirt
Yarn: White DK/#3
Join the white yarn evenly around the lower edge of the waistband.
Round 1: Ch 3, work dc evenly around. Join.
Round 2: Ch 3, *dc in next 5 sts, 2 dc in next st*; repeat around.
Round 3: Dc around without increasing.
Round 4: *Dc in next 6 sts, 2 dc in next st*; repeat around.
Rounds 5–6: Dc around.
Round 7: *Dc in next 7 sts, 2 dc in next st*; repeat around.
Rounds 8–9: Dc around.
Round 10: *Dc in next 8 sts, 2 dc in next st*; repeat around.
Continue the same progression, placing an increase round approximately every third round. Space the increases evenly so the skirt expands gradually rather than forming isolated wedges.
After reaching the required circumference, work even in dc until the dress approaches the target length.
For a finished dress of approximately 48 cm, stop the main skirt roughly 1 cm before the desired total length.
Final Round: Sc evenly around the entire hem.
Add complete dc rounds before the final edging when additional length is required. Avoid partial rounds because they can produce an uneven hem.
White Five-Petal Crochet Flowers – Make 3
Yarn: White DK/#3
Round 1: Make an MR. Ch 1 and work 10 sc into the ring. Join with sl st. (10)
Form five evenly spaced petals.
Each petal: Ch 2, dc, tr, dc, ch 2, sl st into the corresponding base space.
Repeat until five petals are complete.
Fasten off and leave approximately 20 cm for sewing.
Make three white flowers. Aim for approximately 4 cm across each finished motif, adjusting tension if necessary.
Red Five-Petal Crochet Flowers – Make 5
Yarn: Red DK/#3
Repeat the white flower instructions five times using red yarn.
Make all five motifs with the same hook and tension. Block them to approximately equal dimensions before attaching them to the skirt.
Flower Centers
The reference design uses pearl-look centers. These can be reproduced with securely sewn decorative beads when appropriate for the intended wearer.
For a fully crocheted alternative, make small contrasting centers.
Round 1: 6 sc in MR. (6)
Sl st into the first sc and fasten off, leaving approximately 15 cm for sewing.
Sew one center onto each flower. Embroidered centers are another option when detachable embellishments are unsuitable.
Flower Placement
The flower arrangement is central to the appearance of this crochet dress with flowers. Do not distribute the motifs as a rigid grid.
Place the three white flowers across the red upper section so they follow the diagonal movement of the neckline. One sits high near the shoulder, a second occupies the central upper bodice and the third moves toward the opposite side.
The five red flowers should be distributed across the white skirt. Place two in the upper half and three farther down. Maintain enough empty white fabric between motifs for the skirt shaping to remain visible.
Keep the lowest flowers approximately 3–4 cm above the finished hem. Pin every motif before sewing any of them permanently.
Assembly
- Block the red bodice to the intended chest dimensions and check the diagonal neckline before joining the side seam.
- Join the bodice side seam with mattress stitch, keeping the seam vertical.
- Pin both red shoulder straps to the front and back sections. Check their lengths before sewing securely.
- Join the white ribbed waistband into a ring and position it evenly around the lower edge of the red bodice.
- Sew the waistband to the bodice without aggressively stretching the ribbing. Use quarter markers to distribute the circumference.
- Work the white skirt from the lower waistband edge and complete all shaping before blocking the hem.
- Pin three white flowers onto the red bodice, following the diagonal direction of the neckline.
- Arrange five red flowers across the white skirt, keeping the lowest motifs at least 3–4 cm above the hem.
- Sew each flower securely through the center and several concealed points behind the petals. Add embroidered or firmly attached centers afterward.
- Weave in all yarn tails, trim excess yarn and check the chest circumference, strap length and finished dress length.
The finished garment should have a stable red upper section, a narrow vertically ribbed white waistband and an evenly hanging flared skirt.
7 Technical Tips for a Better Crochet Flower Dress
- Mark the neckline shaping edge. Losing track of the active decrease side can create a zigzag edge instead of one controlled diagonal line.
- Measure gauge across at least 10 cm. A difference of two stitches over 10 cm becomes significant when that error is repeated across the entire chest circumference.
- Do not overstretch the waistband. Excessive tension while attaching the ribbed strip can gather the red bodice directly above the white waist.
- Pin every flower before sewing. Secure a 4 cm flower at the center and at least two petal points during positioning so the motif does not rotate.
- Measure both straps after pinning. The attachment points create the asymmetry; unintended differences in strap length can make the entire bodice hang unevenly.
- Maintain 3–4 cm of clearance above the hem. Flowers positioned too close to the lower edge can fold underneath the skirt during wear.
- Keep yarn tails inside matching colors. Weave red tails through red stitches and white tails through white stitches so contrasting yarn does not show through the crochet fabric.
How to Adjust the Dress Size
For a smaller or larger version, start with measurements rather than changing the hook size alone. The three most important figures are chest circumference, shoulder-to-waist length and desired total length.
Make the bodice wide enough to match the required chest measurement with appropriate ease. Lengthen or shorten the bodice before adding the waistband. The waistband itself should fit the lower bodice circumference without substantial stretching.
Skirt length is the easiest dimension to modify. Add or remove complete rounds while preserving the established increase spacing. For greater fullness, shorten the distance between increase rounds; for a less flared silhouette, place increases farther apart.
Flower size can also be adjusted independently. A smaller hook creates denser, smaller motifs, while an additional round or heavier yarn produces larger appliqués. Keep the motifs proportional to the garment rather than scaling every component automatically.
Finishing and Blocking
Before blocking, inspect every seam and flower attachment from the wrong side. Loose tails should be woven through several neighboring stitches rather than simply knotted and cut.
Shape the waistband so its ribs remain vertical. Arrange the skirt on a flat surface and measure from the waistband to the hem at several points. Correct any obvious unevenness while the yarn is damp according to its care instructions.
Shape each flower individually. Spread all five petals and keep the center approximately circular. Avoid stretching the appliqués wider than intended because oversized flowers can alter the visual proportions of the dress.
Allow the garment to dry completely before taking final chest and length measurements.
Conclusion
The strongest identifier of this red and white crochet flower dress is the relationship between its three sections: an asymmetrical red bodice, a narrow vertically ribbed white waistband and a flared white skirt. Make the gauge swatch first, then compare the resulting stitch width with the intended wearer’s actual chest measurement before constructing the full bodice. After finishing, photograph the dress flat and on a hanger so both the flower placement and neckline construction remain visible. Save the finished project to Pinterest and share your version on Instagram with #RedWhiteFlowerDress. Which detail would you keep from the reference: the diagonal three-flower neckline or the five scattered red skirt flowers?









