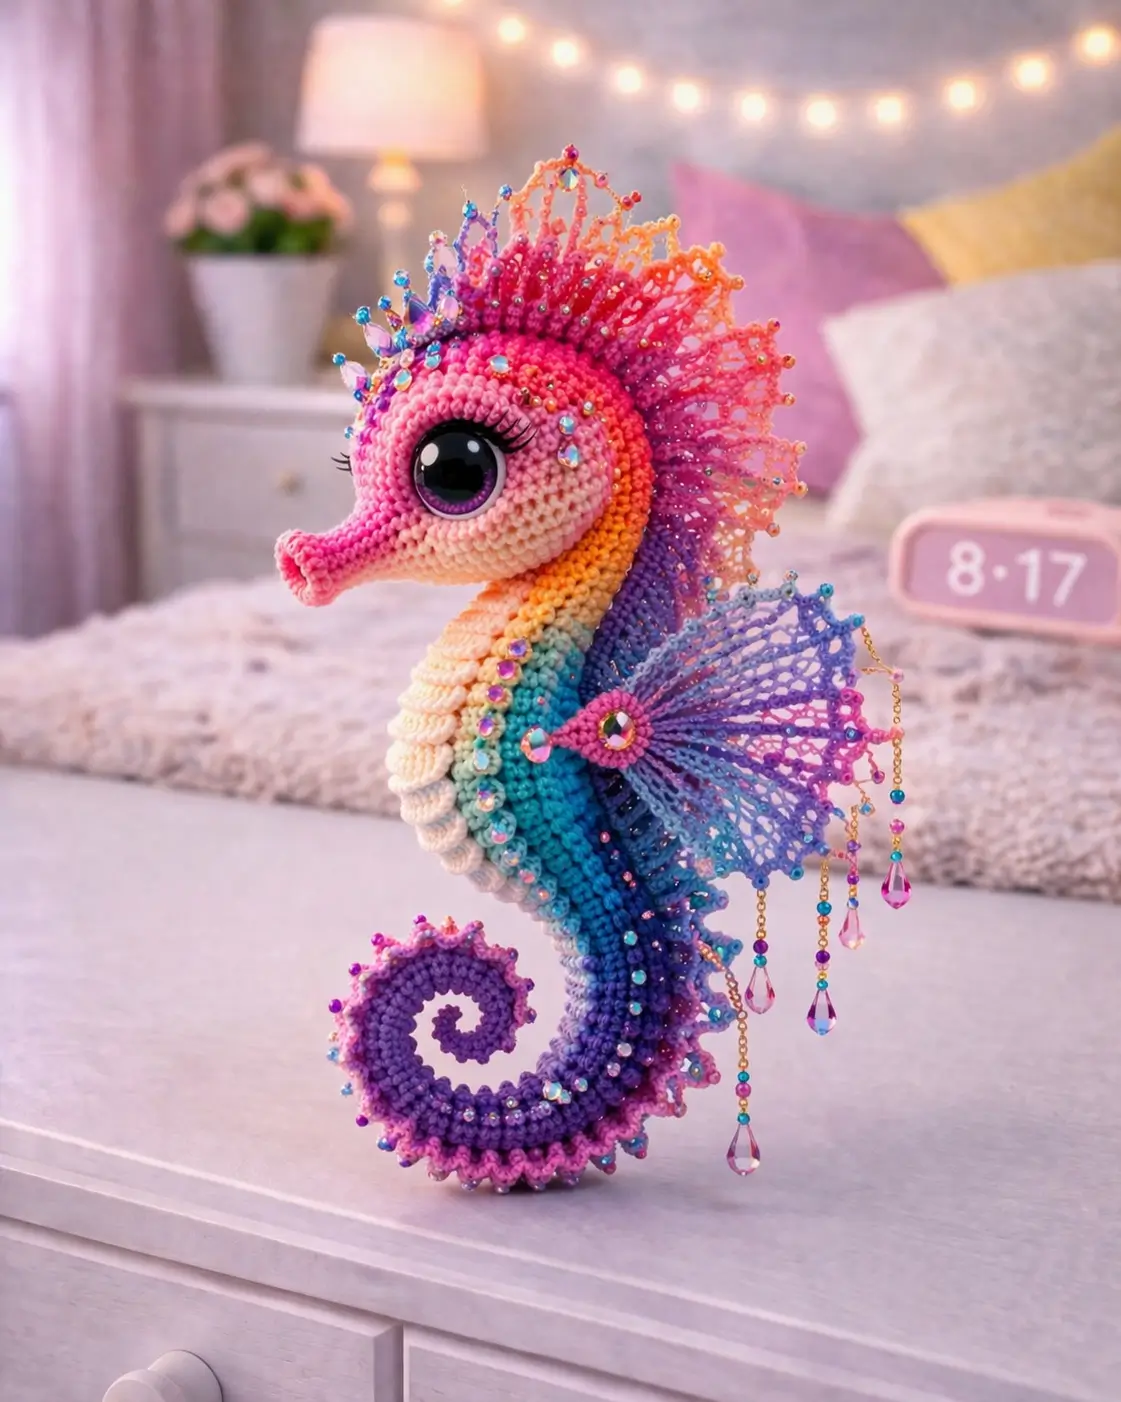
A seahorse has a coronet instead of a mane, and that crown controls the whole pattern. This seahorse amigurumi crochet pattern builds a narrow snout, deep chest, curled tail, and decorative fin structure in sport-weight cotton with a 2.0 mm hook; finished height lands around 13 cm in comparable published seahorse patterns, with 9 mm eyes as a common reference size. It suits an intermediate maker and works well as shelf decor or a nursery display piece.
The Design: What Makes This Seahorse Different
You need three silhouette decisions to make the shape read instantly. First, the head cannot be round like a bear or cat; it needs a forward-projecting snout and a slight forehead break, otherwise the profile turns generic. Second, the torso must carry more depth at the chest than at the tail. That contrast gives the piece the upright seahorse stance seen in marine anatomy and in current crochet seahorse patterns. Third, the back fin has to rise from crown to tail in one controlled line, because the coronet is the visual landmark here, not the belly. Published seahorse crochet tutorial pages usually simplify this into a short fin strip or a plush ridge. This version pushes further with lace structure and bead edges. A common failure mode in any seahorse amigurumi free pattern is oversizing the belly and undersizing the snout; the result looks like a dragon, not a seahorse.
Project Info at a Glance
| Skill Level | Time | Finished Size | Hook | Best For |
|---|---|---|---|---|
| Intermediate | 8–10 hours | 13 cm | 2.0 mm | Display decor, nursery shelf, ocean-theme gift |
Materials and Tools
Yarn
- Pink gradient main — sport cotton — approx. 50 g total mixed main shades — YarnArt Jeans or similar fine cotton reference
- Purple/blue accent — sport cotton — scrap amounts — any mercerized cotton in teal, violet, and blue
- Cream belly — sport cotton — scrap amount
- Bead-thread match — lace cotton or sewing thread — small amount
- Black and white embroidery yarn — small amount
Tools
- Hook 2.0 mm
- Safety eyes 9 mm
- Polyfill stuffing
- Tapestry needle
- Stitch markers
- Beading needle
- Seed beads, faceted acrylic drops, jump rings or fine chain
Abbreviations
MR / sc / inc / dec / sl st / ch / BLO / FLO / hdc / dc
Use invisible decrease for the head and neck transition; a standard front-loop decrease creates visible dents on narrow-profile animals.
Pattern — Step by Step
Continuous spiral unless noted. This is an original image-based pattern draft built with standard amigurumi stitch math and proportions adapted to the photographed seahorse.
Head (Make 1)
Yarn: pink gradient — standard amigurumi math with medium 36-st plateau
R1: 6 sc in MR (6)
R2: inc x6 (12)
R3: (sc 1, inc) x6 (18)
R4: (sc 2, inc) x6 (24)
R5: (sc 3, inc) x6 (30)
R6: (sc 4, inc) x6 (36)
R7-11: sc around (36)
R12: (sc 4, dec) x6 (30)
Insert eyes between R8 and R9. For a display version, place them slightly forward.
R13: (sc 3, dec) x6 (24)
R14: (sc 2, dec) x6 (18)
Stuff firmly through the forehead and cheek area.
R15: (sc 1, dec) x6 (12)
Fasten off. Leave 20 cm tail.
Snout (Make 1)
Yarn: bright pink — adapted from published seahorse snout construction with narrowed tube logic
R1: 6 sc in MR (6)
R2: (sc 1, inc) x3 (9)
R3: sc around BLO (9)
R4-7: sc around (9)
R8: (sc 1, dec) x3 (6)
R9-10: sc around (6)
Do not overstuff. A soft snout keeps the taper clean.
Fasten off. Leave 18 cm tail.
Body and Tail Core (Make 1)
Yarn: rainbow sequence from cream chest to teal, blue, and violet — standard amigurumi math with long tapered tail
R1: 6 sc in MR (6)
R2: inc x6 (12)
R3: (sc 1, inc) x6 (18)
R4: (sc 2, inc) x6 (24)
R5: (sc 3, inc) x6 (30)
R6: (sc 4, inc) x6 (36)
R7-10: sc around (36)
R11: (sc 4, dec) x6 (30)
R12: (sc 3, dec) x6 (24)
R13-15: sc around (24)
R16: (sc 2, dec) x6 (18)
R17-20: sc around (18)
R21: (sc 1, dec) x6 (12)
R22-30: sc around (12)
R31: (sc 1, inc) x4, sc 4 (16)
R32-34: sc around (16)
R35: (sc 2, dec) x4 (12)
R36-45: sc around (12)
R46: dec x6 (6)
R47-54: sc around (6)
Stuff chest and upper body firmly. Leave the last 12 rounds unstuffed so the tail can curl.
Fasten off. Leave 30 cm tail.
Belly Plates (Make 1 strip)
Yarn: cream — image-based decorative strip
Ch 22.
Row 1: Starting in 2nd ch from hook, sl st 1, (hdc 3 in next ch, sl st in next ch) x10.
Fasten off. Leave 25 cm tail.
Side Fins (Make 2)
Yarn: blue to violet — published seahorse side fins are usually small and body-mounted
R1: 6 sc in MR (6)
R2: (sc 1, inc) x3 (9)
R3: sc around (9)
Flatten lightly.
Row 4: ch 1, turn, sc 4, hdc 1, dc 1, hdc 1, sc 2 (9)
Fasten off. Leave 18 cm tail.
Coronet Crown Fin (Make 1)
Yarn: pink, coral, orange — expanded here into a crown form
Ch 31.
Row 1: Starting in 2nd ch from hook, sl st 2, (ch 4, sl st in next ch) x9, sl st 19.
Row 2: Work 3 sc into each ch-4 loop, with picot points on every other loop if desired.
Add seed beads at the tips before fastening if using pre-threaded beads.
Fasten off. Leave 35 cm tail.
Dorsal Lace Fringe (Make 1)
Yarn: magenta to violet gradient
Ch 41.
Row 1: Starting in 2nd ch from hook, sl st 3, (dc 4 in next ch, sl st in next 2 ch) x6, (hdc 3 in next ch, sl st in next 2 ch) x5.
Fasten off. Leave 30 cm tail.
Cheek Patches (Make 2)
Yarn: pale pink — flat circle detail to support jeweled cheek area
R1: 6 sc in MR (6)
R2: inc x6 (12)
Fasten off. Leave 15 cm tail.
Eye Rings (Make 2)
Yarn: violet
R1: 8 sl st around MR (8)
Fasten off. Leave 12 cm tail.
Tail Edge Ruffle (Make 1 strip)
Yarn: pink-violet
Ch 36.
Row 1: Starting in 2nd ch from hook, (3 sc in next ch, sl st in next ch) across.
Fasten off. Leave 25 cm tail.
Crystal Drop Strands (Make 5–7)
Yarn: sewing thread or metallic cord — image-based accessory
For each strand: thread 6–10 seed beads, add one faceted drop, knot securely, leave 5–9 cm hanging length.
Make mixed lengths.
Chest Jewel Cluster (Make 1)
Yarn: sewing thread
Thread 5–7 small crystals or faux gems and couch them into a vertical line.
Keep total finished length near 3.5 cm.
Assembly
- Sew the snout centered on the lower front of the head.
- Attach the eye rings, then install or embroider the eyes so the gaze sits slightly forward.
- Add the cheek patches below and slightly behind the eyes.
- Sew the head to the top chest opening of the body.
- Stitch the belly plate strip down the front center from neck to lower torso.
- Roll the tail inward and tack it in three places so the curl holds without twisting.
- Sew the side fins at upper-mid body level, one on each side.
- Attach the dorsal lace fringe from crown area down the back.
- Sew the coronet crown fin along the top of the head and first neck section.
- Add jewel cluster and crystal drop strands to the fin and side body, then weave in every tail.
The completed piece should stand with the chest forward, tail curled under, and crown slightly flared back.
7 Technical Tips
- Mark round 1 every time you change color. Gradient seahorses hide the round start, and one missed join line can shift the snout center by 1–2 stitches.
- Stuff the head harder than the neck. A soft neck collapses under a large eye and beaded crown, especially once the side fin is attached.
- Use invisible decreases on rounds 12–15 of the head. Standard decreases show as six dents across the face on a 36-stitch plateau.
- Place the eyes before the final two decrease rounds. On a medium head, set them 8 stitches apart center-to-center or the face loses the seahorse profile.
- Do not bead the crown before testing balance. Even 3–5 g of top weight can tip a 13 cm seahorse backward if the tail curl is too loose.
- Pin the side fins and dorsal fringe before sewing. The body line must stay vertical; a fin set one round too low makes the torso look squat.
- Weave tail ends through the curl, not away from it. Loose ends inside the tail roll work free faster because the curve flexes against the shelf surface.
Conclusion
This version treats the seahorse as a display subject, not a basic plush. The narrow snout, segmented chest, rolled tail, side fins, and coronet do most of the identification work; the beads only amplify that structure. For that reason, build the body first, test the balance, then commit to the lace fin and hanging crystals. That sequence reduces rework. Once your seahorse amigurumi crochet pattern is assembled, photograph it in profile and from the front, then save one image for Pinterest and one reel clip for Instagram. Use #RainbowSeahorseCrown when you post. One useful question remains: did you keep the coronet narrow like a true seahorse, or widen it into a fantasy crest?









