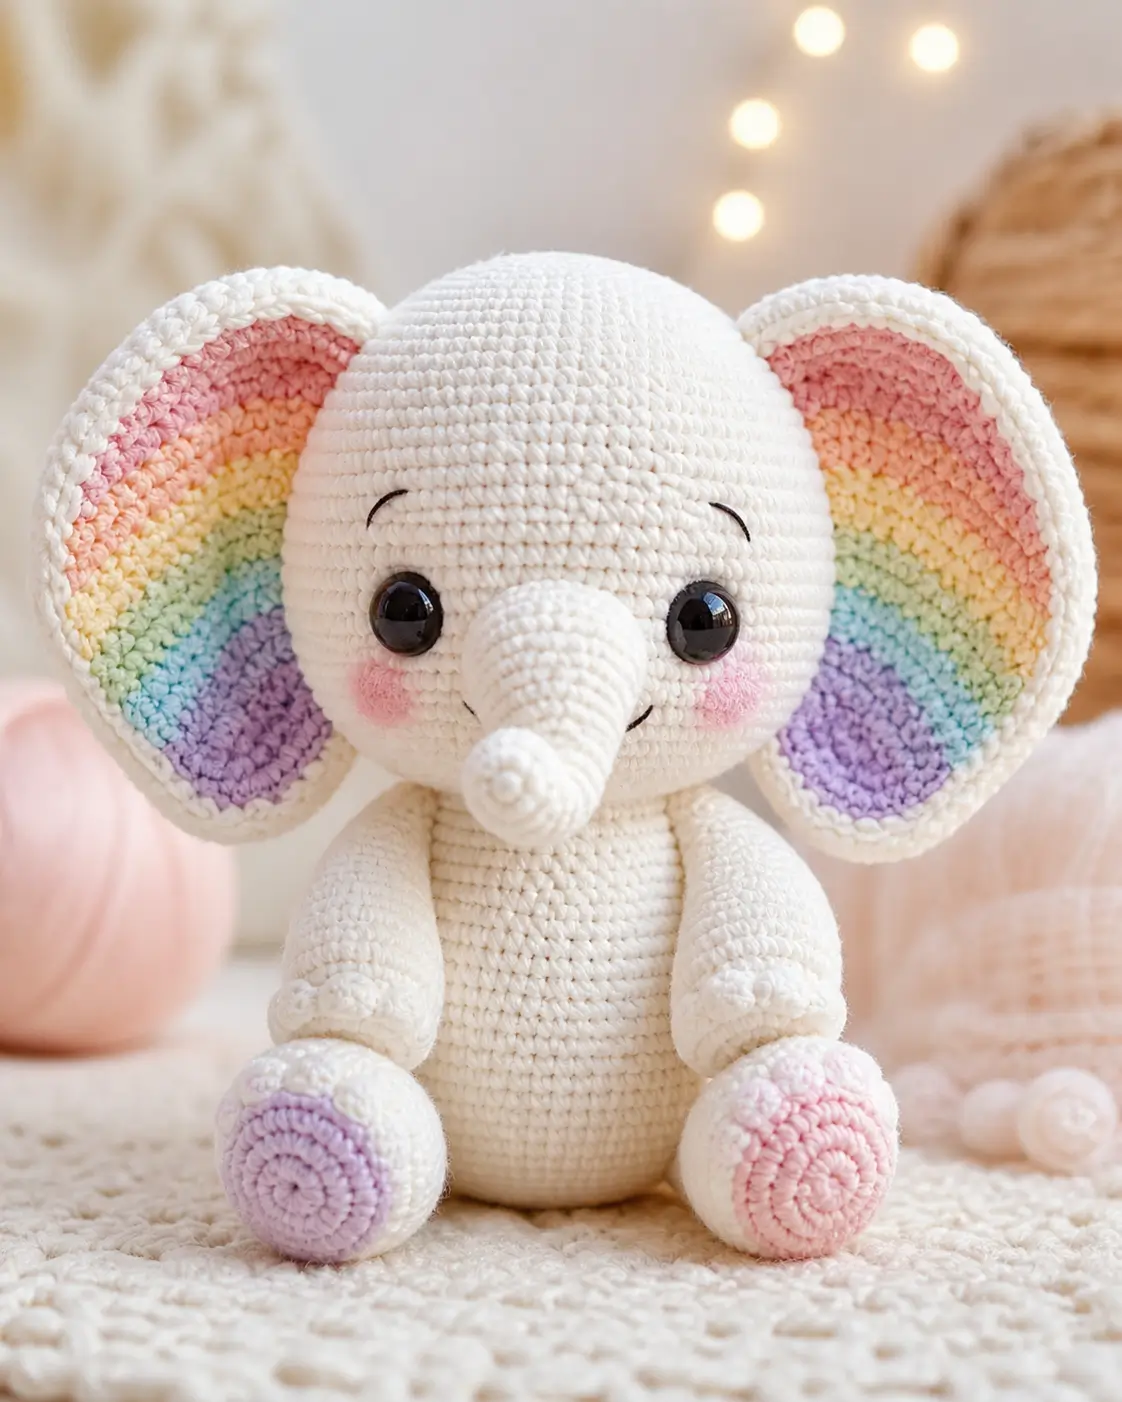
Elephant ears are heat panels; on this toy they also carry the rainbow. This elephant amigurumi crochet pattern uses DK cotton, a 2.5 mm hook, and 12 mm eyes to make a 20 cm sitting elephant at easy-intermediate level. You will build a stable white body, broad striped ears, a tapered trunk, and colored paw pads for a nursery shelf sample that photographs clearly.
The Design: What Makes This Elephant Different
Start with the ears, not the trunk. The rainbow panels are wide enough to read from the front, so the head needs a 42-stitch plateau and firm side seams. A smaller head would pull the ears inward and hide the pastel bands. The trunk is built from tip to face; that keeps the opening broad, lets the base sit flush, and stops the nose from tilting upward. For a sitting elephant amigurumi, the body stays shorter than the head because the legs provide the lower visual weight. The maker should avoid the common elephant mistake: placing ears level with the eyes. Ears set too low make the head look like a mouse. This rainbow elephant amigurumi pattern uses high side placement, separate paw pads, and cheek patches to keep the face clean.
Project Info at a Glance
| Skill Level | Time | Finished Size | Hook | Best For |
|---|---|---|---|---|
| Easy-intermediate | About 8 hours | Approx. 20 cm sitting | 2.5 mm | Nursery decor, toy photography, pastel animal sets |
A 20 cm elephant size and 2.5 mm DK setup match published DK elephant pattern data. The 8-hour time benchmark comes from a 20 cm elephant listing and will vary with sewing speed. Source: Just a Little Crochet.
Materials and Tools
Yarn
- Ivory white — DK cotton — 100 g — Paintbox Cotton DK, Scheepjes Catona, or similar matte cotton
- Pastel pink — DK cotton — 5 g — inner ear band, cheek patches, one paw pad
- Peach — DK cotton — 4 g — inner ear band
- Pale yellow — DK cotton — 4 g — inner ear band
- Mint green — DK cotton — 4 g — inner ear band
- Sky blue — DK cotton — 4 g — inner ear band
- Lavender — DK cotton — 5 g — inner ear band and one paw pad
- Black embroidery cotton — small amount — eyebrows and mouth line
The 100 g main plus 25 g accent estimate follows published DK elephant material ranges. Source: Desert Blossom Crafts.
Tools
- Hook 2.5 mm
- 12 mm black safety eyes
- Polyester stuffing
- Yarn needle
- Stitch markers
- Pins
- Scissors
- Blush powder or textile crayon, optional for soft cheek color
Use embroidered eyes instead of plastic eyes for toys intended for children under 3. A DK elephant source gives 12 mm eyes and also notes embroidery as the safer child-use option. Source: Desert Blossom Crafts.
Abbreviations
MR = magic ring; sc = single crochet; inc = 2 sc in one stitch; dec = single crochet decrease; inv dec = invisible decrease; sl st = slip stitch; ch = chain; BLO = back loop only; FO = fasten off.
Invisible decrease uses the front loops of the next two stitches to reduce bulk, which prevents dark gaps on the white head when stuffing presses outward.
Pattern — Step by Step
Work in a continuous spiral unless a color-change ear round says to join. Counts are shown in brackets.
Head
Yarn: ivory white — Source: standard amigurumi math; sizing checked against published 20 cm DK elephant data.
R1: 6 sc in MR (6)
R2: inc ×6 (12)
R3: (sc, inc) ×6 (18)
R4: (2 sc, inc) ×6 (24)
R5: (3 sc, inc) ×6 (30)
R6: (4 sc, inc) ×6 (36)
R7: (5 sc, inc) ×6 (42)
R8–R18: sc around (42)
R19: (5 sc, dec) ×6 (36)
R20: (4 sc, dec) ×6 (30)
R21: (3 sc, dec) ×6 (24)
R22: (2 sc, dec) ×6 (18)
R23: (sc, dec) ×6 (12)
R24: dec ×6 (6)
Insert 12 mm safety eyes between R13 and R14, 10 stitches apart, before R19. Begin stuffing at R19 and keep the top dome firm.
Fasten off. Weave the final tail through front loops and close.
Body
Yarn: ivory white — Source: standard amigurumi math; body kept smaller than head for sitting balance.
R1: 6 sc in MR (6)
R2: inc ×6 (12)
R3: (sc, inc) ×6 (18)
R4: (2 sc, inc) ×6 (24)
R5: (3 sc, inc) ×6 (30)
R6: (4 sc, inc) ×6 (36)
R7–R15: sc around (36)
R16: (4 sc, dec) ×6 (30)
R17: sc around (30)
R18: (3 sc, dec) ×6 (24)
R19: sc around (24)
R20: (2 sc, dec) ×6 (18)
R21: sc around (18)
R22: (sc, dec) ×6 (12)
R23: dec ×6 (6)
Stuff firmly at the base and moderately at the neck so the head sits upright.
Fasten off. Leave a 50 cm tail for sewing.
Arms / Front Legs
Make 2. Yarn: ivory white — Source: standard amigurumi math.
R1: 6 sc in MR (6)
R2: inc ×6 (12)
R3: (sc, inc) ×6 (18)
R4–R5: sc around (18)
R6: (sc, dec) ×6 (12)
R7–R12: sc around (12)
Stuff only the lower half. Flatten the top opening and crochet 6 sc through both layers if a flat seam is preferred.
Fasten off. Leave a 25 cm tail.
Back Legs / Feet
Make 2. Yarn: lavender for one sole, pink for one sole, then ivory white — Source: standard amigurumi math.
R1: 6 sc in MR with sole color (6)
R2: inc ×6 (12)
R3: (sc, inc) ×6 (18)
R4: BLO sc around in ivory white (18)
R5–R6: sc around (18)
R7: (sc, dec) ×6 (12)
R8–R10: sc around (12)
R11: dec ×6 (6)
Stuff the toe end firmly and leave the upper back of the foot slightly softer for sitting.
Fasten off. Leave a 30 cm tail.
Rainbow Ears
Make 2. Yarn: lavender, blue, green, yellow, peach, pink, ivory white — Source: standard amigurumi math; inner/outer ear construction checked against elephant-ear-specific references.
R1: 6 sc in MR with lavender (6)
R2: inc ×6 with lavender (12)
R3: (sc, inc) ×6 with sky blue (18)
R4: (2 sc, inc) ×6 with mint green (24)
R5: (3 sc, inc) ×6 with pale yellow (30)
R6: (4 sc, inc) ×6 with peach (36)
R7: (5 sc, inc) ×6 with pastel pink (42)
R8: (6 sc, inc) ×6 with ivory white (48)
R9: sc around with ivory white (48)
Join each color round with sl st if you want cleaner rainbow bands. Do not stuff. Fold the lower 8 stitches slightly inward during assembly to form the rounded elephant-ear shape.
Fasten off. Leave a 45 cm tail on each ear.
Trunk
Yarn: ivory white — Source: standard amigurumi math; separate elephant trunk construction checked against published elephant part layout.
R1: 6 sc in MR (6)
R2–R4: sc around (6)
R5: inc ×6 (12)
R6–R9: sc around (12)
R10: (sc, inc) ×6 (18)
R11–R14: sc around (18)
R15: (2 sc, inc) ×6 (24)
R16–R17: sc around (24)
Stuff the base only. Leave the tip nearly empty so the trunk points forward instead of dropping.
Fasten off. Leave a 35 cm tail.
Cheek Patches
Make 2. Yarn: pastel pink — Source: standard amigurumi math.
R1: 6 sc in MR (6)
R2: inc ×6 (12)
Make flat circles. Sew or tack beneath the eyes, then add powdered blush over the patch edge if a softer photo finish is needed.
Fasten off. Leave a 20 cm tail.
Toe Bumps
Make 6. Yarn: ivory white — Source: standard amigurumi math.
R1: 6 sc in MR (6)
Pull the ring tight to form a small nub. Sew three bumps onto each front leg tip.
Fasten off. Leave a 12 cm tail on each bump.
Eyebrow Strands
Make 2. Yarn: black embroidery cotton — Source: visible photo detail.
Ch 7.
Row 1: sl st in 2nd ch from hook and in each remaining ch (6)
Curve each strand above an eye with shallow stitches. Keep the inner eyebrow ends higher than the outer ends.
Fasten off. Leave a 15 cm tail.
Tail
Yarn: ivory white — Source: elephant part convention; published elephant patterns commonly include a small tail.
Ch 8.
Row 1: sl st in 2nd ch from hook, sl st in next 5 ch, 3 sc in last ch (9 worked stitches)
Do not stuff. Brush or split the final yarn end for a tiny tail tuft.
Fasten off. Leave a 20 cm sewing tail.
Optional Photo Prop: Small Spiral Yarn Ball
Yarn: ivory white — Source: photo prop interpretation; standard amigurumi math.
R1: 6 sc in MR (6)
R2: inc ×6 (12)
R3: (sc, inc) ×6 (18)
R4: BLO sc around (18)
R5: sc around (18)
R6: (sc, dec) ×6 (12)
R7: dec ×6 (6)
Close the ball, then chain 20 and sl st back along the chain to make the loose cord.
Fasten off. Hide one tail and leave the cord visible.
Assembly
- Pin the head to the body with the head centerline directly above the body increase seam.
- Sew the body to the head in a full circle, then stitch a second circle 2 mm inside the first for neck support.
- Center the trunk between the eyes with its top edge near R13 and its base covering the lower face.
- Sew the trunk around R17 of the trunk opening, adding one stabilizing stitch under the trunk tip.
- Place cheek patches under the eyes and slightly outside the trunk edge, then sew with tiny whipstitches.
- Attach ears high on the head, spanning about R8 to R18, with the pink band facing forward.
- Sew front legs to the body sides just below the head join, angled inward by about 15 degrees.
- Sew back legs to the lower front body so the colored soles face forward and support the sitting pose.
- Add eyebrows above the eyes, embroider a short mouth curve beside the trunk, and attach the tail at the back.
- Sew toe bumps onto the front legs and weave every tail through at least 8 cm of stuffed fabric.
The finished toy is a seated white elephant with rainbow ears, a forward trunk, visible cheek patches, and pastel foot pads.
7 Technical Tips
- Stitch marker drift: If the marker has moved more than 1 stitch left or right by head R18, the trunk will not center cleanly. Shift the start point back one stitch on the next plain round before decreases begin.
- Stuffing firmness: A 42-stitch head needs small 1 cm tufts, not one large clump. Stop adding stuffing when stitches stay closed under thumb pressure and no white gaps widen.
- Eye placement timing: Install 12 mm eyes between R13 and R14 before working R19. After the head drops below 36 stitches, the backings become hard to press on without distorting the dome.
- Invisible decrease gaps: White cotton shows every normal decrease ridge. Work inv dec on R19–R24 of the head and pull each decrease tight before making the next sc.
- Velvet substitution tension: If using velvet instead of DK cotton, move to a 3.5 mm hook and expect the toy to grow. A loose velvet stitch can add 3–5 cm to the finished height and make the ears sag.
- Ear pinning failure: Low ears create a mouse profile. Keep the upper ear edge near head R8 and the lower edge no lower than R18 before sewing.
- Tail weaving length: Short yarn tails work loose at paw pads and cheek circles. Weave each finishing tail through at least 8 cm of stuffed fabric, then reverse direction once before trimming.
Conclusion
Block the ears first, then judge the face. The rainbow bands must sit flat before the trunk is sewn down, because the trunk becomes the visual centerline for the whole toy. Make one sample ear, check the stripe width, and mirror the second ear with the same color order. This elephant amigurumi crochet pattern is ready for a WordPress post, Pinterest pin, or Instagram carousel once the assembly photos are taken in head-to-body order. Share the finished piece with the hashtag #RainbowEarElephant, and include one close-up of the ear edge. Which rainbow band should sit closest to the elephant’s cheek: lavender or pink?










Thank you for the elephant pattern. I would love to do it soon.