Introduction
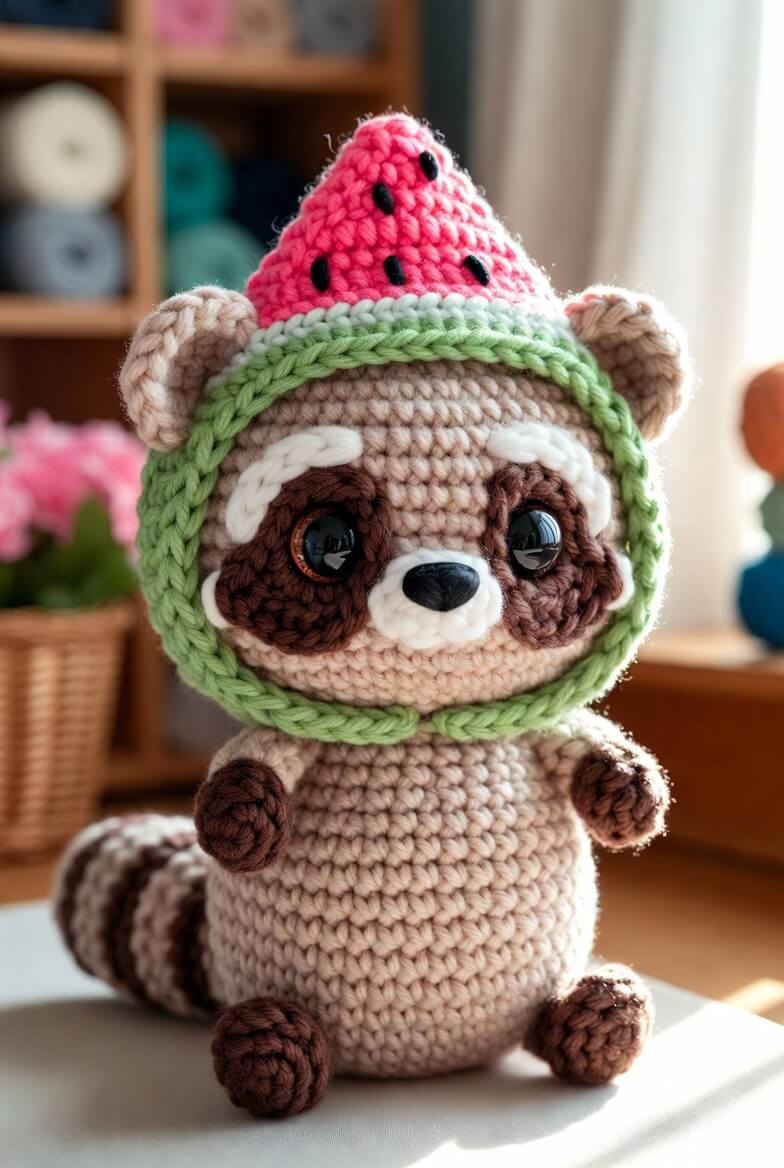
A raccoon mask loses its species-defining shape when the dark patches sit too far above the nose. This raccoon amigurumi crochet pattern fixes their position around 14 mm eyes and adds a fitted watermelon hood. Use worsted yarn and a 3.5 mm hook. The completed raccoon measures approximately 22 cm seated and suits an intermediate maker who needs a removable costume with a stable face opening.
The Design: What Makes Melon the Raccoon Different
Melon’s eye masks are separate appliqués rather than in-round color changes. Their curved lower edges meet beside the muzzle, while the raised outer corners frame the oversized eyes without turning the face into one continuous dark band. Cream eyebrows sit above the masks and preserve a clear line between the markings and the hood.
The body expands to 36 stitches and keeps a broad lower plateau. That width supports the large head and prevents the striped tail from rolling the figure sideways. A double-layer hood band forms the green rind around the face, and the pink crown tapers into a watermelon-slice point. One common error in a raccoon with hood amigurumi is making the opening before the ears are attached. The finished hood then presses both ears forward. Attach the ears first, measure around them and test the band before adding the crown.
Project Info at a Glance
| Skill Level | Time | Finished Size | Hook | Best For |
|---|---|---|---|---|
| Intermediate | 9–11 hours | Approximately 22 cm seated | 3.5 mm | Seasonal displays, fruit-themed collections and removable-costume toys |
Materials and Tools
Yarn
- Warm greige — worsted or Aran yarn — approximately 90 g — for the head, body, ears and limb tops
- Dark brown — worsted or Aran yarn — approximately 35 g — for the masks, paws and tail stripes
- Cream white — worsted yarn — approximately 25 g — for the muzzle, eyebrows, inner ears and pale tail stripes
- Watermelon pink — worsted yarn — approximately 35 g — for the hood crown
- Leaf green — worsted yarn — approximately 20 g — for the outer rind band
- Pale mint — worsted yarn — approximately 10 g — for the inner rind stripe
- Black — embroidery yarn — a small quantity for the watermelon seeds
- Blush pink — embroidery yarn — a small quantity for the cheeks
Yarn consumption changes with gauge and hood depth. Keep extra green yarn available when the face band needs additional rows to pass over the ears.
Tools
- 3.5 mm crochet hook
- 14 mm safety eyes
- 12 mm safety nose
- Polyester stuffing
- Yarn needle
- Locking stitch markers
- Dressmaking pins
- Scissors
- Row counter
- Flexible measuring tape
Replace plastic eyes and noses with embroidered features when the finished toy is intended for a child under three.
Abbreviations
- MR — magic ring
- sc — single crochet
- inc — two single crochet in one stitch
- dec — invisible decrease over the next two stitches
- sl st — slip stitch
- ch — chain
- BLO — back loop only
- FLO — front loop only
- hdc — half double crochet
- dc — double crochet
- st/sts — stitch or stitches
An invisible decrease is worked through the front loops of the next two stitches before completing one single crochet.
Pattern — Step by Step
Work in a continuous spiral unless a section states otherwise. Mark the first stitch of every round.
Head
Yarn: warm greige — standard six-stitch amigurumi shaping.
R1: 6 sc in MR (6)
R2: inc ×6 (12)
R3: (sc, inc) ×6 (18)
R4: (2 sc, inc) ×6 (24)
R5: (3 sc, inc) ×6 (30)
R6: (4 sc, inc) ×6 (36)
R7: (5 sc, inc) ×6 (42)
R8–R15: sc around (42)
Place the safety-eye posts between R12 and R13 with approximately nine visible stitches between them. Keep the washers unattached until both masks and the muzzle have been pinned.
R16: (5 sc, dec) ×6 (36)
R17: (4 sc, dec) ×6 (30)
R18: (3 sc, dec) ×6 (24)
R19: (2 sc, dec) ×6 (18)
Stuff the crown and side walls firmly. Add small pieces around the eye posts to limit deep indentations.
R20: (sc, dec) ×6 (12)
R21: dec ×6 (6)
Fasten off. Leave a 20 cm tail and close the opening through the front loops.
Body
Yarn: warm greige.
R1: 6 sc in MR (6)
R2: inc ×6 (12)
R3: (sc, inc) ×6 (18)
R4: (2 sc, inc) ×6 (24)
R5: (3 sc, inc) ×6 (30)
R6: (4 sc, inc) ×6 (36)
R7–R13: sc around (36)
R14: (4 sc, dec) ×6 (30)
R15–R17: sc around (30)
R18: (3 sc, dec) ×6 (24)
R19–R21: sc around (24)
R22: (2 sc, dec) ×6 (18)
Stuff the lower half firmly and press it against a level surface to create a flat base. Pack the upper rounds more densely around the neck.
R23: (sc, dec) ×6 (12)
R24: dec ×6 (6)
Fasten off. Leave a 35 cm tail for joining the body to the head.
Arms — Make 2
Begin with dark brown and change to warm greige after R5.
R1: 6 sc in MR (6)
R2: inc ×6 (12)
R3–R5: sc around (12)
Change to warm greige.
R6–R12: sc around (12)
Stuff the paw firmly. Leave the upper four rounds lightly filled so the arm lies against the body.
Flatten the opening and work 6 sc through both layers (6).
Fasten off. Leave a 30 cm sewing tail.
Back Feet — Make 2
Yarn: dark brown.
R1: 6 sc in MR (6)
R2: inc ×6 (12)
R3: (sc, inc) ×6 (18)
R4–R6: sc around (18)
R7: (sc, dec) ×6 (12)
R8: sc around (12)
Stuff the front two-thirds firmly. Keep the final round flexible so the foot can be sewn flat against the body.
Flatten and work 6 sc through both layers (6).
Fasten off. Leave a 30 cm sewing tail.
Outer Ears — Make 2
Yarn: warm greige.
R1: 6 sc in MR (6)
R2: inc ×6 (12)
R3: (sc, inc) ×6 (18)
R4: sc around (18)
R5: (sc, dec) ×6 (12)
Do not stuff. Flatten each ear into a shallow semicircle.
Fasten off. Leave a 25 cm tail.
Inner Ears — Make 2
Yarn: cream white.
R1: 6 sc in MR (6)
R2: inc ×6 (12)
Join with a sl st. Fasten off, leaving a 20 cm sewing tail.
Fold each circle slightly and sew it to the front of one outer ear, leaving a narrow greige border.
Eye Masks — Make 2
Yarn: dark brown — worked in turning rows.
Ch 5.
Row 1: Starting in the second ch from the hook, 4 sc (4). Ch 1 and turn.
Row 2: inc, 2 sc, inc (6). Ch 1 and turn.
Row 3: inc, 4 sc, inc (8). Ch 1 and turn.
Row 4: sc across (8). Ch 1 and turn.
Row 5: dec, 4 sc, dec (6). Ch 1 and turn.
Row 6: dec, 2 sc, dec (4).
Work sc evenly around the complete patch, placing two stitches in each lower corner.
Fasten off. Leave a 30 cm sewing tail.
Eyebrows — Make 2
Yarn: cream white.
Ch 7. Starting in the second ch from the hook, 6 sc (6).
Fasten off. Leave a 20 cm sewing tail.
Curve each strip gently before pinning. The inner eyebrow end should sit one round higher than the outer end.
Muzzle
Yarn: cream white.
R1: 6 sc in MR (6)
R2: inc ×6 (12)
R3: (sc, inc) ×6 (18)
R4: BLO sc around (18)
R5: sc around (18)
Insert the safety nose between R3 and R4. Stuff the muzzle lightly so it remains a shallow oval.
Fasten off. Leave a 30 cm sewing tail.
Tail
Alternate dark brown and cream white in two-round stripes.
R1: With dark brown, 6 sc in MR (6)
R2: inc ×6 (12)
R3: (sc, inc) ×6 (18)
R4: (2 sc, inc) ×6 (24)
R5–R6: sc around in cream white (24)
R7–R8: sc around in dark brown (24)
R9–R10: sc around in cream white (24)
R11–R12: sc around in dark brown (24)
R13: (2 sc, dec) ×6 in cream white (18)
R14–R15: sc around in cream white (18)
R16–R17: sc around in dark brown (18)
R18: (sc, dec) ×6 in cream white (12)
R19–R21: sc around in cream white (12)
Stuff the rounded tip firmly. Reduce the filling toward the base so the tail can curve beside the body.
Flatten the opening and work 6 sc through both layers (6).
Fasten off. Leave a 35 cm sewing tail.
Hood Face Band
Begin with leaf green. Work in joined rounds.
Ch 48. Join with a sl st, taking care not to twist.
R1: Ch 1, sc around, join with sl st (48)
R2–R4: BLO sc around, join with sl st (48)
Change to pale mint.
R5–R6: sc around, join with sl st (48)
Fasten off. Test the band around the completed head. It should pass over both ears and rest outside the eyebrows without covering either eye.
Watermelon Crown
Yarn: watermelon pink — worked upward from the pale-mint edge.
Join pink yarn to any stitch of R6.
R1: sc around, join with sl st (48)
R2: (6 sc, dec) ×6, join with sl st (42)
R3: sc around (42)
R4: (5 sc, dec) ×6 (36)
R5: sc around (36)
R6: (4 sc, dec) ×6 (30)
R7: sc around (30)
R8: (3 sc, dec) ×6 (24)
R9: sc around (24)
R10: (2 sc, dec) ×6 (18)
R11: sc around (18)
R12: (sc, dec) ×6 (12)
R13: sc around (12)
R14: dec ×6 (6)
Fasten off. Leave a 15 cm tail and close the top through the front loops.
Flatten the upper crown slightly from front to back. This creates the triangular watermelon-slice profile shown in the reference image.
Watermelon Seeds
Yarn: black embroidery yarn.
Embroider seven vertical seed stitches across the pink crown. Each seed should measure approximately 7–9 mm, with three placed near the lower third, three above them and one near the top.
Cheek Blush — Make 2
Yarn: blush pink embroidery yarn.
Work three short horizontal stitches beneath each eye mask. Keep every stitch within a one-stitch-wide area.
Assembly
- Center the body directly below the head and pin the neck at four points. Sew around the join twice through complete stitches.
- Pin one dark mask around each eye post. Set the inner lower corners approximately one stitch from the planned muzzle seam.
- Place the muzzle between the masks and check that the nose aligns with the center of the head. Lock the eye and nose washers only after all three pieces remain level.
- Sew the masks through their back loops, then attach the muzzle. Add a small amount of stuffing before closing the final 2 cm of the muzzle seam.
- Pin the cream eyebrows one round above the dark masks. Angle the inner ends upward by approximately 5 mm and sew through the underside of each chain.
- Attach the ears across approximately R5–R10 of the head. Their upper edges must remain narrow enough for the 48-stitch hood band to pass over them.
- Sew the back feet to the lower front of the body across approximately R5–R8. Attach the arms across R15–R19 with the paws angled slightly inward.
- Join the tail to the lower rear-left side near R7 of the body. Curve it around the side so at least three alternating stripes remain visible from the front.
- Pull the watermelon hood over the ears and center its opening around the face. Place the green band outside the eyebrows and tack it behind each ear when permanent positioning is required.
- Embroider the cheek marks and watermelon seeds, then weave every yarn tail through at least four directional changes inside a stuffed section.
The finished raccoon should sit independently with both feet touching the surface and the watermelon point centered above the nose.
7 Technical Tips
- Mask rotation: A patch shifted by two stitches can make the muzzle appear off-center. Pin both masks and count nine visible stitches between the 14 mm eye posts before attaching either washer.
- Restricted hood opening: A band below 48 stitches may not pass over both finished ears. Test the green section before adding the pink crown and increase evenly by six stitches when needed.
- Collapsed hood point: Loose upper rounds can fold sideways instead of forming a watermelon tip. Place a small amount of stuffing in the final 3 cm or flatten the section from front to back before closing.
- Uneven rind stripe: A missed stitch in the pale-mint rounds produces a visible dip above the forehead. Recount both rind rounds and confirm that each contains 48 stitches.
- Tail twisting: Stuffing the complete 21-round tail firmly prevents it from curving beside the body. Pack R1–R12 firmly, then reduce the density through the final nine rounds.
- Visible decrease holes: Standard decreases can open gaps across the pink crown. Work through the two front loops and keep the completed stitch the same height as its neighboring single crochets.
- Loose seed embroidery: A seed longer than 9 mm can snag and distort the crown. Anchor each vertical stitch separately and knot the ends inside the hood rather than connecting all seven seeds with one floating strand.
Conclusion
Complete the face before closing the hood crown, because the eye masks and ears determine the required opening. Check that the green band clears both eyebrows, the tail supports the left side and the watermelon point remains aligned with the nose. The next practical step is to crochet the 48-stitch hood band and test it on the finished head before continuing with pink yarn. Save this raccoon amigurumi crochet pattern to Pinterest, then share the finished figure on Instagram with #MelonRaccoon. Did you keep the watermelon hood removable, or tack it behind both ears for permanent placement?









