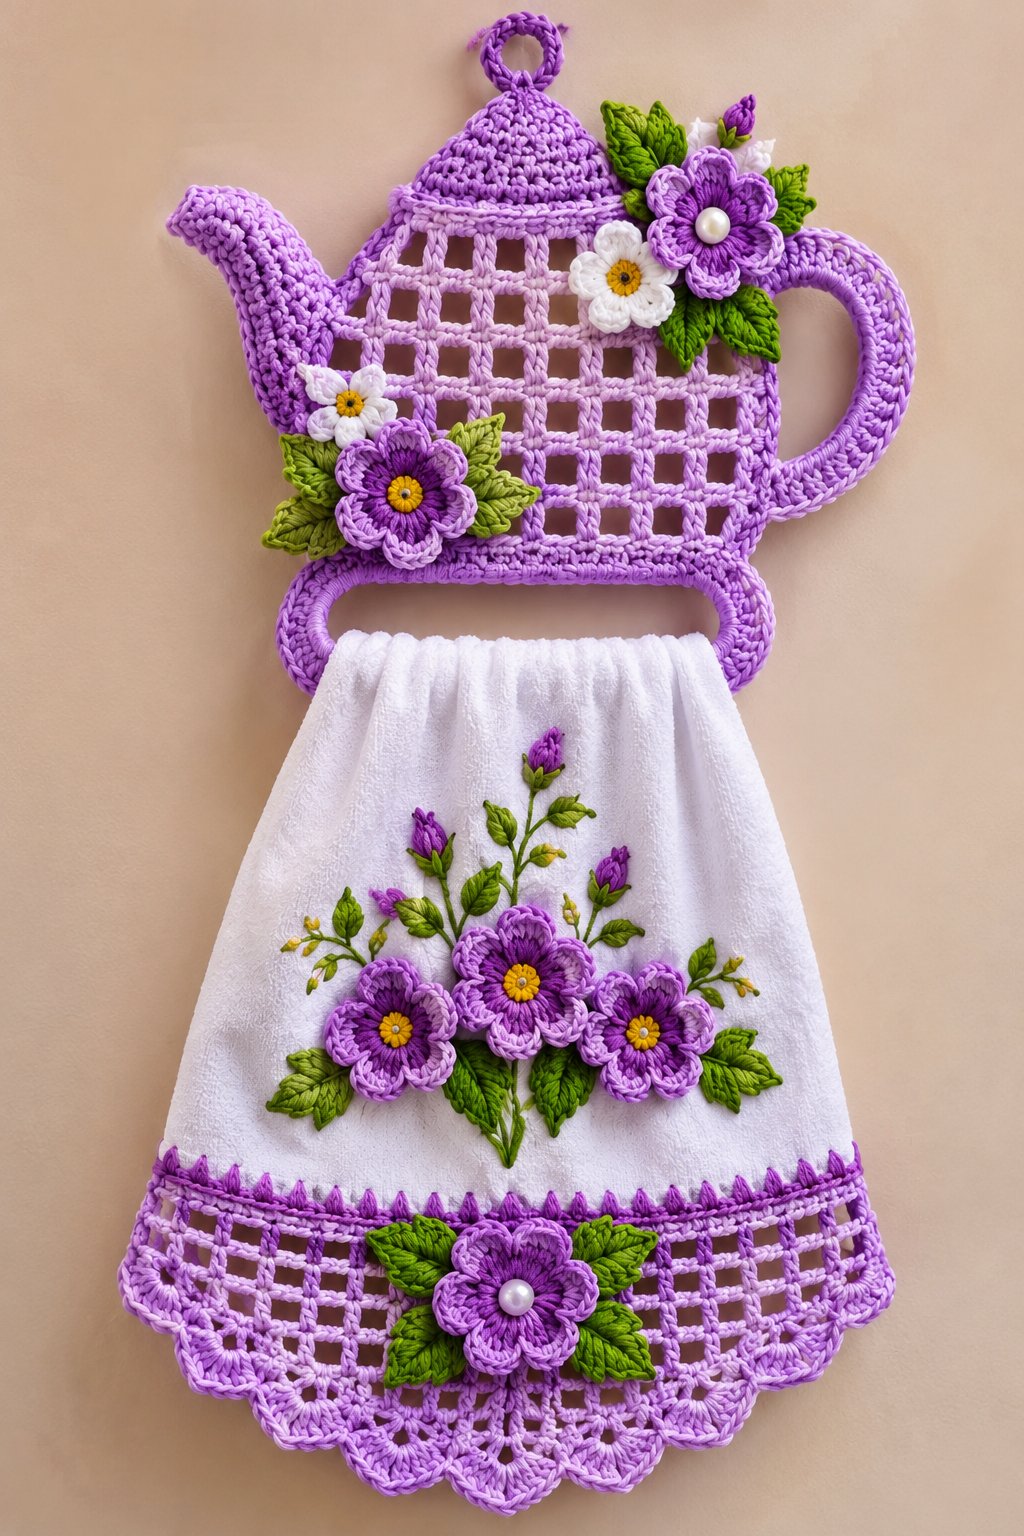
Pattern note: This original reconstruction is based exclusively on the supplied photograph. Exact yarn quantities, dimensions, and hidden construction details cannot be determined visually. Measurements and stitch instructions are proposed specifications rather than a tested reproduction.
Introduction
The curved spout and open lattice body distinguish this Purple Crochet Teapot Towel Holder from ordinary kitchen towel hangers. Its pointed lid, circular handle, dimensional purple flowers, and green leaves create a decorative teapot silhouette above a white floral towel.
This intermediate-to-advanced crochet project uses DK cotton yarn, a 3.0 mm hook, and separate appliqués. The proposed finished teapot measures approximately 27 cm wide and provides a removable towel display for kitchen walls or cabinets.
The Design: What Makes This Teapot Different
The teapot combines three construction elements: a rectangular openwork body, shaped outer components, and a reinforced lower towel bar.
Its lattice consists of aligned chain spaces separated by vertical single-crochet anchors. This construction keeps the center transparent while the solid spout, lid, and handle define the teapot’s outline.
The pointed lid rises toward a circular hanging loop. A wide curved handle balances the upward-facing spout, while purple flowers and textured green leaves decorate opposite corners.
The white towel repeats the floral colors through three purple blossoms, embroidered stems, small buds, and a scalloped lavender border.
Unlike a stuffed amigurumi teapot, this floral crochet kitchen towel holder remains flat. The towel’s weight must be carried by the reinforced support bar rather than the decorative lattice.
Project Information at a Glance
| Detail | Specification |
|---|---|
| Skill Level | Intermediate–Advanced |
| Estimated Time | 12–18 hours |
| Teapot Width | Approximately 27 cm |
| Teapot Height | Approximately 22 cm |
| Hook | 3.0 mm |
| Yarn | DK cotton |
| Construction | Flat panels and appliqués |
| Best For | Decorative kitchen towel display |
Dimensions and working time are estimates for the reconstructed pattern.
Materials and Tools
Yarn
Suggested quantities:
- Light lavender DK cotton — 100 g: Teapot, lid, handle, spout, support bar, and lace.
- Medium purple DK cotton — 25 g: Flower petals and buds.
- Dark violet DK cotton — 15 g: Flower centers.
- Leaf green DK cotton — 25 g: Leaves and stems.
- White DK cotton — 15 g: Small flowers.
- Golden-yellow DK cotton — 5 g: Floral centers.
Choose smooth cotton with firm stitch definition. The photographed design does not show fuzzy or velvet yarn.
Tools
- 3.0 mm crochet hook
- Tapestry needle and scissors
- Stitch markers and measuring tape
- Sewing pins and matching thread
- White cotton hand towel, approximately 35–40 × 45–55 cm
- Two pearl-style beads, approximately 8–10 mm
- Optional removable rigid support, approximately 18 cm
A lightweight towel reduces stress on the hanging loop. Beads must be firmly secured and kept away from young children.
Abbreviations
- MR — Magic ring
- ch — Chain
- sc — Single crochet
- hdc — Half double crochet
- dc — Double crochet
- tr — Treble crochet
- inc — Two sc in one stitch
- dec — Decrease
- sl st — Slip stitch
- BLO — Back loop only
- FLO — Front loop only
- st — Stitch
- sp — Space
- FO — Fasten off
An invisible decrease joins the front loops of two adjacent stitches into one single crochet.
Work flat sections in turned rows unless otherwise indicated. Circular motifs use joined rounds.
Purple Crochet Teapot Towel Holder Pattern — Step by Step
Step 1: Lower Teapot Foundation
Yarn: Light lavender
This foundation supports the lattice and lower attachments.
R1: Ch 43, sc in second ch and across. (42)
R2–R4: Ch 1, sc across. (42)
R5: Ch 1, inc, sc 40, inc. (44)
R6: Ch 1, sc across. (44)
FO, leaving a 20 cm tail.
Keep the strip flat. The slight increase broadens the lower silhouette and provides sewing space for the towel-support bar.
Step 2: Open Lattice Body
Yarn: Light lavender
The teapot’s center features rectangular openings formed by chains and single-crochet anchors.
R1: Ch 44; sc in second ch, ch 6, skip 6 ch, sc in next ch six times. (7 sc anchors, 6 spaces)
R2: Ch 1, sc in first sc, ch 6, sc in next sc six times. (6 spaces)
R3–R8: Repeat R2. (6 spaces per row)
R9: Ch 1, sc in first sc, 6 sc in next ch-space, sc in next sc six times. (43)
R10: Ch 1, sc across. (43)
FO, leaving 25 cm.
Sew the lower lattice edge to the foundation, distributing the one-stitch width difference evenly. Keep the mesh squares aligned. Add repeated mesh rows before R9 if the panel measures less than approximately 11–12 cm tall.
Step 3: Teapot Side Contours
Make 2. Yarn: Light lavender
R1: Ch 5, sc in second ch and across. (4)
R2–R4: Ch 1, sc across. (4)
R5: Ch 1, inc, sc 2, inc. (6)
R6–R10: Ch 1, sc across. (6)
R11: Ch 1, dec, sc 2, dec. (4)
R12–R15: Ch 1, sc across. (4)
FO, leaving 25 cm.
Pin one strip along each lattice side. Curve the middle slightly outward and bring the upper ends inward. Sew without pulling the mesh anchors out of alignment.
Step 4: Pointed Teapot Lid
Yarn: Light lavender
Work upward from a narrow tip toward the wider base.
R1: Ch 3, 2 sc in second ch, 1 sc in last ch. (3)
R2: Ch 1, inc, sc 1, inc. (5)
R3: Ch 1, sc across. (5)
R4: Ch 1, inc, sc 3, inc. (7)
R5: Ch 1, sc across. (7)
R6: Ch 1, inc, sc 5, inc. (9)
R7: Ch 1, sc across. (9)
R8: Ch 1, inc, sc 7, inc. (11)
R9: Ch 1, sc across. (11)
R10: Ch 1, inc, sc 9, inc. (13)
R11: Ch 1, sc across. (13)
R12: Ch 1, inc, sc 11, inc. (15)
R13: Ch 1, sc across. (15)
R14: Ch 1, inc, sc 13, inc. (17)
R15: Ch 1, sc across. (17)
FO.
For the lower band, chain to match the teapot’s upper width. Work three sc rows and finish with slip stitches along the front edge.
Attach the pointed lid centrally above the lattice.
Step 5: Circular Hanging Loop
Yarn: Light lavender
R1: Ch 20, join into a ring. (20)
R2: Work 24 sc around the chain ring. (24)
R3: Sc around, join. (24)
FO, leaving 20 cm.
Flatten the lower attachment point and sew the ring to the lid tip. Reinforce the connection with matching thread because it carries the suspended towel’s weight.
Step 6: Curved Teapot Spout
Yarn: Light lavender
R1: Ch 9, sc in second ch and across. (8)
R2–R4: Ch 1, sc across. (8)
R5: Ch 1, inc, sc 6, inc. (10)
R6–R8: Ch 1, sc across. (10)
R9: Ch 1, inc, sc 8, inc. (12)
R10–R12: Ch 1, sc across. (12)
R13: Ch 1, dec, sc 8, dec. (10)
R14–R16: Ch 1, sc across. (10)
R17: Ch 1, dec, sc 6, dec. (8)
R18–R20: Ch 1, sc across. (8)
FO, leaving 30 cm.
Curve the strip upward, forming the teapot’s left-facing spout. Pin its lower section to the body and sew securely. Add a slip-stitch edging to emphasize the outer curve.
Step 7: Curved Teapot Handle
Yarn: Light lavender
R1: Ch 48.
R2: Sc in second ch and across. (47)
R3–R6: Ch 1, sc across. (47)
FO, leaving a long tail.
Fold the strip lengthwise and stitch the long edges together to form a rounded cord.
Shape it into a large C, attaching the upper end near the teapot shoulder and the lower end near its base.
Maintain approximately 4–5 cm of open space between the handle and body.
Step 8: Lower Towel-Support Bar
Yarn: Light lavender
R1: Ch 50, join into a ring. (50)
R2–R5: Sc around. (50 per round)
Join with sl st and FO.
Flatten the ring into a horizontal oval approximately 18 cm wide. Attach its upper sides beneath the teapot foundation.
The bar should remain visible at both ends of the folded towel. Add concealed reinforcement if the cotton structure bends under a dry towel.
Step 9: Large Purple Flowers
Make 6: two on the teapot, three on the towel, one on the lace.
Yarn: Dark violet and medium purple
Center
R1: With violet, 6 sc in MR. (6)
R2: Inc around. (12)
R3: Sc 1, inc ×6. (18)
R4: Sc around. (18)
Change to medium purple.
Five petals
R5: Sl st in next st, ch 3, 3 dc in next st, ch 3, sl st in next st. Work five petal groups around the center, spacing their anchor points as evenly as possible.
R6: Work approximately 5 sc around each petal edge.
FO, leaving 20 cm.
Use yellow crochet centers for the towel flowers and pearl-style beads for the two prominent decorative flowers.
Step 10: Small White Flowers
Make 2. Yarn: White and yellow
R1: With yellow, 6 sc in MR. (6)
R2: Inc around. (12)
Change to white.
R3: Sl st in next st, ch 3, 2 dc in next st, ch 3, sl st in next st ×6.
FO.
Position these flowers near the purple blossoms on the teapot. Keep their petals visible without covering too much lattice.
Step 11: Textured Green Leaves
Make 12–16. Yarn: Green
R1: Ch 10.
R2: Starting in second ch, sc, hdc, dc, dc, tr, dc, dc, hdc, sc. (9)
R3: On the opposite foundation side, sc, hdc, dc, dc, tr, dc, dc, hdc, sc. (9)
Join with sl st.
For a pointed tip, add ch 2 at the turning end. Surface-crochet slip stitches along the center to form a raised vein.
FO, leaving 15 cm.
Arrange larger leaves behind teapot flowers and smaller leaves around the towel blossoms.
Step 12: Purple Flower Buds
Make 4–6. Yarn: Purple and green
R1: With purple, 6 sc in MR. (6)
R2–R3: Sc around. (6)
R4: Sc 1, dec ×2. (4)
FO and close the opening.
Add a short green chain around each bud base. Leave yarn tails for attachment to embroidered stems.
Step 13: Floral Towel Decoration
Position three large purple flowers across the towel’s lower-middle section. The central blossom sits slightly higher than the outer flowers.
Sew green leaves beneath and between the flowers. Embroider thin branching stems with green yarn, extending upward toward several purple buds.
Attach each flower through its center and lower petal bases. Keep the outer petals raised.
Avoid tightening the embroidery enough to wrinkle the white towel.
Step 14: Purple Lace Towel Border
Yarn: Light lavender
Prepare the towel edge with evenly spaced blanket stitches.
R1: Sc evenly across the prepared edge.
R2: Ch 4, skip 3 sts, sc in next st across.
R3–R4: Ch 4 between successive sc anchors, maintaining aligned mesh openings.
R5: Work 3 dc in each chain space, with ch 2 between groups.
R6: Sc in next chain space, ch 3, 5 dc in following space, ch 3 across.
R7: Work 7 dc around each five-dc group to form scallops.
R8: Add slip stitches along the upper border and small chain picots at the lower points.
FO and weave in ends.
Block the lace flat to define the scalloped edge.
Step 15: Centered Lace Flower
Use the sixth large purple flower from Step 9.
Attach a pearl-style bead to its center and position two green leaves diagonally behind it.
Sew the arrangement onto the middle of the lace border. Keep the mesh openings visible around the flower.
The finished flower should remain centered when the towel hangs from the teapot.
Preparing the White Towel
Choose a white cotton towel approximately 35–40 cm wide and 45–55 cm long. These measurements are suggested because the photograph provides no scale reference.
Fold its upper edge over the crocheted support bar, forming soft, even gathers.
The front panel should hang beneath the teapot without covering the lattice.
Keep the towel removable for washing. If the towel is too heavy, select a thinner cotton fabric rather than stretching the crocheted bar.
The floral appliqués and lace edging should remain flat when the towel hangs vertically.
Assembly Instructions
- Join the body: Sew the open lattice to the lower foundation.
- Shape the sides: Attach both curved side strips.
- Install the lid: Center the pointed dome and lower band.
- Attach the loop: Reinforce the circular hanging ring.
- Position the spout: Sew it to the left side, curving upward.
- Attach the handle: Secure its upper and lower ends on the right.
- Install the towel bar: Center and reinforce the oval support beneath the body.
- Decorate the teapot: Sew purple flowers, white flowers, and green leaves into two asymmetrical clusters.
- Finish the towel: Attach the floral appliqués, embroidered stems, lace border, and centered flower.
- Complete the project: Weave in tails, inspect seams, and fold the towel over its support.
The finished assembly should hang vertically without twisting the teapot body.
Seven Technical Tips
- Lattice alignment: Mark the first and last anchors of each mesh row. A missing chain space will distort the rectangular grid.
- Lid proportion: Measure the lower lid band before attachment. A width difference exceeding 1 cm may make the dome appear off-center.
- Spout shaping: Pin the spout into its upward curve before sewing. A flat seam can cause its opening to point sideways.
- Hanging-loop strength: Reinforce the loop with several passes of matching thread. A weak attachment may stretch under towel weight.
- Handle clearance: Maintain approximately 4–5 cm between the handle and teapot body. A smaller opening reduces the recognizable teapot silhouette.
- Flower placement: Pin both floral clusters before sewing. Incorrect placement can conceal the lattice openings.
- Lace blocking: Shape individual scallops while drying flat. Excess stretching can create an uneven lower edge.
Maintenance and Cleaning
Remove the towel before washing. Hand-wash it in cool or lukewarm water with mild detergent, then press out moisture without twisting the lace.
Dry the towel flat and reshape its floral appliqués.
Clean the teapot holder separately. Remove any non-washable reinforcement before washing.
Inspect the hanging loop, flower attachments, and support bar regularly. Keep the decoration away from burners, open flames, and hot cookware.
Styling and Display Ideas
Hang the teapot against a plain wall or cabinet surface where the lavender lattice remains visible.
A neutral background emphasizes the purple flowers, green leaves, and white towel.
Center the towel beneath the teapot and distribute its folds evenly. Leave enough clearance for the scalloped border to hang freely.
For a coordinated kitchen display, repeat the same purple and green colors in other handmade accessories.
Avoid hanging multiple wet towels from the support bar, since excess weight can distort the crochet.
Common Problems and Solutions
Uneven lattice
Check that every mesh row contains six chain spaces and seven single-crochet anchors. Correct missing anchors before continuing.
Drooping spout
Add a firm slip-stitch edging along the outer curve. Concealed reinforcement may help maintain its shape.
Flat flower petals
Sew flowers through their centers and bases rather than every petal edge. Leave the outer petals free.
Sagging towel bar
Use a lighter towel or add removable reinforcement. Test the structure before hanging it permanently.
Curling lace
Check stitch spacing along the foundation. Reduce excess stitches if the border ripples, then block it flat.
Frequently Asked Questions
Is this pattern beginner-friendly?
It is best for intermediate crocheters familiar with shaped rows, mesh construction, and joining separate components.
What yarn works best?
Smooth DK cotton provides defined stitches and relatively stable openwork. The exact yarn used in the photograph is unknown.
Does the teapot require stuffing?
No. Its center is an open lattice, and the outer components form a flat decorative silhouette.
Can the towel be removed?
Yes. Fold the towel over the oval support bar rather than sewing it permanently to the holder.
Can I change the finished size?
Yes. Adjust yarn thickness, hook size, and component proportions together. Check the lattice dimensions before constructing the lid and handle.
Are the flowers made separately?
Yes. The proposed pattern uses individual crocheted flowers and leaves sewn onto the teapot and towel, with embroidered stems connecting the smaller buds.
Conclusion
The Purple Crochet Teapot Towel Holder combines a pointed lid, curved spout, open lattice, dimensional flowers, and a white towel finished with lavender scalloped lace. Its most important construction requirements are balanced proportions, secure attachments, and a reinforced towel-support bar.
Before displaying the finished piece, inspect every seam and test the hanging loop with a dry towel. Photograph the teapot against a plain background so the lattice and floral details remain visible.
Share your completed project on Pinterest or Instagram, tag CROCHIFY, and use #PurpleCrochetTeapotTowelHolder.
Would you keep the floral clusters asymmetrical, as pictured, or arrange them evenly across the teapot?