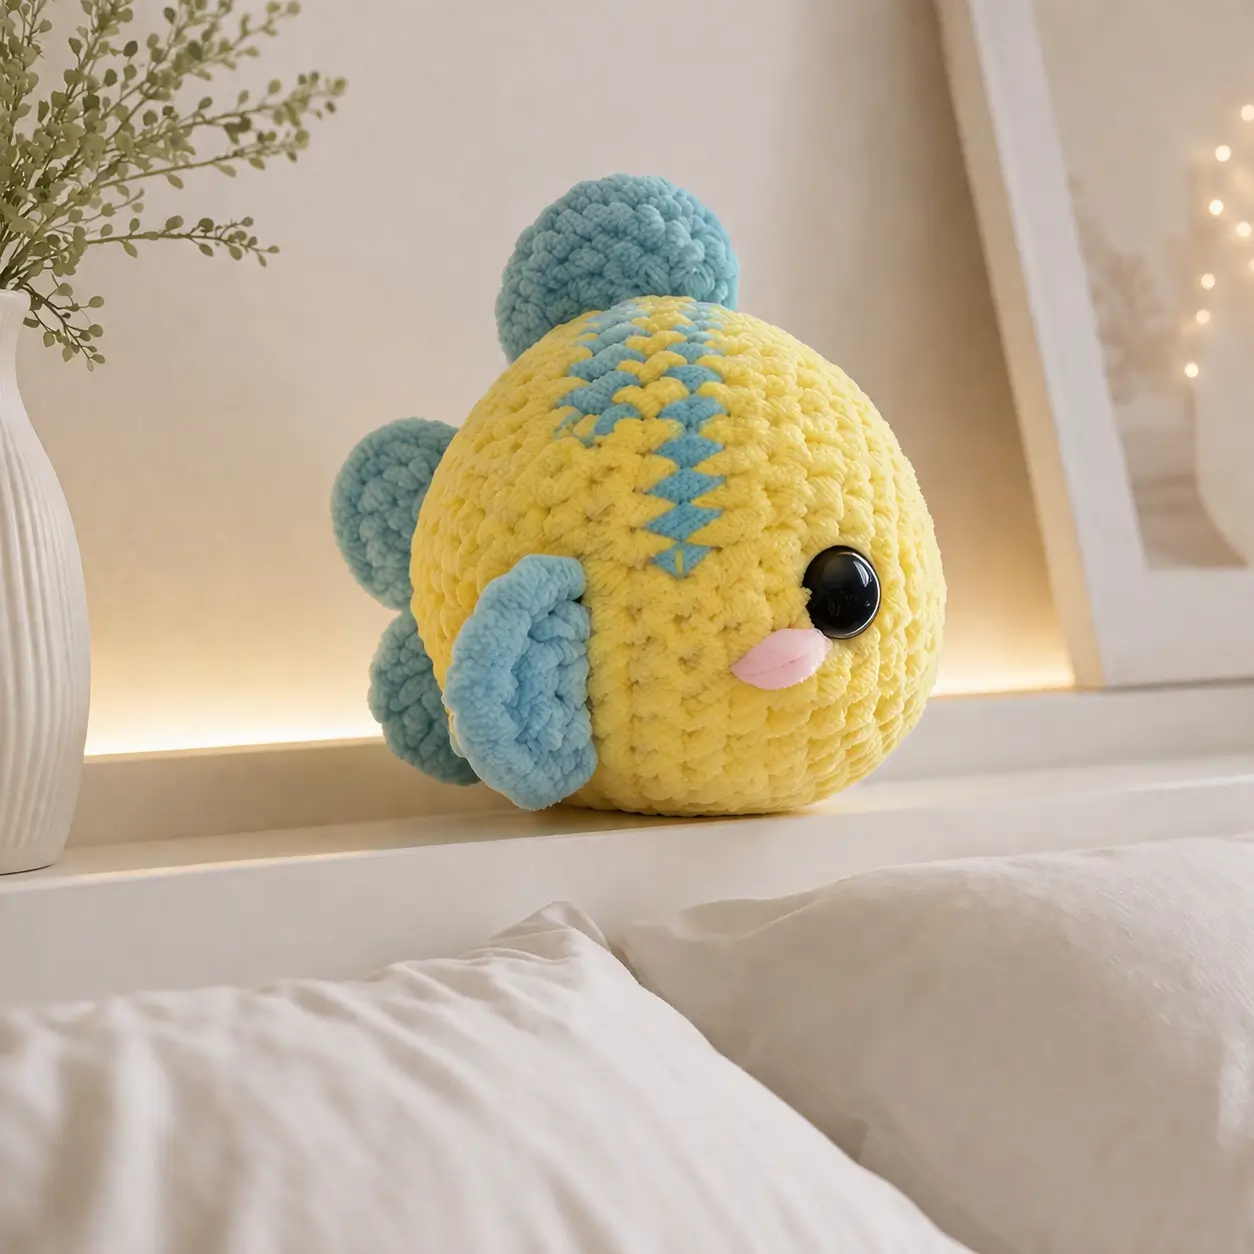
Pufferfish inflate into a sphere. That anatomical fact drives every choice in this puffer fish amigurumi crochet pattern. The photographed plush works best in chunky velvet yarn with a 4.5 mm hook, large safety eyes, and a medium-size body that lands near the common 9–12 cm pufferfish range seen across current patterns.
The Design: What Makes This Puffer Fish Different
This fish is not built around a long body and a narrow tail. It is closer to a stuffed sphere with fins attached to the side planes. That matters. A stretched oval loses the pufferfish silhouette fast. Current indexed patterns show two main approaches: a large round body with sewn fins, or a textured low-sew build with separate fin units.
The photo adds two decisions that alter the drafting. First, the side fins are oversized and sit forward, almost like cheek panels. Second, the dorsal stripe is not a fin row. It is surface colorwork laid over the crown. Third, the face sits low on the front hemisphere, not centered. That placement keeps the fish from reading as a generic ball plush. Many crochet fish plush tutorials skip that proportion issue. They place the eyes too high or push the fins too far back, and the result starts to resemble a bee, chick, or blob more than a blowfish amigurumi. Search results also show frequent DK builds, but this photographed version reads as a velvet yarn amigurumi fish instead.
Project Info at a Glance
| Skill Level | Time | Finished Size | Hook | Best For |
|---|---|---|---|---|
| Easy–Intermediate | 2.5–4 hours | approx. 12 cm wide in chunky velvet; verified pufferfish references commonly land near 9–12 cm | 4.5 mm for plush version; 3.0–3.5 mm documented on many DK versions | Desk plush, baby-mobile decor adaptation, ocean-theme gift |
Materials and Tools
Yarn
- Pastel yellow chenille — super bulky / plush — approx. 35 g — Himalaya Dolphin Baby–type substitute based on current plush pufferfish listings
- Light blue chenille — super bulky / plush — approx. 12 g — same yarn line for fins and stripe
- Pale pink felt or velvet scrap — very small amount — for cheek patches
- Black embroidery thread — small amount — for mouth detail
Tools
- Hook 4.5 mm
- Safety eyes 12 mm for a plush version
- Polyester stuffing
- Yarn needle
- Stitch markers
- Pins or clips
- Scissors
Abbreviations
MR / sc / inc / dec / sl st / ch / BLO / FO
Invisible decrease reduces bulk at taper rounds by pulling through front loops first, which matters in chenille because standard decreases leave a wider ridge.
Pattern — Step by Step
This is a custom photo-based pattern drafted for the plush shown above. It uses standard amigurumi sphere math rather than reproducing any single published pattern.
Head (Make 1)
Yarn: pastel yellow — Standard amigurumi math adapted to a medium sphere
R1: 6 sc in MR (6)
R2: inc x6 (12)
R3: (sc, inc) x6 (18)
R4: (2 sc, inc) x6 (24)
R5: (3 sc, inc) x6 (30)
R6: (4 sc, inc) x6 (36)
R7-R10: sc around (36)
Place the first eye between R8 and R9. Place the second eye with 8 stitches between them. On plush yarn, test the look before locking.
FO. Leave 20 cm tail.
Body (Make 1)
Yarn: pastel yellow — Standard amigurumi math adapted to a medium sphere
R1: 6 sc in MR (6)
R2: inc x6 (12)
R3: (sc, inc) x6 (18)
R4: (2 sc, inc) x6 (24)
R5: (3 sc, inc) x6 (30)
R6: (4 sc, inc) x6 (36)
R7-R12: sc around (36)
R13: (4 sc, dec) x6 (30)
R14: (3 sc, dec) x6 (24)
R15: (2 sc, dec) x6 (18)
Stuff firmly. The front half should stay spherical, not pear-shaped.
FO. Leave 24 cm tail.
Side Fins / Front Fins (Make 2)
Yarn: light blue — photo-based shaping, informed by separate-fin construction seen in current pufferfish tutorials
Ch 5.
Row 1: sc in 2nd ch from hook, sc 3, turn (4)
Row 2: ch 1, inc, sc 2, inc, turn (6)
Row 3: ch 1, sc 6, turn (6)
Row 4: ch 1, dec, sc 2, dec, turn (4)
Row 5: ch 1, sc 4 (4)
FO. Leave 18 cm tail.
Back Fin / Tail Fin (Make 1)
Yarn: light blue — photo-based short fin
Ch 6.
Row 1: sc in 2nd ch from hook, sc 4, turn (5)
Row 2: ch 1, dec, sc, dec, turn (3)
Row 3: ch 1, sc 3 (3)
FO. Leave 18 cm tail.
Dorsal Fin (Make 1)
Yarn: light blue
Ch 4.
Row 1: sc in 2nd ch from hook, sc 2, turn (3)
Row 2: ch 1, dec, sc, turn (2)
Row 3: ch 1, sc 2 (2)
FO. Leave 15 cm tail.
Lower Rear Fin (Make 1)
Yarn: light blue
Ch 4.
Row 1: sc in 2nd ch from hook, sc 2, turn (3)
Row 2: ch 1, sc 3, turn (3)
Row 3: ch 1, dec, sc (2)
FO. Leave 15 cm tail.
Crown Stripe Appliqué (Make 1)
Yarn: light blue — photo-based diamond strip
Ch 7.
Row 1: sc in 2nd ch from hook and across (6)
Row 2: ch 1, dec, sc 2, dec (4)
Row 3: ch 1, inc, sc 2, inc (6)
Row 4: ch 1, dec, sc 2, dec (4)
Row 5: ch 1, inc, sc 2, inc (6)
FO. Leave 20 cm tail.
Cheek Patches (Make 2)
Yarn: pale pink felt or thin velvet scrap
R1: 6 sc in MR (6)
Sl st to first st.
Flatten into a soft oval before sewing or glueing.
Mouth Detail (Make 1)
Yarn: black embroidery thread
Embroider one short horizontal line centered one round below eye level.
Assembly
- Sew the head to the body using the long tails. Match the 36-stitch edges evenly.
- Stuff more before closing the last third of the seam if the sphere has flattened.
- Attach the side fins at the seam line, slightly forward of center, with the lower edges angled down.
- Sew the back fin to the rear midpoint.
- Add the dorsal fin on the upper rear curve.
- Add the lower rear fin opposite the dorsal fin for balance.
- Pin the crown stripe from forehead to upper back and sew with small ladder stitches.
- Sew or attach the cheek patches directly below the eyes.
- Embroider the mouth between the cheek patches.
- Weave in all tails inside the stuffing core and shape the fish into a clean sphere.
The finished plush should sit as a rounded pufferfish with the fins acting as side stabilizers.
7 Technical Tips
- Use one marker at every increase round. Losing the first stitch on chenille yarn shifts the seam and throws off eye symmetry by a full stitch.
- Pack the lower body harder than the upper body. A loose base collapses and the fish rolls forward instead of resting on its underside.
- Keep invisible decreases loose on velvet yarn. Pulling too tight can snap pile fibers and leave a bald notch at the taper rounds.
- Install the eyes before the last third of stuffing. Forced placement through dense fill can stretch the stitch holes and tilt the washers.
- Do not oversize the side fins. On a 36-stitch plateau, fins wider than 6 stitches start to hide the cheek patches.
- Pin the crown stripe before sewing. Even a 3 mm drift off center is visible because the photographed fish uses that stripe as its main top-line detail.
- Bury tails into the stuffing core, not under surface stitches. Chenille friction is low, and shallow weaving can work loose after handling.
Conclusion
This puffer fish amigurumi crochet pattern works because the shaping stays disciplined. Sphere first. Fins second. Face low. Stripe centered. Current live pattern listings show pufferfish projects across DK, worsted, and plush yarns, but the photographed toy reads best as a chenille build with a compact round profile and oversized cheek fins. Next, swatch one eye placement on the head piece before locking both washers. Then photograph the finished plush for Pinterest and Instagram using #PufferFishVelvetPlush. One useful question remains: did you keep the side fins slightly forward, or did they drift back and change the whole pufferfish silhouette?









