Introduction
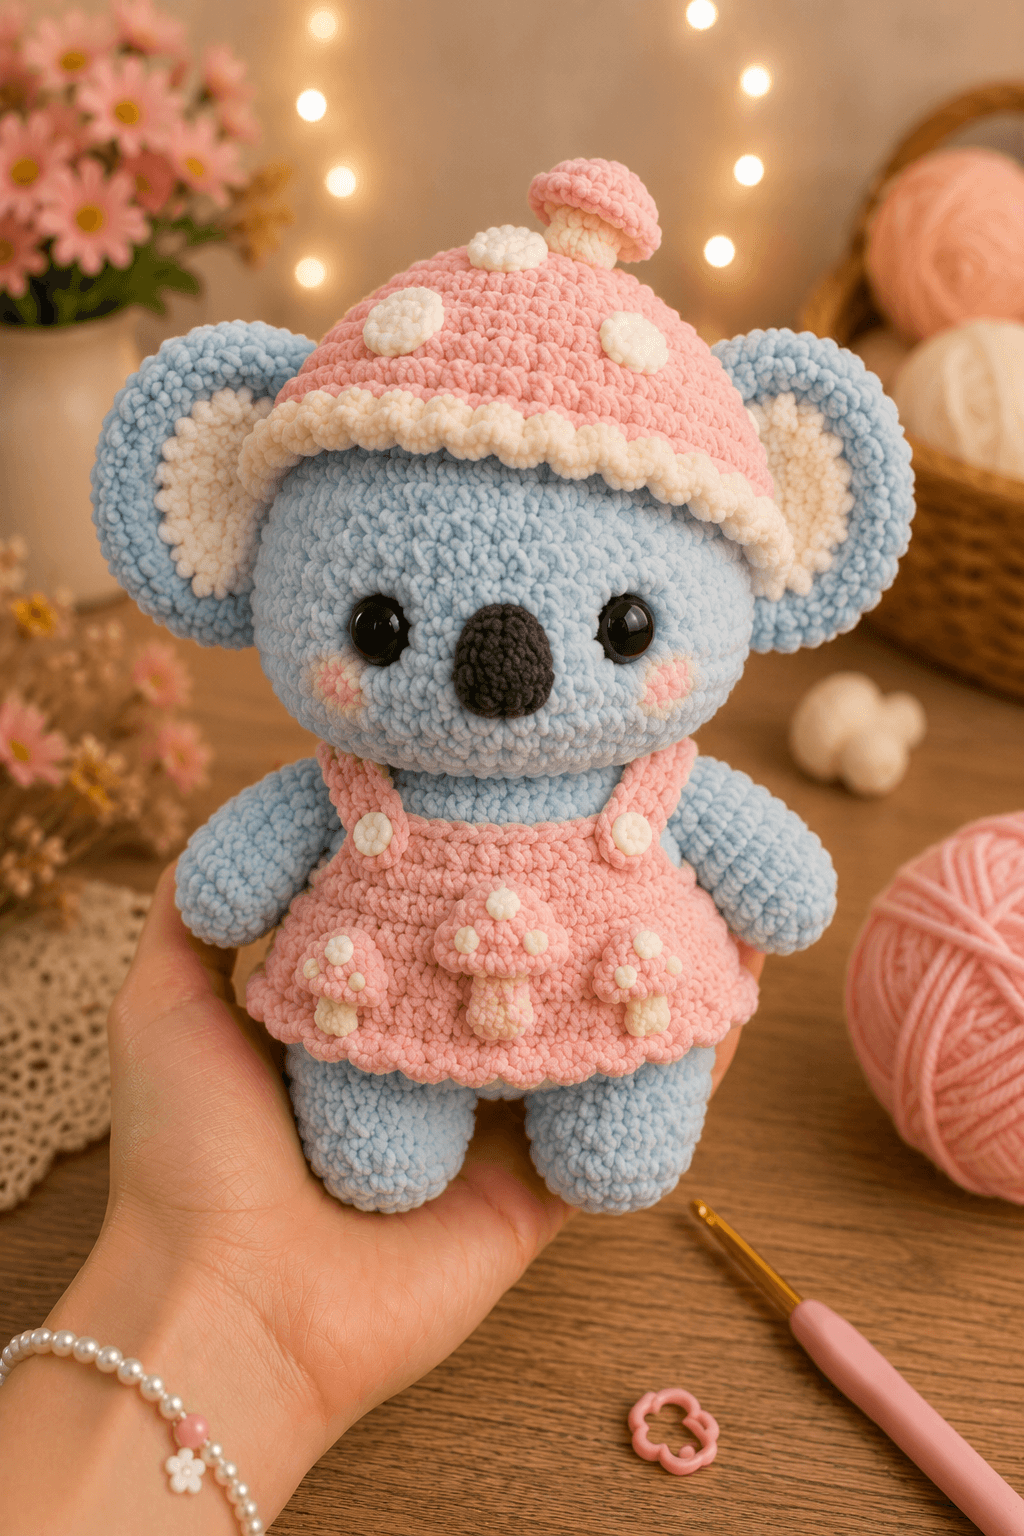
A koala’s ears extend beyond the width of its head, so the hat cannot be shaped like a standard amigurumi cap. This koala amigurumi crochet pattern uses bulky chenille yarn, a 5.5 mm hook, and 14 mm safety eyes to create an approximately 27 cm seated figure. The project is intermediate level and includes a removable mushroom hat, a flared pinafore dress, and five small mushroom appliqués.
The Design: What Makes This Mushroom Koala Different
The head reaches a 36-stitch plateau, but the oversized layered ears add most of the character’s width. Each ear combines a blue outer circle with an ivory inner panel. Folding the lower edge slightly creates the shallow cup associated with a koala ear without adding wire.
A broad oval nose is worked as a separate stuffed piece. Sewing it vertically between the eyes keeps the face recognizably koala-shaped; a round nose would read more like a bear. The compact body and low back legs support the large head, while the pink mushroom dress adds width around the lower torso.
The hat is a separate accessory with an open lower edge. Its shallow crown rests between the ears rather than covering them. A common error in a dressed koala amigurumi is making the hat circumference equal to the full head circumference. That produces a cap too deep for the ear placement and pushes the safety eyes downward.
Project Info at a Glance
| Skill Level | Working Time | Finished Size | Hook | Construction |
|---|---|---|---|---|
| Intermediate | 10–13 hours | Approximately 27 cm seated | 5.5 mm | Continuous spirals with sewn accessories |
Published koala patterns range from about 14 cm to 27 cm depending on yarn and hook choice. A Ravelry-listed koala made with a 3.5 mm hook measures approximately 27 cm, while a current chunky koala tutorial pairs velvet yarn with a 5.5 mm hook. These references support the scale selected for the photographed plush design: 27 cm koala reference and chunky koala materials reference.
Materials and Tools
Yarn
- Powder blue — CYC #5 bulky chenille — approximately 145 g — body, head, limbs, and outer ears
- Soft pink — CYC #5 bulky chenille — approximately 90 g — dress, shoulder straps, hat, and mushroom caps
- Ivory — CYC #5 bulky chenille — approximately 35 g — inner ears, hat trim, spots, buttons, and mushroom stems
- Charcoal — CYC #4 worsted or thin chenille — approximately 12 g — nose
- Blush pink — DK yarn or embroidery thread — approximately 2 g — cheek patches
Tools
- 5.5 mm crochet hook
- 14 mm safety eyes
- Polyester stuffing
- Yarn needle
- Locking stitch markers
- Dressmaking pins
- Scissors
Current chunky koala patterns commonly specify 12–14 mm safety eyes. The photographed head supports the upper end of that range. Safety eyes are not suitable for toys intended for children under three years old; embroider the eyes for a young child’s toy. See the chenille koala eye-size reference.
Abbreviations
- MR — magic ring
- sc — single crochet
- hdc — half double crochet
- dc — double crochet
- inc — two single crochet stitches in one stitch
- dec — invisible decrease
- sl st — slip stitch
- ch — chain
- BLO — back loop only
- FLO — front loop only
- FO — fasten off
For an invisible decrease, insert the hook through the front loops of the next two stitches, yarn over, pull through both front loops, then complete one single crochet.
Pattern — Step by Step
Work in a continuous spiral unless a section states that rows are joined or turned. Mark the first stitch of every round.
Head
Yarn: powder blue. The 6-to-36 expansion follows standard amigurumi sphere construction; a published koala head also uses six-stitch increase and decrease stages. Reference: koala head construction.
R1: 6 sc in MR (6)
R2: inc ×6 (12)
R3: (sc, inc) ×6 (18)
R4: (2 sc, inc) ×6 (24)
R5: (3 sc, inc) ×6 (30)
R6: (4 sc, inc) ×6 (36)
R7–R13: sc around (36)
R14: (4 sc, dec) ×6 (30)
Place the safety eyes between R10 and R11 with approximately eight visible stitches between their inner edges. Attach the washers before adding the nose.
R15: (3 sc, dec) ×6 (24)
R16: (2 sc, dec) ×6 (18)
Stuff the head firmly. Add small pieces around the safety-eye stems to prevent shallow dents.
R17: (sc, dec) ×6 (12)
R18: dec ×6 (6)
Fasten off. Leave a 20 cm tail, pass it through the front loops of the final six stitches, and close the opening.
Body
Yarn: powder blue.
R1: 6 sc in MR (6)
R2: inc ×6 (12)
R3: (sc, inc) ×6 (18)
R4: (2 sc, inc) ×6 (24)
R5: (3 sc, inc) ×6 (30)
R6: (4 sc, inc) ×6 (36)
R7–R10: sc around (36)
R11: (4 sc, dec) ×6 (30)
R12: sc around (30)
R13: (3 sc, dec) ×6 (24)
R14–R15: sc around (24)
R16: (2 sc, dec) ×6 (18)
Stuff the lower body firmly and the upper body moderately. Keep the base flat while adding stuffing.
R17: (sc, dec) ×6 (12)
R18: dec ×6 (6)
Fasten off. Leave a 35 cm tail for attaching the body to the head.
Arms — Make 2
Yarn: powder blue.
R1: 6 sc in MR (6)
R2: inc ×6 (12)
R3–R5: sc around (12)
R6: (2 sc, dec) ×3 (9)
R7–R10: sc around (9)
R11: (sc, dec) ×3 (6)
Stuff the paw and lower arm. Leave the final two rounds unstuffed so the arm can lie flat against the torso.
Flatten the opening and work 3 sc through both layers. Fasten off and leave a 25 cm sewing tail.
Back Legs — Make 2
Yarn: powder blue.
R1: 6 sc in MR (6)
R2: inc ×6 (12)
R3: (sc, inc) ×6 (18)
R4–R6: sc around (18)
R7: (sc, dec) ×6 (12)
R8–R11: sc around (12)
R12: dec ×6 (6)
Stuff each foot firmly. Add less stuffing near the final round so the top can be sewn flat beneath the dress.
Fasten off and leave a 30 cm tail.
Outer Ears — Make 2
Yarn: powder blue. Koala patterns commonly use broad circular or semicircular ear pieces rather than narrow pointed ears. Reference: koala ear construction reference.
R1: 6 sc in MR (6)
R2: inc ×6 (12)
R3: (sc, inc) ×6 (18)
R4: (2 sc, inc) ×6 (24)
R5: sc around (24)
R6: (2 sc, dec) ×6 (18)
R7: sc around (18)
Do not stuff. Flatten each ear lightly without folding it fully in half. Fasten off and leave a 35 cm sewing tail.
Inner Ear Panels — Make 2
Yarn: ivory. Work in turned rows.
Ch 3.
Row 1: 2 sc in the second ch from the hook (2)
Row 2: ch 1, turn, inc in each stitch (4)
Row 3: ch 1, turn, inc, 2 sc, inc (6)
Row 4: ch 1, turn, inc, 4 sc, inc (8)
Row 5: ch 1, turn, inc, 6 sc, inc (10)
Row 6: ch 1, turn, sc across (10)
Fasten off and leave a 20 cm tail. Sew one panel to the front of each blue ear, leaving an even blue border around the curved edge.
Nose
Yarn: charcoal. Work around both sides of the foundation chain to create an oval.
Ch 5.
R1: Starting in the second ch from the hook, 3 sc, 3 sc in the final ch, continue along the opposite side with 2 sc, inc (10)
R2: inc, 2 sc, inc ×3, 2 sc, inc ×2 (16)
R3: sc around (16)
R4: (2 sc, dec) ×4 (12)
Add a small amount of stuffing. The finished nose should retain an oval profile rather than forming a ball.
Fasten off and leave a 30 cm tail for sewing.
Cheek Patches — Make 2
Yarn: blush pink. Use DK yarn with a 3 mm hook when a flatter patch is preferred.
R1: 6 sc in MR (6)
R2: inc ×6 (12)
Slip stitch into the next stitch. Fasten off and leave a 15 cm sewing tail. Do not stuff.
Optional Tail
Yarn: powder blue. The tail is hidden by the dress in the supplied image, but a small koala tail can be added for balance.
R1: 6 sc in MR (6)
R2: inc ×6 (12)
R3–R4: sc around (12)
R5: dec ×6 (6)
Stuff lightly. Fasten off and leave a 20 cm sewing tail.
Pinafore Dress Bodice
Yarn: soft pink. Work in joined rounds. Check the band against the stuffed body before adding the skirt.
Ch 31. Join with a sl st to form a ring, taking care not to twist the chain.
R1: ch 1, sc around, join with sl st (30)
R2–R5: ch 1, sc around, join with sl st (30)
R6: ch 1, sc around in FLO, join with sl st (30)
Do not fasten off. Continue directly into the skirt.
Flared Dress Skirt
Continue with soft pink yarn.
R7: ch 1, (4 sc, inc) ×6, join with sl st (36)
R8: ch 1, sc around, join with sl st (36)
R9: ch 1, (5 sc, inc) ×6, join with sl st (42)
R10–R12: ch 1, sc around, join with sl st (42)
R13: ch 1, (sl st, 4 dc in next stitch, sl st in next stitch) ×14
Fasten off and weave the tail into the inside of the skirt. The final shell round forms the scalloped hem shown in the photo.
Shoulder Straps — Make 2
Yarn: soft pink. Work in turned rows.
Ch 15.
Row 1: Starting in the second ch from the hook, 14 sc (14)
Row 2: ch 1, turn, 14 sc (14)
Fasten off and leave a 20 cm tail at each end. Adjust the starting chain by two stitches when the body gauge differs from the listed size.
Dress Buttons — Make 2
Yarn: ivory.
R1: 6 sc in MR (6)
Slip stitch into the first stitch. Fasten off and leave a 12 cm sewing tail.
Mushroom Hat Crown
Yarn: soft pink. Work in joined rounds so the lower edge remains level.
R1: 6 sc in MR, join (6)
R2: ch 1, inc ×6, join (12)
R3: ch 1, (sc, inc) ×6, join (18)
R4: ch 1, (2 sc, inc) ×6, join (24)
R5: ch 1, (3 sc, inc) ×6, join (30)
R6: ch 1, sc around, join (30)
R7: ch 1, (4 sc, inc) ×6, join (36)
R8: ch 1, sc around in BLO, join (36)
R9: ch 1, (4 sc, dec) ×6, join (30)
Fasten off. The BLO round creates the bend between the rounded crown and the lower brim.
Ivory Hat Trim
Yarn: ivory.
Join ivory yarn to any unworked front loop from R8. Work (sl st, 3 hdc in the next loop, sl st in the next loop) around the hat edge.
Fasten off and weave the tail into the underside of the brim.
Hat Stem and Small Top Cap
Begin with ivory yarn.
R1: 6 sc in MR (6)
R2: inc ×6 (12)
R3–R5: sc around (12)
R6: dec ×6 (6)
Stuff the stem firmly. Change to soft pink for the cap.
R7: inc ×6 (12)
R8: (sc, inc) ×6 (18)
R9: sc around (18)
R10: (sc, dec) ×6 (12)
R11: dec ×6 (6)
Stuff the cap lightly. Fasten off, close the opening, and leave a 25 cm tail. Sew the base of the stem to the center of the main hat.
Hat Spots — Make 4
Yarn: ivory.
R1: 6 sc in MR (6)
R2: inc ×6 (12)
Slip stitch into the next stitch. Fasten off and leave a 15 cm sewing tail. For size variation, stop after R1 on two of the spots.
Large Center Mushroom Appliqué
Begin with ivory yarn for the stem.
Ch 5.
Row 1: Starting in the second ch from the hook, 4 sc (4)
Row 2–R4: ch 1, turn, 4 sc (4)
Fasten off. Join soft pink yarn to the upper edge.
Cap Row 1: ch 1, inc, 2 sc, inc (6)
Cap Row 2: ch 1, turn, inc, 4 sc, inc (8)
Cap Row 3: ch 1, turn, sc across (8)
Fasten off and leave a 25 cm tail. Sew one small ivory spot to the cap before attaching the mushroom to the dress.
Side Mushroom Appliqués — Make 4
Begin with ivory yarn for each stem.
Ch 4.
Row 1: Starting in the second ch from the hook, 3 sc (3)
Row 2–R3: ch 1, turn, 3 sc (3)
Fasten off. Join soft pink yarn to the upper edge.
Cap Row 1: ch 1, inc, sc, inc (5)
Cap Row 2: ch 1, turn, inc, 3 sc, inc (7)
Cap Row 3: ch 1, turn, sc across (7)
Fasten off and leave a 20 cm tail. Add one or two small ivory spots to each cap.
Tiny Mushroom Spots
Yarn: ivory.
For each spot, make 5 sc in an MR and close the ring tightly. Slip stitch to the first stitch, fasten off, and leave a short sewing tail.
Assembly
- Center the head over the body and pin the neck seam in four places. Sew through both pieces twice, adding a final layer of stuffing beneath the chin before closing the seam.
- Place the ears between R4 and R10 of the head. Their outer edges should extend beyond the head by approximately 4 cm, and their lower edges should sit level with the eyes.
- Position the safety eyes first, then pin the charcoal nose vertically between them. Sew around the nose while adding a small amount of stuffing beneath its center.
- Attach one blush cheek patch beneath each eye. Leave approximately one visible blue stitch between the patch and the nose seam.
- Sew the arms to the upper sides of the body, about two rounds below the neck. Angle the hands inward so they rest against the dress.
- Attach the back legs beneath the body with four to six visible stitches between them. Set the koala on a flat surface before tightening the final stitches.
- Place the dress around the body and close any remaining gap at the back. Cross the shoulder straps slightly toward the rear, then sew the ivory buttons over the front strap ends.
- Arrange the large mushroom at the center of the skirt and place two smaller mushrooms on each side. Pin all five pieces before sewing so the design remains balanced across the curved fabric.
- Position the optional tail at the center back beneath the skirt. Sew the mushroom spots to the hat and attach the stuffed top stem to the crown.
- Set the hat between the ears with the ivory trim resting above the forehead. Tack it to the head at three hidden points when a fixed accessory is preferred, then weave every tail through at least 3 cm of stuffed fabric.
The completed koala should rest on both back feet with the body upright and the hat centered between the ear bases.
7 Technical Tips
- Round-marker drift: Missing the first stitch can rotate the eye line by several stitches before the head reaches R13. Move the marker immediately after making the first stitch of every round.
- Soft neck joint: Loose stuffing beneath the chin causes the 36-stitch head to lean after the hat is attached. Pack the upper body until it resists light finger pressure, then add a final piece of stuffing during assembly.
- Visible decrease holes: Standard decreases separate the chenille fibers and expose the inner cord. Work each decrease through the front loops and keep the working loop close to the 5.5 mm hook shaft.
- Late eye placement: Safety-eye washers become difficult to attach once the head decreases below 30 stitches. Install both eyes after R14 and check their spacing before adding stuffing.
- Flattened ear rims: Sewing through both ear layers around the full circumference removes the cupped profile. Attach only the lower third of each ear and leave the upper edge free.
- Uneven skirt hem: A twisted foundation chain makes one side of the pinafore rise above the other. Place the chain ring on a flat surface and check every chain before joining it.
- Loose appliqué tails: Small mushroom spots can detach when their ends are hidden only beneath the dress fabric. Pass each tail through the stuffed body or knot paired tails on the concealed side of the garment.
Conclusion
Check the finished koala from the front before fixing the hat to the head. Both inner-ear panels should remain visible, the nose must sit on the vertical center line, and the dress straps should meet the bodice at matching heights. Measure the completed figure and record the yarn brand, hook size, and seated height before beginning a second version because chenille thickness varies between manufacturers. Save the finished project to Pinterest and share the mushroom arrangement on Instagram with #MushroomKoala. The next practical step is to pin all five dress appliqués without sewing them, then compare their spacing in a front-facing photograph. Which mushroom should remain the visual center: the tall middle piece or one of the side clusters?









