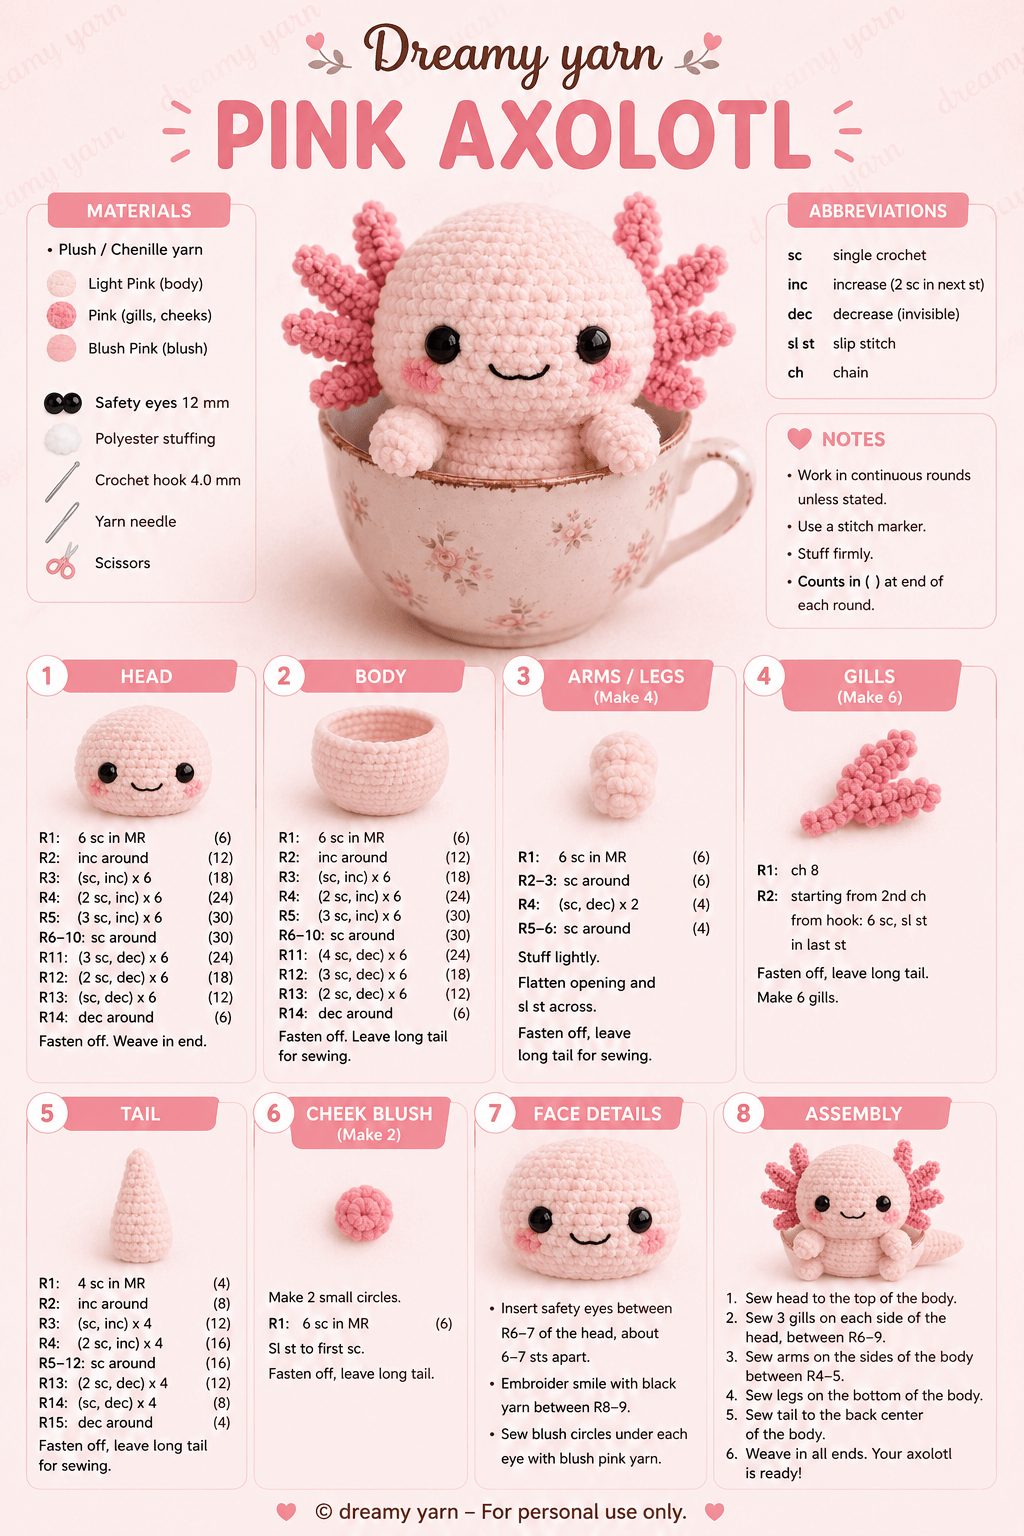
An axolotl stops looking like an axolotl the moment the side gills sit too high above the eyes. This pink axolotl crochet pattern keeps the head low, the gills broad, and the body compact so the shape reads clearly even inside a teacup display. It uses plush chenille yarn, a 4.0 mm hook, and a simple round construction suited to an intermediate maker making decor, a gift, or a market plush.
The Design: What Makes This Axolotl Different
This version is built for a cup-top pose rather than a flat standing plush. The head is almost as wide as the body, which matters because axolotls read through head shape first and limb structure second. The six external gills are sewn as separate pieces instead of being worked as surface loops. That choice gives better control over angle and spacing. Published axolotl patterns commonly use six external gill pieces placed around the side of the head, centered to the eye line, and that layout matches the photographed style. :contentReference[oaicite:12]{index=12}
The second structural choice is the compressed body. A longer torso would look more salamander-like, but this cup display benefits from a shorter build that sits visibly above the rim. The cheeks are separate blush circles rather than embroidery alone, which gives more contrast on plush yarn. A common mistake in an axolotl amigurumi crochet pattern is crowding the gills too close to the crown. Then the animal reads more like a frilled doll head than a resting amphibian.
Project Info at a Glance
| Skill Level | Time | Finished Size | Hook | Best For |
|---|---|---|---|---|
| Intermediate | 3–5 hours | Approx. 11–13 cm plush | 4.0 mm | Teacup decor, desk display, handmade gift |
Axolotl patterns in the market range from very small cotton minis to chunky plush versions. Supergurumi’s small cotton example uses a 2.5 mm hook and finishes at 5.5 cm sitting height, while chunky marketplace versions scale up with thicker yarn and larger hooks. :contentReference[oaicite:13]{index=13}
Materials and Tools
Yarn
- Light pink — plush / chenille — main body and limbs
- Pink — plush / chenille — gills and cheeks
- Blush pink — plush / chenille or smooth scrap yarn — blush accent if a lighter shade is preferred
Tools
- Hook 4.0 mm
- Safety eyes 12 mm
- Polyester stuffing
- Yarn needle
- Scissors
- Stitch marker
The uploaded pattern card specifies plush chenille yarn, 12 mm safety eyes, polyester stuffing, and a 4.0 mm hook. Broader axolotl pattern references show that hook and eye size shift sharply with yarn bulk, which is why this plush build cannot be scaled from a fine-cotton pattern without changing proportions. :contentReference[oaicite:14]{index=14}
Abbreviations
- MR = magic ring
- sc = single crochet
- inc = increase
- dec = decrease
- sl st = slip stitch
- ch = chain
Use invisible decrease on all closing rounds. Plush yarn softens edges, but standard decreases still create ridges on pale rounded parts.
Pattern — Step by Step
Continuous spiral unless noted. The stitch counts below follow the photographed pattern card and standard amigurumi math.
Head (Make 1)
Yarn: light pink — Source: uploaded image text
R1: 6 sc in MR (6)
R2: inc around (12)
R3: (sc, inc) x 6 (18)
R4: (2 sc, inc) x 6 (24)
R5: (3 sc, inc) x 6 (30)
R6-R10: sc around (30)
R11: (3 sc, dec) x 6 (24)
R12: (2 sc, dec) x 6 (18)
R13: (sc, dec) x 6 (12)
R14: dec around (6)
Insert safety eyes between R6 and R7, about 6–7 stitches apart. Stuff firmly before the final decrease round.
Fasten off. Weave in end.
Body (Make 1)
Yarn: light pink — Source: uploaded image text
R1: 6 sc in MR (6)
R2: inc around (12)
R3: (sc, inc) x 6 (18)
R4: (2 sc, inc) x 6 (24)
R5: (3 sc, inc) x 6 (30)
R6-R10: sc around (30)
R11: (3 sc, dec) x 6 (24)
R12: (2 sc, dec) x 6 (18)
R13: (sc, dec) x 6 (12)
R14: dec around (6)
Leave a long tail for sewing. Stuff firmly but keep the top surface slightly flatter than the lower half.
Fasten off.
Arms / Legs (Make 4)
Yarn: light pink — Source: uploaded image text
R1: 6 sc in MR (6)
R2-R3: sc around (6)
R4: (sc, dec) x 2 (4)
R5-R6: sc around (4)
Stuff lightly. Flatten opening and slip stitch across.
Fasten off. Leave long tail for sewing.
Gills (Make 6)
Yarn: pink — Source: uploaded image text
R1: ch 8
R2: starting from 2nd ch from hook: 6 sc, sl st in last st
Make 6 identical gills. Leave long tails for sewing. External gills are the load-bearing visual feature of an axolotl, and six separate side pieces are a common published solution. :contentReference[oaicite:15]{index=15}
Fasten off.
Tail (Make 1)
Yarn: light pink — Source: uploaded image text
R1: 4 sc in MR (4)
R2: inc around (8)
R3: (sc, inc) x 4 (12)
R4: (2 sc, inc) x 4 (16)
R5-R12: sc around (16)
R13: (2 sc, dec) x 4 (12)
R14: (sc, dec) x 4 (8)
R15: dec around (4)
Stuff only the thicker front half. The tip should stay soft enough to angle outward.
Fasten off. Leave long tail for sewing.
Cheek Blush (Make 2)
Yarn: blush pink — Source: uploaded image text
R1: 6 sc in MR (6)
sl st to first sc
Make 2 small flat circles. Do not stuff.
Fasten off. Leave long tail.
Face Details
Yarn: black embroidery thread or black yarn scrap — Source: uploaded image text
Embroider the smile between R8 and R9. Keep the mouth shallow and centered. Place the blush circles under each eye after the eyes are locked so the cheeks do not distort the eye spacing.
Assembly
- Sew the head to the top of the body.
- Sew 3 gills on each side of the head, placed between R6 and R9.
- Sew the arms to the sides of the body between R4 and R5.
- Sew the legs to the lower body so the plush sits forward when placed in a cup.
- Attach the tail at the back center of the body.
- Insert and secure the safety eyes if not already done.
- Embroider the smile between R8 and R9 of the head.
- Sew one blush circle under each eye.
- Check the gill spread from the front and rotate any piece that tilts upward too sharply.
- Weave in all ends and place the axolotl into the cup.
The finished piece should sit with the head fully visible above the cup rim and the gills fanning outward rather than backward.
7 Technical Tips
- Mark the first stitch of every round. Plush yarn hides round transitions, and one missed round on the head can shift the eye line noticeably.
- Insert the safety eyes before closing the head. On a 30-stitch plateau, reopening plush fabric after stuffing usually leaves visible fiber drag.
- Keep the gills low on the sides of the head. If the top gill starts above the eye line, the face loses the classic axolotl silhouette.
- Use invisible decrease on the final three head rounds and final three body rounds. Standard decreases leave corners that catch light on pale chenille.
- Stuff the body firmer than the limbs. Soft limbs are fine, but a soft body sinks too deep into the cup and hides the face.
- Pin all six gills before sewing any of them permanently. Even a 3–4 mm height mismatch between sides is obvious from the front.
- Weave tails through at least three internal direction changes. Chenille yarn sheds and slips more easily than smooth cotton, especially on small appendages.
Conclusion
This pink axolotl crochet pattern depends on placement more than complexity. Keep the head round, the gills low, the limbs small, and the tail restrained, and the character will read clearly from the front. Start by finishing the head and pinning one full side of gills before sewing the body pieces together. Share the finished project on Pinterest and Instagram with one straight-on cup shot and one side view to show the gill spread. Hashtag: #PinkTeacupAxolotl. Did you angle your top gills outward, or did you keep the full fan almost horizontal?









