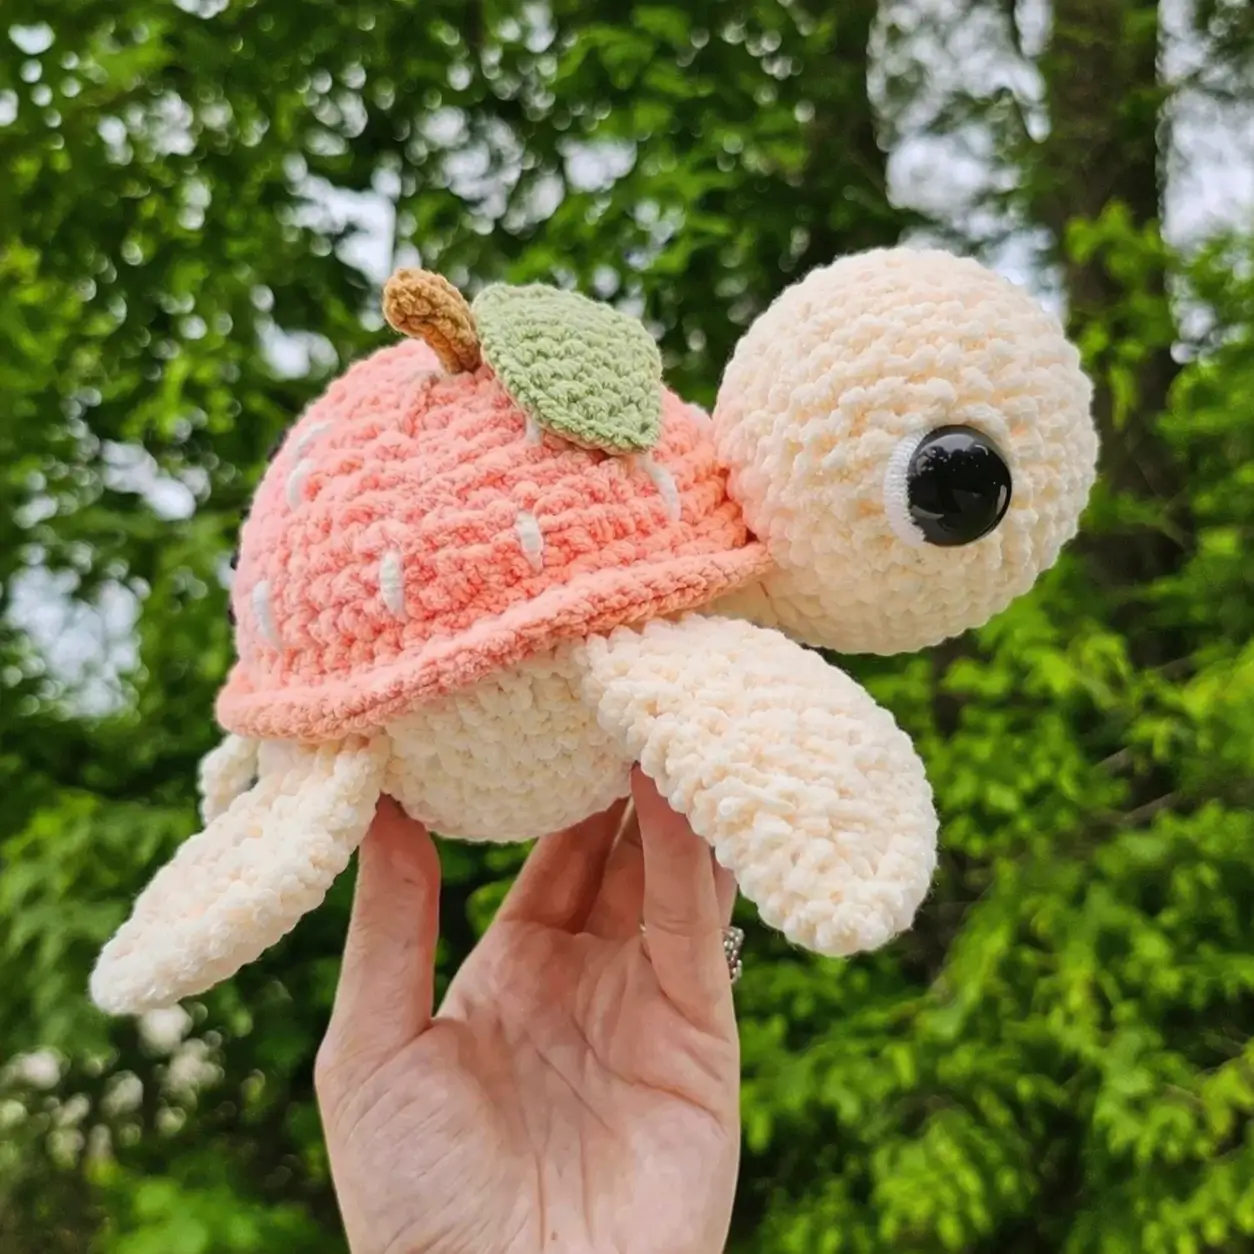
A peach shell needs a brim, a stem, and one leaf, or the turtle reads as generic. This peach turtle amigurumi crochet pattern is built for plush chenille yarn, uses a 4.5 mm hook, finishes at roughly 15 cm long, and suits an advanced beginner to intermediate maker. It works well as a desk plush or market sample because the fruit detail changes the silhouette without changing the base anatomy.
The Design: What Makes Peach Turtle Different
The shell cannot be treated like a standard dome. A peach reads from its cap line first, so this version uses a separate shell piece with a slight flare at the edge to create that lifted fruit-rind look. The stem and leaf then break the top center, which stops the shell from looking like a plain pastel turtle back.
Proportion matters more here than color. The head is kept round and slightly oversized, because fruit turtle designs tend to lose character when the shell takes over the whole figure. Flat, paddle-like flippers also help. They keep the plush low and wide, which is closer to the sea-turtle profile seen in popular chenille turtle amigurumi and fruit turtle amigurumi variants. A common mistake is placing the shell too low on the body. That hides the neck join and makes the peach brim collapse into the flippers.
Project Info at a Glance
| Skill Level | Time | Finished Size | Hook | Best For |
|---|---|---|---|---|
| Advanced beginner / intermediate | 2.5–4 hours | approx. 15.2 cm long | 4.5 mm | Plush gifts, market stock, fruit-animal collections |
Finished-size and hook benchmarks come from published peach turtle and chenille turtle sources; the pattern below is a custom photo-based draft.
Materials and Tools
Yarn
- Ivory / cream — super bulky chenille — about 40 g of the total plush-yarn allotment — Premier Parfait Chunky or similar chenille-style yarn is a close match to this texture.
- Peach pink — super bulky chenille — about 30 g from the same total allotment — use the same base yarn for shell consistency.
- Light green — super bulky chenille or lighter smooth yarn — small amount for leaf
- Brown — small amount for stem
- White — small amount for shell highlight embroidery or optional cheek circles
Tools
- Hook 4.5 mm
- 12 mm safety eyes for a smaller plush benchmark; the photographed sample looks visually larger-eyed, so size up only if your head comes out wider
- Stuffing
- Yarn needle
- Stitch markers
Abbreviations
MR = magic ring
sc = single crochet
inc = increase
dec = invisible decrease
sl st = slip stitch
ch = chain
BLO = back loop only
FLO = front loop only
Invisible decrease reduces bulk at the front of plush pieces and gives a cleaner face line than a standard decrease in chenille yarn.
Pattern — Step by Step
Continuous spiral unless noted. This is a custom pattern drafted from the photo using standard amigurumi stitch math and verified plush-turtle material benchmarks.
Head (Make 1)
Yarn: ivory — photo-based adaptation using standard amigurumi math
R1: 6 sc in MR (6)
R2: inc x6 (12)
R3: (sc, inc) x6 (18)
R4: (2 sc, inc) x6 (24)
R5: (3 sc, inc) x6 (30)
R6–R9: sc around (30)
Insert eyes between R7 and R8, about 8 sts apart. Stuff as you go.
R10: (3 sc, dec) x6 (24)
R11: (2 sc, dec) x6 (18)
R12: (sc, dec) x6 (12)
R13: dec x6 (6)
Fasten off. Leave a 20 cm tail.
Body (Make 1)
Yarn: ivory — photo-based adaptation using standard amigurumi math
R1: 6 sc in MR (6)
R2: inc x6 (12)
R3: (sc, inc) x6 (18)
R4: (2 sc, inc) x6 (24)
R5: (3 sc, inc) x6 (30)
R6: (4 sc, inc) x6 (36)
R7–R9: sc around (36)
R10: (4 sc, dec) x6 (30)
R11: (3 sc, dec) x6 (24)
R12–R13: sc around (24)
Stuff lightly. Keep the belly soft so the shell can sit over it.
R14: (2 sc, dec) x6 (18)
R15: (sc, dec) x6 (12)
R16: dec x6 (6)
Fasten off. Leave a 20 cm tail.
Front Flippers (Make 2)
Yarn: ivory — photo-based adaptation using standard amigurumi math
R1: 6 sc in MR (6)
R2: inc x6 (12)
R3–R5: sc around (12)
R6: (2 sc, dec) x3 (9)
R7–R10: sc around (9)
Do not overstuff. Flatten the opening and sc through both layers 4 sts to close.
Fasten off. Leave a 20 cm tail.
Back Flippers (Make 2)
Yarn: ivory — photo-based adaptation using standard amigurumi math
R1: 6 sc in MR (6)
R2: inc x6 (12)
R3–R4: sc around (12)
R5: (2 sc, dec) x3 (9)
R6–R8: sc around (9)
Flatten the opening and sc through both layers 4 sts to close.
Fasten off. Leave a 20 cm tail.
Peach Shell Dome (Make 1)
Yarn: peach — custom shell drafted to match the photo’s fruit cap and brim
R1: 6 sc in MR (6)
R2: inc x6 (12)
R3: (sc, inc) x6 (18)
R4: (2 sc, inc) x6 (24)
R5: (3 sc, inc) x6 (30)
R6: (4 sc, inc) x6 (36)
R7–R10: sc around (36)
R11: BLO sc around (36)
R12: (5 sc, inc) x6 (42)
R13: sc around (42)
R14: sl st around (42)
Fasten off. Leave a 30 cm tail.
Shell Brim Shaping Note
This photo shows a slight outward lip, not a flat coaster edge.
After R14, steam is not used on chenille. Shape the brim with your fingers while sewing so the edge angles down just a little at the front.
Leaf (Make 1)
Yarn: light green — fruit-turtle leaf logic adapted from published fruit variants
Ch 7.
Work into the chain: sc in 2nd ch from hook, hdc, dc, dc, hdc, sc.
Turn to the underside of the chain and work: sc, hdc, dc, dc, hdc, sc.
Sl st to tip.
Optional: embroider a center vein with a strand of matching yarn.
Fasten off. Leave a 15 cm tail.
Stem (Make 1)
Yarn: brown — photo-based accessory draft
Ch 6.
Starting in 2nd ch from hook, sl st 5 back down the chain.
Twist gently to make it read as a short stem.
Fasten off. Leave a 10 cm tail.
Cheek Patches (Make 2)
Yarn: white or blush peach
R1: 6 sc in MR (6)
R2: inc x6 (12)
Fasten off. Leave a 12 cm tail.
Embroidered Shell Highlights
Yarn: white — photo-based finishing detail
Use 3–5 short straight stitches on each side of the shell.
Place them vertically or on a slight diagonal.
Do not cross the brim line.
Fasten off inside the shell.
Assembly
- Sew the head to the front upper third of the body.
- Attach the front flippers to each side of the body, centered just below the neck line.
- Attach the back flippers slightly farther back and a little lower than the front pair.
- Test the body on a flat surface and adjust flipper angle until the turtle sits level.
- Position the shell dome over the top of the body so R11 sits just above the flipper joins.
- Sew the shell in place through the body’s outer stitches only, keeping the brim free at the edge.
- Stitch the stem slightly off center on the shell top.
- Sew the leaf beside the stem with the tip angled back toward the shell curve.
- Add cheek patches below the eyes if you want the softer fruit-plush look.
- Embroider the white shell highlights and weave in every tail through a second anchor pass.
The plush is complete when the shell brim sits proud of the body instead of collapsing into it.
7 Technical Tips
- Use a marker on every first stitch of the round. Losing one round on the shell dome shifts the brim lower, and the peach reads like a cap instead of fruit skin.
- Stuff the head firmly, but stop before it creaks. On chenille, an overfilled head can push the eye washers outward and distort the face line.
- Place the eyes before the final head decreases. For a 30-stitch head like this one, check symmetry with 8 stitches between the eyes before locking the backs.
- Keep the flippers under-stuffed. A hard flipper twists downward at the sewn edge and makes the turtle rock instead of sit flat.
- Use invisible decreases on the head and body close. Standard decreases leave a ridge in plush yarn, and that ridge shows most on pale ivory.
- Pin the shell before sewing. Measure the front overhang; around 0.8 to 1.2 cm of visible brim gives the shell the peach-cap look from the photo.
- Weave each tail through two directions before trimming. Chenille sheds when cut too near the knot, and the leaf or stem can loosen first because those anchors are small.
Conclusion
The key to a strong peach turtle amigurumi crochet pattern is not the color alone. Shell profile, brim depth, leaf scale, and head placement do the work. Start with the body and head first, dry-fit the shell before sewing, and keep the flippers soft so the piece stays low and stable. For publishing, photograph the leaf side and the front brim angle; those two views sell the concept faster than a top-down shot. Share the finished plush on Pinterest and Instagram with #PeachTurtlePattern. One useful finishing question remains: did you angle your stem forward like a fresh peach, or keep it upright for a cleaner silhouette?









