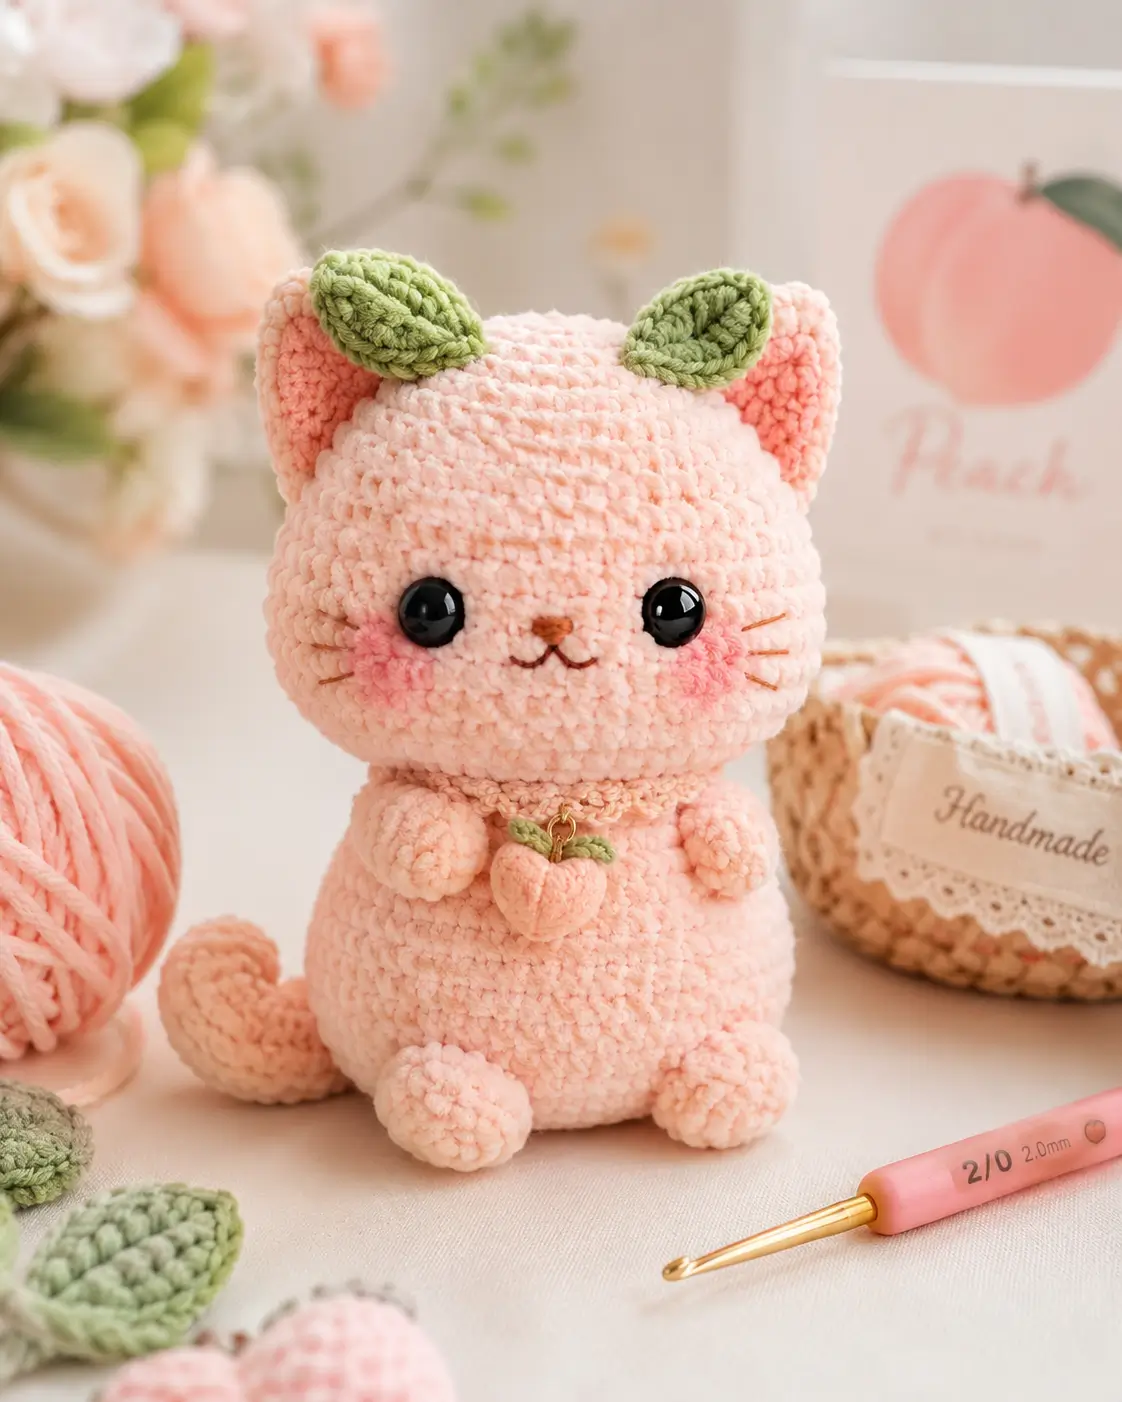
A peach-themed cat fails on sight if the head reads as a plain kitten before the leaves read as fruit. This peach cat amigurumi crochet pattern targets a compact 12 cm display plush with a small hook, dense fabric, and intermediate assembly. The build works well for market tables, desk decor, and styled product photos because the peach charm stays readable at small scale.
The Design: What Makes Peach Cat Different
The leaf placement is not decoration. It is identity. Put the leaves too high and the silhouette turns into a cat with a headband; put them too low and the ears disappear into the top line. The second structural choice is the head-to-body ratio. A fruit cat crochet design needs a wider head than a standard kitten plush so the cheek color and face spacing stay soft without looking flat. Then there is the body base. A seated kawaii cat amigurumi needs a low center of gravity, or the tail becomes a kickstand instead of a rear detail. One common mistake is shrinking the cheek patches too far. That removes the peach effect and leaves only a pink cat with leaves.
Project Info at a Glance
| Skill Level | Time | Finished Size | Hook | Best For |
|---|---|---|---|---|
| Intermediate | 4–5 hours | 12 cm | 2.0 mm | Display plush, market stock, desk mascot |
Time is an editorial estimate. Published Peach Cat references range from a 7.5 cm 4-ply cotton mini on a 1.8 mm hook to a 12 cm Circulo Amigurumi version on a 2.0 mm hook, and up to about 25 cm in plush yarn on a 4 mm hook.
Materials and Tools
Yarn
- Pale peach — velvet or chenille look — approx. 60 g — YarnArt Dolce or a similar soft plush yarn
- Leaf green — same texture — approx. 8 g — matching chenille
- Blush pink — same texture or brushed acrylic — approx. 4 g — for cheek patches
- Brown embroidery thread — small amount — nose, mouth, whiskers
Tools
- Hook 2.0 mm
- Safety eyes 8–10 mm
- Polyester stuffing
- Tapestry needle
- Stitch markers
- Fine scissors
- Small ring, thread loop, or jump ring for the peach charm
Published Peach Cat patterns show the smallest cotton builds around 8 mm eyes and 2.0 mm hooks, while larger plush builds use much larger eyes and a 4 mm hook. That range matters because the photo style sits closer to the compact end, not the oversized plush end.
Abbreviations
- MR = magic ring
- sc = single crochet
- inc = increase
- dec = decrease
- sl st = slip stitch
- ch = chain
- BLO = back loop only
- FO = fasten off
Invisible decrease joins two stitches through the front loops first, which keeps the surface cleaner around the face and body taper.
Pattern — Step by Step
Continuous spiral unless noted.
Head (Make 1)
Yarn: pale peach
- R1: 6 sc in MR (6)
- R2: inc ×6 (12)
- R3: (1 sc, inc) ×6 (18)
- R4: (2 sc, inc) ×6 (24)
- R5: (3 sc, inc) ×6 (30)
- R6: (4 sc, inc) ×6 (36)
- R7: 36 sc (36)
- R8: 36 sc (36)
- R9: 36 sc (36)
- R10: 36 sc (36)
- R11: 36 sc (36)
- Insert 8–10 mm eyes between R8 and R9, spaced 8 stitches apart. Start stuffing.
- R12: (4 sc, dec) ×6 (30)
- R13: (3 sc, dec) ×6 (24)
- R14: (2 sc, dec) ×6 (18)
- Stuff cheeks firmly, crown lighter.
- R15: (1 sc, dec) ×6 (12)
- R16: dec ×6 (6)
Fasten off. Leave a 20 cm tail.
Body (Make 1)
Yarn: pale peach
- R1: 6 sc in MR (6)
- R2: inc ×6 (12)
- R3: (1 sc, inc) ×6 (18)
- R4: (2 sc, inc) ×6 (24)
- R5: (3 sc, inc) ×6 (30)
- R6: 30 sc in BLO (30)
- R7: 30 sc (30)
- R8: 30 sc (30)
- R9: 30 sc (30)
- Stuff base firmly so it can sit flat.
- R10: (3 sc, dec) ×6 (24)
- R11: 24 sc (24)
- R12: (2 sc, dec) ×6 (18)
- R13: 18 sc (18)
- R14: (1 sc, dec) ×6 (12)
Fasten off. Leave a 25 cm tail.
Arms (Make 2)
Yarn: pale peach
- R1: 6 sc in MR (6)
- R2: inc ×6 (12)
- R3: 12 sc (12)
- R4: 12 sc (12)
- Stuff only the lower half.
- Flatten. Crochet 6 sc through both layers to close (6).
Fasten off. Leave a 15 cm tail.
Feet (Make 2)
Yarn: pale peach
- R1: 6 sc in MR (6)
- R2: inc ×6 (12)
- R3: 12 sc in BLO (12)
- R4: 12 sc (12)
- Stuff lightly so the feet stay rounded but not rigid.
- Flatten. Crochet 6 sc through both layers to close (6).
Fasten off. Leave a 15 cm tail.
Ears (Make 2)
Yarn: pale peach with blush-pink inner edge if desired
- Ch 2.
- Row 1: 2 sc in second ch from hook (2)
- Row 2: ch 1, turn, inc, inc (4)
- Row 3: ch 1, turn, 1 sc, inc, inc, 1 sc (6)
- Row 4: ch 1, turn, 2 sc, inc, inc, 2 sc (8)
- Row 5: ch 1, turn, 8 sc (8)
Fasten off. Leave a 12 cm tail. Fold the bottom edge slightly before sewing.
Leaf Toppers (Make 2)
Yarn: leaf green
- Ch 7.
- Row 1: starting in second ch from hook, sl st, sc, hdc, dc, hdc, sc.
- Work along the opposite side of the chain: sc, hdc, dc, hdc, sc, sl st.
Fasten off. Leave a 12 cm tail.
Pin each leaf first. The outer points should sit slightly in front of the ear line.
Tail (Make 1)
Yarn: pale peach
- R1: 6 sc in MR (6)
- R2: 6 sc (6)
- R3: 6 sc (6)
- R4: 6 sc (6)
- R5: 6 sc (6)
- R6: 6 sc (6)
- R7: 6 sc (6)
- R8: 6 sc (6)
- Stuff very lightly or leave unstuffed for a softer curl.
- Flatten. Crochet 3 sc through both layers to close (3).
Fasten off. Leave a 15 cm tail.
Cheek Patches (Make 2)
Yarn: blush pink
- R1: 6 sc in MR (6)
- R2: inc ×6 (12)
Fasten off. Leave a 10 cm tail.
These are flat circles. Do not stuff.
Peach Charm Necklace (Make 1 set)
Yarn: pale peach + leaf green
Charm fruit
- R1: 6 sc in MR (6)
- R2: inc ×6 (12)
- R3: (1 sc, inc) ×6 (18)
- R4: 18 sc (18)
- R5: (1 sc, dec) ×6 (12)
- Stuff lightly.
- R6: dec ×6 (6)
Fasten off. Thread the tail from top to bottom and pull once to create the peach groove.
Charm leaf
- Ch 5.
- Row 1: starting in second ch from hook, sl st, sc, hdc, sc.
Fasten off.
Neck cord
- Ch 22, or adjust to your neck circumference.
- Row 1: starting in second ch from hook, 21 sl st (21)
Fasten off.
Attach the charm at center front. Join the cord at the back after fitting around the neck.
Assembly
- Sew the head to the body with the head tilted forward by about 3–5 mm.
- Embroider the nose centered between the eyes, one round below the eye line.
- Stitch the mouth as a short split curve under the nose.
- Add three whiskers on each side using brown thread, keeping each whisker roughly 1.5 cm long.
- Sew the cheek patches under the eyes so their inner edges sit one stitch away from the muzzle centerline.
- Attach the arms high on the body, slightly forward, so they frame the necklace area.
- Sew the feet to the lower front base with enough outward angle to keep the seated stance broad.
- Attach the tail low on the back and curl it toward one side before locking the final stitches.
- Sew the ears to the top corners of the head, then place the two green leaves slightly inward from the ear bases.
- Add the peach charm necklace and tighten the back join so the charm rests at mid-chest.
The finished cat should sit upright with the tail acting as a rear accent rather than a load-bearing prop.
7 Technical Tips
- Stitch marker drift: Lose the marker by one round on the head and the eyes shift upward enough to flatten the face. Move the marker every round, not every second round.
- Stuffing firmness: Pack the body base firmly and keep the top third lighter, or the cat tips forward once the head is attached. Too much neck stuffing also forces the chin upward.
- Invisible decreases: Standard decreases on plush yarn leave visible dents along R12–R16 of the head. Invisible decreases keep the taper smoother under the cheek area.
- Eye placement timing: Install the eyes before the head drops below 24 stitches. Waiting until R14 makes washer placement harder and can distort the eye line.
- Velvet tension: Plush yarn hides missed stitches at the sides of the head and around the tail tube. Count every round against the written stitch total instead of reading only by texture.
- Pinning leaves and ears: A leaf that sits directly above the ear point reads like foliage glued on later. Place the leaf bases 2–3 stitches inward from each ear seam before sewing.
- Tail weaving: A loose tail join makes the curl sag after handling. Run the tail end through the body twice in different directions before trimming.
Conclusion
Next, crochet the head first and test the eye spacing before committing to the full assembly. That one checkpoint controls most of the character read. After finishing, photograph the plush from the front and from a slight top angle so the leaves, ears, and peach charm all stay visible in one frame. Pin the result to Pinterest with the side profile, then post a close-up of the face and collar on Instagram. Use #PeachCatPattern. For anyone publishing a compact fruit-cat tutorial, the stronger keyword target remains peach cat amigurumi crochet pattern. One build question matters most here: did your leaves sit closer to the ears, or closer to the centerline?









