Introduction
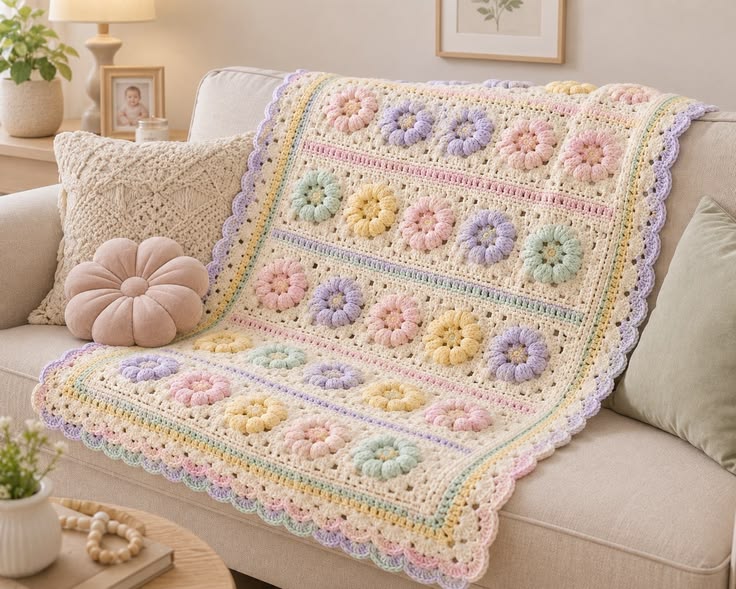
Twenty raised pastel flower rings have to stay circular while their cream backgrounds form a rectangular blanket grid. This puff flower granny square crochet blanket pattern uses DK yarn, a 4 mm hook, cream backgrounds, and pink, lavender, mint, and yellow flowers. The intermediate throw finishes at approximately 106 × 136 cm. Modular construction makes individual flower colors easy to reposition before the final joining and scalloped border.
The Design: What Makes This Pastel Flower Blanket Different
The photographed blanket separates its flowers into horizontal bands instead of packing identical motifs into a conventional checkerboard. Each raised blossom uses a ring of rounded puff petals surrounded by cream openwork, giving the flowers physical depth without separate sewn appliqués. Narrow pastel stripes divide the floral rows and repeat mint, yellow, pink, and lavender at the perimeter. A multicolor scalloped border then softens the otherwise rectangular construction. This approach suits a pastel flower granny square blanket because the neutral background controls four flower colors while the repeated cream sections keep the surface from becoming visually crowded. Published DK flower blankets support a 4–4.5 mm hook range and finished throw sizes around 106 × 136 cm. The main construction error is joining squares before blocking; inconsistent motif dimensions then turn the horizontal divider rows into visible waves.
Project Info at a Glance
| Skill Level | Time | Finished Size | Hook | Best For |
|---|---|---|---|---|
| Intermediate | Approx. 24–32 hours | Approx. 106 × 136 cm | 4 mm | Lap throws, nursery décor, sofa blankets |
Made by Gootie’s published Flower Granny Square Blanket uses DK #3 yarn, a 4.5 mm hook, approximately 800 g of background yarn plus five flower colors, and finishes at 106 × 136 cm. A current Pastel Blossom baby blanket uses DK cotton or cotton blend with a 4 mm hook and finishes at 76 × 66 cm, while Hooked With A Twist’s puff-flower blanket uses 4–5 mm hooks and worsted yarn for a 33–34 inch square blanket. These provide practical benchmarks for the photo-inspired reconstruction below.
Materials and Tools
Yarn
- Warm cream — DK #3 — approximately 700–800 g
- Blush pink — DK #3 — approximately 100–130 g
- Lavender — DK #3 — approximately 100–130 g
- Mint green — DK #3 — approximately 100–130 g
- Pastel yellow — DK #3 — approximately 100–130 g
Plan approximately 1,100–1,300 g total yarn for the full throw, including joining and the multicolor border. Exact consumption depends heavily on puff-stitch height. Made by Gootie’s comparable DK throw uses eight 100 g background skeins plus portions of five 100 g flower-color skeins.
Tools
- 4 mm crochet hook
- 4.5 mm hook — optional if the puff stitches are too compact
- Tapestry needle
- Scissors
- Locking stitch markers
- Blocking mats
- Rust-resistant blocking pins
- Tape measure
Abbreviations
- MR — magic ring
- ch — chain
- sc — single crochet
- hdc — half double crochet
- dc — double crochet
- sl st — slip stitch
- puff — puff stitch
- sp — space
- st/sts — stitch/stitches
- BLO — back loop only
An invisible decrease is not required because this project consists of flat motifs, joining rows, and perimeter rounds rather than closed three-dimensional forms.
About This Photo-Inspired Reconstruction
The instructions below are an original reconstruction based on the visible structure of the reference image. Published flower-blanket patterns are used only as technical benchmarks for yarn weight, hook size, finished dimensions, motif construction, and border methods. The photographed blanket appears to contain approximately 20 prominent flower motifs arranged as four horizontal rows of five, separated by cream and pastel bands.
Gauge and Motif Size
Make one complete square before producing the full motif set.
- Blocked flower square: approximately 18 × 18 cm
- Five-square row: approximately 90 cm before side borders
- Flower diameter: approximately 10–11 cm
- Finished blanket: approximately 106 × 136 cm after divider bands and border
Motif size is more important than a conventional stitch gauge. Every blocked square should finish within approximately 3 mm of the target measurement before joining begins.
Pattern — Step by Step
Use US crochet terminology. Make five flowers in each pastel color for a total of 20 motifs. Arrange the colors only after every square has been blocked.
Puff Flower Center — Make 20
Yarn: blush pink, lavender, mint, or pastel yellow.
R1: Make MR. Ch 3, work 15 dc into ring. Join with sl st. (16 dc including beginning ch)
R2: Ch 1. Sc in every stitch around. Join. (16 sc)
Do not fasten off.
Puff Petal Round
A puff stitch for this reconstruction is made by yarning over, inserting the hook into the indicated stitch, pulling up a tall loop, and repeating that action four times. Yarn over and draw through all loops, then ch 1 to close the puff.
R3: Ch 1.
*Puff in next stitch, ch 1, skip next stitch.*
Repeat around.
Join to first puff. (8 puffs)
The eight puffs form the raised flower ring visible across the blanket.
Petal Expansion Round
R4: Sl st into first ch-1 space.
Ch 2, work 3 dc in same space.
Work 4 dc in every remaining ch-1 space.
Join. (32 dc)
Fasten off the flower color.
Cream Transition Round
Yarn: warm cream.
Join cream between two petal groups.
R5: Ch 1, sc in same space.
*Ch 3, skip 4 dc, sc between the next petal groups.*
Repeat around.
Join. (8 ch-3 spaces)
Squaring Round
Sl st into the first ch-3 space.
R6: Ch 3, 2 dc, ch 2, 3 dc in same space to form the first corner.
Ch 2.
Work 3 dc in next ch-3 space.
Ch 2.
In next ch-3 space work 3 dc, ch 2, 3 dc.
Continue around, establishing four evenly spaced corners.
Join.
Granny Expansion Round
R7: Sl st to first corner.
Ch 3, 2 dc, ch 2, 3 dc in corner.
*Ch 1, 3 dc in each side space to next corner. In corner work 3 dc, ch 2, 3 dc.*
Repeat around.
Join.
Final Cream Square Round
R8: Ch 1.
Sc in every dc and ch-1 space around.
In each corner ch-2 space work:
sc, ch 2, sc.
Join and fasten off.
Block each motif to approximately 18 × 18 cm.
Flower Color Quantities
Make:
- 5 blush-pink flower squares
- 5 lavender flower squares
- 5 mint flower squares
- 5 pastel-yellow flower squares
This produces 20 motifs. The photographed blanket uses an irregular pastel sequence rather than placing all matching colors in the same column.
Suggested Four-by-Five Layout
Row 1: Pink – Lavender – Lavender – Pink – Pink
Row 2: Mint – Yellow – Pink – Lavender – Mint
Row 3: Pink – Lavender – Pink – Yellow – Lavender
Row 4: Yellow – Mint – Lavender – Pink – Pink
Swap individual colors as needed to distribute repeated shades across the complete surface.
Joining One Five-Square Flower Row
Place two blocked motifs side by side with right sides facing upward.
Join cream yarn through corresponding back loops.
Work relaxed slip stitches across the complete edge.
Add the third, fourth, and fifth squares using the same method.
Make four separate five-square strips before adding the horizontal divider bands.
Horizontal Cream Divider Band
Join cream yarn to the lower edge of one completed five-square strip.
Row 1: Ch 1, sc evenly across the full width.
Row 2: Ch 3, turn, dc in every stitch across.
Row 3: Ch 1, turn, sc across.
Fasten off.
Keep the stitch count identical across all three internal divider bands.
Pink Accent Stripe
Join blush pink along the lower edge of the cream divider.
Row 1: Ch 1, sc in every stitch across.
Fasten off.
This narrow line reproduces the pink horizontal accent visible between floral rows.
Lavender Accent Stripe
On the next divider, substitute lavender for the final accent row.
Work one sc in every stitch across.
Fasten off.
Mint Accent Stripe
Use mint for another divider accent.
Maintain exactly the same stitch count as the previous pastel stripes.
These narrow color lines repeat the flower palette without adding another heavily textured section.
Joining the Flower Rows
Place the next five-square strip against the completed divider band.
With cream yarn, slip stitch through corresponding back loops along the entire width.
Check the ends after every 20–25 stitches.
The two layers should remain the same length without gathering.
Repeat until all four flower rows and three divider bands form one rectangular panel.
Top and Bottom Cream Bands
Join cream at one upper corner.
Row 1: Sc evenly across.
Row 2: Dc across.
Row 3: Sc across.
Fasten off.
Repeat along the lower blanket edge.
Perimeter Foundation Round
Join cream in any corner.
Ch 1.
Sc evenly around the complete blanket.
Work sc, ch 2, sc in each corner.
Join.
Lay the blanket flat before continuing. Correct any rippling in this round rather than attempting to hide it beneath later edging.
Border Round 2 — Mint
Join mint in a corner ch-2 space.
Ch 1.
Sc in every stitch.
In each corner work:
sc, ch 2, sc.
Join and fasten off.
Border Round 3 — Yellow
Join pastel yellow.
Ch 2.
Hdc in every stitch around.
In each corner work:
2 hdc, ch 2, 2 hdc.
Join and fasten off.
Border Round 4 — Cream
Join cream.
Ch 1.
Sc in every stitch around.
Work sc, ch 2, sc in each corner.
Join.
Scalloped Pastel Border
The reference finishes with rounded pastel shells alternating around the cream perimeter.
Join blush pink approximately 5 cm from a corner.
*Skip 2 stitches, work 5 dc in next stitch, skip 2 stitches, sl st in next stitch.*
Repeat for several shells.
Change to lavender, then mint, then pale yellow as desired.
At each corner, place a larger shell of 7 dc into the corner space.
Continue around the complete blanket.
Fasten off.
Optional Cream Picot Between Shells
For a more detailed edge, join cream into a slip stitch between two pastel shells.
Ch 3.
Sl st in first chain.
Sl st into the next shell junction.
Repeat around.
Keep these picots small so the pastel scallops remain the dominant final edge.
Assembly
- Make one complete puff-flower square and block it to approximately 18 × 18 cm before calculating the dimensions of the remaining motifs.
- Crochet 20 flower squares using five each in blush pink, lavender, mint, and pastel yellow, keeping the cream squaring rounds identical.
- Block every motif to the same measurement and reject or remake any square differing from the target by more than approximately 3 mm.
- Arrange the 20 squares into four rows of five, distributing matching flower colors so large same-color clusters do not develop.
- Join each five-square row with relaxed cream slip stitches through corresponding back loops and verify that every strip remains straight.
- Add the cream divider bands and narrow pastel accent stripes between the four floral rows, maintaining matching stitch totals across the blanket width.
- Join all four floral strips to their divider bands and add matching cream bands across the upper and lower edges.
- Work the cream perimeter foundation round, correcting side-edge spacing immediately if the blanket begins to ripple or contract.
- Add mint, yellow, and cream border rounds followed by the alternating pastel shell edging around all four sides.
- Weave all tails into matching dense stitches and block the complete blanket to approximately 106 × 136 cm without flattening the raised puff flowers.
The completed blanket should form four horizontal rows of raised pastel flowers on a warm cream ground, separated by narrow colored lines and enclosed by a multicolor scalloped border.
7 Technical Tips
- The puff flowers differ in diameter: pull every puff loop to approximately the same dc height before closing the stitch. A difference of even 5 mm per puff becomes obvious across an eight-petal flower.
- The granny squares cup around the flowers: check that all eight cream ch-3 transition spaces remain relaxed before the squaring round. Tight transition chains reduce the circumference around the raised petals and pull the corners inward.
- The horizontal flower rows become wavy: block every motif to within approximately 3 mm of the same 18 cm width before joining. Five squares differing by only 4 mm each can create a 2 cm mismatch across one row.
- The divider bands contract: compare their width against the joined five-square strip after every row. A divider that is more than approximately 1 cm shorter should be remade with looser tension or a 4.5 mm hook.
- The perimeter ruffles: reduce the number of stitches placed into the vertical row ends during the first cream border round. Extra stitches in that foundation round become increasingly visible after the mint, yellow, and shell rounds are added.
- The scallops fold over each other: increase the number of skipped stitches between five-dc shells or reduce each shell to four dc. The shell repeat must match the actual perimeter circumference rather than being forced into every available stitch.
- The flowers flatten during blocking: pin only the cream square edges and finished blanket perimeter. Place small rolled cloth supports beneath damp puff flowers so their raised centers are not pressed against the blocking mat.
Why DK Yarn Fits This Design
The photograph shows substantial flower texture but not the heavy depth associated with super-bulky motifs. DK yarn gives the puff petals enough volume while allowing the cream openwork and narrow divider stripes to remain comparatively light.
Made by Gootie’s Flower Granny Square Blanket uses DK #3 yarn with a 4.5 mm hook and finishes at 106 × 136 cm. A current Pastel Blossom pattern similarly specifies DK cotton or cotton blend and a 4 mm hook for a smaller 76 × 66 cm baby blanket.
Those published specifications make DK a useful starting point for recreating the scale visible here.
Verified Flower Blanket Benchmarks
Made by Gootie’s published flower blanket measures approximately 106 × 136 cm. It uses a 4.5 mm hook, DK #3 yarn, and approximately 800 g / 1,760 m of background yarn, plus five flower colors.
Meladora’s puff-flower baby blanket uses worsted-weight yarn with 4.5 and 5 mm hooks and measures approximately 75 × 92 cm. Its published yarn specification is 100 g / 240 m per skein.
The Adelia Puff Flower Square Blanket uses worsted yarn, 4 or 5 mm hooks, and approximately 1,061–1,909 m depending on size. Its standard version measures approximately 33–34 inches square.
A current pastel flower-square baby blanket specifies DK yarn, a 4 mm hook, 25 flower squares, and a finished measurement of approximately 76 × 66 cm.
Why Puff Stitches Work for the Flowers
A puff stitch places several elongated loops into one stitch and closes them together at the top. The extra yarn creates a rounded raised element without requiring a separately crocheted petal to be sewn onto the blanket.
Current puff-flower square patterns use the same principle. Joanita Theron’s Puff Flower Granny Square uses a 4 mm hook and worsted yarn, while Crafting Happiness lists Aran yarn, a 4.5 mm hook, and approximately 27–46 m per adjustable square.
The photograph’s rounded petals are therefore better represented by puff or cluster construction than by flat double-crochet fans.
Choosing the Cream Background
Use a warm ivory rather than bright optical white.
Useful yarn shade names include cream, natural, vanilla, ecru, and soft ivory.
The cream occupies most of the blanket surface, so purchase the full quantity from one dye lot when possible.
Even a small change in cream tone becomes visible across large uninterrupted joining and border areas.
Choosing the Pink
The photographed pink is light and slightly muted.
Look for blush, shell pink, powder pink, or pale rose.
A highly saturated hot pink will dominate the lavender, yellow, and mint flowers.
Keep all four pastel shades at roughly comparable visual intensity.
Choosing the Lavender
Use a light lavender with a cool undertone.
Suitable shade descriptions include lilac, wisteria, soft violet, and pale lavender.
The lavender is also repeated along the scalloped perimeter, so reserve approximately 15–20 g after completing the flower motifs.
Choosing the Mint
The green in the reference is pale and cool rather than earthy sage.
Look for mint, seafoam, pale aqua green, or soft pistachio.
Use the same mint in the flower centers, divider stripe, and border to connect distant areas of the blanket.
Choosing the Yellow
A pale butter yellow provides contrast without creating a strong primary-color effect.
Useful shade names include buttercream, lemon chiffon, vanilla yellow, and pale primrose.
Avoid dark mustard if the objective is to reproduce the light pastel palette in the photograph.
Cotton Versus Acrylic
DK cotton or cotton blend produces crisp flowers and a clearly defined shell border. It also adds considerable weight to a 106 × 136 cm blanket.
Acrylic reduces finished weight and gives the puff stitches more spring. Anti-pilling acrylic is practical for a sofa throw that will receive regular washing.
Whichever fiber is selected, use one yarn family across all five colors. Mixed fibers can respond differently during blocking and make identically counted squares finish at different dimensions.
Making a 25-Square Baby Blanket
For a compact baby version, make 25 smaller motifs and arrange them in a 5 × 5 grid.
A current Pastel Blossom pattern provides a useful benchmark at approximately 76 × 66 cm using 25 DK flower squares and a 4 mm hook.
Reduce each motif to approximately 11–12 cm if targeting similar dimensions.
Add only one narrow divider treatment or join the squares directly to prevent the blanket from becoming disproportionately long.
Making a 12-Square Lapghan
Arrange 12 larger squares in a 3 × 4 grid.
Increase individual motifs if necessary rather than adding excessive border width.
Maisie and Ruth’s Cozy Petals pattern uses 12 squares for its lapghan configuration, demonstrating the usefulness of a 3 × 4 modular arrangement.
Keep the four pastel colors evenly distributed across the smaller field.
Making a Larger Throw
Increase the grid to 5 × 6 motifs for 30 squares.
At an 18 cm blocked motif size, the raw floral grid measures approximately 90 × 108 cm before divider bands and borders.
Additional cream bands and perimeter rounds can then bring the finished blanket closer to standard throw proportions.
Expect yarn requirements to increase by at least 40–50 percent over the 20-square version.
Making a Square Blanket
Use a 5 × 5 arrangement of equal-size motifs.
Omit or reduce the horizontal divider bands so the vertical and horizontal dimensions remain similar.
The Adelia Puff Flower Square Blanket provides a published example of an approximately 33–34 inch square format using puff-flower motifs.
Finish all four sides with the same number of border rounds.
Making the Flowers More Raised
Increase each puff from four yarn-over insertions to five.
Pull every loop to the same height.
Close the puff firmly, then work the securing chain loosely.
The flower will project farther from the cream square but will also consume more yarn.
Make one sample before changing all 20 motifs.
Making Flatter Flowers
Use three yarn-over insertions per puff instead of four.
Alternatively, replace the puff with a 4-dc cluster.
The flatter version is useful for blankets that need to fit smoothly under another layer of bedding.
Do not mix different puff depths within one blanket unless the variation is deliberate.
Making Ten-Petal Flowers
Start R1 with 20 dc instead of 16.
In the puff round, work one puff followed by one skipped stitch around. (10 puffs)
Increase the transition-round spacing accordingly.
The resulting flower is larger and may require another cream squaring round to maintain the 18 cm target.
Changing to Daisy Centers
For a flatter daisy appearance, work a small yellow center followed by white or pastel dc-cluster petals.
Jo to the World’s Flower Granny Square Blanket provides a published step-by-step example of constructing flower squares, joining them with flat slip stitch, and finishing the blanket with six border rounds.
Keep the cream background unchanged so the overall blanket geometry remains compatible with the reconstruction.
Flat Slip-Stitch Joining
A flat slip-stitch join is practical for this project because the joining line remains visible but narrow.
Jo to the World’s flower blanket specifically demonstrates this joining technique.
Place motifs with right sides facing upward.
Work through corresponding loops without tightening the yarn.
Check the joined strip after each square because a tight seam can shorten a five-square row significantly.
Mattress-Stitch Alternative
For a less visible join, place blocked squares side by side.
Thread cream yarn onto a tapestry needle.
Catch corresponding inner loops along both edges.
Pull the seam closed every few centimeters.
This method keeps the cream background visually continuous and avoids adding another raised crochet line between motifs.
Join-As-You-Go Alternative
The Adelia Puff Flower Square Blanket uses a join-as-you-go approach for its floral squares.
That method reduces the amount of finishing after all motifs are complete.
For the photographed blanket, however, joining after blocking gives more control over the deliberate horizontal flower rows and divider bands.
Use join-as-you-go only after confirming that every motif finishes at the same size without individual blocking adjustments.
Keeping the Divider Stripes Straight
Mark every joined-square seam along the first divider row.
The markers should remain vertically aligned with the seams in the flower strip.
If the stripe begins drifting, recount the stitches between markers.
Correct the count immediately rather than adding or removing stitches at the far end of the row.
Planning the Pastel Border
Lay the blanket flat before selecting the shell sequence.
Place colors that are underrepresented near a particular edge more frequently along that section.
The photographed border does not need strict pink-lavender-mint-yellow repetition to read as balanced.
What matters is distributing all four colors around the perimeter without creating a long single-color run.
Fixing a Square That Is Too Small
If one blocked motif is approximately 5–8 mm undersized, add one cream sc round before joining.
Use a slightly larger hook for that corrective round if necessary.
If the motif is more than about 1 cm too small, remake it.
Large corrections create visibly wider cream frames and disrupt the repeated square design.
Fixing a Square That Is Too Large
First confirm that the flower puff loops are not substantially taller than those on the other motifs.
Block the square to the target measurement without severe stretching or compression.
If it remains more than approximately 1 cm oversized, remake the motif with a smaller hook.
Do not force an oversized square into the joining seam.
Fixing a Twisted Puff Flower
Check whether all eight puffs were placed at equal intervals.
A missed skipped stitch can move the later petals around the circle.
Count the R2 stitches before starting the puff round.
The 16-stitch setup should produce eight evenly spaced puffs.
Fixing a Tight Scalloped Border
If the finished edge curls toward the blanket, the shell repeat is too short for the perimeter.
Reduce the number of skipped stitches between shells.
Another option is increasing five-dc shells to six dc along straight sides.
Correct the repeat before working an entire side.
Fixing a Wavy Scalloped Border
If the shells flare outward, increase the number of skipped foundation stitches between them.
Do not attempt to flatten severe ruffling by blocking.
A structurally overfilled border will return to its original wave after washing.
Test three or four shells before committing to the full perimeter.
Yarn Tail Management
Each multicolor motif creates several ends, so weave tails in as the squares are completed.
Run each tail through approximately 5 cm of matching dense stitches.
Change direction once.
Do not carry lavender, mint, pink, or yellow tails through open cream spaces where the colors can remain visible from the front.
Blocking the Individual Squares
Pin all four corners first.
Set each side to approximately 18 cm.
Add pins at the side midpoints.
Support the flower rather than stretching it outward.
Allow every square to dry completely before stacking the motifs for layout planning.
Blocking the Finished Blanket
Wash or dampen according to the yarn manufacturer’s instructions.
Lay the blanket on a large flat surface.
Set the four corners first, then straighten the horizontal flower rows.
Shape the pastel scallops individually.
Do not press the puff flowers beneath heavy towels or boards while drying.
Care
Follow the care instructions for the selected yarn.
Support the blanket when wet because the combined weight of 20 textured motifs can stretch the joining seams.
Dry flat when practical.
After laundering, reshape the shell border and lift the puff petals with your fingers before the blanket is fully dry.
Sources
Primary DK-yarn, hook, yarn-quantity, and finished-size benchmarks were checked against Made by Gootie’s Flower Granny Square Blanket, which specifies DK #3 yarn, a 4.5 mm hook, approximately 800 g of background yarn plus flower colors, and a finished size of 106 × 136 cm.
A smaller pastel benchmark was checked against Pastel Blossom Granny Square Baby Blanket, which specifies 25 flower squares, DK cotton or cotton blend, a 4 mm hook, and an approximate 76 × 66 cm finished size. Puff-flower yardage and hook comparisons came from Adelia Puff Flower Square Blanket on Ravelry, which uses worsted yarn with 4–5 mm hooks and lists approximately 1,061–1,909 m.
Additional flower construction data was checked against Joanita Theron’s Puff Flower Granny Square, which uses a 4 mm hook and lists approximately 95–110 m; Crafting Happiness’ Puff Flower Granny Square, which uses Aran yarn and a 4.5 mm hook; and Meladora’s Puff Flower Granny Blanket, which measures approximately 75 × 92 cm.
Joining and border construction were compared with Jo to the World’s Flower Granny Square Blanket, which includes flower-square construction, flat slip-stitch joining, and a six-round blanket border. Individual chunky flower-square yarn consumption was also compared with Maisie and Ruth’s Cozy Petals Blanket, which publishes separate gram and yardage measurements for the flower center, petals, and background of each motif.
Conclusion
The repeated 18 cm flower square is the measurement that controls this blanket. Make and block one motif first, then keep the remaining 19 within approximately 3 mm of that size so the four floral rows meet their divider bands cleanly. Eight raised puffs create each pastel flower, while cream squaring rounds provide enough flat structure for joining. After assembly, correct the first perimeter round before adding the colored stripes and shells. Your next step is to test one pink motif with the selected DK yarn. Save this puff flower granny square crochet blanket pattern to Pinterest or share it on Instagram with #PastelPuffFlowerBlanket. Which flower row would you place the mint blossoms in?









