Introduction
A granny stripe changes character when five muted colors are repeated instead of dozens of scrap shades. This granny stripe crochet blanket uses DK yarn, a 4 mm hook, offset cluster rows, and a scalloped pink border, with 73 × 93 cm used as the reference size. The construction suits an advanced beginner and gives you a repeatable color plan rather than requiring random yarn changes.
The Design: What Makes This Pastel Blanket Different
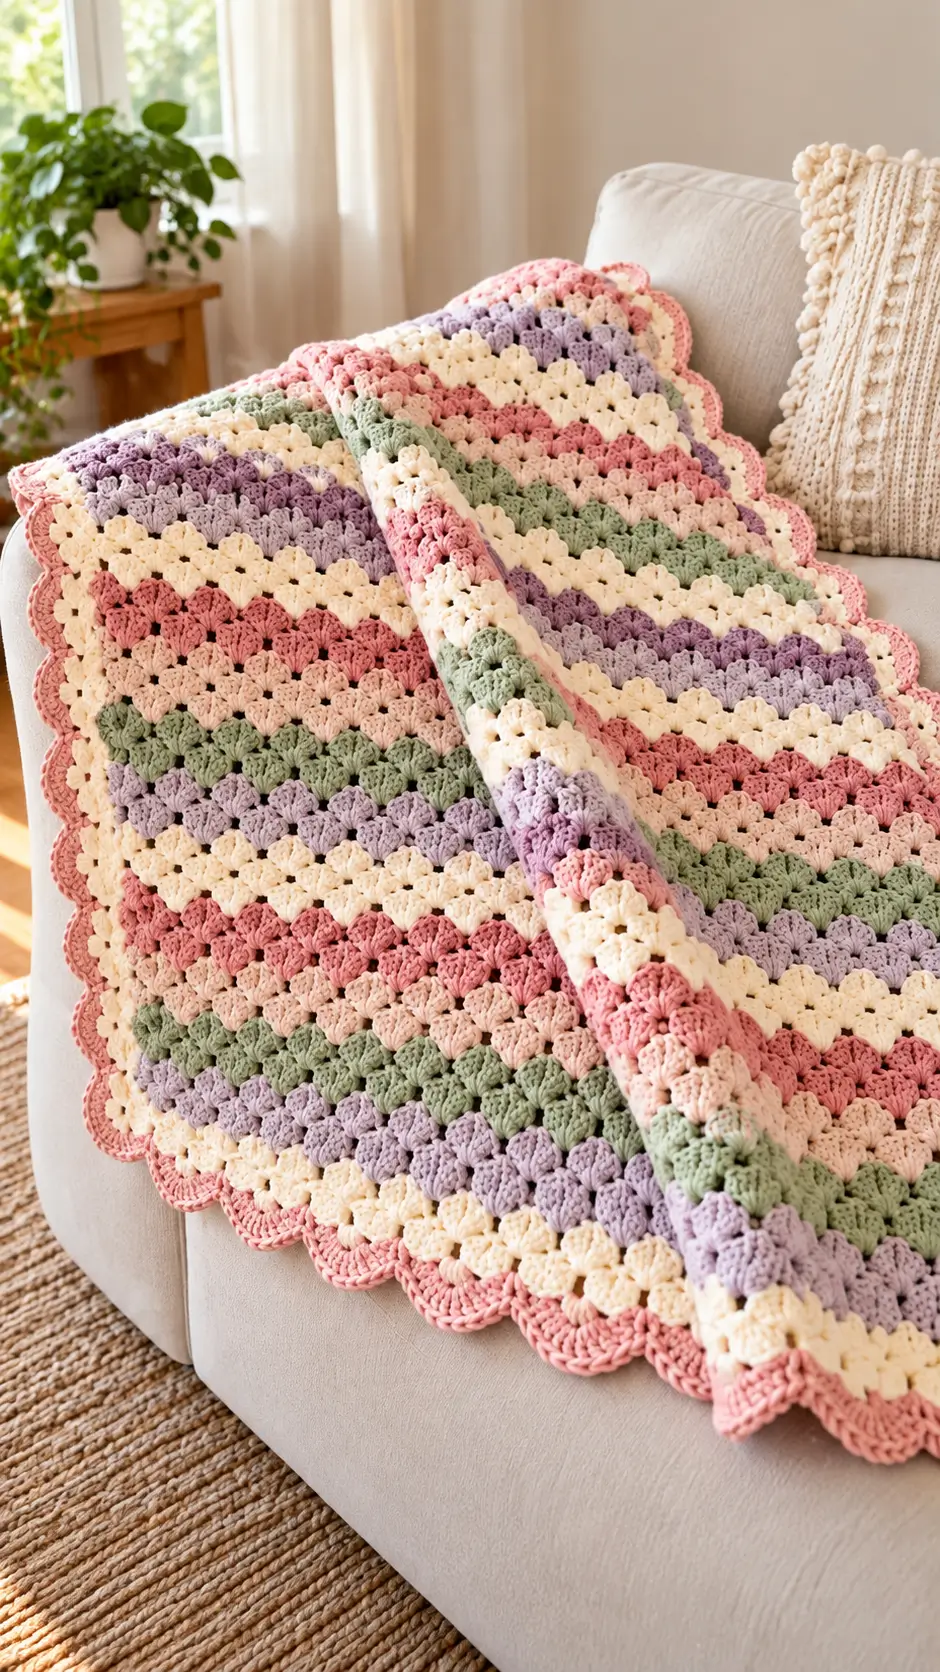
The photograph depends on three structural decisions. First, clusters are offset so each new group sits in the space between the groups below; that creates the recognizable granny-stripe grid. Second, cream appears frequently between dusty rose, blush, sage, and lavender, preventing adjacent pastel bands from visually merging. Third, the shell border is deeper than a basic single-crochet edging, giving the rectangular body a clearly defined perimeter.
A common mistake in a pastel crochet blanket is treating every color change as an independent design choice. That can produce accidental blocks of similar values. A fixed sequence gives the granny stitch blanket a more controlled rhythm.
The other frequent error occurs at the row ends. Missing the final edge stitch gradually narrows the rectangle even though the central clusters remain correct.
Project Info at a Glance
| Skill Level | Time | Finished Size | Hook | Best For |
|---|---|---|---|---|
| Advanced beginner | Multi-session project | 73 × 93 cm reference | 4 mm | Lap blanket, nursery throw, sofa layer |
The reference measurements use a documented DK granny-stripe construction. Your finished measurements can vary according to yarn, tension, border depth, and blocking.
Materials and Tools
Yarn
Use DK-weight yarn throughout. Approximately 400 g total is a practical reference quantity for a 73 × 93 cm granny-stripe blanket, although individual consumption varies with gauge and border depth.
- Cream/ivory — DK — approximately 120–160 g
- Dusty rose — DK — approximately 60–80 g
- Blush pink — DK — approximately 50–70 g
- Sage green — DK — approximately 50–70 g
- Pale lavender — DK — approximately 50–70 g
- Border pink — reserve approximately 40–60 g from the pink allocation
Exact yarn consumption changes with gauge, blanket dimensions, border depth, fiber content, and the number of rows assigned to each color.
Tools
- 4 mm crochet hook
- Yarn needle
- Sharp scissors
- Measuring tape
- 2 removable stitch markers
Place the stitch markers at the first and last working positions when establishing the rectangle. No stuffing, safety eyes, or sewing components are required.
Abbreviations
- ch — chain
- sc — single crochet
- dc — double crochet
- sl st — slip stitch
- sk — skip
- sp — space
- st/sts — stitch/stitches
- 3-dc cluster — three double crochet stitches worked into the same space
US crochet terminology is used throughout this pattern.
Pattern — Step by Step
The blanket is worked flat in turned rows rather than in continuous rounds. The granny-stripe foundation can be adjusted using a multiple of 3 + 2, allowing you to change the blanket width while preserving the repeat.
Foundation
Yarn: cream.
For a custom width, make a foundation chain using a multiple of 3 + 2.
Make a gauge swatch before committing to the full foundation chain. A useful reference gauge is approximately six granny clusters per 10 cm with DK yarn and a 4 mm hook.
Foundation: Chain to your calculated multiple of 3 + 2.
Do not stretch the foundation chain while measuring it. Place it on a flat surface, smooth it once, and then take the measurement.
Granny Stripe Body
Yarn: cream, dusty rose, blush pink, sage green and pale lavender.
Row 1: Establish granny clusters evenly across the foundation while maintaining the selected three-stitch repeat. Turn.
Row 2: Ch 3 for the edge height. Work 3 dc into each space between clusters across the row. Finish the edge with the required dc into the turning-chain area. Turn.
Row 3: Ch 3. Work the first partial edge cluster, then 3 dc into each open space across. Complete the final edge cluster. Turn.
Rows 4 onward: Repeat Rows 2 and 3 while maintaining the same number of cluster positions.
The groups of three double crochets sit in the spaces between the clusters from the previous row. This offset arrangement creates the characteristic granny-stripe structure.
Photo-Matched Color Sequence
The photographed blanket uses short pastel bands rather than large blocks. Use the following sequence as a practical approximation:
- Rows 1–4: Cream
- Rows 5–8: Dusty rose
- Rows 9–12: Blush pink
- Rows 13–16: Cream
- Rows 17–20: Sage green
- Rows 21–24: Cream
- Rows 25–28: Pale lavender
- Rows 29–32: Cream
Repeat this 32-row sequence until the blanket approaches the required length.
The precise row count in the photograph cannot be determined reliably because sections of the blanket are folded and viewed in perspective. Physical measurement is therefore a better stopping condition than attempting to reproduce an estimated photographic row count.
For a finished length close to 93 cm, periodically lay the work flat and measure through the center. Stop the main body at a complete color band whenever possible.
Side Preparation Round
Yarn: dusty rose or border pink.
The scalloped border needs an even foundation around all four sides. Complete this preparation round before adding the decorative shells.
Round 1: Join the border yarn in a corner. Ch 1 and sc evenly around the entire blanket. Work 3 sc in each corner.
Along the top and bottom edges, work into the established stitches or spaces without adding unnecessary stitches.
Along the row ends, distribute the single crochet stitches evenly. Do not automatically place one stitch into every visible loop if the fabric begins to ripple.
Join with a sl st to the first sc.
Place the blanket on a flat surface before continuing. A border that waves usually contains too many stitches. A border that pulls inward generally contains too few.
Scalloped Border
Yarn: dusty rose.
The photographed blanket has broad rounded scallops around the perimeter. The following border creates a comparable silhouette.
Round 2: Ch 1 and sc in each stitch around, placing 3 sc into the center stitch of each corner. Join with a sl st.
Round 3: Ch 1. Skip 2 sts, work 5 dc in the next st, skip 2 sts, then sc in the next st. Repeat around the blanket.
At each corner, adjust the spacing slightly when necessary so a shell is centered on or immediately around the corner. Do not force the standard repeat if the remaining corner stitches do not divide evenly.
Join with a sl st.
Round 4 — optional: Work loose slip stitches around the shell edge when additional definition is wanted. Omit this round if the slip stitches cause the scallops to contract.
Fasten off, leaving approximately a 15 cm yarn tail.
Changing the Blanket Size
Granny stripes scale more accurately by stitch repeat than by copying another crocheter’s starting-chain number. Use a foundation based on a multiple of 3 + 2.
Make a swatch first. Count how many complete clusters fit into 10 cm, determine the required finished width, and calculate the necessary number of cluster repeats from that measurement.
For example, a gauge of six clusters per 10 cm gives approximately 43.8 clusters across a 73 cm width. Round this to a practical whole-repeat count and calculate the foundation chain from the required repeat.
Length is easier to adjust. Continue adding rows until the main body reaches the planned measurement minus the depth that will be added by the border.
Do not calculate blanket size from the number of yarn balls alone. Meterage varies between DK yarns, and two balls of identical weight can contain different lengths of yarn.
Controlling the Pastel Stripe Sequence
The photograph gets much of its structure from differences in color value rather than extreme contrast. Cream functions as the separator. Sage green and lavender form the cooler bands, while dusty rose and blush pink provide the warmer sections.
Write the sequence down before starting:
Cream → dusty rose → blush pink → cream → sage green → cream → lavender → cream.
Mark each band as it is completed.
If the blanket needs to be longer, repeat the complete sequence rather than introducing unrelated colors near the end. For a shorter blanket, stop after a complete cream separator or accent band so the final section does not appear interrupted.
Changing yarn after several rows also reduces the number of ends compared with changing colors every row. Each independent color change can create two additional yarn tails that eventually need to be secured.
Finishing
Weave the yarn tails horizontally through dense sections of matching-color clusters instead of carrying them across the open granny spaces. Reverse direction at least once so the yarn has additional resistance against working loose.
Trim a tail only after it has been woven securely through several centimeters of fabric.
Measure the completed blanket on a flat surface. A useful reference size for this project is approximately 73 × 93 cm, but your result can differ because gauge, yarn composition, border spacing, and finishing methods affect the dimensions.
Follow the care instructions printed on the selected yarn label. Acrylic, cotton, wool, and blended DK yarns can require different washing and drying methods.
Assembly and Final Checks
- Complete the granny-stripe body to the planned length.
- Check that the first and last edges maintain the same number of repeating positions.
- Lay the rectangle flat and inspect both side edges for narrowing or widening.
- Weave the body color-change tails into matching-color clusters.
- Join the border yarn at a corner rather than halfway along a prominent edge.
- Work the preparation round evenly around all four sides.
- Check the preparation round for cupping or rippling before starting the shells.
- Crochet the scalloped round, adjusting the repeat only where necessary at the corners.
- Weave the border tails through the denser base stitches.
- Measure the finished blanket flat and record its dimensions, yarn, and hook size for future versions.
The completed piece consists of one striped rectangular body surrounded by a continuous scalloped border.
7 Technical Tips for a Cleaner Granny Stripe Blanket
- Use stitch markers to catch edge loss. Place one marker at each end of the active row. If a marker gradually shifts inward, an edge stitch or cluster has probably been omitted.
- Check the width every 10–12 rows. A noticeable change of approximately 1 cm over a short section can indicate tension drift or an accidental change in the repeat count.
- Do not pull the color-change stitch excessively tight. A tight join shortens one side edge and can gradually curve an otherwise rectangular blanket.
- Count clusters during routine checks. One missing three-double-crochet group creates a structural gap and alters the placement of the following row.
- Test border spacing after completing one full side. Rippling indicates excessive base stitches, while inward curling generally means additional stitches are required.
- Center the corner scallops before finishing the border. Temporarily pinning the four corners makes uneven shell placement visible before the final yarn tail is cut.
- Weave each tail approximately 5–7 cm through dense stitches. A tail carried through an open granny space remains more visible and has less friction holding it in position.
Conclusion
Finish the final scallop, weave the remaining border tail through at least 5–7 cm of dense stitches, then measure the blanket flat and record its dimensions. That measurement gives you a personal gauge reference for resizing the next version. For this granny stripe crochet blanket, the practical next step is making a small five-color swatch and checking the cluster spacing with a 4 mm hook. Save the finished color sequence to Pinterest and share the completed throw on Instagram with #PastelGrannyStripeBlanket. Which detail would you keep unchanged: the sage-and-lavender stripe sequence or the dusty-pink scalloped border?









