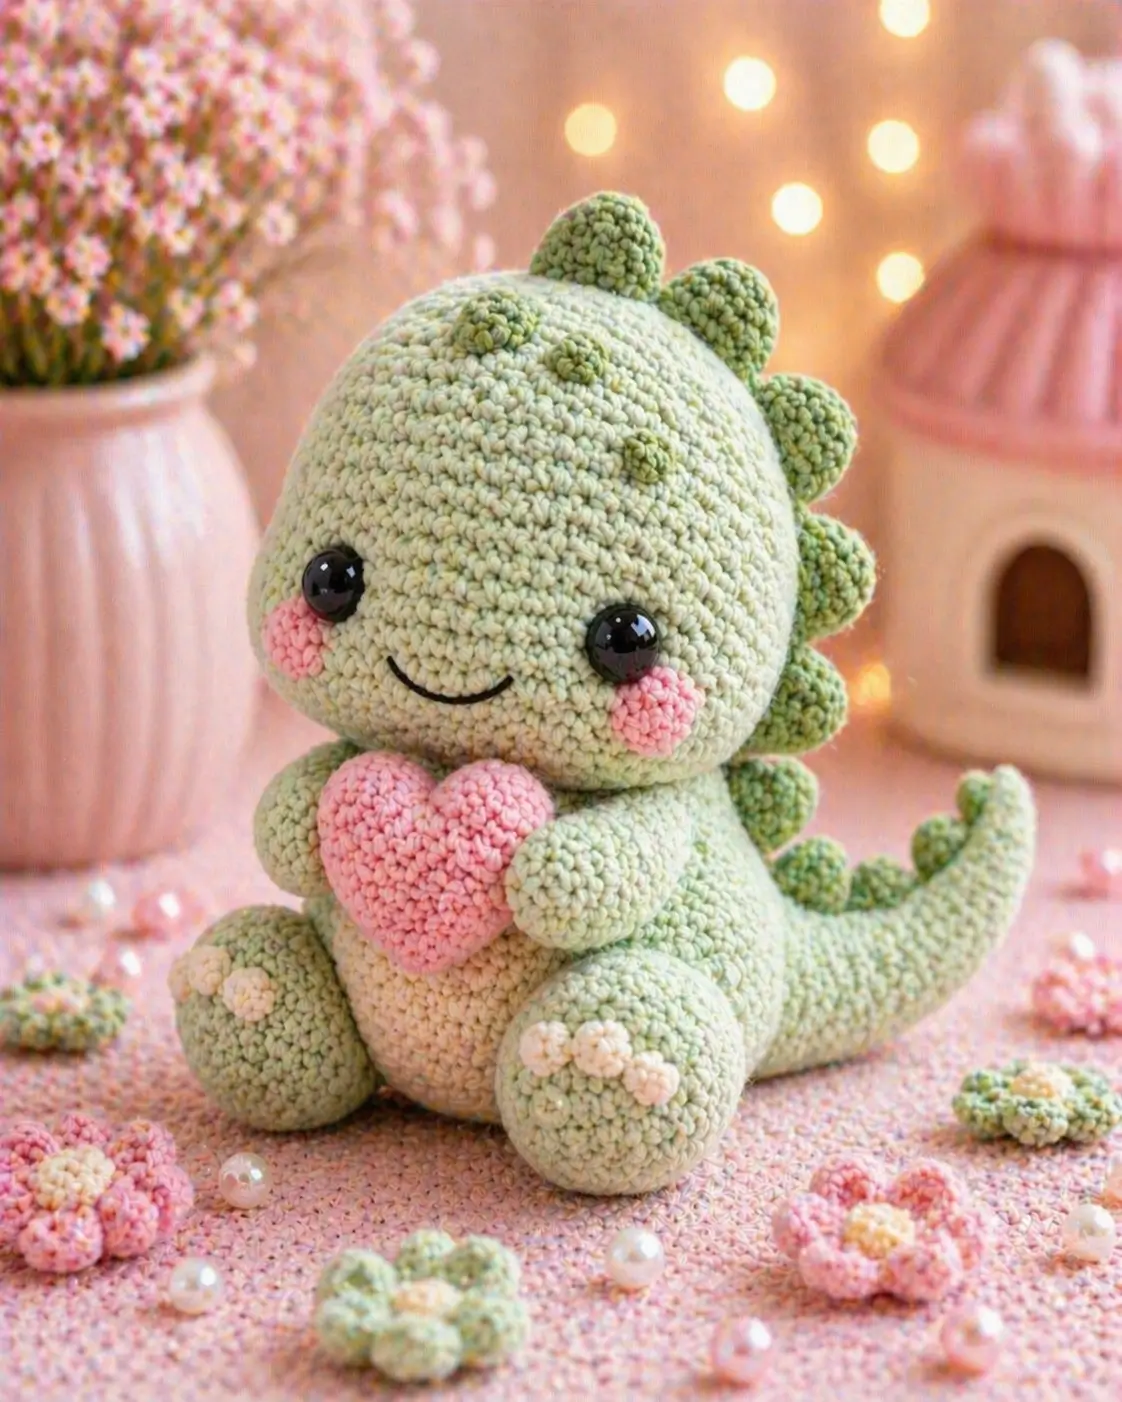
A dinosaur reads as a dinosaur from the spine line first, not the smile. This dinosaur amigurumi crochet pattern uses aran cotton, a 3.75 mm hook, and compact round shaping to build a seated pastel dino about 20 cm tall. Skill level sits at advanced beginner. The heart prop gives it a practical role as a shelf plush, nursery gift, or seasonal desk piece.
The Design: What Makes This Dinosaur Different
The photo pushes three structural choices. First, the head has to dominate, so this version keeps a medium 36-stitch sphere and a smaller seated body; that ratio keeps the toy in baby-dino territory instead of lizard territory. Second, the tail must leave the body low and firm enough to act as a third contact point, because a sitting dinosaur amigurumi will roll backward when the tail is stuffed like a limb. Third, rounded dorsal bumps suit a pastel dinosaur crochet pattern better than sharp plates, since the silhouette stays soft even with visible spine detail. You should pin the spikes before sewing any limb. The toy then carries the full center line cleanly from crown to tail. A common mistake is placing the eyes too low, which pushes the face toward frog proportions. Published dinosaur patterns also regularly solve the outline with separate tails and added spikes, which supports that choice here.
Project Info at a Glance
| Skill Level | Time | Finished Size | Hook | Best For |
|---|---|---|---|---|
| Advanced beginner | ~13 hours reported by one maker | 20 cm sitting | 3.75 mm | Gift plush / shelf display |
Size, hook, and base materials come from a sitting dinosaur listing, while the time line above comes from a verified buyer review on that same page. Dinosaur market results also frame these projects as plush gift items and display toys.
Materials and Tools
Published sitting dinosaur references in this size range use 10ply aran cotton and roughly 80 g of main color yarn, with 9 mm to 12 mm safety eyes depending on surface style. Cotton or cotton-blend yarn holds the spine bumps and cheek circles flatter than softer microfiber.
Yarn
- Mint green — aran cotton — 80 g — Paintbox Cotton Aran Spearmint Green or similar
- Cream — aran cotton — 20 g — Paintbox Cotton Aran Champagne White or similar
- Blush pink — aran cotton — 20 g — Paintbox Cotton Aran Blush Pink or similar
- Sage green — aran cotton — 10 g — Paintbox Cotton Aran Racing Green or similar
- Black — embroidery floss — small amount — for smile
Tools
- Hook 3.75 mm
- 9–10 mm safety eyes
- Polyester stuffing
- Yarn needle
- Stitch markers
- Pins
Abbreviations
MR = magic ring, sc = single crochet, inc = increase, dec = invisible decrease, sl st = slip stitch, ch = chain, BLO = back loop only, FO = fasten off. BLO appears only when a bend line or attachment ridge is useful.
Invisible decrease keeps the face and body shaping cleaner than a standard two-stitch decrease, especially on pale yarn.
Pattern — Step by Step
Continuous spiral unless noted.
Head (Make 1)
Yarn: mint green — Source: standard amigurumi math
R1: 6 sc in MR (6)
R2: inc x6 (12)
R3: (sc, inc) x6 (18)
R4: (2 sc, inc) x6 (24)
R5: (3 sc, inc) x6 (30)
R6: (4 sc, inc) x6 (36)
R7: sc around (36)
R8: sc around (36)
R9: sc around (36)
R10: sc around (36)
R11: sc around (36)
R12: sc around (36)
R13: sc around (36)
R14: (4 sc, dec) x6 (30)
R15: sc around (30)
R16: (3 sc, dec) x6 (24)
R17: (2 sc, dec) x6 (18)
R18: (sc, dec) x6 (12)
R19: dec x6 (6)
Insert safety eyes between R10 and R11, 10 stitches apart. Stuff firm before R17.
Fasten off. Leave 20 cm tail.
Body (Make 1)
Yarn: mint green — Source: standard amigurumi math
R1: 6 sc in MR (6)
R2: inc x6 (12)
R3: (sc, inc) x6 (18)
R4: (2 sc, inc) x6 (24)
R5: (3 sc, inc) x6 (30)
R6: (4 sc, inc) x6 (36)
R7: sc around (36)
R8: sc around (36)
R9: sc around (36)
R10: sc around (36)
R11: (4 sc, dec) x6 (30)
R12: sc around (30)
R13: (3 sc, dec) x6 (24)
R14: sc around (24)
R15: sc around (24)
R16: (2 sc, dec) x6 (18)
R17: (sc, dec) x6 (12)
R18: dec x6 (6)
Stuff lower body medium-firm. Keep the front round, but compress the back slightly so the tail can brace the seated angle.
Fasten off. Leave 25 cm tail.
Belly Patch (Make 1)
Yarn: cream — Source: photo-derived original pattern
Ch 5.
R1: starting in 2nd ch from hook, sc 3, 3 sc in last ch, working on opposite side sc 2, inc in last ch (10)
R2: inc, sc 2, inc x3, sc 2, inc x2 (16)
R3: sc, inc, sc 2, (sc, inc) x3, sc 2, (sc, inc) x2 (22)
Do not stuff. This patch should sit flat.
Fasten off. Leave 25 cm tail.
Arms / Front Legs (Make 2)
Yarn: mint green — Source: standard amigurumi math
R1: 6 sc in MR (6)
R2: inc x6 (12)
R3: sc around (12)
R4: sc around (12)
R5: sc around (12)
R6: sc around (12)
R7: sc around (12)
Stuff only the lower half. Flatten the opening before sewing so each arm hugs the heart instead of sticking straight out.
Fasten off. Leave 18 cm tail.
Back Legs (Make 2)
Yarn: mint green — Source: standard amigurumi math
R1: 6 sc in MR (6)
R2: inc x6 (12)
R3: (sc, inc) x6 (18)
R4: sc around (18)
R5: sc around (18)
R6: sc around (18)
R7: (sc, dec) x6 (12)
R8: sc around (12)
R9: sc around (12)
Stuff the foot section firm and leave the upper edge soft. That contrast gives the seated shape more contact with the table.
Fasten off. Leave 25 cm tail.
Forehead Bumps (Make 2)
Yarn: sage green — Source: photo-derived original pattern
R1: 6 sc in MR (6)
R2: inc x6 (12)
R3: sc around (12)
Stuff very lightly or leave unstuffed for flatter bumps.
Fasten off. Leave 12 cm tail.
Dorsal Spikes (Make 7)
Yarn: sage green — Source: photo-derived original pattern
R1: 6 sc in MR (6)
R2: inc x6 (12)
R3: sc around (12)
Do not overstuff. Slightly flatten each piece so it reads as a rounded back bump rather than a ball.
Fasten off. Leave 15 cm tail on each.
Tail (Make 1)
Yarn: mint green — Source: standard amigurumi math
R1: 6 sc in MR (6)
R2: inc x6 (12)
R3: (sc, inc) x6 (18)
R4: sc around (18)
R5: sc around (18)
R6: sc around (18)
R7: (2 sc, inc) x6 (24)
R8: sc around (24)
R9: sc around (24)
R10: sc around (24)
R11: sc around (24)
R12: sc around (24)
R13: (2 sc, dec) x6 (18)
R14: sc around (18)
R15: sc around (18)
R16: sc around (18)
Stuff the base firm and the tip lightly. Keep the opening unclosed so the tail can be sewn to the lower back with a lifted curve.
Fasten off. Leave 30 cm tail.
Cheek Patches (Make 2)
Yarn: blush pink — Source: photo-derived original pattern
R1: 6 sc in MR (6)
Sl st to first stitch.
These are flat circles, not stuffed pieces.
Fasten off. Leave 10 cm tail.
Toe Dots (Make 6)
Yarn: cream — Source: photo-derived original pattern
R1: 6 sc in MR (6)
Make three for each back foot. Keep them tiny.
Fasten off. Leave 8 cm tail.
Heart Accessory (Make 1)
Yarn: blush pink — Source: photo-derived original pattern
First Half
R1: 6 sc in MR (6)
R2: inc x6 (12)
R3: sc around (12)
Second Half
R1: 6 sc in MR (6)
R2: inc x6 (12)
R3: sc around (12)
Join Halves
R4: sc 12 around first half, sc 12 around second half (24)
R5: sc around (24)
R6: (2 sc, dec) x6 (18)
R7: sc around (18)
R8: (sc, dec) x6 (12)
R9: dec x6 (6)
Stuff lightly after R8. Shape the lobes with your fingers before closing the point.
Fasten off. Leave 30 cm tail.
Assembly
- Sew the head to the body with the head centered and the face angled slightly downward.
- Attach the belly patch to the front body, with its top edge about two rounds below the neck seam.
- Place the cheek patches below the eyes, then embroider a shallow smile in black floss one round lower than the eye line.
- Sew the arms high on the body so they angle inward toward the center front.
- Attach the back legs low and slightly forward so the dinosaur sits on its feet and lower body, not only on the tail.
- Sew three toe dots across the front curve of each back foot.
- Add the two forehead bumps on the crown, centered above the eyes.
- Pin all seven dorsal spikes in one straight center line, then sew them from crown to tail base.
- Sew the tail to the lower back with the curve lifting upward and away from the floor.
- Stitch the heart between the arms and tack it to the body at two hidden points.
The sample stands in a stable seated pose once the leg angle, tail brace, and arm tacks are locked in place.
7 Technical Tips
- Use one locking stitch marker for the start of every round. Missing one round on the head can move the eye band by 4–5 mm, and the cheeks will no longer balance left to right.
- Stuff the head firm, the body medium-firm, and the tail base firm again. A soft tail base is the most common reason a seated dinosaur tips backward after assembly.
- Work invisible decreases on all visible shaping rounds from Head R14 onward. Standard decreases leave ridges that show immediately on pale mint yarn.
- Insert the safety eyes before the head closes past 24 stitches. Waiting until 18 stitches or fewer can stretch the fabric and distort the round eye shape.
- If you switch this build to chenille or velvet, go down about 0.5 mm in hook size first. Looser plush tension can make the eye posts wobble and spread the spike seam.
- Pin the spikes first and check them from front, side, and top view. A one-stitch drift at the crown becomes obvious by the time you reach the tail.
- Weave every yarn tail back through at least three direction changes inside the body. One straight buried tail can work loose when the heart is tugged or the plush is squeezed.
Conclusion
This dinosaur amigurumi crochet pattern works best when the silhouette is treated as three aligned masses: head, body, and tail. Build one sample in the listed colors first, then adjust only the spikes or heart size on later versions so the seated balance stays consistent. Post the side profile to Pinterest, because the spine line is what sells the dinosaur shape fastest. Share the front view on Instagram so the cheek spacing and arm angle read clearly. Use the tag #PastelHeartDino to keep versions grouped. The next step is simple: pin your spike line before sewing anything permanent. One question matters with this character more than most others: did your tail hold the sit angle, or does this dinosaur need one more round of firm stuffing at the base?









