Introduction
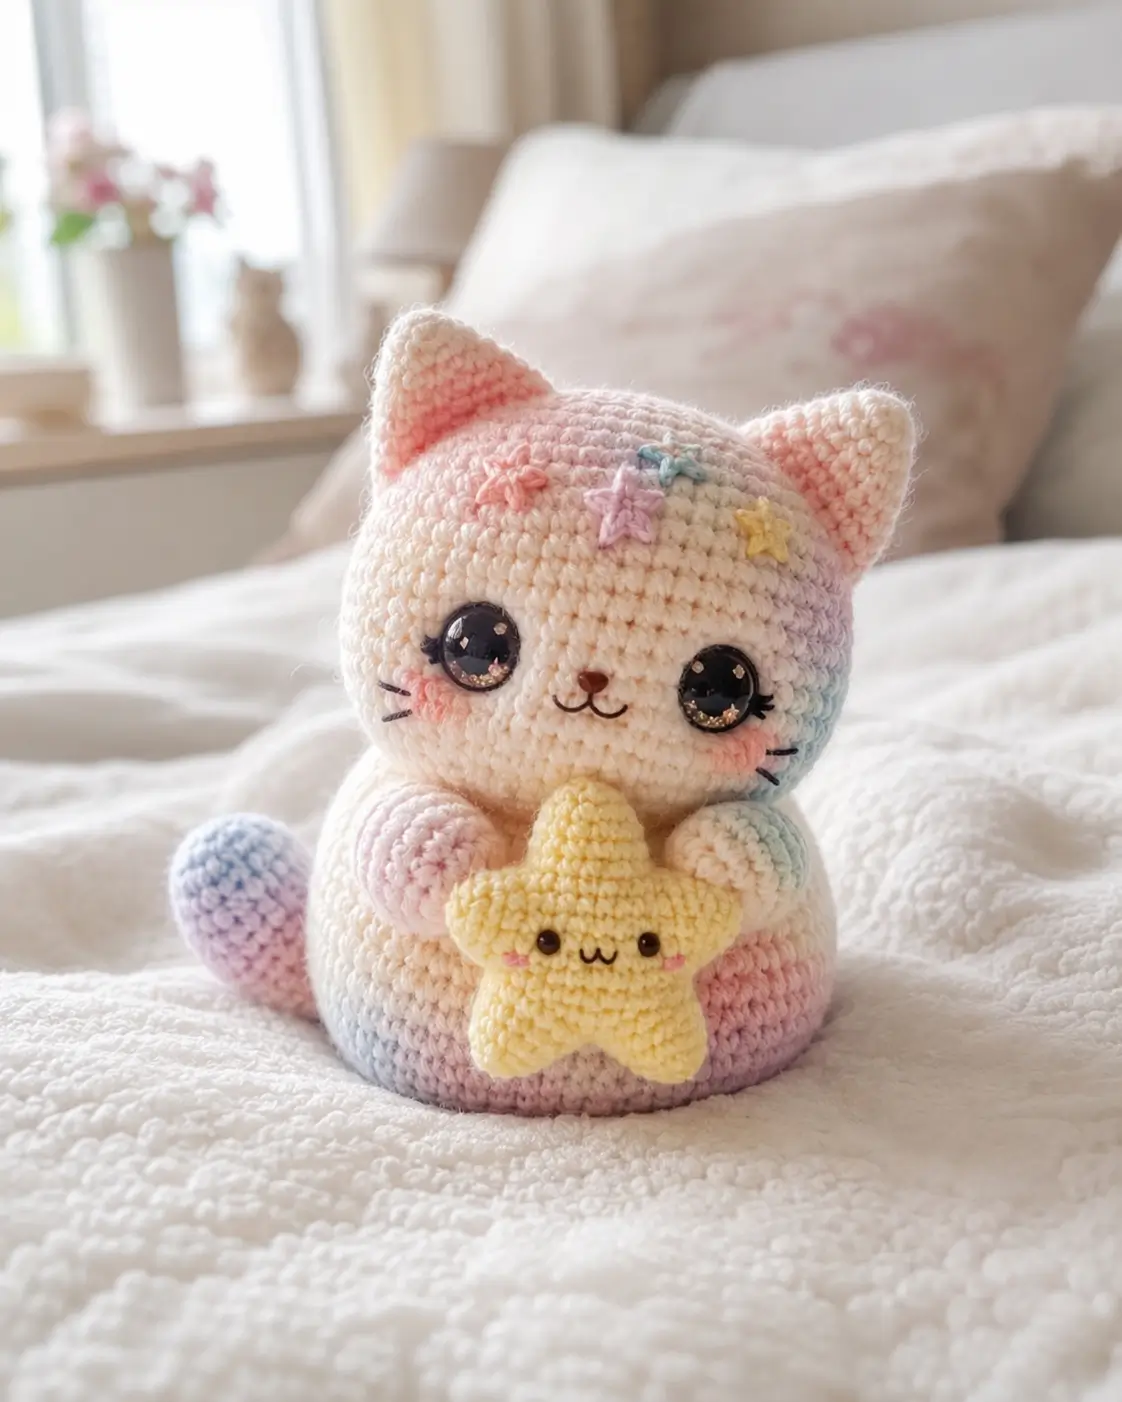
Cats read wrong the moment the ear triangles sink into the head dome. This cat amigurumi crochet pattern fixes that first, then builds a seated pastel body, 12 mm eyes, DK yarn structure, and a separate star accessory into a project that finishes at about 16 cm. It suits an advanced beginner or intermediate maker and works well as shelf decor, nursery display, or a photo-ready gift model based on current cat pattern sizing and materials.
The Design: What Makes This Cat Different
You are not building a standing kitten here. The shape depends on a deep seated base, a broad face, and ears that sit high enough to break the top curve cleanly. That choice matters because rounded heads can drift toward bear proportions unless the ear width and angle are pushed early. The front paws stay small and forward so the star remains visible instead of disappearing into the belly line.
A second choice is the pastel distribution. Many generic pastel cat amigurumi patterns use stripes or single-color blocking, but this one benefits from soft pooling across the head, tail, and lower body because the silhouette is simple. The third choice is the flat cheek circle. It adds facial width without adding muzzle bulk. A common failure in a sitting cat amigurumi is overstuffing the head and underfilling the base; the result tips forward and hides the paws.
Project Info at a Glance
| Skill Level | Time | Finished Size | Hook | Best For |
|---|---|---|---|---|
| Advanced beginner / intermediate | 5–7 hours | About 16 cm seated | 3.0 mm | Decor, gift make, pastel nursery styling |
Size and hook are aligned to comparable DK cat patterns in the 15–19 cm seated range.
Materials and Tools
Yarn
- Cream/pastel variegated — DK / light worsted — 40–55 g — Paintbox Cotton DK or similar
- Cream — DK / light worsted — 15 g — for ears, paws, cheek circles if needed
- Yellow — DK / light worsted — less than 10 g — star accessory
- Pink, lilac, blue, mint — small scraps — forehead stars and blush accents
- Brown or black embroidery thread — small amount — nose, mouth, whiskers
Tools
- Hook 3.0 mm
- 12 mm safety eyes
- Polyester stuffing
- Yarn needle
- Stitch markers
- Pins
- Blush or pastel chalk for cheeks, optional
Abbreviations
- MR = magic ring
- sc = single crochet
- inc = increase
- dec = invisible decrease
- sl st = slip stitch
- ch = chain
- BLO = back loop only
- FO = fasten off
Invisible decrease is used on visible shaping rounds because it reduces gaps on stuffed surfaces.
Pattern — Step by Step
Continuous spiral unless noted.
Head (Make 1)
Yarn: pastel variegated — Source: Standard amigurumi math with medium 36-st plateau
R1: 6 sc in MR (6)
R2: inc x6 (12)
R3: (1 sc, inc) x6 (18)
R4: (2 sc, inc) x6 (24)
R5: (3 sc, inc) x6 (30)
R6: (4 sc, inc) x6 (36)
R7–R12: sc around (36)
R13: (4 sc, dec) x6 (30)
R14: (3 sc, dec) x6 (24)
Insert safety eyes between R8 and R9, 8 sts apart. Embroider nose and mouth after stuffing.
R15: (2 sc, dec) x6 (18)
Stuff firmly at the lower half, lighter near crown.
R16: (1 sc, dec) x6 (12)
R17: dec x6 (6)
Fasten off. Close opening. Leave 15 cm tail.
Body (Make 1)
Yarn: pastel variegated — Source: Standard amigurumi math with medium 36-st plateau
R1: 6 sc in MR (6)
R2: inc x6 (12)
R3: (1 sc, inc) x6 (18)
R4: (2 sc, inc) x6 (24)
R5: (3 sc, inc) x6 (30)
R6: (4 sc, inc) x6 (36)
R7–R11: sc around (36)
R12: (4 sc, dec) x6 (30)
R13: (3 sc, dec) x6 (24)
R14: (2 sc, dec) x6 (18)
Stuff base very firmly so the cat sits level.
R15: BLO sc around (18)
R16: sc around (18)
Fasten off. Leave 20 cm tail for sewing.
Front Paws (Make 2)
Yarn: cream or pastel scrap — Source: Standard amigurumi math
R1: 6 sc in MR (6)
R2: inc x6 (12)
R3: BLO sc around (12)
R4–R5: sc around (12)
R6: (1 sc, dec) x4 (8)
Light stuffing only in paw pad.
R7–R9: sc around (8)
Flatten top and crochet 4 sc through both sides. Fasten off. Leave 20 cm tail.
Back Legs (Make 2)
Yarn: cream or pastel scrap — Source: Standard amigurumi math
R1: 6 sc in MR (6)
R2: inc x6 (12)
R3: (1 sc, inc) x6 (18)
R4: BLO sc around (18)
R5: sc around (18)
R6: (1 sc, dec) x6 (12)
Stuff front half only so the foot keeps a pad shape.
R7: sc around (12)
R8: (4 sc, dec) x2 (10)
R9: sc around (10)
Flatten and close with 5 sc. Fasten off. Leave 20 cm tail.
Ears (Make 2)
Yarn: cream/pastel — Source basis: Supergurumi cat ear shaping
R1: 4 sc in MR (4)
R2: inc x4 (8)
R3: (1 sc, inc) x4 (12)
R4: 1 sc, inc, (2 sc, inc) x3, 1 sc (16)
R5–R6: sc around (16)
Flatten without stuffing. Fasten off. Leave 18 cm tail.
Tail (Make 1)
Yarn: pastel variegated — Source basis: narrow tube tail construction from cat patterns
R1: 6 sc in MR (6)
R2–R11: sc around (6)
Stuff lightly or insert a little extra stuffing at tip only.
Fasten off. Leave 20 cm tail.
Cheek Patches (Make 2)
Yarn: pale pink — Source: Standard flat circle math
R1: 6 sc in MR (6)
R2: inc x6 (12)
Fasten off with invisible finish. Leave 12 cm tail.
Forehead Stars (Make 3–4)
Yarn: pink, lilac, blue, yellow — Source basis: star accessory references and applique scale data
For each mini star:
Ch 2.
Into 2nd ch from hook work: (sl st, ch 2, sl st) five times around the same point.
Fasten off. Leave tail for sewing.
Star Accessory — Front (Make 1)
Yarn: yellow — Source basis: small amigurumi star sizing references
R1: 5 sc in MR (5)
R2: inc x5 (10)
R3: (sl st in next st, 2 sc in next st) x5 (15)
R4: (sl st in next st, sc in next st, 2 sc in next st) x5 (20)
Fasten off.
Star Accessory — Back (Make 1)
Yarn: yellow — Source: same as front
Work R1–R4 same as front. Do not fasten off.
Join Star Accessory
Place pieces wrong sides together.
Sc evenly through both layers around all five points, using 20 joining sts total.
Add 5 mm eyes or embroider the face before closing. Stuff lightly halfway through.
Fasten off. Leave 25 cm tail for tacking to paws if desired.
Assembly
- Sew the head to the body, centering the neck opening over the body top.
- Pin both ears to the head so the inner edges sit about 3 stitches apart at the crown line, then sew.
- Attach the safety eyes if not already placed, then embroider a small brown nose centered between them.
- Embroider the mouth directly under the nose and add three short whisker lines on each side.
- Sew the cheek patches low on the face, one round below the outer corners of the eyes.
- Attach the front paws to the body front, spaced 4 stitches apart, angled inward to hold the star.
- Sew the back legs to the lower sides of the body so the flat paw pads face forward.
- Attach the tail to the back center, low enough to act as a third support point.
- Sew the mini forehead stars across the upper front head in an uneven cluster.
- Position the yellow star between the front paws and tack it in place with two or three hidden stitches.
The finished model should sit flat on its base with the tail and lower body supporting the rear line.
7 Technical Tips
- Mark R1 from the start. Losing the first stitch marker on a 36-st head shifts the eye line, and even a two-stitch drift makes the face look cross-eyed.
- Pack the body base harder than the crown. A soft base collapses into an oval and the seated cat rolls forward instead of staying upright.
- Use invisible decreases on the head. Standard decreases leave slots that show stuffing near the face, especially around R13–R16.
- Install eyes before the final head decreases. On a 24-st opening, washer placement is still manageable; at 18 or 12 stitches it becomes awkward and can distort the face.
- Pin both paws with the star in place before sewing. Without that check, the paws often end up symmetric to each other but too wide to grip the accessory.
- Keep tail stuffing light. A rigid tail pushes the body off level, while a lightly filled tail supports the silhouette without forcing the cat forward.
- Weave tails across at least 3 direction changes. Short straight weaves can work loose in high-curve pieces like ears and cheek circles.
Conclusion
This cat amigurumi crochet pattern works because the structure stays disciplined: medium 36-st shaping, high-set ears, a stable seated base, and small flat details that widen the face without changing the silhouette. Start with the head and body first, then test the paw spacing with the star before you commit to assembly. Share the finished cat on Pinterest and Instagram with one clear front photo and one side view so the tail placement reads correctly. Use #PastelCatWithStar when posting. For this specific design, did you place the forehead stars in a straight line, or did you stagger them to keep the cat’s face less symmetrical?









