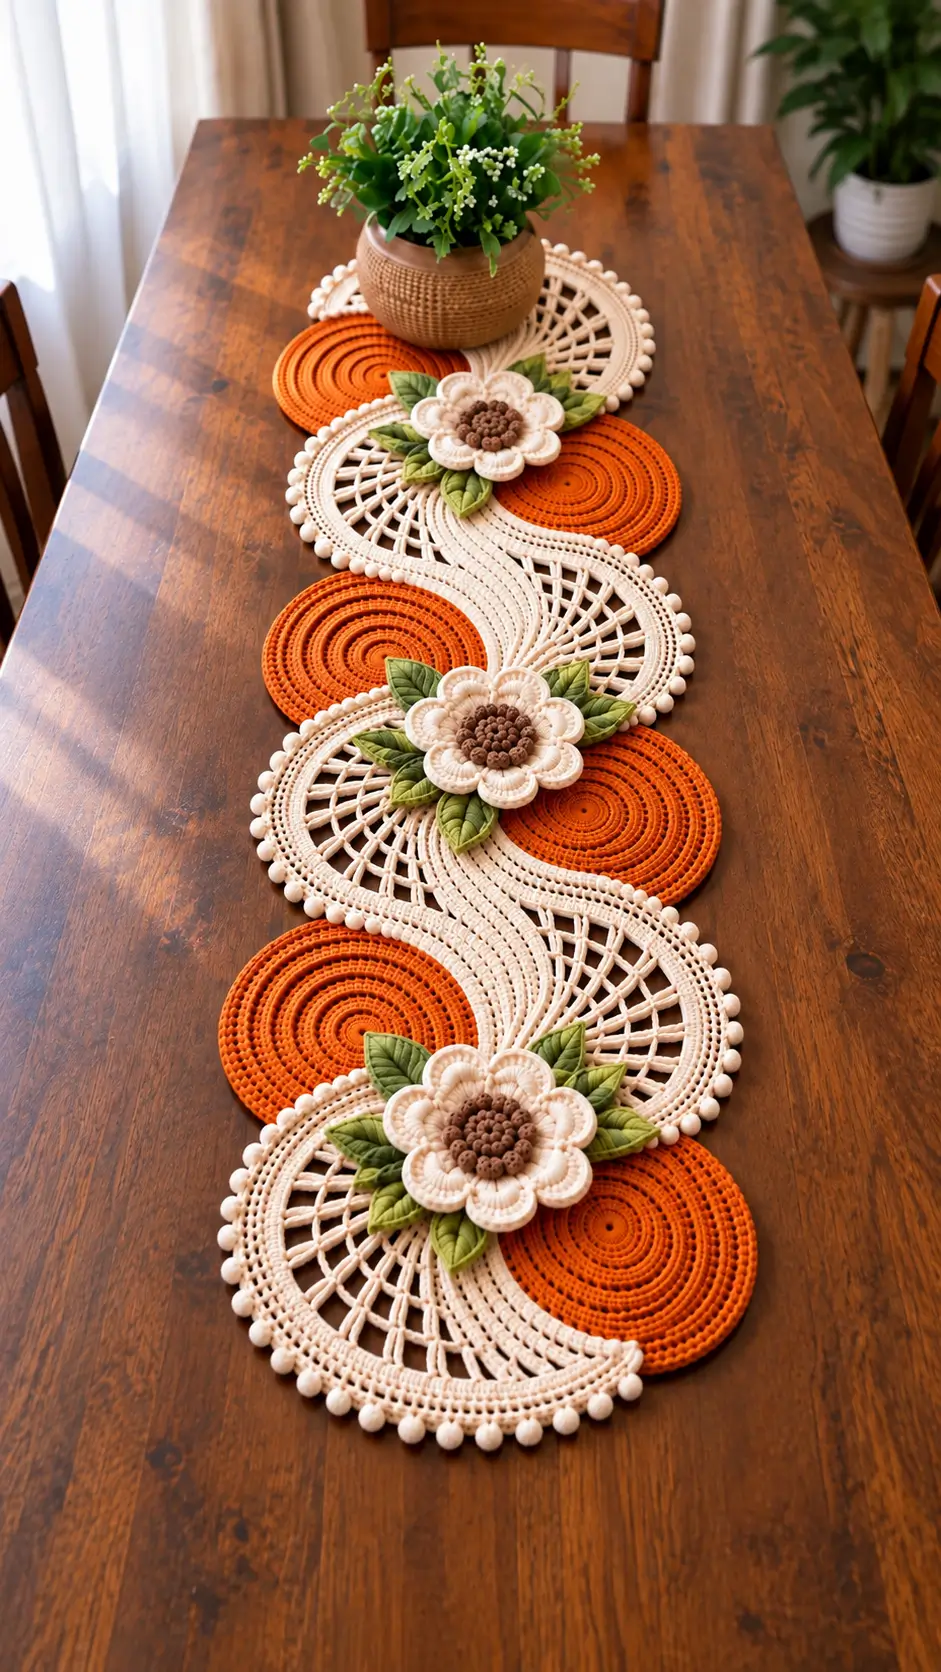
Six burnt-orange circles give this runner its rhythm, but the cream S-shaped lace sections are what hold the composition together. This orange floral crochet table runner pattern recreates the photographed design with circular medallions, open crochet lace, dimensional cream flowers, brown centers, olive leaves, and a bobble-style outer edging. Use cotton yarn with a 3.5 mm hook. The project is best suited to an intermediate crocheter and can be lengthened by adding another motif repeat.
The Design: What Makes This Floral Table Runner Different
The runner is constructed from separate components rather than crocheted as one conventional rectangle. Dense orange circles alternate from left to right, while large cream lace motifs overlap the circles and create the flowing S-shaped center line visible in the photograph.
Three raised flowers cover the major joining points. Their brown textured centers sit above two layers of cream petals, while pointed olive leaves extend diagonally behind each bloom. This placement is structural as well as decorative: the flower-and-leaf groups conceal several motif joins.
The main construction problem is keeping the circular pieces flat. Too many increases produce ruffling; too few cause the medallions to cup. The second common problem is joining the lace sections before blocking them. Block every large motif individually, check its diameter, and only then assemble the full crochet floral table runner.
Project Info at a Glance
| Skill Level | Intermediate |
|---|---|
| Construction | Separate motifs joined by sewing |
| Approx. Finished Size | 34 × 125 cm, adjustable |
| Hook | 3.5 mm |
| Recommended Yarn | DK / light-worsted cotton |
| Main Colors | Cream, burnt orange, olive green, brown |
| Best For | Dining tables, console tables and sideboards |
Materials and Tools
Yarn
- Cream cotton yarn — DK/light-worsted — approximately 250–300 g
- Burnt-orange cotton yarn — DK/light-worsted — approximately 150–180 g
- Olive-green cotton yarn — DK/light-worsted — approximately 50–70 g
- Brown cotton yarn — DK/light-worsted — approximately 30–40 g
The exact yarn quantity depends on the final runner length, yarn twist, gauge, and the number of motif repeats. Cotton is preferable for this construction because it produces defined circular edges and responds well to blocking.
Tools
- 3.5 mm crochet hook
- Yarn needle
- Scissors
- Stitch markers
- Blocking mat and rust-resistant pins
- Measuring tape
Abbreviations
- MR — magic ring
- ch — chain
- sc — single crochet
- hdc — half double crochet
- dc — double crochet
- tr — treble crochet
- sl st — slip stitch
- st / sts — stitch / stitches
- inc — 2 stitches in the same stitch
- ch-sp — chain space
- BLO — back loop only
- FLO — front loop only
When a decrease is required, an invisible decrease is made through the front loops of the next two stitches before completing the single crochet.
Pattern — Step by Step
Use US crochet terminology. Unless a motif specifically states otherwise, close joined rounds with a slip stitch. Check each completed circular motif on a flat surface before continuing.
Orange Circular Medallions — Make 6
Yarn: burnt orange.
R1: 6 sc in MR (6)
R2: inc × 6 (12)
R3: (1 sc, inc) × 6 (18)
R4: (2 sc, inc) × 6 (24)
R5: (3 sc, inc) × 6 (30)
R6: (4 sc, inc) × 6 (36)
R7: (5 sc, inc) × 6 (42)
R8: (6 sc, inc) × 6 (48)
R9: (7 sc, inc) × 6 (54)
R10: (8 sc, inc) × 6 (60)
R11: (9 sc, inc) × 6 (66)
R12: (10 sc, inc) × 6 (72)
At this point the circle should remain completely flat. If it begins to ripple, work the next round without increases.
R13: sc around (72)
R14: (11 sc, inc) × 6 (78)
R15: sc around (78)
R16: (12 sc, inc) × 6 (84)
R17: sc around (84)
R18: (13 sc, inc) × 6 (90)
Fasten off and weave in the tail. Block each circle to approximately the same diameter before assembly. Make all six orange circles before beginning the lace pieces so any gauge difference can be corrected early.
Large Cream Lace Medallions — Make 4
Yarn: cream.
R1: 6 sc in MR (6)
R2: inc × 6 (12)
R3: (1 sc, inc) × 6 (18)
R4: (2 sc, inc) × 6 (24)
R5: (3 sc, inc) × 6 (30)
R6: (4 sc, inc) × 6 (36)
R7: Ch 5, skip 2 sts, sc in next st. Repeat around, adjusting the final space if necessary.
R8: Sl st into first ch-sp. Work 6 sc into every ch-5 space around.
R9: Ch 7, skip 3 sc, sc between the next groups. Repeat around.
R10: Work 8 sc in each ch-7 space.
R11: Ch 9, skip 4 sc, sc at the midpoint between arches. Repeat around.
R12: Work 10 sc into every ch-9 space.
R13: Ch 11, skip 5 sc, sc between arches. Repeat around.
R14: Work 12 sc into each ch-11 space.
The widening chain arches create the radial openwork visible in the photographed cream sections.
Shaped Cream Outer Band
The photographed cream components are not complete circles. Each one behaves more like a broad crescent, allowing the neighboring orange circle to remain visible.
Fold the completed lace medallion visually into two halves and mark approximately one-third of the circumference that will overlap an orange circle. Do not add the wide border across that marked section.
Join cream yarn at the first marker.
Row 1: Sc evenly around the exposed two-thirds of the medallion.
Row 2: Ch 3, turn. Dc across, placing 2 dc into approximately every sixth stitch to prevent the curved edge from tightening.
Row 3: Ch 1, turn. Sc across.
Row 4: Ch 3, turn. Dc across with evenly distributed increases along the outer curve.
Row 5: Ch 1, turn. Sc across.
Fasten off. Block the motif into a smooth crescent before adding the decorative edging.
Cream Bobble-Style Edge
Join cream yarn at one end of the shaped outer band.
Edging: *Sc in next 3 sts, ch 5, work 5 dc into the third chain from the hook, remove hook from loop, insert hook into first dc, pull working loop through to close the cluster, ch 1, sc in next 3 sts.* Repeat along the exposed curved edge.
Adjust the spacing by one stitch where required. The raised clusters should sit approximately 1.5–2 cm apart and face away from the center of the runner.
Large Layered Cream Flowers — Make 3
Each flower consists of a brown center plus two cream petal layers.
Brown Flower Center
Yarn: brown.
R1: 6 sc in MR (6)
R2: inc × 6 (12)
R3: (1 sc, inc) × 6 (18)
R4: (2 sc, inc) × 6 (24)
R5: (3 sc, inc) × 6 (30)
Do not cut the yarn yet.
Textured round: Work a small raised cluster into each alternate stitch. A compact 3-dc bobble works well. Keep the clusters close together so the center develops the knotted appearance visible in the photograph.
Fasten off.
Inner Cream Petals
Join cream yarn around the outer edge of the brown center.
Petal 1: Ch 3, 2 dc in same base point, 2 tr in next st, 2 dc in next st, ch 3, sl st in next st.
Repeat around to form approximately 8 rounded petals. Keep the petal bases close enough that no large gaps expose the joining stitches.
Outer Cream Petals
Turn the flower over and join cream yarn behind the first petal layer.
Ch 5 and anchor behind the next inner petal with a slip stitch. Repeat around to form eight chain spaces.
Into each ch-5 space work:
1 sc, 1 hdc, 3 dc, 2 tr, 3 dc, 1 hdc, 1 sc.
Repeat for all eight spaces.
Fasten off, leaving a 30 cm tail for attaching the flower to the runner. The outer petals should remain broader than the first layer so both tiers stay visible.
Pointed Olive Leaves — Make 18
Yarn: olive green.
Ch 13.
Starting in the second chain from the hook:
Side 1: 1 sc, 1 hdc, 2 dc, 3 tr, 2 dc, 1 hdc, 1 sc.
Work 3 sc into the final chain to turn around the tip.
Continue along the opposite side of the foundation chain:
Side 2: 1 sc, 1 hdc, 2 dc, 3 tr, 2 dc, 1 hdc, 1 sc.
Sl st at the base.
For a stronger central vein, surface-slip-stitch from the base toward the tip through the original foundation chain. Fasten off with a 20 cm tail for sewing.
Block the leaves with a defined point. Avoid stretching the center vein because an elongated foundation chain makes the leaf twist after attachment.
Optional Smaller Leaves — Make 6
The photograph contains several shorter leaves close to the flowers. Use these to fill exposed joins.
Ch 10.
Starting in the second chain:
1 sc, 1 hdc, 2 dc, 2 tr, 1 dc, 1 hdc, 1 sc.
Work 3 sc in the final chain and repeat the stitch sequence along the opposite side.
Sl st at the base and fasten off with a sewing tail.
Assembly
- Block all six orange medallions to matching diameters. They must lie flat before any permanent joining begins.
- Arrange the orange circles in three offset pairs. Place the first circle toward the left, the next toward the right, and continue alternating to reproduce the flowing rhythm visible in the photograph.
- Position the four cream lace crescents between the orange medallions. Rotate each cream section so its solid curved band creates a continuous S-shaped line down the center of the runner.
- Pin the complete arrangement to a blocking mat or large padded surface. Measure the overall width at several points before sewing.
- Sew overlapping cream and orange sections together from the back. Catch only the back loops where possible so the joining yarn remains inconspicuous from the front.
- Position the three large cream flowers over the principal cream-and-orange intersections. One flower sits near the upper third, one near the center, and one toward the lower third.
- Arrange approximately six olive leaves around each large flower. Point the leaves outward rather than aligning every leaf in the same direction.
- Sew the leaves first. Attach their bases and center veins while leaving the outer edges slightly free; then sew the flowers over the leaf bases to hide the attachment points.
- Check the runner on a flat table. Correct any twisted motif connection before weaving in the final tails, then secure every yarn end through several stitches on the back.
- Block the assembled runner to approximately 34 × 125 cm, or to the dimensions created by your yarn and gauge. Shape the cream curves, orange circles, leaves, petals, and outer clusters individually before allowing the piece to dry completely.
The finished runner should form a flat alternating sequence of orange circles and cream openwork curves with three raised floral focal points.
7 Technical Tips for a Flatter, Cleaner Runner
- Mark the beginning of every orange round. A misplaced increase shifts the six increase points and can turn a circular medallion into a visible hexagon.
- Check the orange circles every three rounds. If the edge lifts more than about 5 mm from the table, the motif needs additional increases; if it forms waves, reduce the increase frequency.
- Block before assembly. A 1 cm diameter difference between adjacent circles becomes much more noticeable after the cream lace sections are sewn between them.
- Keep chain arches loose. Tight ch-9 or ch-11 spaces pull the cream lace inward and cause the openwork section to cup instead of lying flat.
- Pin each flower before sewing. An off-center flower exposes the joins underneath and can make the leaves appear uneven even when their spacing is correct.
- Attach leaves through the center vein. Sewing around the complete perimeter flattens the leaf and removes the raised shape visible in the photographed runner.
- Weave tails away from open lace. Run each tail through at least 4–5 cm of dense stitches; yarn ends carried across chain spaces remain visible from the front.
Changing the Length
The modular construction makes the finished length adjustable. For a shorter runner, use four orange circles, three cream lace sections, and two large flowers. For a longer dining table, add another pair of orange circles plus one cream section and one flower group.
Lay out the additional components before joining them. The alternating left-right position of the orange medallions should continue through every repeat; placing two consecutive circles on the same side interrupts the S-shaped cream line.
Color Placement
The photographed palette depends on four clearly separated values. Burnt orange supplies the strongest solid color, cream creates the lace background and petals, olive green defines the foliage, and dark brown concentrates contrast in the flower centers.
If substituting colors, keep the lace and flower petals in the lightest shade. A darker lace color reduces the visual separation between the openwork and the solid circular medallions. The flower centers should remain considerably darker than the petals so the layered construction stays readable from across a dining table.
Blocking and Finishing
Blocking is part of the construction rather than an optional finishing step for this pattern. Begin with the orange circles. Pin each one at equal intervals around its circumference and compare all six diameters before moving to the cream motifs.
For the lace crescents, pin the inner curve first and then open each chain arch individually. The outer cream border should form a controlled curve rather than a series of sharp corners. Position the decorative clusters last so they point consistently outward.
Do not press the dimensional flowers flat. Shape the cream petals individually and keep the brown centers raised. Pin the olive leaves at their tips while preserving a slight ridge along each center vein.
After final blocking, place the runner on the intended table and check all motif intersections. No cream lace section should buckle beneath an orange circle, and the dimensional flower groups should cover their principal attachment seams.
Conclusion
The defining feature of this orange floral crochet table runner pattern is the alternating construction: dense burnt-orange circles sit beside open cream crescents, while three-dimensional flowers and pointed olive leaves cover the major joins. Make and block one orange circle and one cream lace section first, then compare their proportions before producing the remaining motifs. That test prevents a gauge mismatch from multiplying across the entire runner. Once finished, photograph the full S-shaped layout from directly above for Pinterest or show a close view of the layered flowers on Instagram using #OrangeFloralTableRunner. Which element would you change first: the burnt-orange circles, the brown flower centers, or the olive leaves?









