Introduction
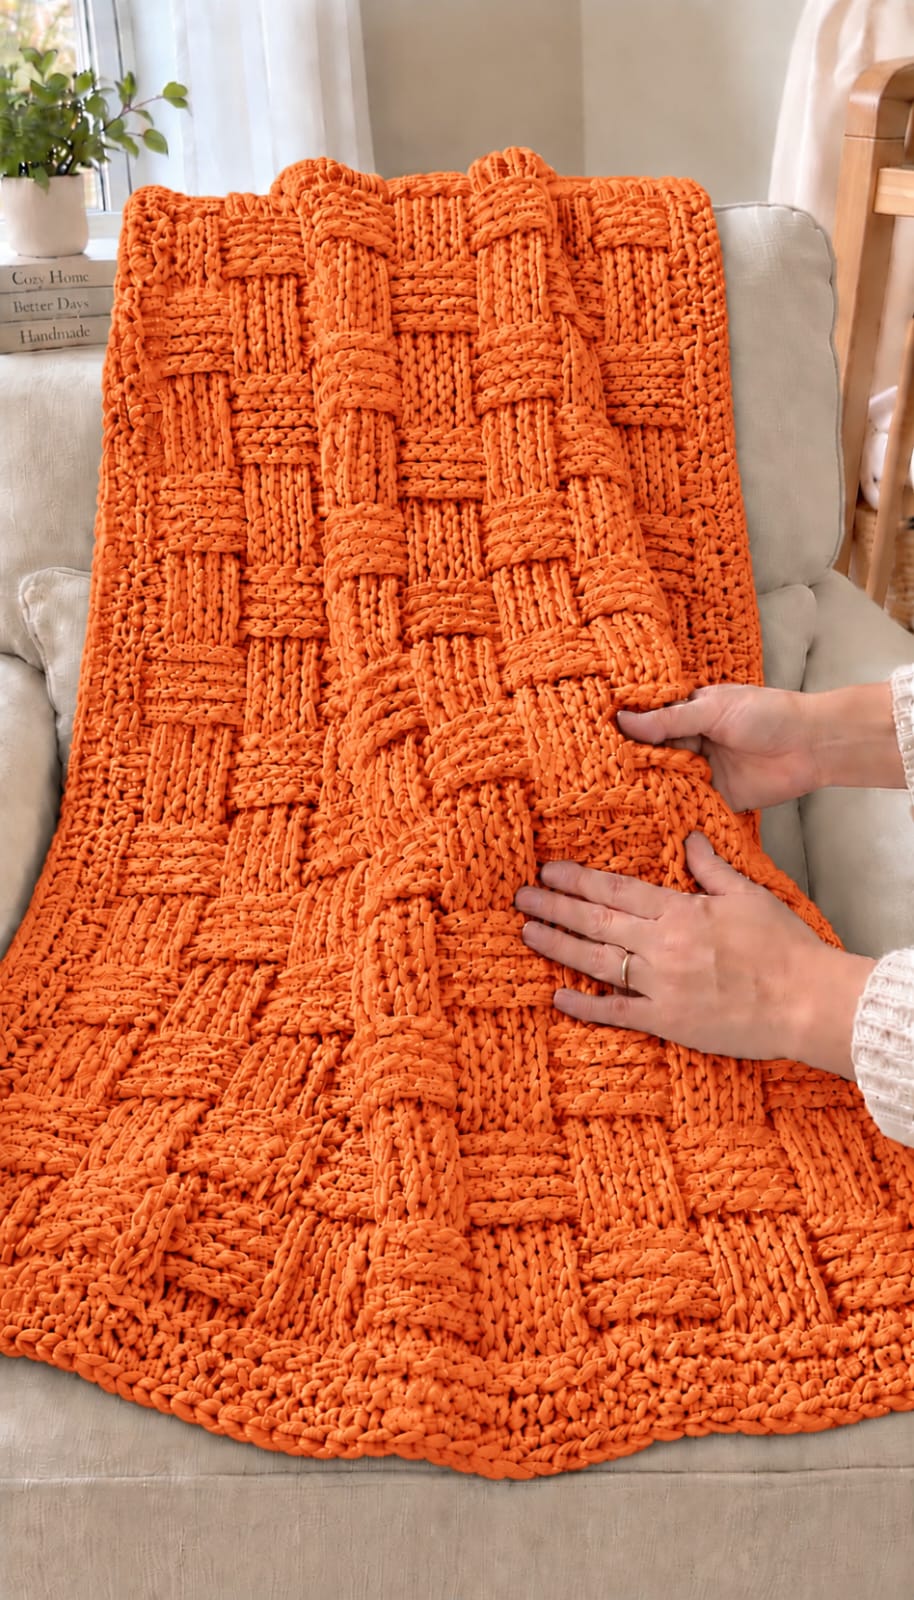
Oversized orange basket blocks must alternate direction without losing their square proportions when the heavy fabric folds over a chair. This orange chunky basket weave crochet blanket pattern uses super-bulky chenille yarn, an 8 mm hook, and front- and back-post double crochet. The intermediate reconstruction targets approximately 115 × 140 cm, creating a substantial throw while keeping the repeated woven structure practical to count.
The instructions below are an original photo-inspired reconstruction based on visible structure; published patterns cited later are used only for sizing, gauge, and material benchmarks.
The Design: What Makes This Orange Basket Weave Blanket Different
The reference uses unusually large woven blocks rather than the narrow checkerboard texture found in many basketweave patterns. Each block appears to contain four raised post stitches, with neighboring blocks changing orientation to create the over-under effect. Thick orange chenille exaggerates that relief, so the reconstruction keeps the repeat compact and uses an 8 mm hook rather than an extremely large hook that would open the fabric. A narrow integrated border stabilizes the perimeter without competing with the chunky basketweave crochet blanket texture. The blocks reverse direction after four rows, producing clearly defined rectangular sections when the blanket is draped. A common error is inserting post stitches around the top loops instead of the vertical posts; that removes the raised architecture and turns the fabric into ordinary double crochet.
Project Info at a Glance
| Skill Level | Time | Finished Size | Hook | Best For |
|---|---|---|---|---|
| Intermediate | Approx. 18–24 hours | Reconstruction target: approx. 115 × 140 cm | 8 mm | Sofa throws, reading chairs, fall décor |
The dimensions above are reconstruction targets because the photographed blanket cannot be physically measured. Published chunky basketweave benchmarks vary considerably: Michele Webb’s super-bulky version measures approximately 55 × 45 inches / 140 × 114 cm with an 8 mm hook, while Yarnspirations publishes a super-bulky basketweave crochet blanket at an 8-stitch × 5-row gauge per 10 cm using a 9 mm hook.
Materials and Tools
Yarn
- Burnt orange / pumpkin orange — super bulky #6 chenille or blanket yarn — approximately 2,000–2,300 g
A smooth polyester blanket yarn similar in construction to Bernat Blanket works well for this project. Michele Webb’s published 55 × 45-inch chunky basketweave blanket calls for approximately 75 ounces of super-bulky yarn, while Yarnspirations’ Basket Weave Crochet Blanket specifies 1,720–1,760 yards. Basketweave consumes considerably more yarn than an open stitch because every front- and back-post stitch wraps around an existing vertical post.
Tools
- 8 mm crochet hook
- 9 mm crochet hook — optional if your chenille is particularly dense
- Locking stitch markers — at least 4
- Large-eye tapestry needle
- Scissors
- Flexible measuring tape
Abbreviations
- ch — chain
- sc — single crochet
- hdc — half double crochet
- dc — double crochet
- FPdc — front post double crochet
- BPdc — back post double crochet
- sl st — slip stitch
- st/sts — stitch/stitches
- RS — right side
- WS — wrong side
An invisible decrease is not required for this flat blanket, but the term means working through the front loops of two adjacent stitches before completing one sc.
Understanding Front-Post and Back-Post Double Crochet
The basket structure comes from working around stitch posts rather than through the top loops.
For FPdc, yarn over, insert the hook from front to back and then back to front around the vertical post of the next stitch. Yarn over, pull up a loop, then complete the double crochet normally.
For BPdc, yarn over, insert the hook from back to front and then front to back around the post. Pull up a loop and complete the double crochet.
Front-post stitches project toward you. Back-post stitches move away from you. Alternating groups of them creates the woven illusion.
Gauge
Before beginning the full blanket, work at least a 20 × 20 cm swatch in the basket pattern.
With an 8 mm hook and super-bulky chenille, target approximately 8–9 post stitches per 10 cm. Row gauge may vary from about 5–7 rows per 10 cm depending on yarn compression.
Yarnspirations publishes a super-bulky Basket Weave Crochet Blanket at 8 stitches × 5 rows per 4 inches / 10 cm using a 9 mm hook. Michele Webb uses an 8 mm hook with Bernat Blanket. Those specifications support the 8–9 mm range for this reconstruction.
Pattern — Step by Step
The photographed throw is worked as one large rectangle. The basketweave repeat is based on groups of four post stitches.
This reconstruction uses a starting multiple of 8 + 4, a standard basketweave framework also documented by Hooked by Robin. The exact row sequence below is independently arranged to reproduce the broad blocks visible in the reference.
Foundation Chain
With orange yarn and the 8 mm hook:
Ch 100.
This gives 96 repeat chains plus 4 additional chains.
Lay the foundation chain on a flat surface before continuing. It should measure approximately 112–118 cm without stretching.
If it is substantially narrower, switch to a 9 mm hook for the foundation chain only.
Foundation Row
Row 1: Dc in the fourth ch from hook and in every remaining ch across. Turn.
Keep this row relaxed. A tight foundation row will pull the lower corners inward once the heavy basket texture develops.
Basketweave Block A
Row 2: Ch 2. Work 4 FPdc around the next 4 posts, then 4 BPdc around the next 4 posts. Repeat *4 FPdc, 4 BPdc* across, maintaining the established groups. Dc in the final edge stitch. Turn.
Row 3: Ch 2. Work the stitches as they visually present from this side so the same raised blocks remain raised on the blanket face. Continue alternating groups of 4 post stitches across. Dc in final edge stitch. Turn.
Row 4: Repeat Row 3.
Row 5: Repeat Row 3.
Four working rows now form the first set of woven blocks.
Basketweave Block B
Row 6: Ch 2. Reverse every block: work 4 BPdc over the group that previously projected forward and 4 FPdc over the group that previously receded. Continue across. Dc in final edge stitch. Turn.
Row 7: Maintain the new block orientation across.
Row 8: Repeat Row 7.
Row 9: Repeat Row 7.
The second four-row block is now complete.
Main Eight-Row Repeat
Repeat Rows 2–9 until the blanket body measures approximately 134–136 cm from the foundation edge.
End after a complete four-row block rather than stopping halfway through a basket section.
For the target dimensions, expect approximately 17–20 complete block sections, depending on the actual height produced by the chosen chenille.
How the Basket Blocks Should Look
Viewed from the front, one four-stitch group should resemble a raised vertical band. Its neighbor should look recessed or horizontally compressed.
After four rows, the orientation changes.
The result is a checkerboard of broad woven rectangles. Because the yarn is very thick, the post stitches visually merge into substantial padded strips rather than showing as isolated columns.
This is the defining feature of the orange chunky basket weave crochet blanket pattern: large blocks, heavy relief, and minimal open space.
Maintaining the Edge Stitches
Do not work the first and last structural edge stitches as post stitches.
Keep one ordinary dc at each side.
Place a locking marker in the first and last full stitch of every row if the thick chenille makes the tops difficult to identify.
Count after every fourth row. Correcting one missing stitch immediately is much easier than discovering a narrowing edge several block sections later.
Finishing the Main Blanket Body
Once the body measures approximately 134–136 cm, finish the current four-row block.
Do not fasten off.
The narrow perimeter border adds approximately 2–3 cm to each side, bringing the reconstruction toward the 115 × 140 cm finished target.
Border Round 1
Ch 1.
Work sc evenly across the top edge.
At the first corner work 3 sc.
Continue down the side edge, placing stitches evenly rather than forcing one sc into every visible strand.
Work 3 sc in the next corner.
Sc across the foundation edge.
Work 3 sc at the third corner.
Continue evenly up the final side.
Work 3 sc in the last corner and join with sl st.
Border Round 2
Ch 1.
Sc in each stitch around.
Work 3 sc in the center stitch of each corner.
Join with sl st.
Do not pull the side stitches tightly. The heavy center fabric needs enough border circumference to lie flat.
Border Round 3
Ch 2.
Hdc in each stitch around.
At each corner work 3 hdc in the center corner stitch.
Join with sl st.
Fasten off with a 20 cm tail.
Optional Rope-Like Final Edge
If the blanket needs the thicker perimeter visible near the bottom of the reference, add one final round of reverse single crochet.
Join the yarn at any corner.
Work reverse sc evenly around the entire blanket.
Keep the stitches loose enough that the edge does not contract.
Fasten off and weave in the tail.
Assembly
- Work a 20 × 20 cm basketweave swatch with the selected super-bulky orange yarn and confirm that approximately 8–9 post stitches measure 10 cm.
- Chain 100 with the 8 mm hook, or use a 9 mm hook for the foundation chain if the unstretched chain measures less than approximately 112 cm.
- Complete the foundation double-crochet row while keeping both edge stitches relaxed and marking the first and last full stitches.
- Work four rows of alternating 4-FPdc and 4-BPdc groups to establish the first set of raised basket blocks.
- Reverse every four-stitch group for the next four rows, creating the second half of the eight-row woven repeat.
- Continue the eight-row sequence until the body measures approximately 134–136 cm, always stopping after a complete four-row block.
- Work the first sc border round around all four edges, distributing side stitches evenly and placing three sc at every corner.
- Add the second sc round and one hdc round, maintaining three stitches in the center corner position so the border remains flat.
- Work the optional reverse-sc edging if a heavier perimeter is wanted, then fasten off with at least a 20 cm yarn tail.
- Weave all tails through at least 8 cm of dense matching fabric, measure the blanket without stretching it, and reshape the corners and basket blocks by hand.
The completed throw should form a rectangular field of alternating oversized orange basket blocks surrounded by a narrow, stable border.
7 Technical Tips
- The blanket narrows toward the top: count the working stitches after every four-row block and keep markers in both edge stitches. Losing even one edge stitch every few repeats can remove several centimeters from the final width.
- The basket blocks look flat: confirm that the hook passes completely around the vertical post rather than through its top loops. Missing the post removes approximately the full thickness of the raised FPdc ridge from that stitch.
- The foundation edge curls upward: remake the starting chain with a hook 1 mm larger than the body hook. A foundation measuring more than about 3 cm narrower than the first completed basket section will continue pulling inward.
- The blanket becomes excessively rigid: move from an 8 mm to a 9 mm hook if the swatch cannot fold naturally under its own weight. Super-bulky basketweave already forms a double-thick structure, so unusually tight tension can create board-like fabric.
- The blocks drift out of alignment: place a marker after every eight structural stitches for the first three repeats. A four-stitch group worked with the wrong post orientation shifts the visual checkerboard by half a block.
- The border ripples: reduce the number of stitches placed along each raw side edge rather than changing the top and bottom counts. Excess side-edge stitches create visible waves of 1–2 cm even when the blanket body itself lies flat.
- Chenille tails emerge after handling: weave every tail through at least 8 cm of dense post-stitch fabric and reverse direction once. Polyester blanket yarn can slide backward through short finishing paths when a heavy throw is repeatedly folded.
Why Basketweave Uses More Yarn
Standard double crochet travels upward from one row to the next. A post stitch travels around the body of the stitch below before reaching its normal height.
That additional path consumes yarn.
Basketweave compounds the effect because nearly every structural stitch is a front- or back-post double crochet. The finished fabric is also substantially thicker than ordinary dc.
Michele Webb lists approximately 1,460–1,540 yards of super-bulky yarn for a 55 × 45-inch blanket. Yarnspirations lists 1,720–1,760 yards for another super-bulky basketweave throw.
Buy all orange yarn from the same dye lot when possible.
Verified Super-Bulky Basketweave Benchmark
Yarnspirations’ Basket Weave Crochet Blanket uses Bernat Blanket Tweeds, a super-bulky polyester yarn supplied in 300 g / 220 yd balls. The published crochet pattern specifies a 9 mm hook, a gauge of 8 stitches × 5 rows per 10 cm, and approximately 1,720–1,760 yards / 1,573–1,609 m.
Those specifications are particularly relevant to the photographed blanket because its yarn has the thick, rounded appearance associated with polyester blanket yarn.
Verified 8 mm Basketweave Benchmark
Michele Webb’s Chunky Basketweave Blanket uses super-bulky Bernat Blanket with an 8 mm hook.
The published finished measurement is approximately 55 × 45 inches, equivalent to about 140 × 114 cm. Yardage is approximately 1,460–1,540 yards / 1,335–1,408 m, with 75 ounces of yarn listed.
Those dimensions are very close to the reconstruction target selected from the photograph, making the pattern a useful size, hook, and yarn-weight benchmark without copying its instructions.
Verified 11.5 mm Basketweave Benchmark
Yarnspirations also publishes a Basketweave Blanket using Bernat Forever Fleece Tweeds. That version uses eight 250 g balls, totaling approximately 2,000 g and 1,200 yards / 1,102 m.
The specified hook is considerably larger at 11.5 mm, while the published pattern gauge is approximately 6.5 stitches × 4 rows per 10 cm.
This demonstrates why the yarn itself matters more than the printed weight category alone. Two super-bulky yarns can require substantially different hook sizes.
Why the Reconstruction Uses an 8 mm Hook
The photograph shows a dense woven surface with limited open space between posts. An 11.5 or 15 mm hook would produce substantially larger openings with many common blanket yarns.
An 8 mm hook is therefore the starting point.
It also matches Michele Webb’s published Bernat Blanket basketweave specification.
Gauge still takes priority. If your selected orange chenille creates a stiff 8 mm swatch, move to 9 mm. If large openings appear between the post groups, try 7 or 7.5 mm.
Choosing the Orange Yarn
The blanket in the reference uses a saturated orange positioned between pumpkin and burnt orange.
Useful commercial shade descriptions include pumpkin, burnt orange, spice, persimmon, autumn orange, and terracotta.
Choose one solid color if reproducing the photograph. Tonal or variegated yarn can make the block transitions harder to read because color changes compete with the directional post texture.
Polyester Chenille Versus Acrylic
Polyester blanket yarn produces large, rounded post stitches. It also gives the finished throw considerable weight.
Acrylic #6 yarn generally produces sharper stitch definition and may be lighter at the same dimensions.
Chenille more closely reproduces the padded surface visible in the image.
Whatever fiber is selected, swatch before buying yarn by yardage alone. Two yarns labeled super bulky can differ dramatically in meters per 100 g.
How Much Yarn to Buy
For a reconstruction around 115 × 140 cm, plan for approximately 1,400–1,700 m of standard super-bulky blanket yarn.
When using 300 g balls containing about 200–220 m, this can mean roughly 7–9 balls.
The gram estimate of approximately 2,000–2,300 g is intentionally a working range. Tension, border width, yarn construction, and block depth all change consumption.
Keep at least one unopened ball until the final repeat so it can be returned where retailer policies allow.
Block Size and Proportion
Each visual block in this reconstruction is four stitches wide and four rows high.
That does not mean its physical width and height will automatically match.
Measure one completed block after Rows 2–5.
If it is extremely tall and narrow, your row height is too large relative to stitch width. Tighten the pull-up loops slightly or test a smaller hook.
If it is broad and shallow, loosen the post stitches rather than adding rows to only part of the blanket.
Maintaining Consistent Post Height
Pull every FPdc and BPdc loop to approximately the same height as an ordinary dc.
Do not yank the yarn tight immediately after wrapping around the post.
Compressed post stitches make the fabric shorter and harder to fold.
Conversely, very tall loops can make the raised blocks sag. A consistent hook angle matters more than crocheting quickly.
Reading the Texture Instead of Counting Every Row
After several repeats, the fabric itself becomes a useful guide.
A raised group should remain raised for four working rows. Then its orientation changes.
Place a locking marker through the edge at every block transition.
If interrupted, count the visible ridges from the previous marker rather than trying to reconstruct the entire row sequence from memory.
Making the Blanket Wider
The basket stitch uses a repeat based on multiples of eight.
Add 8 foundation chains for each additional full pair of four-stitch blocks.
With this super-bulky gauge, one repeat may add roughly 8–10 cm, but measure the actual swatch before calculating a final width.
Keep the additional width symmetrical if the blanket will be centered over a bed or sofa.
Making the Blanket Narrower
Remove foundation chains in groups of eight.
Do not remove four chains merely to eliminate one visual block because the alternating repeat depends on paired block groups.
A narrower throw around 90–100 cm works well for a reading chair.
Recalculate yarn requirements after changing the foundation width.
Making the Blanket Longer
Add complete four-row block sections.
For the cleanest visual ending, finish after the second half of a complete eight-row repeat.
Measure the blanket while it lies flat rather than hanging from the hook.
The weight of chenille can stretch a suspended blanket enough to give an inaccurate length measurement.
Making a Smaller Lap Blanket
Target approximately 90 × 110 cm.
Reduce the starting chain by complete eight-chain repeats until the swatch calculation reaches the required width.
Work fewer eight-row repeats for length.
Keep all three border rounds; the smaller body still benefits from a stable perimeter.
Making a Larger Sofa Throw
Target approximately 130 × 160 cm.
Add foundation repeats until the width reaches about 126 cm before the border.
Continue complete block repeats until the body reaches about 154–156 cm.
Expect a substantial increase in yarn consumption. Basketweave area increases quickly when both dimensions are enlarged.
Making a Bed-Size Version
Calculate from the swatch rather than relying on a fixed starting chain.
Measure the intended mattress width and add the desired side drop.
Convert that width into complete eight-stitch repeats.
A full bed-size blanket made in super-bulky basketweave can become very heavy, so consider a lighter #4 or #5 yarn if the finished piece must be moved frequently.
Changing to Worsted Yarn
Hooked by Robin documents basketweave as a flexible stitch that can be worked with different yarns and hooks. A lighter yarn retains the woven structure but produces smaller blocks.
With worsted #4 yarn, begin testing around a 5–6 mm hook.
Do not retain the 100-chain foundation and expect the same width. Recalculate the number of eight-stitch repeats from the new gauge.
Changing to DK Yarn
Hooked by Robin’s published Basket Weave Stitch example uses DK yarn with a 4 mm hook. The documented starting formula is a multiple of 8 + 4.
A DK blanket will be lighter and show many more individual stitches than the photographed orange throw.
Increase the number of repeats until the foundation reaches the required physical width rather than trying to scale the hook alone.
Why the Blanket Is Reversible
FPdc and BPdc exchange visual roles when the fabric is viewed from the opposite side.
A front-post group on one face appears recessed from the reverse.
Because neighboring groups alternate, both sides retain a woven checkerboard effect.
This makes basketweave particularly useful for a throw that will be folded, draped, and turned during use.
Adding a Wider Border
After Border Round 3, continue with additional hdc or sc rounds.
Maintain three stitches in the center corner position.
A border wider than approximately 5 cm begins to become a strong visual frame around the large basket blocks.
If that is the intended effect, work an odd number of rounds so the final edge remains clearly separate from the central pattern.
Adding a Basketweave Border
A textured border can be worked with alternating FPdc and BPdc rather than plain hdc.
Winding Road Crochet publishes a mini basketweave blanket-border technique that begins with a stabilizing sc round before introducing post stitches.
For this already heavily textured blanket, a plain border is more faithful to the reference and reduces additional bulk at the corners.
Correcting a Missed FPdc
If a stitch was worked as BPdc instead of FPdc in the current row, undo the row to that position.
Do not attempt to disguise the error with surface crochet.
The mistake affects the depth of the whole four-row block.
Correcting it immediately keeps subsequent post stitches wrapped around the intended structural columns.
Correcting a Twisted Foundation Chain
Because the project is worked flat, a twisted chain does not create the catastrophic problem seen in joined rounds. It can still make Row 1 difficult to work evenly.
Lay the full chain flat before beginning the first dc row.
Untwist every section and place a marker approximately every 20 chains.
The markers also make the long foundation easier to recount.
Correcting a Wavy Side Edge
First count the stitches.
If the count is correct, inconsistent turning-chain tension is the likely cause.
Keep the turning chain relaxed and maintain one ordinary edge stitch.
The final sc border can correct minor variation of a few millimeters, but it cannot hide repeated increases or decreases.
Correcting a Stiff Blanket
Work a second swatch with a hook one size larger.
Compare the two samples after each has rested flat for several minutes.
If the larger-hook swatch bends more naturally without developing obvious gaps, use that hook for the blanket.
Do not try to soften excessively tight basketweave by stretching the finished fabric; chenille may not recover evenly.
Correcting Oversized Gaps
Large spaces between post groups usually indicate that the hook is too large for the yarn or the pull-up loops are excessively tall.
Test a hook 0.5–1 mm smaller.
Keep the post stitch wrapped closely around the vertical column below.
The photograph shows dense blocks with minimal background visible between them.
Managing a Heavy Work in Progress
Keep most of the blanket supported on a table, bed, or lap while crocheting.
Do not let the full weight hang from the active row.
Several kilograms of completed chenille fabric can stretch edge stitches and place unnecessary tension on the working loop.
Rotate the blanket rather than lifting it by one corner when changing position.
Joining a New Ball
Change yarn near the side edge whenever practical.
Leave tails at least 15–20 cm long.
Avoid knots in the middle of a raised four-stitch block because they can become visible when the fabric bends.
After completing several additional rows, weave the old and new tails separately through dense matching post stitches.
Blocking the Finished Blanket
Polyester chenille generally requires shaping rather than aggressive blocking.
Lay the finished throw flat and square the four corners by hand.
Measure opposite sides and diagonals.
If one section is compressed, gently redistribute the basket blocks rather than applying high heat. Always follow the yarn manufacturer’s care instructions before using steam.
Washing and Drying
Follow the care label for the selected yarn. Bernat Blanket Tweeds is listed as machine washable, but the finished blanket’s weight still requires careful handling.
Support the entire wet throw when transferring it.
Do not pull it from a washer by one corner.
Reshape the border and basket blocks after laundering and before the blanket is fully dry.
Sources
Super-bulky yarn, 9 mm hook, gauge, and yardage benchmarks were checked against Yarnspirations’ Basket Weave Crochet Blanket on Ravelry, which specifies Bernat Blanket Tweeds, an 8-stitch × 5-row gauge per 4 inches, a 9 mm hook, and approximately 1,720–1,760 yards.
The closest published size benchmark was checked against Michele Webb’s Chunky Basketweave Blanket, which uses Bernat Blanket, an 8 mm hook, approximately 1,460–1,540 yards, and finishes at roughly 55 × 45 inches.
A second super-bulky crochet benchmark came from Yarnspirations’ Basketweave Blanket, which uses Bernat Forever Fleece Tweeds, an 11.5 mm hook, approximately 1,200 yards / 1,102 m, and eight 250 g balls.
The multiple-of-eight basketweave framework and FPdc/BPdc technique were checked against Hooked by Robin’s Basket Weave Stitch tutorial, which documents a multiple of 8 plus 4 and demonstrates the alternating front- and back-post construction.
Additional post-stitch terminology was compared with Underground Crafter’s Basketweave Stitch guide, which defines both front-post and back-post double crochet and uses them in a blanket setting.
Border construction was compared with Winding Road Crochet’s Mini Basketweave Blanket Border, which begins by stabilizing the blanket perimeter with a single-crochet round before adding texture.
Finished-size adjustment principles were checked against Jo to the World’s Basketweave Stitch Blanket, which documents changing width through multiples of 8 plus 4 and changing length through complete row repeats.
Conclusion
The oversized checkerboard depends on consistent four-stitch post groups, not complicated shaping. Swatch the orange chenille first, verify the width of one complete eight-stitch repeat, then calculate any size adjustment before committing several kilograms of yarn. Keep the foundation relaxed and count after every four-row section; those two checks prevent most width problems. Your concrete next step is to crochet a 20 cm basketweave swatch with the 8 mm hook. Save this orange chunky basket weave crochet blanket pattern to Pinterest or share the finished throw on Instagram with #OrangeBasketWeaveBlanket. Would you keep the narrow orange border shown here or frame these oversized blocks with a wider edge?









