Introduction
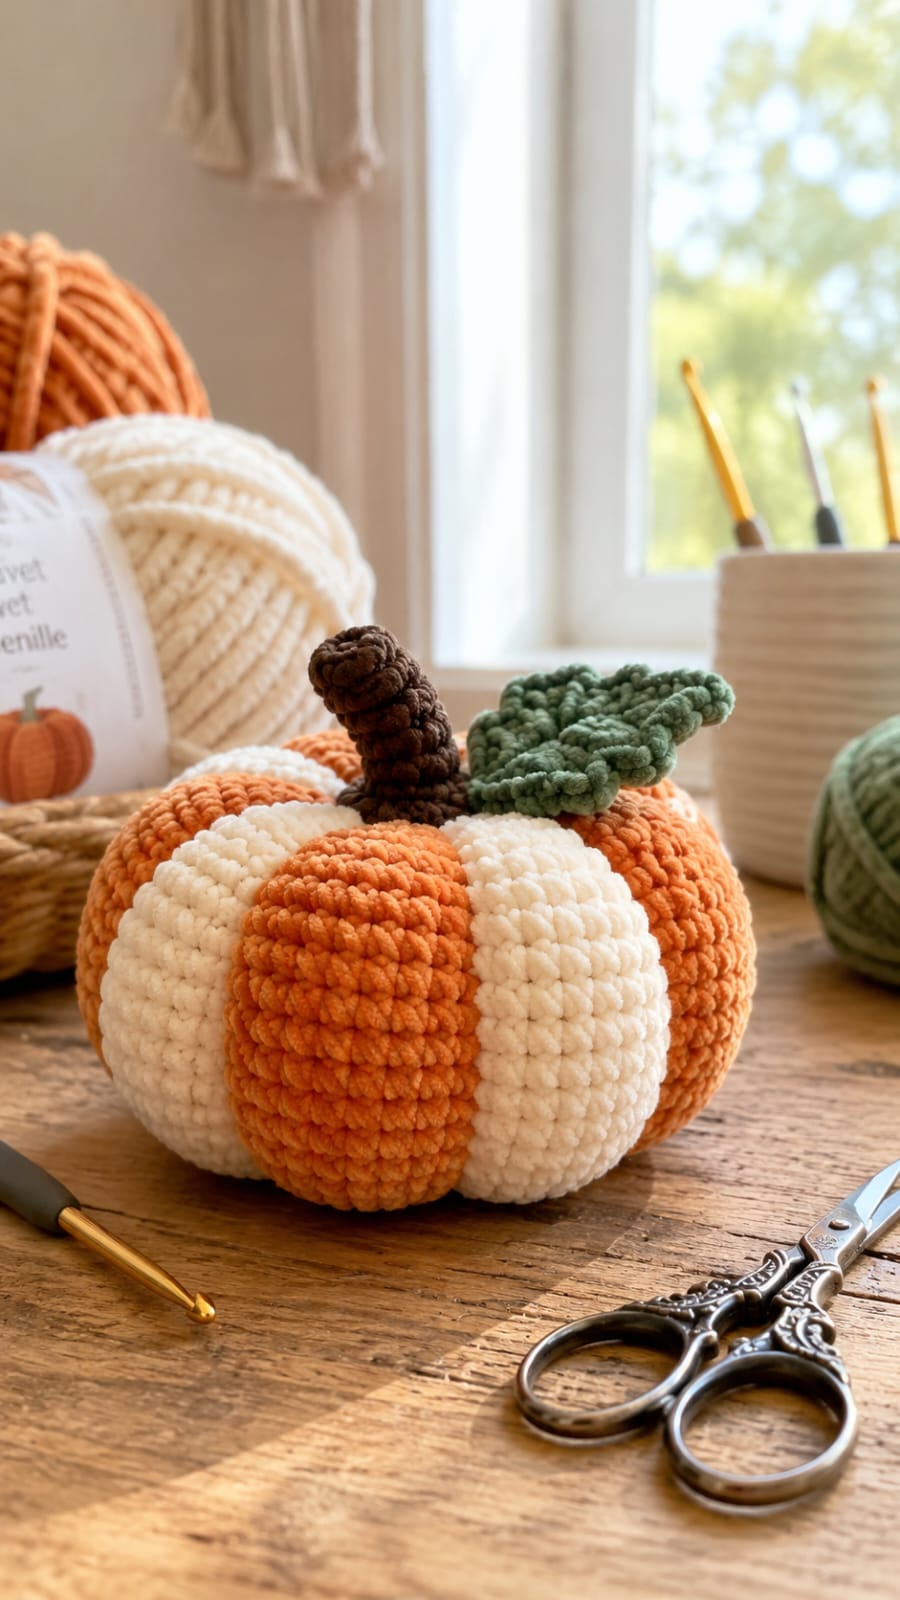
A six-lobed pumpkin only keeps this alternating color rhythm when every cream section lands exactly between two orange sections. This two color crochet pumpkin pattern uses chunky yarn, a 4.5 mm hook and a 42-stitch stuffed core to make a pumpkin about 21 cm wide. Six padded outer lobes, a curved brown stem and one sage leaf create the photographed fall structure.
The Design: What Makes This Crochet Pumpkin Different
The hidden core expands to 42 stitches because the finished pumpkin needs enough internal volume to support six thick outer sections without collapsing between them. Instead of changing yarn repeatedly inside one continuous sphere, six padded lobe panels are made separately: three orange and three cream. That construction gives this ribbed crochet pumpkin unusually deep channels and keeps every color division clean from crown to base. The panels are sewn around the core in alternating order, then lightly cinched through the central axis to flatten the shape. A curved brown stem and broad sage leaf cover the upper meeting point. One common mistake in a chunky crochet pumpkin pattern is overstuffing the outer panels. They should form convex ribs, not six independent tubes attached to a ball.
Project Info at a Glance
| Skill Level | Time | Finished Size | Hook | Best For |
|---|---|---|---|---|
| Intermediate | 7–9 hours | Approximately 21 cm wide × 20 cm high including stem | 4.5 mm | Fall table decor, shelves and seasonal centerpiece displays |
Materials and Tools
Yarn
- Pumpkin orange — chunky / plush yarn — approximately 90–110 g — used for the core and three outer lobes.
- Warm cream — matching chunky yarn — approximately 70–90 g — used for three alternating lobes.
- Dark brown — chunky or doubled worsted yarn — approximately 15–20 g — used for the stem.
- Muted sage green — chunky or doubled worsted yarn — approximately 12–15 g — used for the broad leaf.
Tools
- 4.5 mm crochet hook
- Polyester stuffing, approximately 150–190 g
- Long tapestry or doll needle
- Standard yarn needle
- Locking stitch marker
- Six removable pins or stitch markers
- Scissors
- Measuring tape
The hook should produce fabric dense enough that stuffing does not show between stitches. Make the core first and confirm its width before producing all six lobe panels.
Abbreviations
- MR — magic ring
- sc — single crochet
- inc — two single crochet stitches in one stitch
- dec — invisible single crochet decrease
- sl st — slip stitch
- ch — chain
- hdc — half double crochet
- dc — double crochet
- tr — treble crochet
- BLO — back loop only
An invisible decrease is worked through the front loops of the next two stitches before completing one single crochet through both loops.
Pattern — Step by Step
Work stuffed components in continuous spirals unless rows are specifically stated. Mark the first stitch of every round and verify the total before moving the marker.
Central Pumpkin Core
Yarn: pumpkin orange — Source: standard six-stitch amigurumi arithmetic.
R1: 6 sc in MR (6)
R2: inc ×6 (12)
R3: (sc, inc) ×6 (18)
R4: (2 sc, inc) ×6 (24)
R5: (3 sc, inc) ×6 (30)
R6: (4 sc, inc) ×6 (36)
R7: (5 sc, inc) ×6 (42)
R8–R15: sc around (42)
R16: (5 sc, dec) ×6 (36)
R17: (4 sc, dec) ×6 (30)
R18: (3 sc, dec) ×6 (24)
R19: (2 sc, dec) ×6 (18)
R20: (sc, dec) ×6 (12)
R21: dec ×6 (6)
Begin stuffing after R16. Pack the middle firmly but leave the upper and lower 2 cm slightly softer so the finished pumpkin can be compressed vertically.
Fasten off. Leave a 35 cm tail and close the final six front loops.
Central Compression
Yarn: matching orange.
Cut approximately 100 cm of yarn and thread the long needle. Enter through the lower center, pass through the complete core and exit at the upper center.
Return through the same central channel and pull gradually until the core becomes approximately 1–1.5 cm shorter.
The resulting form should be broad and slightly flattened rather than spherical.
Secure the yarn inside the lower closure and bury the end.
Orange Lobe Panels (Make 3)
Yarn: pumpkin orange — original padded-panel construction.
R1: 6 sc in MR (6)
R2: inc ×6 (12)
R3: (sc, inc) ×6 (18)
R4–R12: sc around (18)
R13: (sc, dec) ×6 (12)
R14: sc around (12)
R15: dec ×6 (6)
Stuff only to approximately 60–70 percent firmness. The panel should remain compressible enough to flatten along the side facing the core.
Fasten off. Leave a 35 cm sewing tail.
Cream Lobe Panels (Make 3)
Yarn: warm cream.
R1: 6 sc in MR (6)
R2: inc ×6 (12)
R3: (sc, inc) ×6 (18)
R4–R12: sc around (18)
R13: (sc, dec) ×6 (12)
R14: sc around (12)
R15: dec ×6 (6)
Match the stuffing firmness of the orange panels. A cream section packed more firmly will project farther and disturb the alternating silhouette.
Fasten off. Leave a 35 cm sewing tail.
Flatten the Inner Face of Each Lobe
Lay one completed panel horizontally and press one side against the table.
Use several temporary pins to maintain a flattened strip approximately 2.5–3 cm wide along the back of the piece.
Do not crease the outer face. Only the surface that contacts the central core should become flatter.
Repeat with all six panels.
Mark Six Core Positions
View the central core from directly above and divide its circumference into six equal sections.
Place markers where the centers of the lobe panels will sit.
Three positions will receive orange panels and three cream panels, alternating around the complete circumference.
Attach First Orange Lobe
Pin the flattened back of one orange lobe against the core from lower center toward upper center.
Sew along one side of the flattened strip with small matching stitches, then return along the opposite side.
Keep approximately 8–10 mm of the orange core visible beyond the lobe ends until all six panels are positioned.
Attach First Cream Lobe
Place one cream panel immediately beside the first orange section.
Sew its flattened back to the core using cream yarn and the same two-line attachment method.
Leave a narrow natural groove between the outer curves of the two panels rather than sewing their edges tightly together.
Attach Remaining Four Lobes
Continue around the pumpkin in this order:
Orange
Cream
Orange
Cream
Orange
Cream
Pin all remaining pieces before finishing the seams.
View the pumpkin from above after every two panels. The meeting point should stay centered rather than spiraling toward one side.
Upper Lobe Connection
Use orange or cream yarn to match the nearest panel.
At the crown, add one hidden stitch between every neighboring pair of lobe panels approximately 10–15 mm below their upper tips.
These stitches stop the six sections from opening outward when the stem is added.
Lower Lobe Connection
Repeat the same hidden connections at the base, joining neighboring lobes approximately 10–15 mm above their lower ends.
Set the pumpkin on a hard surface and check that all six sections touch the table evenly.
Correct a raised panel by moving stuffing upward inside that lobe rather than pulling its lower seam tighter.
Brown Stem
Yarn: dark brown — original curved stem construction.
R1: 6 sc in MR (6)
R2–R5: sc around (6)
R6: (2 sc, inc) ×2 (8)
R7–R9: sc around (8)
R10: (3 sc, inc) ×2 (10)
R11–R12: sc around (10)
R13: (4 sc, inc) ×2 (12)
R14: sc around (12)
Stuff R9–R14 lightly. Leave the upper rounds almost empty so the tip can lean backward without forming a sharp kink.
Fasten off. Leave a 35 cm sewing tail.
Stem Base Disc
Yarn: dark brown.
R1: 6 sc in MR (6)
R2: inc ×6 (12)
R3: (sc, inc) ×6 (18)
Keep the disc flat. It will cover the upper lobe meeting point and distribute the stem attachment.
Fasten off. Leave a 25 cm sewing tail.
Large Sage Leaf
Yarn: muted sage green.
Row 1: ch 13
Row 2: starting in second ch from hook: sl st, sc, hdc, dc, dc, 2 tr, dc, dc, hdc, sc, sl st; work 3 sc in final chain.
Continue along the opposite side:
sl st, sc, hdc, dc, dc, 2 tr, dc, dc, hdc, sc, sl st.
Pinch the foundation chain slightly so it forms the main vein. The finished leaf should measure approximately 8–10 cm long.
Fasten off. Leave a 25 cm sewing tail.
Leaf Edge
Continue in sage green.
Join yarn at the leaf base. Work sl st in the next two edge stitches, then repeat (sc, ch 1, sc in next stitch, sl st in next stitch) around both sides.
The small changes in height create the irregular leaf margin visible in the reference.
Fasten off and leave a 20 cm attachment tail.
Assembly
- Finish and firmly stuff the 42-stitch central core, then compress it vertically by approximately 1–1.5 cm.
- Complete three orange and three cream padded lobes, matching their stuffing firmness before beginning attachment.
- Mark six equal positions around the central core and pin all six panels in alternating orange-and-cream order.
- Sew each lobe to the core along two parallel attachment lines on its flattened back, leaving the rounded outer face free.
- Add hidden upper and lower stitches between neighboring panels so the six sections remain grouped around one central axis.
- Place the pumpkin on a hard surface and redistribute stuffing inside any lobe that projects more than approximately 10 mm beyond its neighbors.
- Sew the 18-stitch brown stem base disc over the crown, covering the upper ends of all six panel seams.
- Attach the brown stem to the base disc and curve the lightly filled upper section backward by several degrees.
- Sew the sage leaf beside the stem and add one second concealed attachment approximately 10 mm along its center vein.
- Weave all structural tails through at least 4–5 cm of dense crochet, reverse direction once and trim only after the ends retract beneath the stitches.
The completed pumpkin should sit on all six padded lobes with an even orange-cream sequence, a visible groove between every section and a stable stem centered over the crown.
7 Technical Tips
- Unequal lobe projection: One overfilled panel can stand 10–15 mm farther forward than its neighbors. Match all six pieces by weight and firmness before sewing them to the core.
- Spiraling color layout: Starting attachment without six marked center lines allows the orange-and-cream sequence to drift around the crown. Mark the complete circumference first and pin every panel before permanent sewing.
- Visible decrease holes: Plush yarn can open around ordinary decreases and expose pale stuffing. Work through the two front loops and keep the decrease tension equal to the surrounding single crochet stitches.
- Flat outer ribs: Pressing the entire lobe before attachment removes the rounded pumpkin profile. Flatten only a 2.5–3 cm strip along the hidden rear surface and leave the front face untouched.
- Open crown: Six padded sections can spread apart beneath the stem. Add one hidden stitch between every neighboring lobe about 10–15 mm below the crown before fitting the stem base.
- Stem wobble: Sewing a 12-stitch stem directly over the crowded lobe tips concentrates its weight on a small area. Add the 18-stitch base disc first so the seam spans approximately 3–4 cm.
- Leaf rotation: An 8–10 cm leaf attached only at its base can turn behind the stem. Add one second fixing stitch roughly 10 mm along the center vein while leaving the outer leaf free.
Conclusion
Check the orange-and-cream sequence from directly above before attaching the stem because the crown disc will cover the easiest access to the six panel endpoints. Next, set the pumpkin on a level surface and compare every lobe from the front, side and top, correcting any section that projects more than about 10 mm beyond its neighbors. Attach the brown stem and sage leaf only after that balance is stable. Share the finished two color crochet pumpkin pattern project on Pinterest with a vertical fall photograph, then post a close view of the alternating ribs on Instagram using #TwoColorCrochetPumpkin. For this pumpkin specifically, would you keep the strict orange-and-cream alternation or replace one cream lobe with sage green?









