Introduction
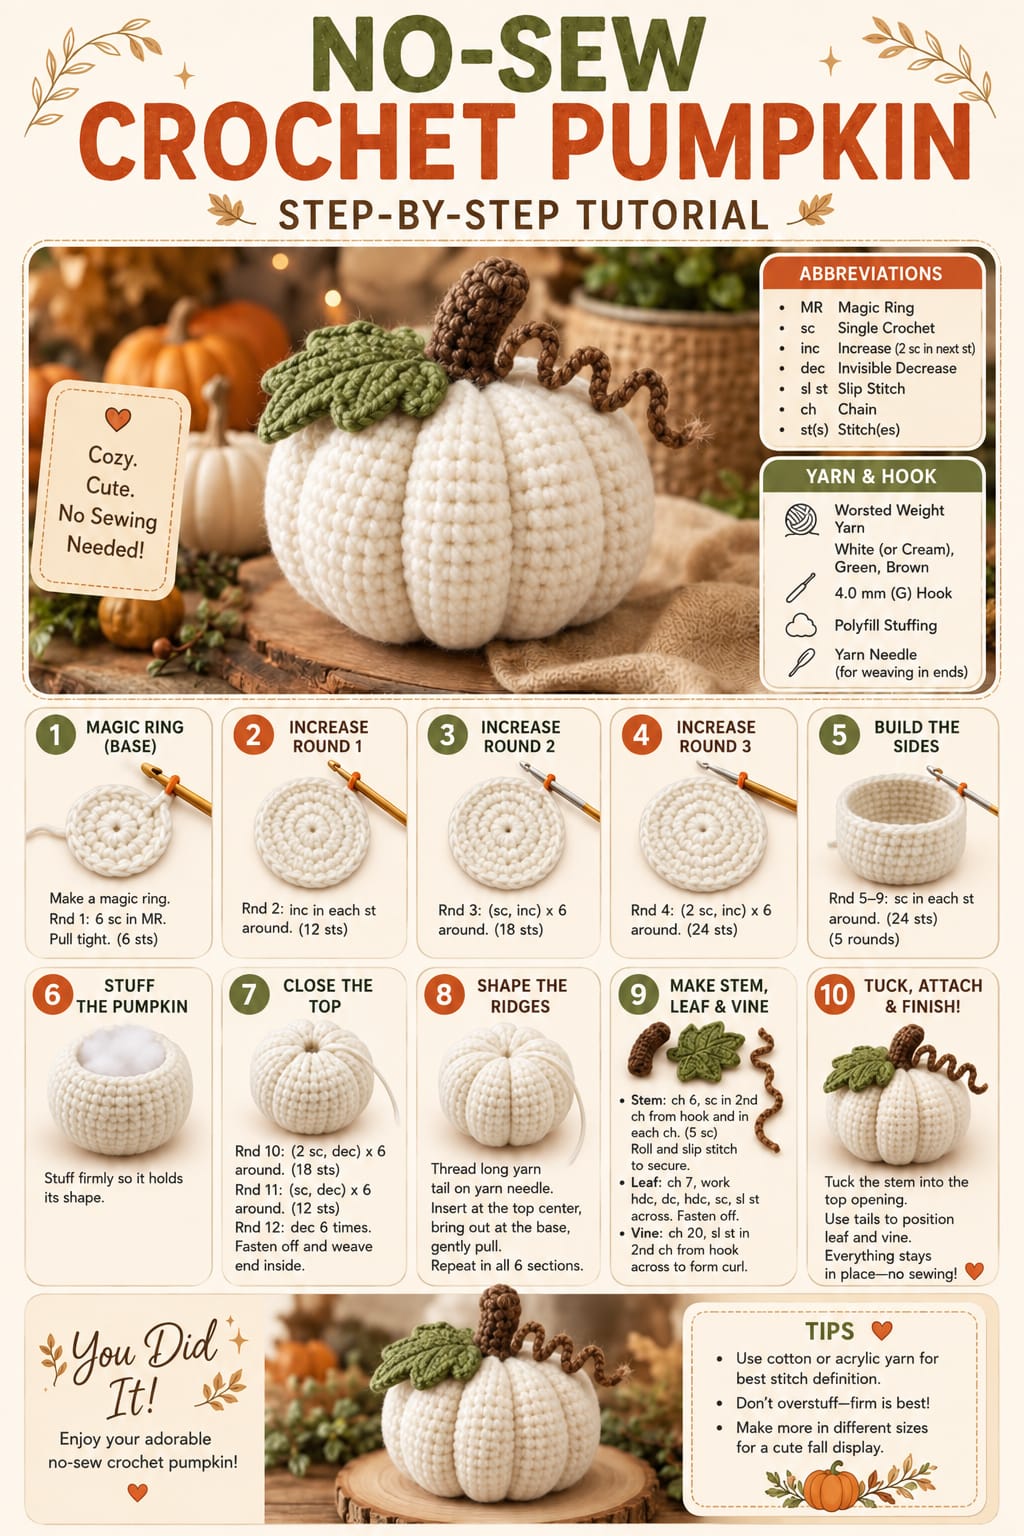
Six pumpkin grooves have to pull inward without collapsing the cream body around the stem opening. This no-sew crochet pumpkin pattern uses worsted-weight yarn, a 4 mm hook, fiberfill, a brown stem, green leaf, and curled vine to make an approximately 12–14 cm pumpkin. The intermediate construction keeps separate pieces anchored with their own tails, reducing assembly and making the design practical for quick fall decor.
The Design: What Makes This No-Sew Pumpkin Different
The pumpkin begins as a continuous amigurumi form rather than a rectangle that must be seamed into a tube. A six-stitch magic ring expands to a 42-stitch plateau, giving the body enough circumference for a medium decorative pumpkin while preserving the standard six-section increase geometry. After stuffing and closing, a long cream strand passes repeatedly through the center to create six deep lobes.
The topper uses three contrasting elements: a compact brown stem, a broad olive leaf, and a narrow spiral vine. Keeping these parts small prevents the crown from overpowering the ribbed crochet pumpkin. Comparable free pumpkin patterns also use worsted or Aran yarn with hooks around 4–5.5 mm, while stem-and-vine tutorials commonly form curls by increasing along a chain. The main maker error is tightening the sculpting strands before checking equal spacing. That produces one narrow lobe and five progressively wider sections.
Project Info at a Glance
| Skill Level | Time | Finished Size | Hook | Best For |
|---|---|---|---|---|
| Intermediate | Approx. 2–3 hours | Approx. 12–14 cm wide × 9–11 cm high | 4 mm | Fall shelves, centerpieces, Halloween displays |
The exact size depends on yarn construction, gauge, stuffing density, and sculpting tension. Published worsted and Aran crochet pumpkins commonly use hooks from approximately 4–5.5 mm, making a 4 mm hook appropriate when a dense amigurumi fabric is required.
Materials and Tools
Yarn
- Warm cream or ivory — worsted/Aran #4 — approximately 70–90 g
- Medium brown — worsted/Aran #4 — approximately 10–15 g
- Olive or moss green — worsted/Aran #4 — approximately 12–18 g
- Extra cream shaping strand — approximately 2.5–3 m
Tools
- 4 mm crochet hook
- Polyester fiberfill — approximately 70–100 g
- Long tapestry or doll needle
- Locking stitch marker
- Scissors
- Tape measure
Abbreviations
- MR — magic ring
- sc — single crochet
- inc — 2 sc in the same stitch
- dec — invisible decrease
- hdc — half double crochet
- dc — double crochet
- sl st — slip stitch
- ch — chain
- BLO — back loop only
- st/sts — stitch/stitches
An invisible decrease is worked through the front loops of two consecutive stitches before completing one single crochet, which reduces the raised bar produced by a conventional decrease.
Gauge and Finished Measurements
Amigurumi gauge should be tight enough that pale fiberfill cannot be seen between the cream stitches.
A useful target is approximately 18–20 sc × 20–22 rounds = 10 × 10 cm before stuffing.
The completed body should measure approximately 12–14 cm across after sculpting. The stem adds roughly 5–6 cm to the overall height.
If visible holes appear when the swatch is stretched, reduce the hook to 3.5 mm. If the fabric becomes difficult to penetrate, return to 4 mm rather than tightening the working yarn further.
Pattern — Step by Step
Work the pumpkin body in a continuous spiral. Place a marker in the first stitch of every round.
Cream Pumpkin Body
Yarn: warm cream or ivory.
R1: 6 sc in MR. (6)
R2: inc ×6. (12)
R3: (1 sc, inc) ×6. (18)
R4: (2 sc, inc) ×6. (24)
R5: (3 sc, inc) ×6. (30)
R6: (4 sc, inc) ×6. (36)
R7: (5 sc, inc) ×6. (42)
The body has reached its 42-stitch plateau.
Build the Pumpkin Sides
R8: sc around. (42)
R9: sc around. (42)
R10: sc around. (42)
R11: sc around. (42)
R12: sc around. (42)
R13: sc around. (42)
R14: sc around. (42)
R15: sc around. (42)
R16: sc around. (42)
The nine-round plateau gives the pumpkin a broad middle before the upper decreases begin.
Decrease the Pumpkin
R17: (5 sc, dec) ×6. (36)
R18: (4 sc, dec) ×6. (30)
R19: (3 sc, dec) ×6. (24)
Begin stuffing. Add small pieces around the lower circumference before filling the center.
R20: (2 sc, dec) ×6. (18)
Add more stuffing. Keep the body firm but compressible.
R21: (1 sc, dec) ×6. (12)
Complete the stuffing before the final round.
R22: dec ×6. (6)
Fasten off, leaving a 100–120 cm cream tail.
Thread the tail through the front loops of the remaining six stitches and pull the opening closed.
Compressing the Pumpkin
Thread the long cream tail onto a doll needle.
Insert the needle through the top center and bring it out at the bottom center.
Return through the pumpkin from bottom to top.
Pull until the body shortens approximately 1–1.5 cm.
Repeat once if required.
Do not make the pumpkin completely flat. The reference retains a rounded upper surface with a broad lower circumference.
Creating Six Pumpkin Ridges
Divide the circumference into six equal sections.
Place six stitch markers around the widest part if visual spacing is difficult.
Bring the shaping yarn out through the top center.
Run it down the outside of the body along the first marked channel.
Insert the needle into the bottom center.
Push it through the stuffing and out through the top center.
Pull until the first groove measures approximately 6–10 mm deep.
Move to the second marked position.
Repeat until all six channels have been formed.
View the pumpkin from directly above before securing the yarn.
Adjust the tension until the six lobes are approximately equal.
Knot the shaping yarn at the top where the stem and leaf will cover it.
Optional Eight-Ridge Version
The photographed design reads clearly with six broad sections, but a more segmented pumpkin can use eight grooves.
Mark the body at quarter points first.
Add one marker halfway between each quarter point.
Run the shaping strand through all eight positions.
Keep the grooves slightly shallower, approximately 5–8 mm.
Do not use eight very deep channels on a 12 cm body because the lobes can become narrow and cylindrical.
Brown Crochet Stem
Yarn: medium brown.
R1: 6 sc in MR. (6)
R2: sc around. (6)
R3: sc around. (6)
R4: sc around. (6)
R5: sc around. (6)
R6: sc around. (6)
R7: sc around. (6)
R8: sc around. (6)
Sl st in the next stitch.
Fasten off, leaving approximately 25 cm.
The stem should measure approximately 5–6 cm.
Shaping the Stem Without Sewing
Insert several short brown yarn scraps inside the stem instead of polyester stuffing.
Use the finishing tail to pass down through the stem tube and out near its lower edge.
Pull slightly so the upper half bends.
Pass the tail through the pumpkin’s top opening before it is completely hidden beneath the leaf.
Bring the tail out through a neighboring pumpkin stitch.
Weave it back through dense stitches to lock the stem in position.
This anchoring method avoids a conventional perimeter seam around the stem base.
Large Green Leaf
Yarn: olive or moss green.
Ch 11.
Starting in the second chain from the hook:
sl st, sc, hdc, dc, 2 dc, dc, hdc, sc, sc, 3 sc in final chain.
Continue along the opposite side of the foundation chain:
sc, sc, hdc, dc, 2 dc, dc, hdc, sc, sl st.
Do not fasten off.
Leaf Edging
Ch 1.
Sc around the first side.
At the leaf point work:
sc, ch 2, sl st in first ch, sc.
Continue sc along the second side.
Sl st at the base.
Fasten off, leaving approximately 30 cm.
Leaf Vein
Join green yarn at the leaf base.
Surface slip stitch along the central foundation chain toward the point.
Fasten off.
The raised central vein gives the leaf enough structure to remain visible against the cream pumpkin.
Optional Three-Lobed Leaf
The reference topper can also be interpreted as a broader lobed leaf. Use this variation when more crown coverage is wanted.
R1: 6 sc in MR. (6)
R2: inc ×6. (12)
R3: (1 sc, inc) ×6. (18)
Do not fasten off.
Center lobe: ch 9; starting in second chain work sl st, sc, hdc, dc, tr, dc, hdc, sc.
Sl st into the next two stitches of R3.
Side lobe: ch 7; starting in second chain work sl st, sc, hdc, dc, hdc, sc.
Sl st into the next two stitches.
Repeat the side lobe on the opposite side.
Fasten off with a long anchoring tail.
Brown Curly Vine
Yarn: medium brown.
Ch 26.
Starting in the second chain from the hook, work 2 sc in every chain.
The increases force the chain into a spiral.
For a tighter curl at the tip, work 3 sc into each of the final six chains instead of 2 sc.
Fasten off, leaving approximately 25 cm.
Do not stretch the spiral after finishing it.
Short Secondary Vine
For the smaller curl visible beside the main vine:
Ch 14.
Work 2 sc in each chain from the second chain to the end.
Fasten off with a 20 cm tail.
Position the short curl on the opposite side of the stem from the longer vine.
Anchoring the Leaf Without a Sewn Perimeter
Lay the green leaf over the gathered crown.
Push the leaf’s long finishing tail down through the same central opening used by the stem.
Bring the tail out through a cream stitch approximately 2 cm from the center.
Reinsert it through a neighboring stitch and bring it back toward the crown.
Repeat once.
Weave the remaining tail through the underside of the leaf.
The leaf is held at its base while its pointed end remains free.
Anchoring the Vine
Insert the vine tail through the crown beside the stem.
Bring the tail through the pumpkin body and out approximately 1–1.5 cm away.
Return through an adjacent stitch.
Pull only until the vine base sits against the crown.
Do not tighten enough to bury the first curl.
Weave the tail through the dense cream stitches.
Assembly
- Crochet the cream body from the 6-stitch magic ring through the 42-stitch plateau and complete all decrease rounds to six stitches.
- Stuff the body firmly before closing R22, concentrating fiberfill around the circumference rather than creating one dense central lump.
- Pass the cream tail through the top and bottom centers and compress the body by approximately 1–1.5 cm.
- Mark six equal positions around the circumference before tightening any external sculpting channel.
- Form six grooves through the center, compare their depth from above, and secure the shaping strand beneath the future topper.
- Crochet the six-stitch brown stem tube and fill it with yarn scraps so the top can retain a slight curve.
- Make the green leaf, add its central surface-crochet vein, and position the base against one side of the stem.
- Crochet the long brown spiral vine and optional shorter curl, keeping both spirals relaxed after they leave the hook.
- Anchor the stem, leaf, and vines through the central crown opening with their own long tails rather than sewing their full perimeters to the pumpkin.
- Weave all remaining tails through dense matching stitches, reshape the six lobes by hand, and check that the pumpkin rests evenly on its base.
The finished pumpkin should have six broad cream lobes, a curved brown stem, one visible green leaf, and at least one brown spiral vine secured at the crown.
7 Technical Tips
- The pumpkin shows white stuffing between stitches: reduce the hook from 4 mm to 3.5 mm if stretched single crochet exposes gaps larger than approximately 2 mm. Adding more stuffing will make loose fabric openings more visible rather than correcting them.
- One lobe becomes much narrower: mark all six groove positions before pulling the first shaping strand tight. Correct spacing first, then tighten each channel to approximately 6–10 mm depth.
- The pumpkin remains spherical: compress the top and bottom centers by approximately 1–1.5 cm before making the external grooves. Sculpting strands divide the circumference but should not perform all of the vertical compression.
- The stem pulls out of the crown: pass its tail through at least two dense cream stitches after bringing it through the center opening. Tucking only the stem tube into the hole provides little resistance when the pumpkin is handled.
- The leaf curls underneath itself: block it to approximately 7–9 cm before crown attachment and anchor only its lower 1–2 cm. Fixing the complete perimeter removes the raised leaf shape visible in the reference.
- The vine does not curl: work two single crochets into every foundation chain and three into the final six chains for a tighter tip. One single crochet per chain produces a strip rather than a spiral.
- The bottom rocks on a table: move stuffing away from the exact bottom center before the final shaping is secured. Several lower lobes should touch the surface instead of resting on one hard central mound.
Why a 42-Stitch Body Works Better at This Scale
A 24-stitch body like the simplified construction shown in the reference graphic produces a considerably smaller pumpkin when worked in ordinary worsted yarn.
For a finished body around 12–14 cm wide, expanding through 6, 12, 18, 24, 30, 36, and 42 stitches gives the stuffing enough circumference to form broad lobes.
The arithmetic also remains consistent: every increase round adds exactly six stitches.
Decrease rounds reverse the same progression:
42 → 36 → 30 → 24 → 18 → 12 → 6.
This symmetry makes the body easier to count and produces a balanced top and bottom before sculpting.
Choosing Cream Yarn
Use warm ivory, natural, ecru, or soft cream rather than stark optical white when matching the reference.
A smooth worsted yarn gives the sculpted channels clear edges.
Highly fuzzy fibers obscure the single-crochet rows and soften the grooves.
Cotton produces crisp stitch definition but has less elasticity.
Acrylic is lighter and easier to compress around the shaping strands.
A cotton-acrylic blend provides a middle option when both stitch definition and flexibility are required.
Choosing the Green Leaf Color
The leaf is a muted olive rather than a bright spring green.
Useful shade descriptions include moss, olive, sage, lichen, and fern.
The green should be dark enough to separate from the cream body but not so dark that the surface vein disappears.
Use the same green strand for the main leaf and its raised vein if a restrained finish is preferred.
For stronger definition, make the vein one shade darker.
Choosing the Brown Stem and Vine Yarn
Use medium walnut, chestnut, cocoa, or warm taupe.
The stem and vine should match each other unless a deliberately mixed topper is planned.
Brown worsted yarn can be held double for a thicker stem while the vine remains single-stranded.
If the doubled stem becomes difficult to work with the 4 mm hook, increase only the stem hook to 4.5 mm.
The stem should remain firmer than the spiral vine.
Stuffing the Pumpkin Correctly
Add stuffing before the opening becomes smaller than 24 stitches.
Push the first pieces against the lower sides.
Rotate the body.
Add more material to the opposite side.
Continue building even pressure around the circumference.
When 18 stitches remain, fill the central cavity.
At 12 stitches, check for soft patches near the upper sides.
The final body should be firm enough to resist collapse but flexible enough that the shaping strand can sink into the surface.
Making Deeper Pumpkin Ribs
For more dramatic grooves, tighten each channel in two stages.
Complete all six channels at moderate tension first.
View the pumpkin from above.
After the spacing is correct, return to each groove and deepen it by approximately 2–3 mm.
This method is safer than immediately pulling the first channel to maximum depth.
Deep channels reduce the apparent circumference, so the finished pumpkin may measure slightly less than the unsculpted body.
Making a Smaller No-Sew Pumpkin
Stop increasing at 30 stitches.
Use this sequence:
R1: 6 sc. (6)
R2: 12.
R3: 18.
R4: 24.
R5: 30.
R6–R11: sc around. (30)
R12: decrease to 24.
R13: decrease to 18.
R14: decrease to 12.
R15: decrease to 6.
Use a shorter 4 cm stem and a ch-8 leaf.
Making a Larger Pumpkin
Add one increase round after R7:
R8: (6 sc, inc) ×6. (48)
Continue at 48 stitches for approximately 10–12 rounds.
Then decrease in six-stitch steps:
48 → 42 → 36 → 30 → 24 → 18 → 12 → 6.
Increase the shaping strand to approximately 4 m.
Use eight grooves if the finished body exceeds approximately 17 cm across.
Using Bulky Yarn
Bulky #5 yarn can make the same stitch counts significantly larger.
Begin with a 5–6 mm hook, then adjust after testing the fabric.
If the 42-stitch version becomes larger than required, stop at the 36-stitch plateau.
Maintain the six-stitch increase arithmetic.
Do not skip random increase rounds to control size because irregular expansion can create a pointed or uneven base.
Using Super-Bulky Yarn
For category 6 yarn, a 30- or 36-stitch plateau may be enough for a substantial decorative pumpkin.
Published chunky pumpkin patterns commonly pair super-bulky yarn with hooks around 8–9 mm.
Make a test circle through 30 stitches and measure its diameter before adding another increase round.
Thick yarn also creates deeper natural texture, so external shaping channels can be spaced farther apart.
Why the Vine Curls
A foundation chain has a fixed inner length.
Working two single crochets into every chain forces the outer edge to contain more stitch width than the foundation can accommodate in a straight line.
The strip responds by twisting into a spiral.
Three stitches per chain increase that difference further and produce a tighter curl.
Use two stitches per chain through most of the vine and three only near the end when a tapered spiral is wanted.
Keeping the Project No-Sew
“No-sew” in this construction means the separate topper pieces do not require conventional perimeter sewing.
The pumpkin body itself is worked continuously and has no side seam.
Long finishing tails from the stem, leaf, and vine pass through the crown and are locked into the dense body stitches.
A yarn needle is still used for sculpting, closing the six-stitch opening, anchoring tails, and weaving ends.
That distinction matters when planning the project: no sewing seam is required, but a tapestry or doll needle remains necessary.
Making the Topper Removable
For interchangeable seasonal toppers, do not anchor the leaf and vine permanently.
Make the stem with a slightly wider lower section.
Push it firmly into the gathered crown.
Attach the leaf and vine to the stem itself using their long tails.
The complete topper can then be inserted into the center opening.
This method is intended for decorative use only because pulling the pumpkin by the stem can remove the topper.
Fixing an Uneven Pumpkin
Place the completed body on a table before securing the sculpting strand.
Rotate it slowly.
If one lobe projects farther outward, massage stuffing from that area toward the neighboring lobes.
If a groove is too deep, loosen its external strand.
Do not correct a wide lobe by excessively tightening both neighboring grooves.
Redistributing stuffing preserves a softer and more symmetrical shape.
Care and Storage
Follow the yarn label for fiber-specific cleaning instructions.
Spot cleaning is suitable for most decorative pumpkins.
If the piece is washed, reshape all six lobes while damp.
Arrange the green leaf and brown spiral vine by hand.
Allow the pumpkin to dry fully before storage.
Do not place heavy seasonal decorations directly on top of it. Long compression can flatten the sculpted channels and bend the stem permanently.
Conclusion
The six grooves determine whether this cream pumpkin reads as a sculpted fall form rather than a stuffed crochet ball. Build the body through the full 42-stitch plateau, stuff it evenly, compress the centers, and mark every channel before applying final shaping tension. The brown stem, olive leaf, and spiral vine can then be anchored through the crown with their own tails instead of perimeter seams. Start by testing the 4 mm hook against your chosen worsted yarn for stuffing gaps. Save this no-sew crochet pumpkin pattern to Pinterest or share the finished version on Instagram with #NoSewCrochetPumpkin. Would you keep six broad lobes on this cream pumpkin or divide it into eight narrower sections?









