Introduction
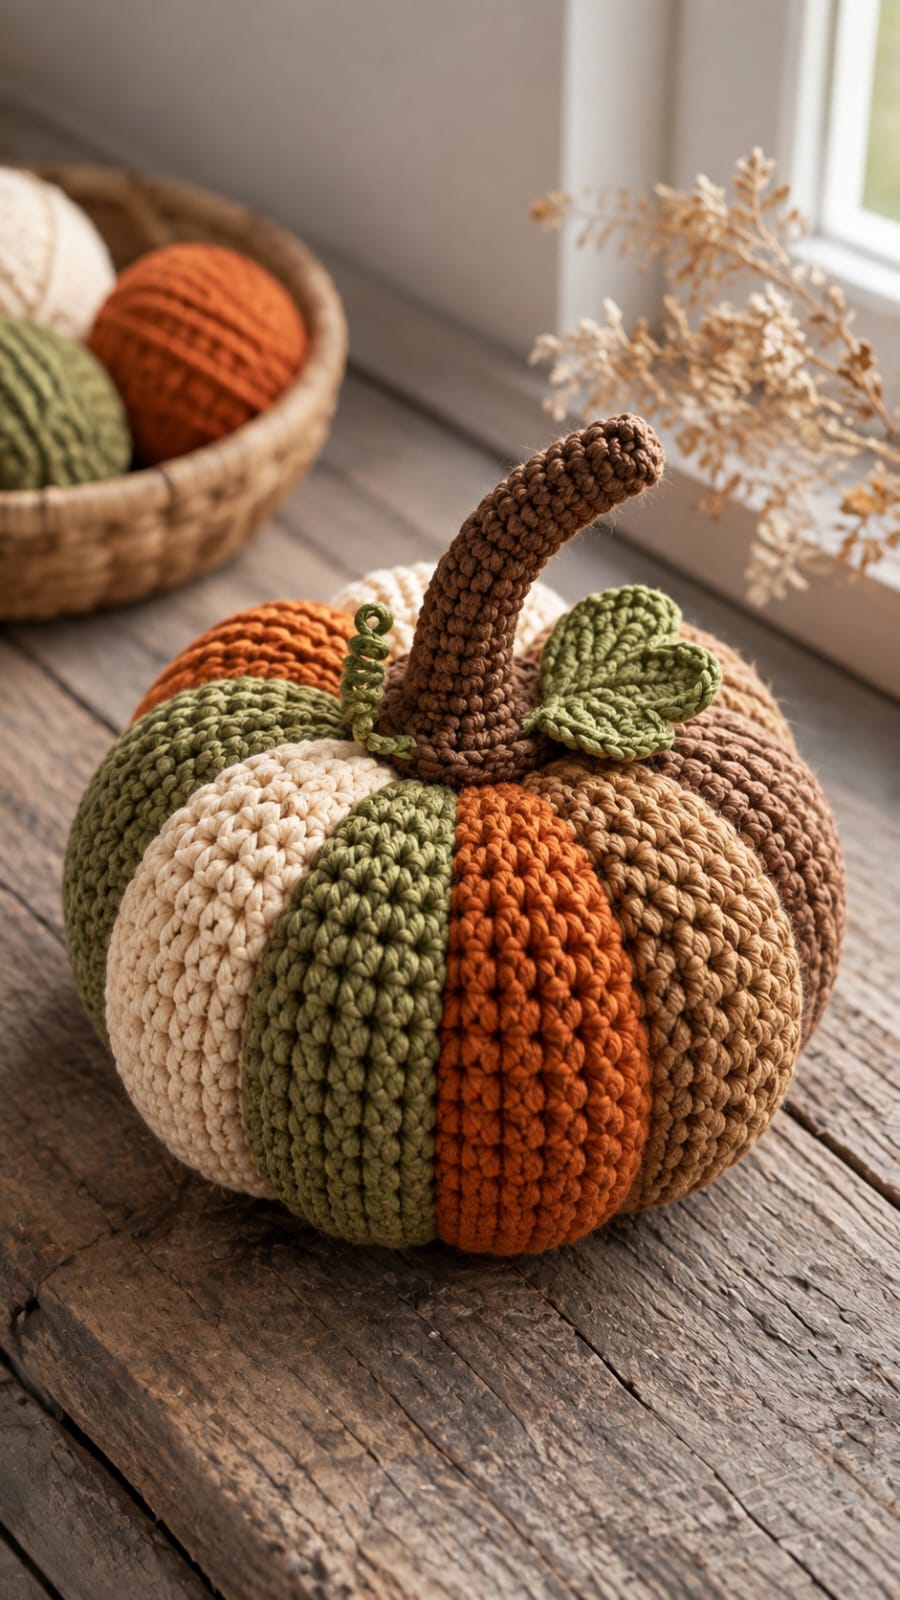
A pumpkin divided into cream, olive, orange and brown ribs cannot hide a misplaced color change. This multicolor crochet pumpkin pattern uses worsted-weight yarn, a 4 mm hook and separately constructed leaves, vine and curved stem to produce an approximately 18–22 cm fall decoration. The intermediate construction is useful when you want a freestanding pumpkin with stronger segmentation than a basic stuffed sphere.
The Design: What Makes This Multicolor Pumpkin Different
The color sequence does part of the shaping work before the pumpkin is even sculpted. Cream, olive, burnt orange and brown sections visually separate adjacent ribs, while external shaping strands deepen those divisions after stuffing. A 36-stitch plateau keeps the body in the medium amigurumi range without creating an oversized sphere. The tall brown stem is deliberately narrow because a thick stem would compete with the segmented body rather than terminate it. Two flattened green leaves cover part of the upper join and help transition from the broad pumpkin to the six-stitch stem. A common error in a striped crochet pumpkin is changing colors at random positions around the body. That produces diagonal blocks instead of deliberate vertical sections, so the color placement and final sculpting lines need to be planned together.
Project Info at a Glance
| Skill Level | Time | Finished Size | Hook | Best For |
|---|---|---|---|---|
| Intermediate | 4–6 hours | Approx. 18–22 cm including stem | 4.0 mm | Fall shelves, table displays and Thanksgiving décor |
Materials and Tools
Yarn
- Cream — worsted / medium #4 — approximately 20–25 g — one or two pumpkin segments.
- Olive green — worsted / medium #4 — approximately 25–30 g — pumpkin segments, leaves and vine.
- Burnt orange — worsted / medium #4 — approximately 25–30 g — pumpkin segments.
- Camel brown — worsted / medium #4 — approximately 20–25 g — pumpkin segments.
- Dark brown — worsted / medium #4 — approximately 15–20 g — tall stem and optional shaping strands.
A smooth cotton or cotton-blend worsted yarn gives the ribs sharper edges. Medium acrylic also works, but use a hook small enough that stuffing cannot show between stitches.
Tools
- 4.0 mm crochet hook
- Polyester fiberfill
- Yarn needle
- Stitch markers
- Scissors
- Dressmaking pins
- Measuring tape
Abbreviations
- MR — magic ring
- sc — single crochet
- inc — increase
- dec — decrease
- sl st — slip stitch
- ch — chain
- hdc — half double crochet
- BLO — back loop only
For an invisible decrease, insert the hook through the front loops of the next two stitches and complete one single crochet through both loops.
Pattern — Step by Step
Work the main pumpkin in a continuous spiral. Mark the first stitch of every round.
Pumpkin Body
Yarn: rotate cream, olive, burnt orange and camel brown through planned sections.
R1: 6 sc in MR (6)
R2: inc ×6 (12)
R3: (sc, inc) ×6 (18)
R4: (2 sc, inc) ×6 (24)
R5: (3 sc, inc) ×6 (30)
R6: (4 sc, inc) ×6 (36)
R7: sc around (36)
R8: sc around (36)
R9: sc around (36)
R10: sc around (36)
R11: sc around (36)
R12: sc around (36)
R13: sc around (36)
R14: sc around (36)
R15: sc around (36)
R16: sc around (36)
R17: (4 sc, dec) ×6 (30)
R18: (3 sc, dec) ×6 (24)
R19: (2 sc, dec) ×6 (18)
R20: (sc, dec) ×6 (12)
Stuff firmly enough to maintain a round body but leave enough compression for the shaping strands. Concentrate slightly more stuffing around the outer circumference than directly through the center.
R21: dec ×6 (6)
Fasten off. Leave a 30 cm tail and close the remaining opening.
Creating the Multicolor Segments
The photographed pumpkin reads as a series of broad vertical lobes rather than ordinary narrow stripes. The cleanest reconstruction is to combine controlled color blocks with external sculpting.
Thread approximately 80 cm of matching or dark brown yarn onto a yarn needle. Insert the needle through the bottom center and exit through the top center. Bring the strand down the outside of the pumpkin, following one planned color boundary, then pass through the center again.
Pull until a groove appears.
Repeat around the pumpkin at six evenly spaced positions. Each new strand should produce a visible indentation without collapsing the body.
After the final pass, secure the shaping yarn beneath the pumpkin.
Target body diameter: approximately 15–17 cm before the stem is attached.
Tall Curved Stem
Yarn: dark brown.
R1: 6 sc in MR (6)
R2: sc around (6)
R3: sc around (6)
R4: sc around (6)
R5: sc around (6)
R6: sc around (6)
R7: sc around (6)
R8: sc around (6)
R9: sc around (6)
R10: sc around (6)
R11: sc around (6)
R12: sc around (6)
R13: sc around (6)
R14: sc around (6)
R15: sc around (6)
R16: sc around (6)
Stuff the lower two-thirds lightly. Leave the final third almost unstuffed so the tip can bend without forming a hard angle.
Fasten off. Leave a 30 cm sewing tail.
Target a stem length of approximately 7–9 cm.
Stem Base Collar
Yarn: dark brown.
R1: 6 sc in MR (6)
R2: inc ×6 (12)
R3: (sc, inc) ×6 (18)
Fasten off with a 25 cm tail.
Position the collar underneath the tall stem. This flat circle spreads the attachment pressure across the top of the pumpkin and conceals the central shaping passes.
Large Leaf
Yarn: olive green.
R1: 6 sc in MR (6)
R2: inc ×6 (12)
R3: (sc, inc) ×6 (18)
R4: (2 sc, inc) ×6 (24)
Fold the circle slightly so it forms an oval rather than remaining perfectly round.
Sl st through both layers for 4 stitches along one edge to create a narrow attachment base.
Fasten off. Leave a 25 cm sewing tail.
Pinch the opposite edge into a soft point before sewing.
Small Leaf
Yarn: olive green.
R1: 6 sc in MR (6)
R2: inc ×6 (12)
R3: (sc, inc) ×6 (18)
Fold lightly and sl st through both layers across 3 stitches at the attachment edge.
Fasten off with a 20 cm tail.
The finished leaf should be approximately 4–5 cm long after shaping.
Curly Vine
Yarn: olive green.
R1: ch 22 (22)
Beginning in the second chain from the hook, work 3 sc into each chain.
The additional stitches force the chain into a spiral.
Fasten off with a 20 cm sewing tail.
Do not stretch the spiral while attaching it. The visible vine should retain approximately three to five tight curls.
Optional Second Tendril
Yarn: olive green.
R1: ch 15 (15)
Starting in the second chain, work 3 sc into each chain.
Fasten off with a 15 cm tail.
Use this shorter spiral behind the stem if a fuller topper is required.
Shaping the Pumpkin
The 36-stitch body is deliberately round before sculpting. Its recognizable pumpkin geometry comes from compression.
Set the stuffed body on a table and identify six evenly spaced vertical paths. Run shaping yarn from bottom center to top center and around the outside along each path.
Pull every strand to approximately the same tension.
The finished grooves should measure roughly 8–12 mm deep at the widest point. Greater compression can make the segments narrow at the center and produce a flower-like silhouette when viewed from above.
After all six grooves are formed, press the top and bottom toward each other by approximately 1–2 cm. This converts the sphere into a squat pumpkin.
Positioning the Color Blocks
The visual sequence in the reference alternates warm neutrals with stronger fall colors. Avoid placing all dark segments together.
A practical arrangement is cream, olive, orange, camel, cream, olive, then repeat or adjust the sequence around the rear.
Place shaping lines directly along the transitions whenever possible. This makes each colored section read as a separate rib.
If a color change creates a visible jog, position that jog toward the bottom or beneath one of the sculpting strands.
Assembly
- Finish the 36-stitch pumpkin body, stuff it and close the six-stitch opening completely.
- Run six shaping strands from bottom center to top center and form evenly spaced vertical grooves.
- Compress the top and bottom by approximately 1–2 cm and secure the sculpting yarn beneath the body.
- Center the dark brown collar over the upper closing point and pin it flat.
- Place the tall stem on the collar and sew through approximately 12–15 mm of its lower circumference so it cannot pivot.
- Bend the upper third of the stem gradually rather than folding one round sharply.
- Position the large olive leaf on one side of the stem and the smaller leaf on the opposite side.
- Sew each leaf only through its narrow attachment edge so the outer portion remains raised.
- Attach the curly vine beside the stem base and add one hidden tack stitch after the first curl if the spiral rotates.
- Set the pumpkin on a flat surface, redistribute the filling through the ribs and weave all remaining tails into the center.
The finished pumpkin should stand independently with clearly separated multicolor ribs, a curved brown stem, two raised leaves and a compact green spiral.
7 Technical Tips
- Ribs disappear after stuffing: Excessive fiberfill prevents the shaping yarn from compressing the center. Remove enough stuffing to let each groove reach approximately 8–12 mm without excessive pulling force.
- Stem falls sideways: A six-stitch tube attached through only one or two stitches acts like a hinge. Sew through at least 12–15 mm around its lower edge and attach it through the brown collar as well as the pumpkin body.
- Color sections become diagonal: Spiral crochet naturally shifts the first stitch as rounds accumulate. Keep a stitch marker in every round and place the most visible color transitions beside planned sculpting grooves.
- Pumpkin becomes spherical: Equal stuffing pressure at the poles removes the squat gourd profile. Compress the finished top and bottom toward each other by approximately 1–2 cm before locking the shaping strands.
- Leaf curls into a cup: A tightly sewn perimeter forces the flat piece to contract. Attach only the final 3–4 stitches at the leaf base and leave the remaining edge unsecured.
- Vine will not spiral: One stitch per chain produces a cord instead of a tendril. Work 3 sc into every foundation chain and leave the finished spiral unstretched.
- Bottom will not sit flat: Sculpting strands pulled harder on one side shift the stuffing and tilt the pumpkin. Place the body on a table after every second groove and correct the tension before tying the final knot.
Adjusting the Pumpkin Size
The photographed design is a medium tabletop pumpkin, but the same construction can be scaled.
For a smaller version, stop the increase sequence at 30 stitches and work seven to eight plain rounds before decreasing by six stitches per decrease round.
For a larger version, continue from 36 to 42 stitches with (5 sc, inc) ×6, then add approximately two extra plateau rounds. Increase the stem length proportionally.
Changing yarn weight also affects the result. Published pumpkin patterns range from tiny sport-weight pieces around 5 cm to substantial worsted-weight table decorations. Keep the hook smaller than the yarn manufacturer’s general recommendation when gaps expose the filling.
Color Planning
The strongest feature of this multicolor crochet pumpkin pattern is the controlled autumn palette. Cream creates the highest contrast. Olive links the pumpkin body to its leaves and vine, burnt orange supplies the conventional pumpkin reference, and camel brown connects visually with the stem.
Limit the palette to four body colors if you want the ribs to remain readable from across a room.
For a neutral version, substitute oatmeal, ivory, mushroom and taupe. A stronger harvest version can use mustard, rust, dark olive and chocolate.
Keep the stem darker than at least three of the body colors. Otherwise its narrow silhouette can disappear against the upper ribs.
Finishing and Blocking
This project should not be aggressively wet blocked after stuffing because water can flatten the sculpted grooves and alter the filling distribution.
Shape the pumpkin by hand instead. Press each lobe outward between two shaping strands and rotate the body after every adjustment.
Flatten only the leaves before assembly. Pin each damp leaf to approximately 4–6 cm long, depending on size, and allow it to dry completely before sewing.
Check the stem from both the front and side. Its bend should begin above the lower half. A curve beginning directly at the pumpkin surface makes the stem appear poorly attached rather than naturally bent.
Conclusion
Use the sculpting lines as structural boundaries rather than treating the colors as ordinary stripes. Finish the 36-stitch body first, compress six evenly spaced grooves, then attach the tall brown stem over a separate collar before adding the leaves and spiral vine. Your next practical step is to arrange four yarn colors in their intended order and photograph that sequence before crocheting, which prevents accidental repetition. Share the finished multicolor crochet pumpkin pattern project on Pinterest and post a top view on Instagram with #MulticolorCrochetPumpkin. For this specific pumpkin, would you keep the cream rib or replace it with mustard for a darker harvest palette?









