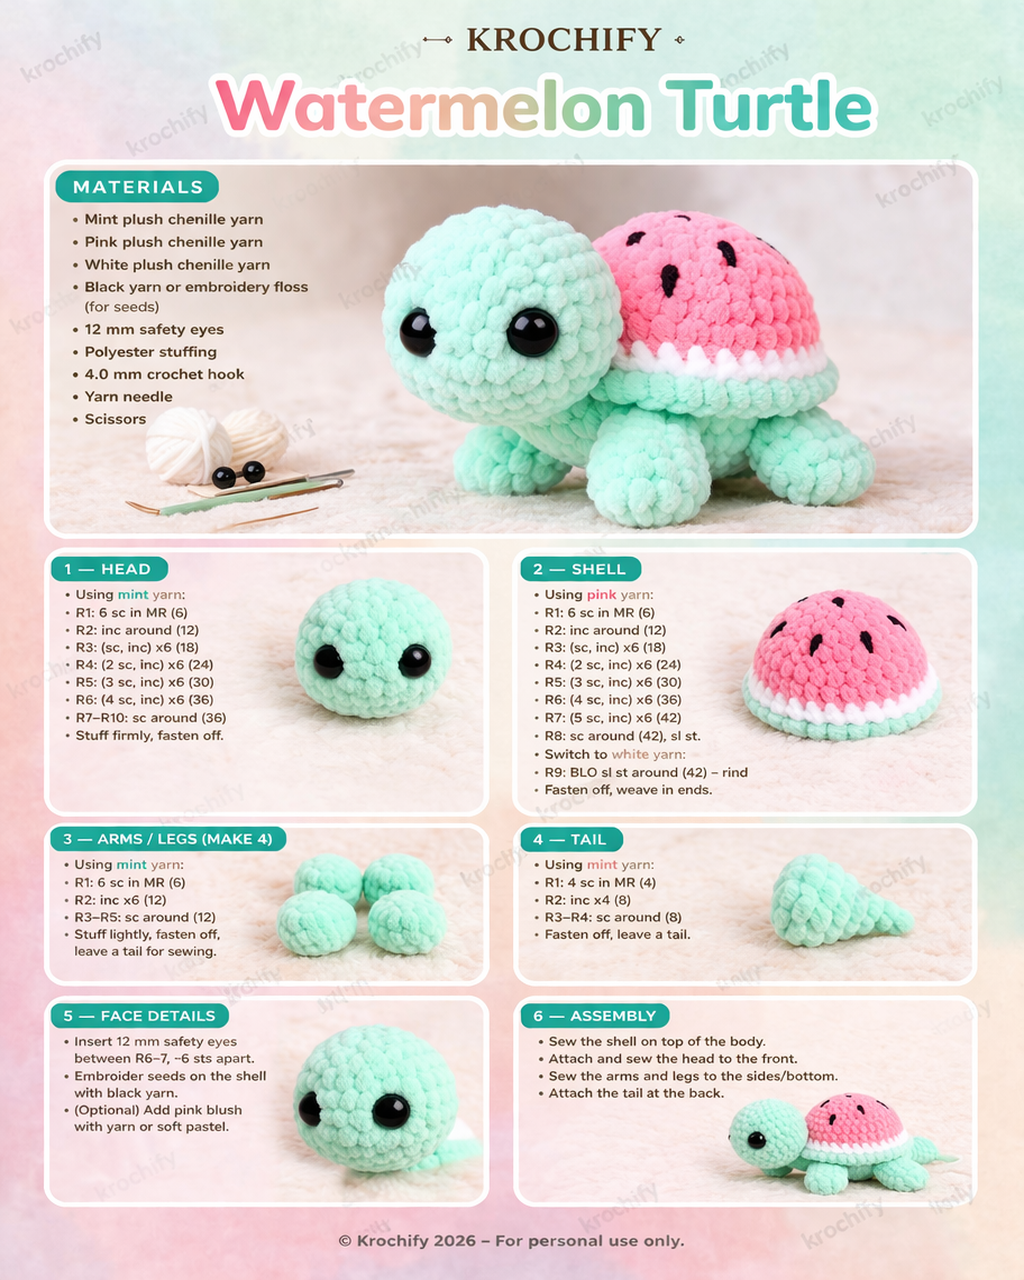
A turtle with a watermelon shell forces one decision: the color change must sit exactly at the shell midpoint or the illusion fails. This turtle amigurumi crochet pattern gives you a compact plush build with defined rounds, material specs, and a stable structure. You will create a miniature turtle with a decorative shell and tight shaping. The result is efficient. Small turtles like this are fast to reproduce for consistent batches.
The Design: What Makes This Turtle Different
This turtle relies on contrast, not complexity. The watermelon shell replaces traditional segmenting with a clean color division. That removes the need for surface embroidery except for seeds. Fewer variables. Better consistency.
The plush yarn changes everything. Stitch definition disappears, so structure must come from math alone. Many beginner attempts fail here. Uneven increases create subtle distortion that becomes obvious once stuffed.
The limb design stays minimal. Short legs keep the center of gravity low. Oversized limbs would push the turtle forward. That mistake appears often in free turtle crochet pattern variations.
Project Information at a Glance
| Skill Level | Time | Finished Size | Hook | Best For |
|---|---|---|---|---|
| Beginner–Intermediate | 45 min | 7–9 cm | 4 mm | Keychains, markets |
Materials and Tools
Yarn
- Mint green plush yarn — 40g
- Pink plush yarn — 20g
- White plush yarn — 10g
- Black yarn — scrap (seeds)
Tools
- 4 mm crochet hook
- 12–14 mm safety eyes
- Stuffing
- Yarn needle
- Stitch marker
Crochet Abbreviations
MR / sc / inc / dec / sl st / BLO
Invisible decrease prevents visible holes in plush yarn.
Step-by-Step Turtle Crochet Pattern
Head (Make 1)
R1: 6 sc in MR (6)
R2: inc x6 (12)
R3: (sc, inc) x6 (18)
R4: (2 sc, inc) x6 (24)
R5: (3 sc, inc) x6 (30)
R6–R8: sc (30)
R9: (3 sc, dec) x6 (24)
Insert eyes between R6–R7
R10: (2 sc, dec) x6 (18)
R11: (sc, dec) x6 (12)
R12: dec x6 (6)
Body (Make 1)
R1–R5 increase to (30)
R6–R7 sc (30)
R8: (3 sc, dec) x6 (24)
Legs (Make 4)
R1: 6 sc MR (6)
R2: inc x6 (12)
R3: sc around (12)
Shell Dome (Make 1)
Start with pink
R1: 6 sc MR (6)
R2: inc (12)
R3: (sc, inc) (18)
R4: (2 sc, inc) (24)
R5: (3 sc, inc) (30)
Switch to white
R6: sc (30)
Switch to green
R7–R8: sc (30)
Shell Trim
Attach green yarn
R1: BLO sc around (30)
R2: (sc, inc) around (45)
Seeds (Make multiple)
Using black yarn, embroider small oval stitches randomly across pink section.
Assembly Instructions
- Sew head to body.
- Attach legs evenly.
- Sew shell to top.
- Add trim edge.
- Insert safety eyes.
- Stuff evenly.
- Embroider seeds.
- Shape shell gently.
- Adjust symmetry.
- Secure ends.
7 Technical Tips for Cleaner Amigurumi
- Incorrect color change placement shifts shell proportions by 1–2 rows.
- Loose stitches in velvet yarn expose stuffing instantly.
- Overstuffing distorts round counts visibly.
- Eyes placed too high flatten the face profile.
- Leg spacing must be even within 5 mm tolerance.
- Shell attachment must align with body centerline.
- Short yarn tails under 3 cm unravel quickly.
Conclusion
This turtle amigurumi crochet pattern depends on precise shaping and accurate color transitions. Use a 4 mm hook and plush yarn to maintain structure. Share your finished turtle on Pinterest and Instagram with #WatermelonTurtle. Will you keep the watermelon shell or experiment with other fruit-inspired designs?









