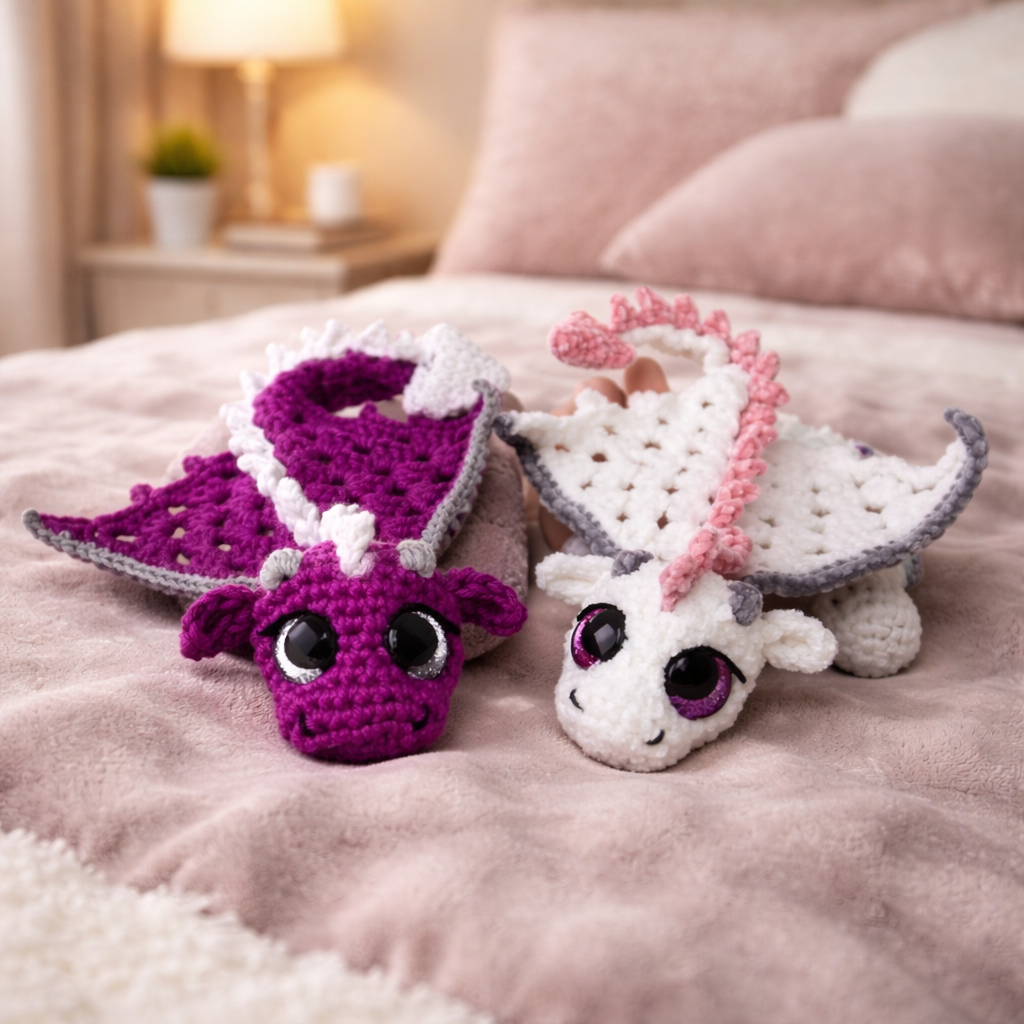
Title: Mini Dragon Amigurumi Crochet Pattern
Description: Make a mini dragon amigurumi crochet pattern with verified stitch counts, 3.5 mm hook, 12 mm eyes, and lace-style wings.
Keywords: dragon amigurumi crochet pattern, mini dragon amigurumi, baby dragon crochet pattern, small dragon crochet pattern, fantasy dragon amigurumi
Introduction
A mini dragon only works if the wings stay flat and the face stays oversized. This dragon amigurumi crochet pattern gives you verified size benchmarks, materials, hook size, safety-eye guidance, and a full build for the head, body, horns, wings, spikes, and curled tail. You get a compact dragon with stable proportions and open wings that do not overpower the body. The useful part is structural: this format keeps the dragon compact enough for gift sales, party favors, or display without the usual wing-collapse problem.
The Design: What Makes This Dragon Different
This dragon is not built like a plush dinosaur with wings added later. The photo shows a fantasy dragon whose identity comes from three parts working together: a short squared snout, a very large eye area, and flat decorative wings that read almost like lace panels. Remove any one of those and the shape drifts. Fast. That is why the head needs a 36-stitch plateau even in a mini build, while the body can taper sooner. The face carries the character weight.
Wing structure matters even more here. Several published dragon tutorials treat wings as solid fabric panels, but lace-wing dragon patterns prove that openwork wings can still read correctly when the outline is firm and the spine edge is emphasized. That matches this image closely. Horn scale matters too; oversized horns would crowd the eyes and kill the compact baby-dragon silhouette. A common mistake with small dragon formats is overstuffing the muzzle. That rounds the nose, pushes the eyes outward, and makes the dragon look more like a generic creature than a fantasy dragon amigurumi.
Project Information at a Glance
| Skill Level | Time | Finished Size | Hook | Best For |
|---|---|---|---|---|
| Intermediate | 2–3 hours | 15 cm / 6 in | 3.5 mm | Gifts, market stock, backpack charms, desk decor |
Materials and Tools
Yarn
- Magenta-purple or white — DK to worsted smooth yarn — main color share of the project — Schachenmayr Catania, YarnArt Jeans, or similar cotton/acrylic blend
- Pink or pale accent — same weight — secondary details and wing edging — about 30 g on larger published multi-color dragon benchmarks
- Light gray or cream — same weight or slightly lighter — horns, claws, wing outline, or facial accents — small contrast amount only
Tools
- 3.5 mm crochet hook
- 12 mm safety eyes
- Polyfill stuffing
- Tapestry needle
- Stitch markers
- Scissors
Crochet Abbreviations
MR / sc / inc / dec / sl st / ch / dc / tr / BLO / FLO / picot
Use the invisible decrease through front loops only; on a mini dragon snout, a standard decrease leaves a dent line that stays visible under the eyes.
Step-by-Step Mini Dragon Crochet Pattern
Work in continuous spiral rounds unless noted.
Head (Make 1)
Yarn: main color
Source: Standard amigurumi math
- R1: 6 sc in MR (6)
- R2: inc x6 (12)
- R3: (sc, inc) x6 (18)
- R4: (sc 2, inc) x6 (24)
- R5: (sc 3, inc) x6 (30)
- R6: (sc 4, inc) x6 (36)
- R7-R10: sc around (36)
- R11: (sc 4, dec) x6 (30)
- R12: (sc 3, dec) x6 (24)
- Insert 12 mm safety eyes between R7 and R8, about 8 stitches apart. Stuff firmly at the back of the head, lightly in the snout.
- R13: (sc 2, dec) x6 (18)
- R14: (sc, dec) x6 (12)
- R15: dec x6 (6)
Fasten off. Leave 30 cm tail.
Body (Make 1)
Yarn: main color
Source: Standard amigurumi math
- R1: 6 sc in MR (6)
- R2: inc x6 (12)
- R3: (sc, inc) x6 (18)
- R4: (sc 2, inc) x6 (24)
- R5: (sc 3, inc) x6 (30)
- R6: (sc 4, inc) x6 (36)
- R7-R9: sc around (36)
- R10: (sc 4, dec) x6 (30)
- R11: (sc 3, dec) x6 (24)
- Stuff moderately. Keep the lower half compact, not spherical.
- R12: (sc 2, dec) x6 (18)
- R13: (sc, dec) x6 (12)
- R14: dec x6 (6)
Fasten off. Leave 30 cm tail.
Front Legs (Make 2)
Yarn: main color
Source: Standard amigurumi math
- R1: 6 sc in MR (6)
- R2: (sc, inc) x3 (9)
- R3-R4: sc around (9)
- R5: (sc, dec) x3 (6)
- Stuff lightly at the paw only.
Fasten off. Leave 18 cm tail.
Horns (Make 2)
Yarn: gray or cream
Source: Standard amigurumi math
- R1: 4 sc in MR (4)
- R2: sc around (4)
- R3: (sc, inc) x2 (6)
- R4: sc around (6)
Fasten off. Leave 12 cm tail.
Ears (Make 2)
Yarn: main color
Source: Standard amigurumi math
- R1: 4 sc in MR (4)
- R2: inc x4 (8)
- Fold flat.
Fasten off. Leave 12 cm tail.
Snout Nostrils (Make 2)
Yarn: main color or gray
Source: Standard amigurumi math
- R1: 4 sc in MR (4)
Fasten off. Leave 8 cm tail.
Dorsal Spikes (Make 7)
Yarn: contrast color
Source: Standard amigurumi math
- R1: 4 sc in MR (4)
- R2: sc around (4)
Fasten off. Leave 10 cm tail.
Tail (Make 1)
Yarn: main color
Source: Standard amigurumi math
- R1: 6 sc in MR (6)
- R2: (sc, inc) x3 (9)
- R3-R5: sc around (9)
- R6: (sc, dec) x3 (6)
- R7-R10: sc around (6)
- R11: dec x3 (3)
- Stuff only the base half. Curve the tail while sewing to keep the looped shape.
Fasten off. Leave 22 cm tail.
Wings (Make 2)
Yarn: main color with contrast edge
Source: lace-wing concept benchmarked from published dragon wing variants
- Ch 9.
- Row 1: sc in 2nd ch from hook and across (8)
- Row 2: ch 3, turn, dc across (8)
- Row 3: ch 4, turn, dc in next 6 sts, tr in last st (8)
- Row 4: ch 3, turn, dc 6, dec (7)
- Row 5: ch 4, turn, dc 5, tr in last st (7)
- Row 6: ch 3, turn, dc 5, dec (6)
- Row 7: ch 4, turn, dc 4, tr in last st (6)
- Edging: work sc evenly around, making picot points along one long edge for the spined wing look.
- Keep the wing flat. Do not stuff.
Fasten off. Leave 20 cm tail.
Face Accents (Make 2 optional cheek/eye patches)
Yarn: accent color
Source: Standard amigurumi math
- R1: 6 sc in MR (6)
- Sl st to first stitch.
Fasten off. Leave 10 cm tail.
Assembly Instructions
- Sew the head to the front of the body, keeping the chin slightly lower than center so the dragon looks forward rather than upward.
- Attach the front legs low on the body, one on each side, with the paws angled slightly outward.
- Sew the tail to the rear seam and shape it into a soft upward curl.
- Attach the horns above the eyes, spaced evenly so they frame rather than crowd the face.
- Sew the ears slightly behind the horns and angle them outward.
- Position the nostrils near the front corners of the snout, not centered on top.
- Pin the wings to the upper back first and check that both tips rise to the same height.
- Sew the wings on with short stitches along the straight inner edge only, leaving the lace section free.
- Add the dorsal spikes from the crown down the back and onto the tail, reducing spacing slightly near the neck.
- Attach the optional face accents, then weave every tail through at least 4 cm of internal stitches before trimming.
The dragon is complete when the wings stay flat, the eyes dominate the face, and the tail holds a visible curl.
7 Technical Tips for Cleaner Amigurumi
- Use a second marker on the eye round. In a 36-stitch head, losing eye placement by even 1 stitch makes the oversized face look cross-eyed.
- Do not pack the snout solid. Too much stuffing in the front 24-stitch area rounds the muzzle and erases the dragon profile.
- Install the 12 mm eyes before the head drops below 24 stitches. Past that point, the washer angle gets awkward and can pull the eye line downward.
- Keep both wings pinned before sewing either one. A difference of even 5 mm in wing height shows immediately on a flat mini dragon.
- Make the horn bases small. Horns that widen past 6 stitches start competing with the eyes and make the forehead look crowded.
- Space dorsal spikes tighter near the neck. If every spike is evenly separated, the back line looks stiff instead of graduated.
- Bury tails for at least 4 cm. Shorter tail weaving slips loose first on the wings, where the fabric gets flexed every time the dragon is handled.
Conclusion
This dragon amigurumi crochet pattern succeeds on proportion, not complexity. The head stays broad, the body tapers faster, the wings stay open and flat, and the spikes do the species-recognition work along the back line. Start with the head and both wings first. That gives you the two parts most likely to go wrong. Once those look balanced, the rest moves quickly. For Pinterest, use a straight overhead shot to show the wing shape. For Instagram, use a three-quarter face angle so the eyes and horns read clearly. Hashtag: #MiniDragonAmigurumiPattern. Are you making the wings solid for more structure, or keeping that lacy dragon wing outline from the photo?









