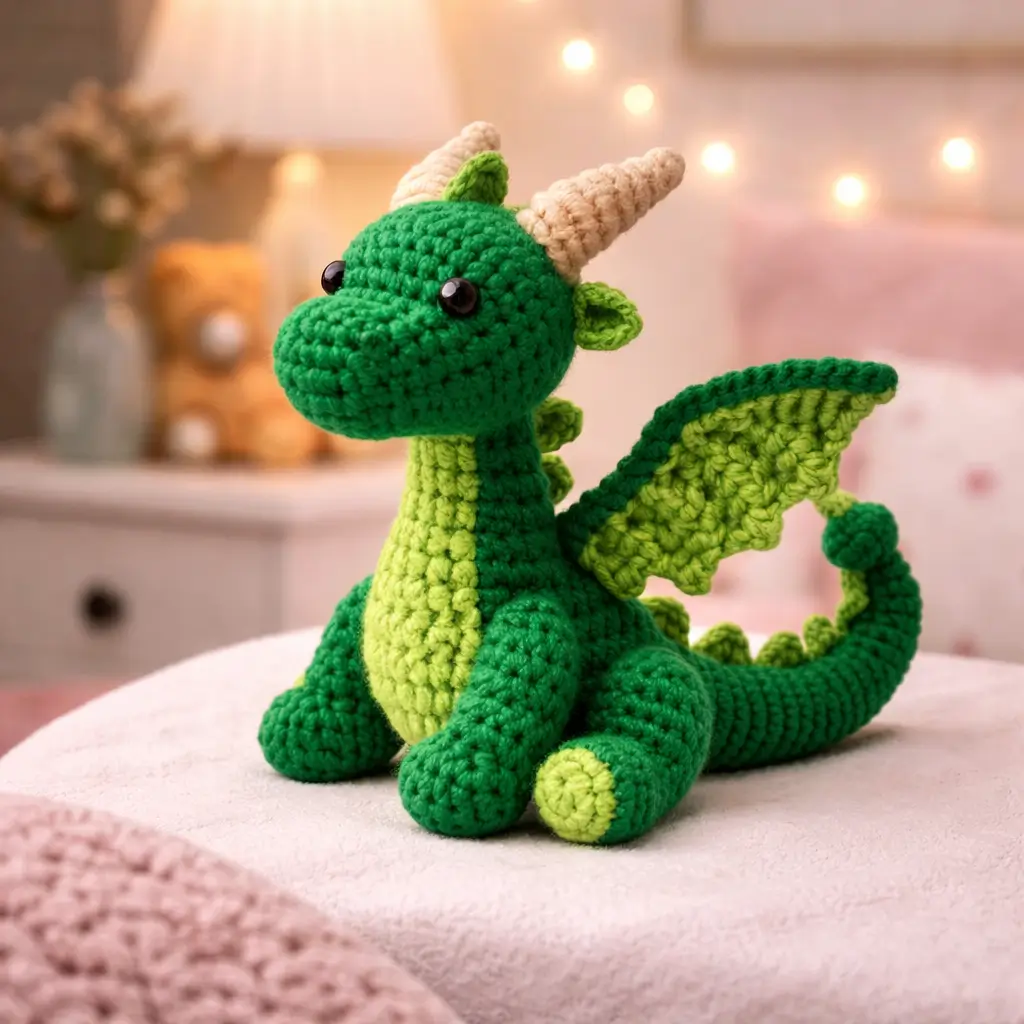
A small dragon only reads clearly when the horns, wings, tail curve, and belly panel all support the same silhouette. This little green dragon crochet pattern gives you the full character build for the dragon in the photo, including head, snout, neck, body, legs, arms, wings, horns, ear fins, back spikes, tail, and belly panel. It works well as a fantasy nursery plush, a shelf display make, or a gift piece for dragon lovers.
The Design: What Makes This Dragon Different
This dragon is built around softness, not threat. The head is broad, the snout is rounded, the horns are short, and the wings stay compact, which keeps the plush gentle instead of fierce. That decision matters. A narrower face or oversized wings would push the design toward a more aggressive fantasy look. The light green belly panel also changes the read immediately. It breaks the dark green body cleanly and gives the neck and torso a stronger vertical line. Then the tail does the final bit of character work. It curves upward and ends with a small rounded tip, which balances the wings from the rear view. One common mistake is making the neck too thin. Then the head feels disconnected and the dragon loses its soft toy look.
Project Information at a Glance
| Skill Level | Time | Finished Size | Hook | Best For |
|---|---|---|---|---|
| Intermediate | 4–6 hours | About 18–24 cm tall depending on yarn | 2.5–3.5 mm | Fantasy gifts, nursery decor, shelf plush |
Materials and Tools
Yarn
- Dark green — DK or light worsted yarn — 70g — for head, body, limbs, tail, and outer wings
- Light green — DK or light worsted yarn — 28g — for belly panel, wing membranes, and back spikes
- Cream — DK yarn — 10g — for horns
- Black — embroidery floss or yarn scrap — 2g — for mouth detail and nostrils if desired
Tools
- 2.5 mm to 3.5 mm crochet hook
- 8 mm to 10 mm safety eyes
- Fiberfill stuffing
- Yarn needle
- Stitch markers
- Small sharp scissors
Crochet Abbreviations
MR / sc / inc / dec / sl st / ch / BLO / hdc / dc
Use invisible decrease on the head and body-closing rounds only. Standard decreases leave dents that show clearly around a smooth dragon face.
Step-by-Step Little Green Dragon Crochet Pattern
Work in continuous spiral rounds unless noted.
Head (Make 1)
Yarn: dark green
Source: Standard amigurumi math
R1: 6 sc in MR (6)
R2: inc x6 (12)
R3: (sc, inc) x6 (18)
R4: (2 sc, inc) x6 (24)
R5: (3 sc, inc) x6 (30)
R6: (4 sc, inc) x6 (36)
R7: sc around (36)
R8: sc around (36)
R9: sc around (36)
R10: sc around (36)
Insert safety eyes between R8 and R9, about 10 stitches apart.
R11: (4 sc, dec) x6 (30)
R12: (3 sc, dec) x6 (24)
R13: (2 sc, dec) x6 (18)
Stuff firmly through the forehead and cheeks.
R14: (sc, dec) x6 (12)
R15: dec x6 (6)
Fasten off. Leave 30 cm tail.
Snout (Make 1)
Yarn: dark green
Source: Standard amigurumi math
R1: 6 sc in MR (6)
R2: inc x6 (12)
R3: sc around (12)
R4: sc around (12)
Fasten off. Leave 18 cm tail.
Stuff lightly only at the front.
Body (Make 1)
Yarn: dark green
Source: Standard amigurumi math
R1: 6 sc in MR (6)
R2: inc x6 (12)
R3: (sc, inc) x6 (18)
R4: (2 sc, inc) x6 (24)
R5: (3 sc, inc) x6 (30)
R6: sc around (30)
R7: sc around (30)
R8: sc around (30)
R9: sc around (30)
R10: (3 sc, dec) x6 (24)
R11: (2 sc, dec) x6 (18)
R12: sc around (18)
Stuff firmly at the seat and chest so the dragon sits upright.
Fasten off. Leave 28 cm tail.
Belly Panel (Make 1)
Yarn: light green
Source: Standard amigurumi math
R1: ch 14
Row 1: starting in 2nd ch from hook, sc across (13)
Row 2: ch 1, turn, sc across (13)
Row 3: ch 1, turn, sc across (13)
Row 4: ch 1, turn, sc across (13)
Row 5: ch 1, turn, sc across (13)
Row 6: ch 1, turn, sc across (13)
Fasten off. Leave 18 cm tail.
Round the top and bottom corners slightly while sewing.
Arms (Make 2)
Yarn: dark green
Source: Standard amigurumi math
R1: 6 sc in MR (6)
R2: inc x6 (12)
R3: sc around (12)
R4: sc around (12)
R5: (4 sc, dec) x2 (10)
R6: sc around (10)
R7: sc around (10)
Stuff the lower half only.
Fasten off. Leave 18 cm tail.
Legs (Make 2)
Yarn: dark green
Source: Standard amigurumi math
R1: 6 sc in MR (6)
R2: inc x6 (12)
R3: sc around (12)
R4: sc around (12)
R5: sc around (12)
R6: (4 sc, dec) x2 (10)
R7: sc around (10)
R8: sc around (10)
Stuff firmly. Keep both legs identical for a steady seated pose.
Fasten off. Leave 20 cm tail.
Front Paw Pads (Make 2)
Yarn: light green
Source: Standard amigurumi math
R1: 5 sc in MR (5)
R2: sc around (5)
Fasten off. Leave 8 cm tail.
Horns (Make 2)
Yarn: cream
Source: Standard amigurumi math
R1: 4 sc in MR (4)
R2: sc around (4)
R3: (sc, inc) x2 (6)
R4: sc around (6)
R5: sc around (6)
R6: sc around (6)
Stuff lightly and shape into a slight curve.
Fasten off. Leave 14 cm tail.
Ear Fins (Make 2)
Yarn: light green
Source: Standard amigurumi math
R1: 4 sc in MR (4)
R2: inc x4 (8)
R3: sc around (8)
R4: (2 sc, dec) x2 (6)
Fasten off. Leave 10 cm tail.
Wings (Make 2)
Yarn: dark green outer edge, light green inner membrane
Source: Standard amigurumi math
Wing frame:
R1: ch 14
Row 1: starting in 2nd ch from hook, sc across (13)
Row 2: ch 1, turn, dec, sc 9, dec (11)
Row 3: ch 1, turn, dec, sc 7, dec (9)
Row 4: ch 1, turn, dec, sc 5, dec (7)
Fasten off. Leave 18 cm tail.
Wing membrane:
R1: ch 12
Row 1: starting in 2nd ch from hook, sc across (11)
Row 2: ch 1, turn, sc across (11)
Fasten off. Leave 14 cm tail.
Sew the membrane inside the outer frame before attaching.
Back Spikes (Make 6)
Yarn: light green
Source: Standard amigurumi math
R1: 4 sc in MR (4)
R2: sc around (4)
R3: sc around (4)
Fasten off. Leave 8 cm tail.
Tail (Make 1)
Yarn: dark green
Source: Standard amigurumi math
R1: 4 sc in MR (4)
R2: sc around (4)
R3: (sc, inc) x2 (6)
R4: sc around (6)
R5: (2 sc, inc) x2 (8)
R6: sc around (8)
R7: sc around (8)
R8: sc around (8)
R9: sc around (8)
Stuff only the first half so the tail curves naturally.
Fasten off. Leave 20 cm tail.
Assembly Instructions
- Sew the snout to the lower center of the head, just below the eyes.
- Attach the head to the body with the face angled slightly upward.
- Sew the belly panel down the neck and front body center.
- Attach the arms high on the front body and the legs wide at the base.
- Sew the tail to the back center and curve it upward.
- Attach the wings to the upper back, slightly angled outward.
- Sew the horns to the top of the head and place the ear fins just below them.
- Attach the back spikes from the head base to the tail base.
- Sew the light green paw pads to the front feet.
- Weave every tail at least 4 cm into the stuffing path before trimming.
The little green dragon is complete.
7 Technical Tips for Cleaner Amigurumi
- Mark every increase round. Missing one increase before the 36-stitch head plateau distorts the face and shifts the horns off line.
- Stuff the head firmer than the body. A soft head makes the snout collapse inward and weakens the dragon expression.
- Insert the eyes before final facial shaping. A shift of even 3 mm changes the entire character look.
- Keep tension tighter around the snout join. Loose stitches there expose stuffing faster than almost any other section.
- Pin both wings before sewing either one permanently. A wing placed 1 cm higher than the other is obvious immediately.
- Use invisible decrease on the face rounds only. Standard decreases leave dents under the eyes and around the snout line.
- Weave tails at least 4 cm deep. Short tails loosen first at the wings, horns, and tail base because those seams get handled most.
Conclusion
This dragon amigurumi crochet pattern works because the shape stays clear: broad head, upright neck, small wings, compact limbs, and a tail that balances the silhouette instead of overwhelming it. Use this build as a base, then change the belly color, horn color, wing size, or spike spacing rather than rewriting the full body structure. Photograph the finished dragon from a front three-quarter angle so the belly panel, horns, wings, and tail curve all remain visible in one frame. Share it on Pinterest and Instagram with #LittleGreenDragonAmigurumi. Will your next dragon stay green, or shift to red and cream for a more classic fantasy look?









