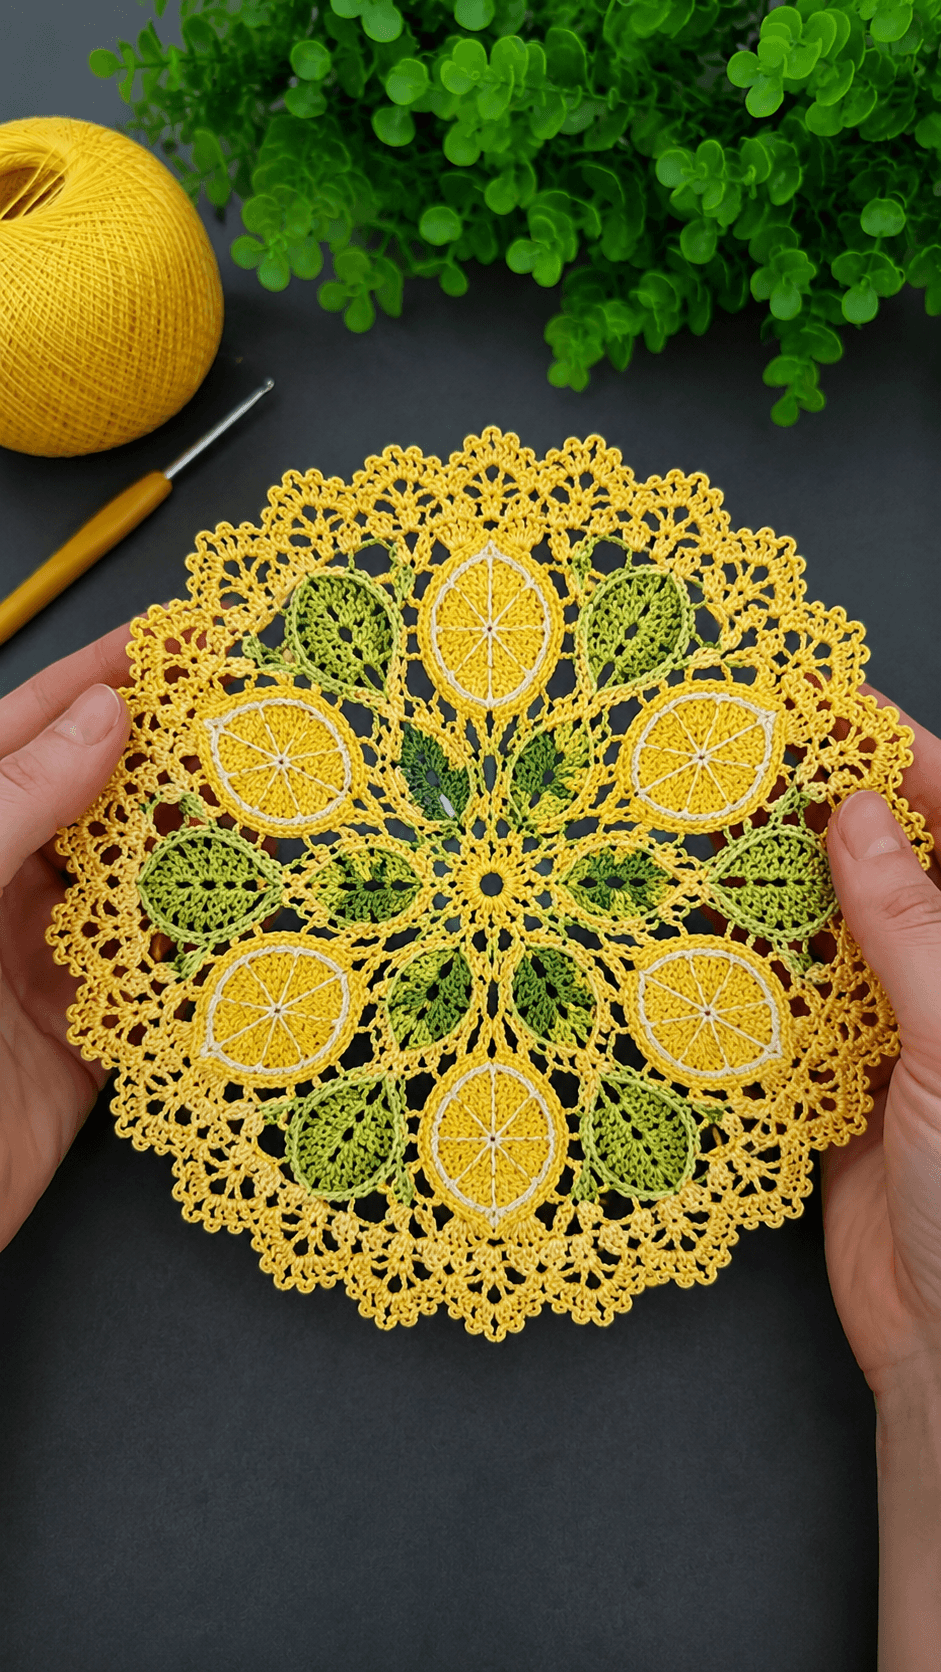
Lemon slices fail when the segment lines are weak. The motif stops reading as citrus and turns into a plain yellow oval inside lace. This lemon crochet doily pattern uses size 10 cotton thread, a 1.65 mm steel hook, and intermediate thread-crochet control to build a decorative doily about 30 to 32 cm across in the photographed version. It suits table display, summer tray styling, or framed kitchen decor.
The Design: What Makes This Lemon Doily Different
A fruit doily depends on recognition before decoration. Here, that recognition comes from three structural choices. First, the lemon slices are outlined in white. That border separates each yellow section from the surrounding lace and keeps the fruit readable at a distance. Second, the leaves are not decorative filler. They act as visual spacers between the slices, preventing the round from looking crowded. Third, the center stays open and radial rather than dense. That decision gives the outer motifs room to breathe and lets the citrus ring carry the theme.
The most common mistake with a crochet lemon doily is flattening the slice detail into one solid yellow patch. Another is oversizing the leaves so they overpower the fruit. This lemon lace doily works because the slices, leaves, joins, and edge all hold separate jobs.
Project Info at a Glance
| Skill Level | Time | Finished Size | Hook | Best For |
|---|---|---|---|---|
| Intermediate | 8–10 hours | Approx. 30–32 cm across | 1.65 mm steel hook | Table decor, kitchen accent, framed wall piece |
Materials and Tools
Thread
- Lemon yellow crochet thread — size 10 — about 45 to 55 g — mercerized cotton
- White crochet thread — size 10 — about 8 to 12 g — mercerized cotton
- Light green crochet thread — size 10 — about 8 to 10 g — mercerized cotton
- Medium green crochet thread — size 10 — about 8 to 10 g — mercerized cotton
Tools
- 1.65 mm steel crochet hook
- Tapestry needle
- Fine scissors
- Rustproof blocking pins
- Blocking mat or padded board
- Spray bottle or light starch
Abbreviations
MR = magic ring, ch = chain, sl st = slip stitch, sc = single crochet, hdc = half double crochet, dc = double crochet, tr = treble crochet, sp = space, rep = repeat, rnd = round, picot = ch 3 and sl st in first ch, long sc = single crochet worked into a lower round.
Invisible decrease is not central to this design. Shape control comes from chain spacing, grouped stitches, and motif placement.
Pattern Notes
Work in joined rounds unless noted. The center ring and outer lace are one piece. Lemon slices and leaves are separate motifs sewn into the open framework after blocking the base lightly. That order keeps the round stable and makes motif spacing easier to correct.
Pattern — Step by Step
Center Ring (Make 1)
Yarn: yellow
- Rnd 1: MR, ch 2, 12 dc in ring. Join. (12)
- Rnd 2: Ch 2, 2 dc in each st around. Join. (24)
- Rnd 3: Ch 1, sc in each st around. Join. (24)
- Rnd 4: Ch 3, *skip 1 st, dc in next, ch 1; rep around. Join to form spokes. (12 dc, 12 ch-1 sps)
- Rnd 5: Sl st into first sp, ch 5, sc in next sp; rep around. (12 arches)
- Rnd 6: In each arch work (sc, ch 3, sc). Join.
- Rnd 7: Ch 6, sc in next center gap around. (12 longer arches)
- Rnd 8: In each arch work (sc, ch 4, sc). Join.
- Rnd 9: Ch 7, sc in next gap around. (12 arches)
- Rnd 10: In each arch work (sc, ch 3, dc, ch 3, sc). Join.
- Rnd 11: Ch 5, sc in each center gap around. Join.
- Rnd 12: Work 6 joining points by placing (sc, ch 5, sc) in every other gap and plain sc in the alternating gaps. Fasten off.
Lemon Slice Motif (Make 6)
Yarn: yellow, then white
- Ch 10.
- Row 1: Sc in 2nd ch from hook and across. Turn. (9)
- Row 2: Ch 1, inc, sc 7, inc. Turn. (11)
- Row 3: Ch 1, sc across. Turn. (11)
- Row 4: Ch 1, inc, sc 9, inc. Turn. (13)
- Rows 5–8: Continue increasing 1 stitch at each end on every other row until 17 sts wide, creating a lemon-oval outline.
- Rows 9–12: Work even.
- Rows 13–16: Dec 1 st at each end on every other row until 13 sts remain.
- Rows 17–18: Work even, then fasten off yellow.
- Outline round in white: Join white at one tip, work sc evenly around, placing 3 sc at each tip and spacing evenly along the sides. Join.
- Segment lines: With white, surface-stitch 1 center line tip to tip, then 3 angled lines on each side from the center to the outline to create citrus sections. Fasten off with neat tails.
Leave a 20 cm sewing tail on the white outline.
Large Leaf Motif (Make 6)
Yarn: light green
- Ch 11.
- Rnd 1: Starting in 2nd ch from hook, sc 1, hdc 1, dc 2, tr 2, dc 2, hdc 1, sc 3 in last ch; working down opposite side, sc 1, hdc 1, dc 2, tr 2, dc 2, hdc 1, sc 1. Join.
- Rnd 2: Ch 1, sc evenly around, placing 2 sc in the tip and base points. Join.
- Vein: Sl st or surface-chain a center vein from tip to base. Fasten off.
Small Leaf Motif (Make 6)
Yarn: medium green
- Ch 9.
- Rnd 1: Starting in 2nd ch from hook, sc 1, hdc 1, dc 2, tr 1, dc 2, hdc 1, sc 3 in last ch; work opposite side as established. Join.
- Rnd 2: Ch 1, sc evenly around with 2 sc at tip and base. Join.
- Vein: Add a simple center vein with surface slip stitches. Fasten off.
Inner Join Round
Yarn: yellow
- Join yellow to any major arch on the center ring.
- Rnd 13: Ch 8, sc in next major arch; rep around 6 times. (6 large arches)
- Rnd 14: In each arch work (sc, ch 5, sc, ch 5, sc). Join.
- Rnd 15: Ch 6 to span between split arches, anchoring in each center sc. This creates 12 placement windows.
- Rnd 16: In each window work (sc, ch 4, sc). Join.
Outer Lace Ring
Yarn: yellow
- Rnd 17: Ch 5, sc in next gap around. (24 arches)
- Rnd 18: In each arch work (sc, ch 3, sc). Join.
- Rnd 19: Ch 6, sc in next center gap around.
- Rnd 20: In each arch work (sc, 3 dc, ch 2, 3 dc, sc). Join.
- Rnd 21: Sl st into ch-2 sp, ch 7, sc in next ch-2 sp; rep around.
- Rnd 22: In each arch work (sc, hdc, 4 dc, picot, 4 dc, hdc, sc). Join.
- Rnd 23: Ch 4, sl st between motifs, ch 4 around to create net spacing.
- Rnd 24: In each ch-4 sp work (sc, ch 3, sc). Join.
- Rnd 25: Ch 5, sc in next gap around.
- Rnd 26: In each arch work (sc, hdc, 2 dc, picot, 2 dc, hdc, sc). Join.
- Rnd 27: Final edge: *sl st in next point, ch 3, picot, sl st in same point, sl st to next valley; rep around. Fasten off.
Assembly
- Block the base lightly before attaching motifs.
- Place the 6 lemon slices evenly around the middle ring, with one at 12 o’clock.
- Pin the opposite slice at 6 o’clock, then the left and right pairs.
- Sew each slice through the white outline only.
- Place 6 large leaves between alternating slices toward the outer half of the doily.
- Place 6 small leaves closer to the center ring in the remaining spaces.
- Sew leaf bases first, then catch the tips with one or two stitches.
- Check that all motifs point outward on the same angle.
- Weave tails into dense stitch groups, never open arches.
- Wet block or lightly starch the full piece and pin every border point.
The doily is complete when the lemon slices read cleanly, the leaves sit between them without overlap, and the outer points repeat at an even distance all around.
7 Technical Tips
- Count the 6 major slice positions before sewing anything. One off-center slice shifts every remaining motif and makes the round look lopsided.
- Keep the white segment lines taut but not tight. If they pull inward more than 2 to 3 mm, the slice will cup instead of staying flat.
- Sew through the white outline, not through the yellow body of the slice. Hidden stitches are harder to correct when spacing changes.
- Use two green values for the leaves. One flat green mass reduces contrast and makes the citrus slices carry too much visual weight.
- Pin every border point individually during blocking. Skipping points produces a soft wave instead of the sharp lace edge visible in the photo.
- Check the angle of all lemon tips before final stitching. Mixed angles make the motifs look random rather than radial.
- Weave tails at least 4 to 5 cm through dense stitches. Thread crochet tails work loose quickly when trapped only in mesh.
Conclusion
This lemon crochet doily pattern works because the fruit motifs stay legible inside a controlled lace framework. The center sets the spacing, the lemon slices establish the theme, and the leaves break the repetition without hiding it. Build the base first, block it lightly, then attach the motifs in a measured sequence. Photograph the finished piece flat against a dark surface for Pinterest and crop one slice close for Instagram detail shots. Use the tag #LemonDoilyPattern. One practical next step is testing the same layout with lime colors and a narrower white outline. Do these lemon slices look better to you with six segments or eight?









