Introduction
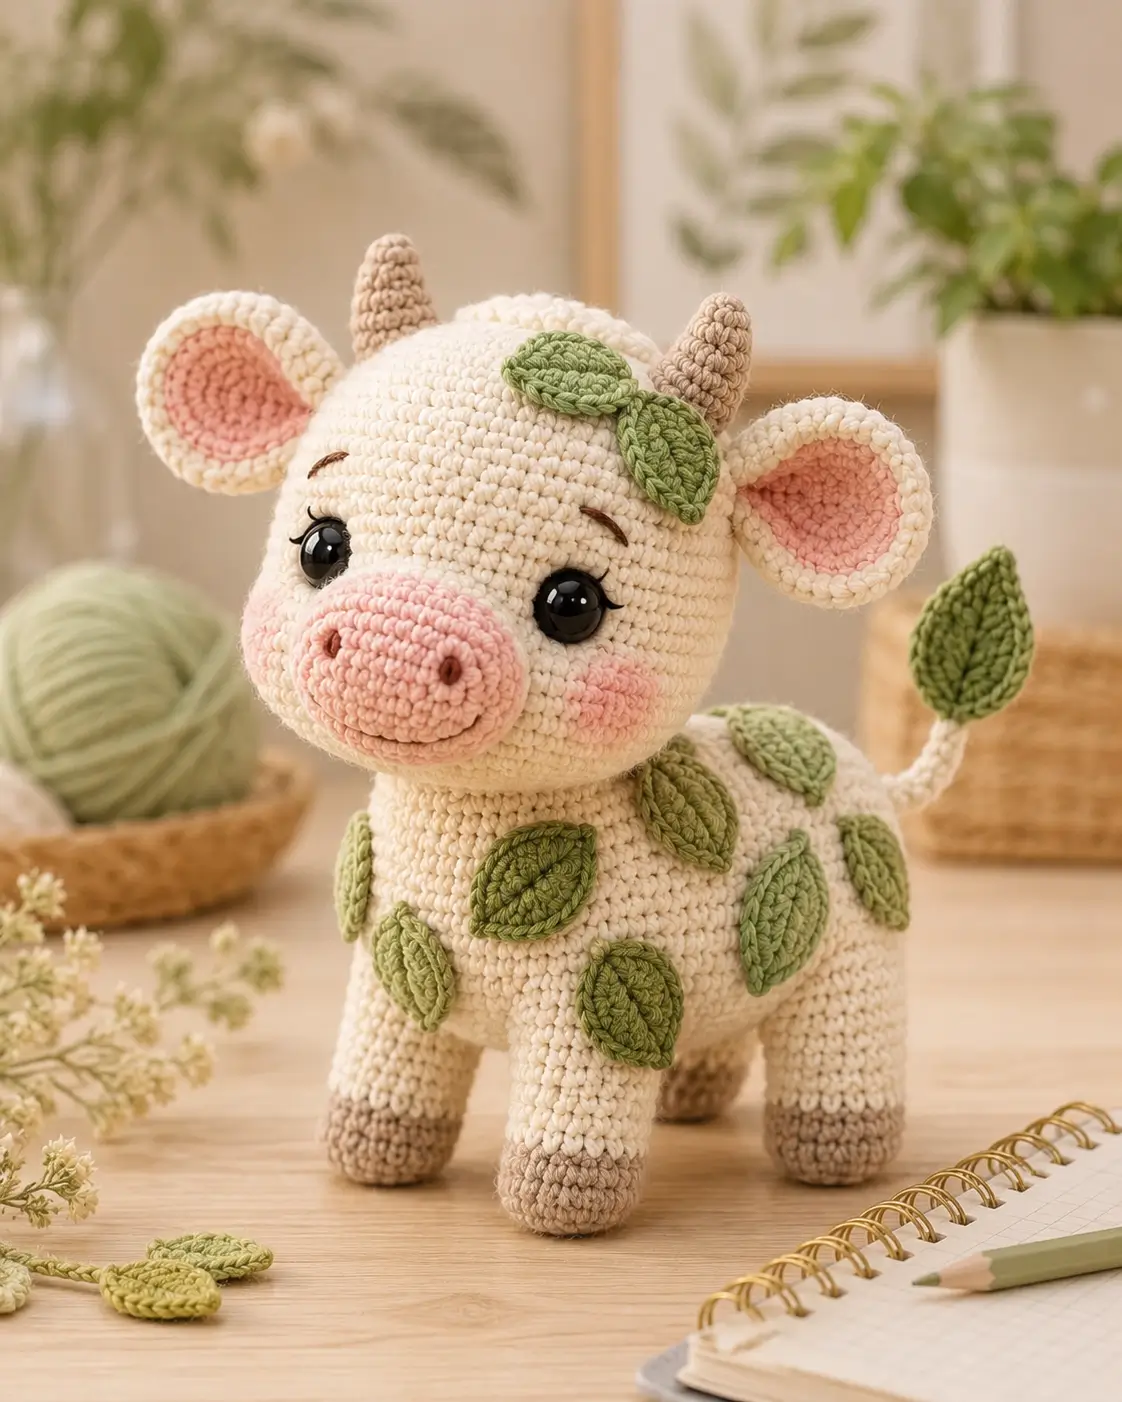
A cow with leaf spots still needs bovine weight before it needs botany. This cow amigurumi crochet pattern builds a cream worsted body, pink muzzle, taupe horns, soft hooves, and separate green leaf appliqués at about 23 cm. Use a 3.5 mm hook, 12 mm eyes, and intermediate joining. The finished toy works as shelf decor because the four legs support the long body.
The Design: What Makes This Leafy Cow Different
Two design calls control this cottagecore crochet cow. First, the body is a horizontal 36-stitch barrel, not a seated pear; that shape keeps the four legs under the weight line and leaves enough flank area for appliqués. Second, the head uses a round 36-stitch form with a separate oval snout, because a cow needs width at the muzzle before the ears and horns read correctly. Third, the leaves replace black spots, so they are sewn as flat pieces after assembly rather than worked as color changes. You place the main forms first. The maker then checks leaf angles against the legs so the cow does not look striped. A common mistake in a free cow crochet pattern is placing horns too far out on the ear line; in a crochet cow amigurumi pattern, horns sit inside the ears.
Project Info at a Glance
| Skill Level | Time | Finished Size | Hook | Best For |
|---|---|---|---|---|
| Intermediate | 6–8 hours | About 23 cm photo-scale | 3.5 mm | Shelf decor, cottagecore nursery display, farm set |
Published cow patterns support this scale range: Cuddly Stitches lists a 23 cm seated cow with 3 mm and fine sport/DK yarn, while Jess Huff and Grace and Yarn use 3.5 mm with weight-4 yarn for larger cow builds.
Materials and Tools
Yarn
- Cream — weight 4 worsted — 120 g — Paintbox Simply Aran, Lion Brand Basic Stitch, or similar smooth acrylic
- Blush pink — weight 4 worsted — 20 g — same yarn family for snout, ears, cheeks
- Taupe beige — weight 4 worsted — 20 g — horns and hooves
- Olive green — weight 4 worsted — 20 g — leaf spots, crown leaves, tail leaf
- Dark brown — embroidery strand or split worsted scrap — under 2 g — brows and nostrils
Tools
- Hook 3.5 mm
- 12 mm safety eyes
- Polyester stuffing
- Yarn needle
- Stitch markers
- Straight pins
- Scissors
Safety eyes are not suitable for toys intended for children under 3; embroidered eyes are the safer option for that age group.
Abbreviations
MR = magic ring; sc = single crochet; inc = 2 sc in same stitch; dec = invisible decrease; sl st = slip stitch; ch = chain; BLO = back loop only; st = stitch; FO = fasten off.
For invisible decrease, work through the front loops of the next two stitches so the decrease line stays flatter than a normal sc2tog.
Pattern — Step by Step
Continuous spiral unless noted. Use a stitch marker in the last stitch of every round. Counts appear in brackets.
Head
Yarn: cream
R1: 6 sc in MR (6)
R2: inc ×6 (12)
R3: (sc, inc) ×6 (18)
R4: (2 sc, inc) ×6 (24)
R5: (3 sc, inc) ×6 (30)
R6: (4 sc, inc) ×6 (36)
R7: sc around (36)
R8: sc around (36)
R9: sc around (36)
R10: sc around (36)
R11: sc around (36)
R12: sc around (36)
Place safety eyes between R9 and R10, 8 stitches apart. Do not attach backs until the snout is pinned.
R13: (4 sc, dec) ×6 (30)
R14: sc around (30)
R15: (3 sc, dec) ×6 (24)
Stuff firmly, especially behind the eye line.
R16: sc around (24)
R17: (2 sc, dec) ×6 (18)
R18: (sc, dec) ×6 (12)
R19: dec ×6 (6)
Fasten off. Close the final hole and weave the tail through the head.
Body
Yarn: cream
R1: 6 sc in MR (6)
R2: inc ×6 (12)
R3: (sc, inc) ×6 (18)
R4: (2 sc, inc) ×6 (24)
R5: (3 sc, inc) ×6 (30)
R6: (4 sc, inc) ×6 (36)
R7: sc around (36)
R8: sc around (36)
R9: sc around (36)
R10: sc around (36)
R11: sc around (36)
R12: sc around (36)
R13: sc around (36)
R14: sc around (36)
R15: sc around (36)
R16: sc around (36)
R17: sc around (36)
R18: sc around (36)
R19: (4 sc, dec) ×6 (30)
R20: sc around (30)
R21: (3 sc, dec) ×6 (24)
Stuff to a firm oval. The body should not collapse when the four legs are pinned.
R22: (2 sc, dec) ×6 (18)
R23: (sc, dec) ×6 (12)
R24: dec ×6 (6)
Fasten off. Leave a 25 cm tail only if you plan to use it for shaping; otherwise weave it in.
Snout
Yarn: blush pink
Ch 7.
R1: sc in 2nd ch from hook, sc 4, 3 sc in last ch; working on opposite side, sc 4, inc in first base st (14)
R2: inc, sc 4, inc ×3, sc 4, inc ×2 (20)
R3: (sc, inc), sc 4, (sc, inc) ×3, sc 4, (sc, inc) ×2 (26)
R4: sc around (26)
R5: sc around (26)
Fasten off. Leave a 35 cm tail and stuff lightly.
Cheek Patches
Yarn: blush pink
R1: 6 sc in MR (6)
R2: inc ×6, sl st to first stitch (12)
Fasten off. Leave a 20 cm tail on each patch.
Front Legs
Yarn: taupe beige, then cream
R1: 6 sc in MR with taupe (6)
R2: inc ×6 (12)
R3: (sc, inc) ×6 (18)
R4: BLO sc around (18)
R5: sc around (18)
R6: (sc, dec) ×6 (12)
R7: change to cream, sc around (12)
R8: sc around (12)
R9: sc around (12)
R10: sc around (12)
R11: sc around (12)
R12: sc around (12)
Stuff the hoof and lower half only. Fasten off and leave an 18 cm tail.
Back Legs
Yarn: taupe beige, then cream
R1: 6 sc in MR with taupe (6)
R2: inc ×6 (12)
R3: (sc, inc) ×6 (18)
R4: (2 sc, inc) ×6 (24)
R5: BLO sc around (24)
R6: sc around (24)
R7: (2 sc, dec) ×6 (18)
R8: (sc, dec) ×6 (12)
R9: change to cream, sc around (12)
R10: sc around (12)
R11: sc around (12)
R12: sc around (12)
R13: sc around (12)
R14: sc around (12)
Stuff the hoof and lower third. Fasten off and leave an 18 cm tail.
Ears
Yarn: cream and blush pink
Outer ear, make 2 in cream:
R1: 6 sc in MR (6)
R2: inc ×6 (12)
R3: (sc, inc) ×6 (18)
R4: (2 sc, inc) ×6 (24)
R5: (3 sc, inc) ×6 (30)
R6: (4 sc, inc) ×6 (36)
Fasten off. Leave a 30 cm tail.
Inner ear, make 2 in blush pink:
R1: 6 sc in MR (6)
R2: inc ×6 (12)
R3: (sc, inc) ×6 (18)
R4: (2 sc, inc) ×6 (24)
Fasten off. Sew each pink circle centered on a cream circle. Pinch the bottom 4 stitches of each ear before sewing to the head.
Horns
Yarn: taupe beige
R1: 6 sc in MR (6)
R2: inc ×6 (12)
R3: sc around (12)
R4: sc around (12)
R5: sc around (12)
R6: sc around (12)
Stuff lightly. Fasten off and leave a 25 cm tail.
Tail Stem
Yarn: cream
R1: 6 sc in MR (6)
R2: sc around (6)
R3: sc around (6)
R4: sc around (6)
R5: sc around (6)
R6: sc around (6)
R7: sc around (6)
R8: sc around (6)
R9: sc around (6)
R10: sc around (6)
Do not stuff. Flatten the opening, sew it closed, and leave a 25 cm tail for body attachment.
Leaf Appliqués
Yarn: olive green
Make 12: 2 for head, 8 for body, 1 for chest, 1 for tail.
Ch 8.
Row 1: sl st in 2nd ch from hook, sc, hdc, dc, dc, hdc, 3 sc in last ch; working on opposite side, hdc, dc, dc, hdc, sc, sl st in base stitch (15)
Row 2: ch 1, surface sl st from base to tip through the center line (7 surface sl st)
Fasten off. Leave a 20 cm tail on body leaves and a 30 cm tail on the tail leaf.
Eyebrows and Nostrils
Yarn: dark brown embroidery strand
Embroider two 6 mm vertical nostrils on the snout between R3 and R4, spaced 3 stitches apart. Work each brow as a shallow 10 mm arc one round above the eye, then bury the thread through the back of the head.
Assembly
- Pin the head to the front top of the body with the snout line facing forward.
- Sew the head to the body using two passes around the neck opening.
- Pin the snout under the eyes, check that both eye backs can still fit, then sew and finish stuffing the snout.
- Attach the cheek patches one round below each eye and slightly behind the snout edge.
- Sew the ears to the head sides, then place each horn inside its matching ear.
- Attach the front legs under the shoulder line, 8 stitches apart at the front.
- Attach the back legs under the rear body, keeping all four hooves level on the table.
- Sew the tail stem to the rear body and attach one green leaf to the tail tip.
- Pin the green leaves across the head, chest, and flanks before sewing any of them down.
- Weave every yarn tail through at least 3 cm of stuffed fabric and trim only after the toy stands evenly.
The leafy cow is complete when all four hooves touch the same flat surface without twisting the body.
7 Technical Tips
- Stitch marker drift: If the marker moves more than 2 stitches away from the underside line, the body leaves will spiral. Reset the marker at the lower center before R10 and again before R18.
- Stuffing firmness: An underfilled neck creates a forward head drop at the seam. Pack a firm 2 cm column of stuffing where the head meets the body.
- Invisible decrease: A normal decrease leaves six visible bars on each closing round. Use front-loop invisible decreases on R17–R19 of the head and R21–R24 of the body.
- Eye placement timing: Safety eyes should be tested before the snout is fully sewn. Place them 8 stitches apart; after the backs are attached, moving them leaves stretched holes.
- Worsted tension: If stuffing shows on the 36-stitch plateau, the hook is too large for the yarn. Drop from 3.5 mm to 3.25 mm and remake the first six rounds.
- Pinning leaves: A leaf sewn across a leg seam pulls the limb outward. Keep every body leaf at least 2 rounds away from a leg attachment point.
- Tail weaving: A short tail end can pull free when the leaf is handled. Bury at least 12 cm of yarn through the tail, body, and back again before trimming.
Conclusion
Before publishing or selling finished pieces, make one test cow and record the actual height, eye spacing, and yarn weight used. This design depends on alignment: the horns sit inside the ears, the leaves avoid the limb seams, and the tail leaf points upward instead of sideways. Photograph the toy from the front and both sides so the green appliqués can be checked against the cream body. Save the final image to Pinterest and post the side-view assembly shot on Instagram with #LeafyCowAmigurumi. For the next sample, test one change only: should the two head leaves sit between the horns, or should one leaf overlap the right horn in this cow amigurumi crochet pattern?









