Introduction
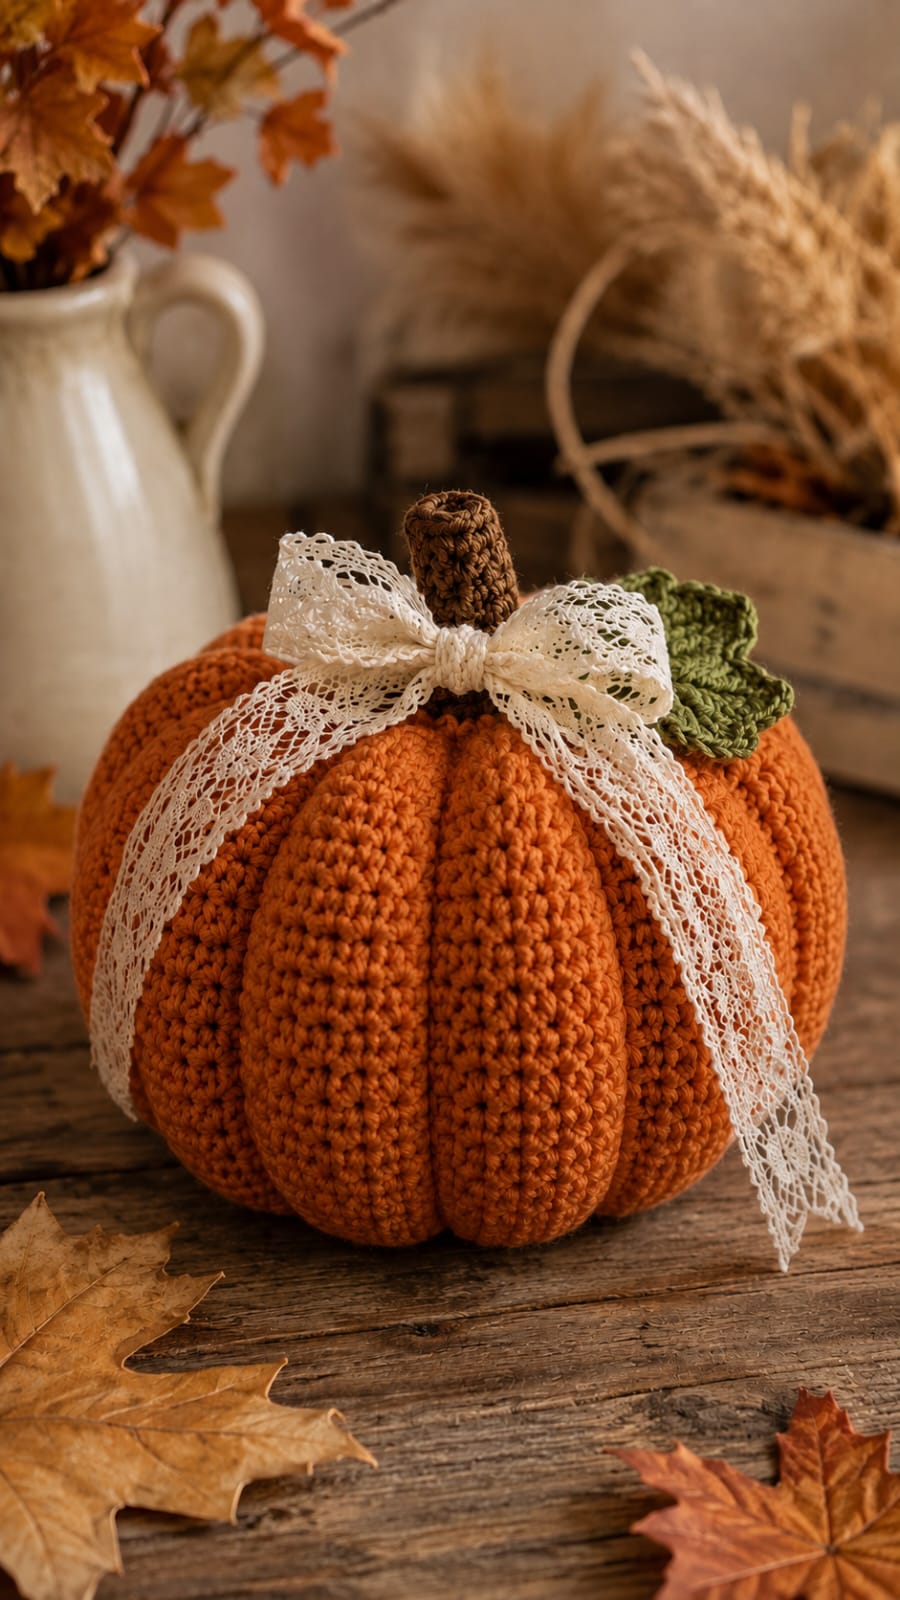
A pumpkin with eight lobes fails immediately when even one groove misses the top-center stem line. This ribbed crochet pumpkin pattern uses worsted or Aran yarn, a 3.5 mm hook and post-stuffing sculpting to make a display pumpkin approximately 20–22 cm wide. Eight deep ribs, a tall brown stem, olive leaf and removable ivory lace bow reproduce the photographed fall arrangement.
The Design: What Makes This Crochet Pumpkin Different
The body expands to a 42-stitch plateau and remains broad through the middle so the finished piece has the low, substantial profile visible in the photograph. Exterior shaping strands are added only after stuffing. That decision allows eight pronounced ribs without forcing complicated color or stitch changes into every round. The resulting realistic crochet pumpkin keeps smooth orange lobes between distinctly recessed channels. A tall brown stem replaces the short stump used on many small pumpkin patterns, while one large olive leaf breaks the circular outline near the crown. The lace ribbon is treated as a removable accessory rather than sewn permanently through the crochet fabric. One common failure in a large crochet pumpkin is sculpting an underfilled body. Deep grooves then collapse the lobe surfaces instead of compressing them into rounded sections.
Project Info at a Glance
| Skill Level | Time | Finished Size | Hook | Best For |
|---|---|---|---|---|
| Intermediate | 6–8 hours | Approx. 20–22 cm wide × 19–22 cm high | 3.5 mm | Fall table decor, farmhouse displays and seasonal centerpieces |
Materials and Tools
Yarn
- Burnt pumpkin orange — worsted / Aran yarn — approximately 140–170 g — used for the complete pumpkin body and sculpting channels.
- Dark brown — worsted / Aran yarn — approximately 20–25 g — used for the tall stem.
- Olive green — worsted yarn — approximately 10–15 g — used for the large leaf.
Additional Material
- Ivory lace ribbon — approximately 80–100 cm long and 4–6 cm wide — used for the removable bow shown in the reference.
Tools
- 3.5 mm crochet hook
- Polyester stuffing, approximately 140–180 g
- Long 12–15 cm tapestry or doll needle
- Standard yarn needle
- Locking stitch marker
- Eight removable stitch markers or pins
- Scissors
- Measuring tape
Use a hook that produces a dense fabric without visible filling between the stitches. If the chosen Aran yarn works loosely at 3.5 mm, make a small sample before beginning the full body.
Abbreviations
- MR — magic ring
- sc — single crochet
- inc — two single crochet stitches in one stitch
- dec — invisible single crochet decrease
- sl st — slip stitch
- ch — chain
- hdc — half double crochet
- dc — double crochet
- tr — treble crochet
- BLO — back loop only
- FLO — front loop only
An invisible decrease is worked through the front loops of the next two stitches before completing one single crochet through both loops.
Pattern — Step by Step
Work the stuffed pumpkin and stem in continuous spirals unless a row is specifically indicated. Keep a stitch marker in the first stitch of each round and confirm the total before moving it.
Pumpkin Body
Yarn: burnt pumpkin orange — Source: original 42-stitch reconstruction using standard six-stitch amigurumi arithmetic.
R1: 6 sc in MR (6)
R2: inc ×6 (12)
R3: (sc, inc) ×6 (18)
R4: (2 sc, inc) ×6 (24)
R5: (3 sc, inc) ×6 (30)
R6: (4 sc, inc) ×6 (36)
R7: (5 sc, inc) ×6 (42)
R8–R15: sc around (42)
R16: (5 sc, dec) ×6 (36)
R17: (4 sc, dec) ×6 (30)
R18: (3 sc, dec) ×6 (24)
R19: (2 sc, dec) ×6 (18)
R20: (sc, dec) ×6 (12)
R21: dec ×6 (6)
Begin stuffing after R16. Pack the broad middle firmly. Leave approximately the final 2 cm around the top and bottom centers slightly softer so both poles can be compressed during sculpting.
Fasten off. Leave a 40 cm tail and draw it through the six remaining front loops.
Top-to-Bottom Compression
Yarn: burnt pumpkin orange.
Cut approximately 100 cm of orange yarn and thread the long needle. Enter through the bottom center, pass through the complete pumpkin and exit at the exact top center.
Return through the same center channel and pull gradually until the body loses approximately 1–1.5 cm of height.
The circumference should broaden slightly. Stop if the top or bottom begins forming a hard pointed depression.
Tie temporarily at the bottom. Do not trim until all eight ribs have been completed.
Marking Eight Rib Positions
Place the pumpkin upright. View it directly from above and divide the circumference into eight approximately equal sections.
Insert one removable marker at the widest point of every future groove. The spacing does not have to match an exact stitch number because stuffing can shift the crochet rounds slightly.
Check the layout from the top, front and back. Each marked line must lead visually toward both center points.
Rib 1
Yarn: matching orange.
Cut approximately 120 cm of yarn. Anchor it securely at the bottom center.
Carry the strand over the outside surface following the first marked line. Pass into the top center, through the complete body and out through the bottom center.
Pull gradually until the groove sits approximately 8–12 mm below the fullest portion of the neighboring lobes.
Do not tie permanently yet.
Rib 2
Repeat the shaping process on the groove exactly opposite Rib 1.
Set the pumpkin on the table after tightening both lines. Compare the height and width of the two resulting opposite lobe pairs.
If one side compresses more heavily, loosen its strand before proceeding.
Ribs 3 and 4
Add the next opposite pair at approximately 90 degrees to the first two ribs.
Work each strand from bottom center to top center along the outside, pass through the body and tighten gradually.
Four ribs should now divide the pumpkin into four broad quarters.
Ribs 5–8
Position the final four grooves halfway between the existing ones.
Complete them in opposite pairs rather than working clockwise around the body. Alternating opposite sides prevents the stuffing from being dragged gradually toward one edge.
After the eighth groove is complete, all lobes should remain rounded rather than pinched.
Tie the sculpting strands securely at the lower center and bury their ends inside the pumpkin.
Tall Brown Stem
Yarn: dark brown — original tall tubular construction.
R1: 6 sc in MR (6)
R2–R5: sc around (6)
R6: (2 sc, inc) ×2 (8)
R7–R9: sc around (8)
R10: (3 sc, inc) ×2 (10)
R11–R12: sc around (10)
R13: (4 sc, inc) ×2 (12)
R14–R15: sc around (12)
Stuff the lower eight rounds lightly. Leave the upper portion softer so the stem retains a slightly irregular natural profile rather than becoming a rigid cylinder.
Fasten off. Leave a 35 cm sewing tail.
Stem Base Disc
Yarn: dark brown.
R1: 6 sc in MR (6)
R2: inc ×6 (12)
R3: (sc, inc) ×6 (18)
Do not stuff. Keep the 18-stitch disc flat.
Fasten off. Leave a 25 cm sewing tail.
Large Olive Leaf
Yarn: olive green — original two-sided leaf construction.
Row 1: ch 13
Row 2: starting in second ch from hook: sl st, sc, hdc, dc, 2 dc, 2 tr, dc, hdc, sc, sl st; work 3 sc in the final chain.
Continue along the opposite side of the foundation chain:
sl st, sc, hdc, dc, 2 tr, 2 dc, dc, hdc, sc, sl st.
Pinch the foundation chain gently to create a raised central vein. The finished leaf should measure approximately 8–10 cm long.
Fasten off. Leave a 25 cm sewing tail.
Leaf Edge Texture
Continue or rejoin olive green yarn.
Work one surface sl st along the center vein from the leaf base toward the tip.
For a slightly irregular edge, add one additional sc into approximately every fourth outer-edge stitch while working a final sl-st edging round.
Do not increase around the complete perimeter; excessive edge stitches cause the leaf to ruffle.
Fasten off and leave a 20 cm attachment tail.
Ivory Lace Bow
Accessory: approximately 80–100 cm of 4–6 cm wide lace ribbon.
Wrap the lace once around the stem immediately above the pumpkin crown. Cross the two ends at the front, form two loops and tie a standard bow.
Adjust the loops to approximately 8–10 cm across. Allow the two tails to fall at different lengths, with the longer tail reaching approximately halfway down the pumpkin body.
The ribbon remains removable. Do not pass sewing yarn through antique, delicate or openwork lace unless permanent attachment is specifically required.
Assembly
- Complete and firmly stuff the orange body, leaving only the top and bottom center zones slightly compressible.
- Compress the central axis by approximately 1–1.5 cm before marking any external grooves.
- Divide the circumference into eight equal sections and mark all future rib positions before adding the first shaping strand.
- Sculpt the ribs in four opposite pairs, checking the pumpkin on a level surface after every pair rather than tightening all eight consecutively.
- Redistribute stuffing beneath any flat lobe and correct its groove tension before tying the sculpting strands permanently.
- Center the 18-stitch brown stem base disc over the upper depression and sew through the disc and orange fabric around its complete edge.
- Position the tall stem over the disc and sew its 12-stitch base securely, keeping the stem nearly vertical with only a slight natural lean.
- Attach the olive leaf beside the stem, sewing the base first and adding one second hidden stitch approximately 10–15 mm farther along the center vein.
- Tie the ivory lace ribbon around the stem and rotate the bow so its loops sit across the front-left crown while the longer tails fall over the pumpkin ribs.
- Weave every structural yarn tail through at least 4–5 cm of dense crochet, reverse direction once and trim only after the end retracts beneath the stitches.
The finished pumpkin should stand on a broad level base with eight rounded lobes, a stable central stem, one raised olive leaf and a removable lace bow.
7 Technical Tips
- Collapsed lobes: An underfilled 42-stitch body folds inward when eight sculpting strands are tightened. Pack the middle firmly enough that thumb pressure produces no more than approximately 10–15 mm of compression before shaping.
- Hard center: Pulling every rib strand at maximum tension compresses the stuffing into a dense core beneath the stem. Stop when each groove sits about 8–12 mm below the neighboring lobe surfaces.
- Visible decrease holes: Loose decreases expose white stuffing against the orange yarn. Work each decrease through the two front loops and keep its tension equal to the adjacent single crochet stitches.
- Uneven rib spacing: Adding grooves without marking the circumference can leave one narrow rear lobe and one oversized front section. Divide the body into eight marked positions before threading the first sculpting strand.
- Stem wobble: Sewing the 12-stitch stem directly over the six-stitch body closure concentrates its weight on too little fabric. Add the 18-stitch base disc first and spread the attachment over roughly 3–4 cm.
- Leaf rotation: A large 8–10 cm leaf attached only through its base can swing behind the stem. Add one concealed fixing stitch 10–15 mm along the center vein while keeping the outer two-thirds free.
- Bow distortion: Lace wider than about 6 cm can hide the leaf and upper rib structure. Use 4–6 cm ribbon, keep each loop near 8–10 cm wide and allow only one tail to extend toward the pumpkin midpoint.
Conclusion
Inspect all eight ribs before attaching the decorative bow because the lace will partially cover the upper groove endpoints. The next practical step is to place the pumpkin on a level table and compare opposite lobe widths from the front, side and top. Correct any groove that differs substantially before burying the sculpting strands. Then attach the stem, leaf and removable ribbon. Share the finished ribbed crochet pumpkin pattern project on Pinterest with a vertical fall photograph, then post a close view of the leaf, stem and rib construction on Instagram using #LaceBowCrochetPumpkin. For this pumpkin specifically, would you keep the wide ivory lace bow or replace it with a narrow velvet ribbon?









