Introduction
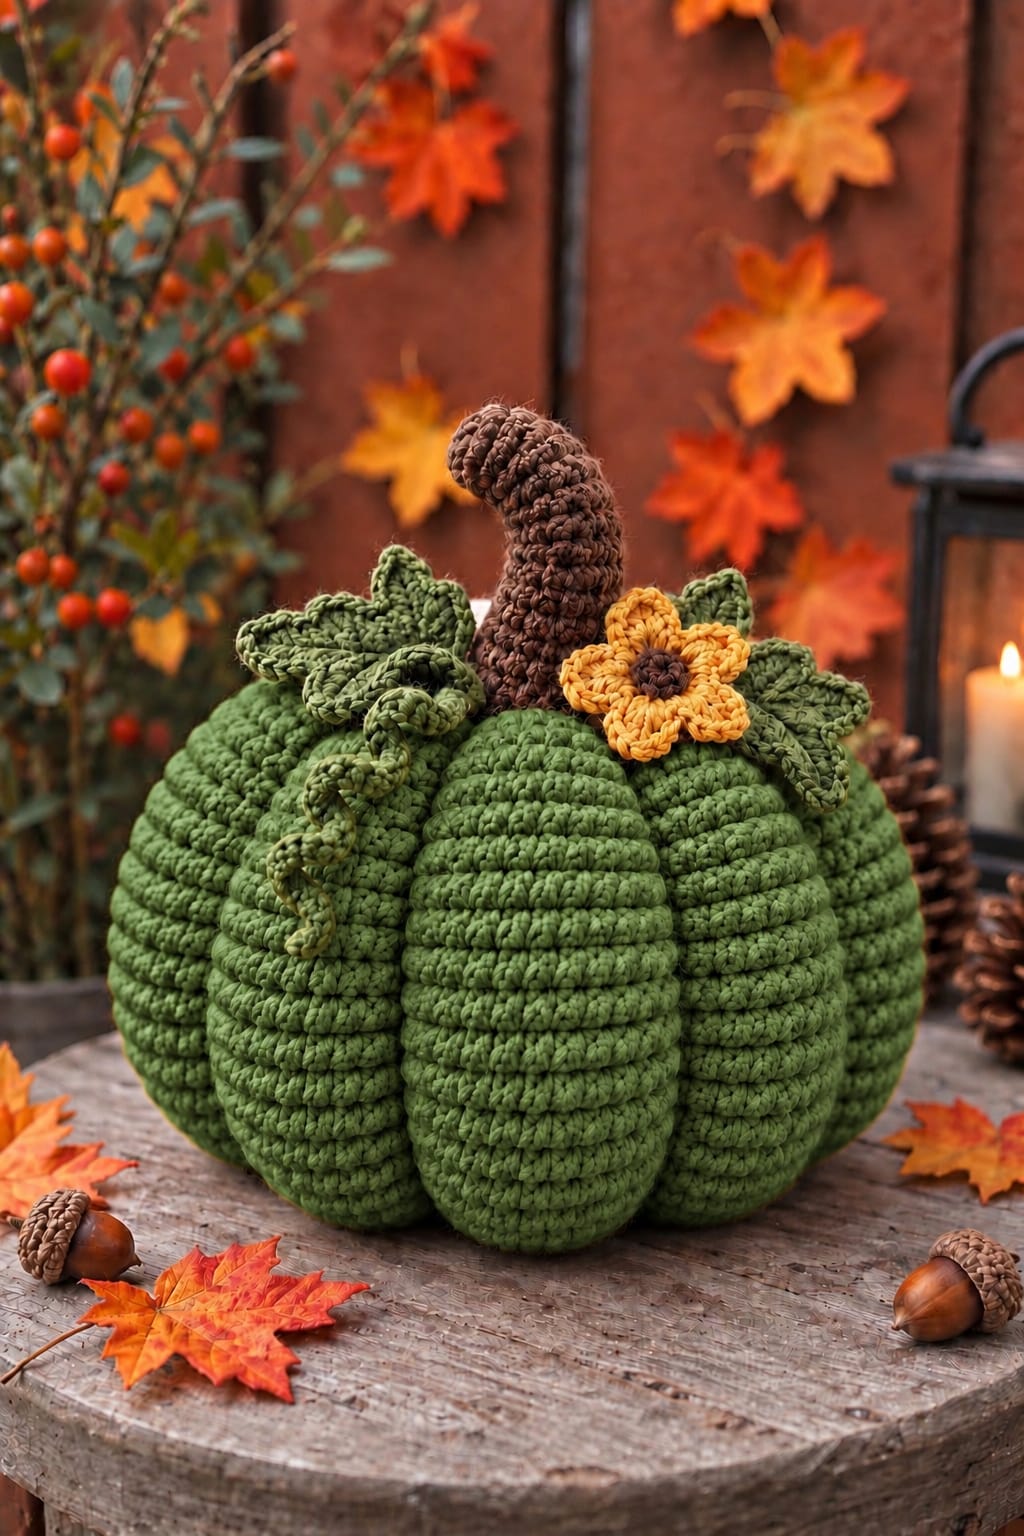
Six broad moss-green lobes meet beneath a hooked brown stem, then a mustard five-petal flower breaks the otherwise botanical crown. This large green crochet pumpkin pattern uses worsted-weight yarn, a 5 mm hook, fiberfill, sculpting strands, leaves, and a spiral vine. The intermediate reconstruction targets approximately 25–28 cm wide and 24–27 cm overall, giving you a substantial freestanding fall centerpiece.
The instructions below are an original photo-inspired reconstruction based on visible structure; published patterns cited later are used only for sizing, gauge, and material benchmarks.
The Design: What Makes This Green Pumpkin Different
The photograph shows a broad body divided into roughly six dominant lobes, with narrow recessed channels doing more shaping work than the crochet texture itself. Dense single crochet keeps the surface compact while external strands compress the stuffed body after closing. The crown is deliberately asymmetric: a tall curved chocolate stem rises behind two large olive leaves, one smaller leaf, a hanging spiral vine, and a mustard flower. This large green crochet pumpkin pattern therefore separates body construction from final sculpting, making lobe depth adjustable after stuffing. A common maker error is filling the center as firmly as the outer wall. That creates a resistant sphere; the shaping strands then cut into the yarn instead of drawing the channels inward. Keep the internal core compressible while maintaining firm outer edges.
Project Info at a Glance
| Skill Level | Time | Finished Size | Hook | Best For |
|---|---|---|---|---|
| Intermediate | Approx. 8–11 hours | Reconstruction target: 25–28 cm wide × 24–27 cm overall | 5 mm | Fall centerpieces, shelves, mantels, harvest displays |
The dimensions above are reconstruction targets inferred from the supplied photograph rather than measurements of an identified original. Published pumpkin references support the material range: Laura Brian’s Fall Pumpkins uses worsted yarn with a 5 mm hook, while ChristaCoDesign’s textured pumpkin and botanical topper also use #4 medium yarn with a 5 mm hook.
Materials and Tools
Yarn
- Moss / forest green — worsted #4 — approximately 190–230 g for the body
- Olive green — worsted #4 — approximately 35–45 g for leaves and vine
- Chocolate brown — worsted #4 — approximately 30–40 g for the curved stem and flower center
- Mustard gold — worsted #4 — approximately 10–15 g for the flower
- Body-color reserve — approximately 15 g for sculpting and repairs
ChristaCoDesign specifies #4 medium worsted yarn and a 5 mm hook for a textured pumpkin and lists 25–45 yards for the pumpkin sizes in that published design. A separate stuffed-pumpkin reference lists approximately 140–160 yards of #4 worsted for the body, 10 yards for a stem, and 8 yards for a leaf. The larger photo reconstruction here intentionally budgets more yarn because its target diameter approaches 28 cm.
Tools
- 5 mm crochet hook
- Polyester fiberfill — approximately 250–350 g
- Long doll or upholstery needle — 12–15 cm
- Tapestry needle
- Six locking stitch markers
- Scissors
- Measuring tape
Abbreviations
- MR — magic ring
- sc — single crochet
- inc — 2 sc in one stitch
- dec — invisible decrease
- hdc — half double crochet
- dc — double crochet
- tr — treble crochet
- sl st — slip stitch
- ch — chain
- BLO — back loop only
- st/sts — stitch/stitches
An invisible decrease is worked through the front loops of the next two stitches before completing one single crochet; this reduces the visible gaps produced during the closing rounds.
Pattern — Step by Step
Work the pumpkin body in a continuous spiral. Move a stitch marker into the first stitch of every round.
Large Green Pumpkin Body
Yarn: moss or forest green — original reconstruction using standard six-stitch amigurumi geometry.
R1: 6 sc in MR. (6)
R2: Inc ×6. (12)
R3: (1 sc, inc) ×6. (18)
R4: (2 sc, inc) ×6. (24)
R5: (3 sc, inc) ×6. (30)
R6: (4 sc, inc) ×6. (36)
R7: (5 sc, inc) ×6. (42)
R8: Sc around. (42)
R9: Sc around. (42)
R10: Sc around. (42)
R11: Sc around. (42)
R12: Sc around. (42)
R13: Sc around. (42)
R14: Sc around. (42)
R15: Sc around. (42)
R16: Sc around. (42)
R17: Sc around. (42)
R18: Sc around. (42)
R19: Sc around. (42)
R20: Sc around. (42)
Begin stuffing. Place small pieces around the outside wall first. Keep the central core softer because the body still needs to compress during sculpting.
R21: (5 sc, dec) ×6. (36)
R22: Sc around. (36)
R23: (4 sc, dec) ×6. (30)
R24: Sc around. (30)
R25: (3 sc, dec) ×6. (24)
R26: Sc around. (24)
Complete the stuffing before the opening becomes smaller. Leave approximately 2 cm beneath the crown slightly softer than the equator.
R27: (2 sc, dec) ×6. (18)
R28: (1 sc, dec) ×6. (12)
R29: Dec ×6. (6)
Fasten off with a 150 cm tail. Pass the tail through the front loops of the final six stitches and close.
Sculpting the Six Deep Lobes
The photograph has broad sections rather than dozens of narrow ribs. Mark six positions around the equator at approximately 60-degree intervals.
Thread approximately 180 cm of green yarn through the long needle. Double it if the selected yarn has low abrasion resistance.
Insert through the bottom center and emerge through the crown.
Bring the strand down the outside at marker one and return through the bottom center. Pull until a shallow channel forms.
Repeat at all six marker positions.
After every groove exists, view the pumpkin from above. Adjust the strands until the six lobe widths are comparable, then deepen each channel with a second pass if required.
Secure the shaping yarn beneath the body and bury both ends through the stuffing.
Flattening the Base
Set the pumpkin on a hard table before attaching the topper.
Massage stuffing away from the exact bottom center and toward the surrounding lobes. Press an approximately 8–10 cm flat footprint into the underside.
If the body still rocks, pass a green strand from bottom center to crown and back once. Tighten only enough to shorten the vertical axis slightly.
Tall Curved Brown Stem
Yarn: chocolate brown.
Target approximately 11–13 cm long.
R1: 6 sc in MR. (6)
R2: Inc ×6. (12)
R3: (1 sc, inc) ×6. (18)
R4: BLO sc around. (18)
R5: (4 sc, dec) ×3. (15)
R6: Sc around. (15)
R7: (3 sc, dec) ×3. (12)
R8: Sc around. (12)
R9: Sc around. (12)
R10: Sc around. (12)
R11: Sc 8, sl st 4. (12 positions)
R12: Sc 8, sl st 4. (12 positions)
R13: Sc 8, sl st 4. (12 positions)
R14: Sc 9, sl st 3. (12 positions)
R15: Sc 9, sl st 3. (12 positions)
R16: Sc around. (12)
R17: Sc around. (12)
R18: (2 sc, dec) ×3. (9)
R19: Sc around. (9)
R20: (1 sc, dec) ×3. (6)
Stuff the first two-thirds firmly. Use substantially less fiberfill in R11–R17 so the shortened slip-stitch side can produce a controlled hook.
Close the six-stitch tip.
Leave approximately 55 cm at the broad base for sewing.
Adding Texture to the Stem
The reference stem has a rough, strongly crocheted surface rather than a smooth cylinder.
Join brown yarn at the R4 BLO ridge.
Surface sl st toward the tip along one vertical stitch column.
Repeat at four positions around the stem.
Leave the surface lines relaxed. Tight vertical embroidery can twist the curved tube.
Large Olive Leaf — Make 2
Yarn: olive green.
Ch 16.
Starting in the second chain, work into the next 14 chains:
sl st, sc, hdc, dc, dc, tr, tr, tr, dc, dc, hdc, sc, sc, sl st.
One foundation chain remains unused.
Work 5 sc into that final chain to turn around the point.
Working down the opposite side of the foundation chain, mirror the sequence:
sl st, sc, sc, hdc, dc, dc, tr, tr, tr, dc, dc, hdc, sc, sl st.
Join at the base.
Ch 5. Starting in second chain, sl st in the next four chains to create the leaf stem.
Fasten off with a 35 cm tail.
Target approximately 10–11 cm long.
Large Leaf Vein and Edge
Join olive at the leaf base.
Surface sl st along the original foundation chain to the point.
Fasten off.
For a more defined outline, join at the base again and work loose sl sts around the outside edge. At the point work sl st, ch 2, sl st before continuing down the opposite edge.
Small Olive Leaf — Make 1
Ch 12.
Starting in second chain, work into the next ten chains:
sl st, sc, hdc, dc, tr, tr, dc, hdc, sc, sl st.
Work 5 sc into the final chain.
Mirror the ten-stitch sequence along the opposite side.
Ch 4 and sl st through three chains for the stem.
Fasten off with a 30 cm tail.
Target approximately 7–8 cm long.
Olive Spiral Vine
Yarn: olive green.
Ch 34.
Starting in second chain, work 3 sc in each of the next 25 chains.
Sl st in each of the remaining eight chains.
Fasten off with a 30 cm tail.
The 25 groups of three single crochets force the working edge to curl, while the eight slip stitches leave a flatter section that can disappear beneath the crown leaves.
Mustard Five-Petal Flower
Yarn: chocolate brown and mustard gold.
Ch 4. Join with sl st to form a ring.
R1: With brown, work 10 sc into the ring. Join. (10)
Change to mustard.
R2: *Sl st in next st, (ch 3, 3 dc, ch 3, sl st) in next st.* Repeat ×5. (5 petals)
Fasten off with a 30 cm sewing tail.
The round consumes exactly two center stitches per petal:
2 stitches × 5 petals = 10 stitches.
Block to approximately 6–7 cm across.
Creating the Crown Recess
The tall stem needs a socket rather than a flat attachment surface.
Thread a separate green strand through the bottom center and bring it out approximately 1 cm to one side of the crown center.
Reinsert approximately 1 cm on the opposite side and return through the bottom.
Pull until the crown develops a recess approximately 4 cm across.
Repeat at a perpendicular angle if necessary.
Do not collapse the entire upper third of the pumpkin. Only the stem attachment zone should sink.
Positioning the Botanical Crown
Place the brown stem first.
Orient its hook forward and slightly left.
Position one large olive leaf behind the left side of the stem and the second behind the right side.
Place the smaller leaf behind the flower.
The mustard flower belongs on the front-right side of the crown, while the spiral vine should fall toward the front-left lobe.
Pin every component before sewing.
Attaching the Stem
Push the 18-stitch stem base into the crown recess.
Sew through every base stitch.
Add a second attachment circle approximately 1 cm above the crown.
Make three additional anchoring stitches from the lower stem into different points of the pumpkin body.
The tall stem creates substantial leverage, so one seam around its lowest edge is not sufficient.
Attaching the Leaves
Sew each leaf stem completely to the crown.
Add one concealed stitch approximately 2–3 cm along the center vein of each large leaf.
Use approximately 1.5 cm for the small leaf.
Leave the pointed edges free.
The free edges create the slight lift visible around the photographed crown.
Attaching the Flower
Position the mustard flower against the front-right side of the brown stem.
Sew the brown center to the crown at four evenly spaced points.
Add one concealed stitch beneath two opposite petals if rotation remains possible.
Do not stitch around all five petal edges.
Attaching the Vine
Hide the eight-slip-stitch section beneath the left leaf.
Sew that flat section to the crown.
Add one concealed stitch where the spiral begins.
Allow the remaining curl to hang freely over the front-left lobe.
Assembly
- Crochet the green body through R29, stuffing after R20 and maintaining a softer central core while keeping the outer circumference evenly filled.
- Mark six positions approximately 60 degrees apart around the equator and install all six exterior shaping strands before tightening any individual groove fully.
- Compare the lobes from above, deepen shallow channels with a second pass, and flatten an approximately 8–10 cm contact area beneath the body.
- Create a roughly 4 cm crown recess with a separate green strand so the broad stem base can sit below the tops of the surrounding lobes.
- Crochet the 20-round brown stem, stuff its lower section firmly, preserve the curved upper section, and add relaxed vertical surface texture.
- Sew the stem through all 18 base stitches, then add a second attachment circle approximately 1 cm higher and three concealed stabilizing stitches.
- Crochet two large olive leaves and one smaller leaf, add the center veins, and arrange them asymmetrically around the stem before sewing.
- Crochet the mustard five-petal flower and secure its brown center to the front-right portion of the crown while leaving the petal edges free.
- Make the 34-chain spiral vine, hide its eight-chain attachment section beneath the left leaf, and allow the remaining curl to hang over the front lobe.
- Weave every remaining tail through at least 5 cm of matching crochet, redistribute any visible stuffing lumps, and reshape all six lobes before display.
The finished reconstruction should have six broad green lobes, deep sculpted channels, a tall curved brown stem, three olive leaves, one hanging spiral vine, and a five-petal mustard flower.
7 Technical Tips
- The channels remain shallow: remove approximately 10–15% of the central stuffing before increasing sculpting tension. Pulling harder against an overfilled 42-stitch body can stretch the crochet fabric without producing deeper valleys.
- One lobe becomes noticeably narrow: mark all six groove positions at approximately 60-degree intervals before inserting the first shaping strand. A channel displaced by 15–20 mm at the equator visibly changes both neighboring sections.
- The tall stem tips sideways: add the second attachment circle approximately 1 cm above its 18-stitch base. A single seam around the bottom edge behaves like a hinge beneath an 11–13 cm curved stem.
- The leaf curls along its vein: compare the surface-slip-stitch line with the original foundation length before fastening off. Shortening a 10 cm leaf by even 5 mm through the center can force the edges upward.
- The vine stays almost straight: work exactly three single crochets into each of the designated 25 foundation chains. Inconsistent groups of two and three stitches create waves rather than a compact spiral.
- The flower buckles at its center: keep R1 at exactly 10 single crochets. Five petals consume two center stitches each, so changing that base count disrupts the radial spacing.
- The pumpkin rocks after assembly: redistribute stuffing away from the bottom center and press an 8–10 cm flat footprint into the underside. A dense central lump creates a pivot point even when all six lobes are balanced.
Why 42 Stitches Work for the Body
The body expands in a standard six-stitch sequence:
6 → 12 → 18 → 24 → 30 → 36 → 42.
Each increase round adds exactly six stitches. After R7, thirteen rounds maintain the 42-stitch circumference before decreases begin.
The body then contracts through:
42 → 36 → 30 → 24 → 18 → 12 → 6.
The additional plain rounds between several decreases prevent the top from closing too abruptly.
Published Worsted Pumpkin Benchmark
Laura Brian’s Fall Pumpkins specifies worsted-weight yarn and a 5 mm hook. The published large size is approximately 5 inches across × 3 inches high.
That design uses half double crochet in the third loop to form raised ridges rather than a stuffed single-crochet sphere, so its instructions are structurally different from this reconstruction.
The yarn category and hook pairing provide a useful reference for firm decorative pumpkin fabric.
Published Textured Pumpkin Benchmark
ChristaCoDesign’s Zucca Textured Pumpkin specifies #4 medium worsted yarn and a 5 mm hook.
The published yarn is WeCrochet Brava, listed at 218 yards / 200 m per 100 g, with approximately 25–45 yards used for the pumpkin sizes shown in that pattern and approximately 10–15 yards of the contrasting topper color.
The pattern includes multiple finishing options, including a stem, leaf, and vine.
Published Stem, Leaf and Vine Benchmark
ChristaCoDesign’s separate pumpkin topper pattern also specifies #4 medium worsted yarn and a 5 mm hook.
The published material requirement is approximately 23–25 yards / 21–23 m for the topper components.
The designer works the stem continuously in the round and increases near its base, while the curly vine uses repeated stitches along a foundation chain.
Published Stuffed-Pumpkin Yarn Benchmark
A current stuffed-pumpkin reference specifies approximately 140–160 yards of #4 worsted yarn for the body, about 10 yards for the stem, and approximately 8 yards for an optional leaf.
The documented project uses a 5 mm hook and approximately three ounces of polyester fiberfill.
The reconstruction in this article has a larger target footprint and more substantial botanical pieces, so its material allowance is intentionally higher.
Published Ribbed Pumpkin Size Benchmark
A current worsted-yarn ribbed pumpkin guide uses a 5 mm hook and lists a large rectangle-based version at approximately 16 cm body height.
The same reference explains that the rectangle height becomes the pumpkin height while its row count determines circumference.
Although this reconstruction uses round-based amigurumi geometry instead, the published dimensions illustrate the scale commonly produced by worsted yarn and a 5 mm hook.
Why the Body Is Smooth Rather Than BLO Ribbed
The supplied photograph shows strong horizontal crochet rows across each lobe rather than dozens of narrow vertical BLO ridges.
For that reason, the body is worked in ordinary single crochet and receives its pumpkin shape after stuffing.
This construction also makes it easier to control six large sections. A rectangle-based ribbed pumpkin naturally produces many narrow channels, which would change the visual proportions of this reference.
Why the Stem Is Brown
The body, leaves, and vine occupy related green values. The chocolate stem separates those components at the crown and establishes a clear vertical focal point.
Its brown color also connects directly to the center of the mustard flower.
Keep the brown fairly dark. A tan stem close in value to the mustard petals can make the flower and stem merge when viewed from several feet away.
Why the Flower Uses Five Petals
The visible flower is compact and has approximately five broad petals.
A 10-stitch center divides cleanly into five two-stitch attachment sections. The petal repeat therefore uses one stitch as an anchor and the next as the petal stitch.
No spacing correction is required at the end of the round.
Why the Vine Uses 25 Curling Chains
Three single crochets in one foundation chain add substantially more fabric than the chain can accommodate in a straight line.
Repeating that increase over 25 chains forces a spiral.
The remaining eight chains receive slip stitches instead, producing a comparatively flat mounting section that can be sewn underneath the foliage.
Making a Smaller Green Pumpkin
Stop the increase sequence at 36 stitches.
Work approximately eight to ten plain rounds.
Then decrease:
36 → 30 → 24 → 18 → 12 → 6.
Reduce the stem to approximately 8–9 cm, shorten the large leaf foundations by two chains, and use a 26-chain vine.
Making an Extra-Large Pumpkin
Add one increase round after R7:
(6 sc, inc) ×6. (48)
Maintain 48 stitches through the central plateau.
Before the existing R21 decrease sequence, work:
(6 sc, dec) ×6. (42)
Then continue through 36, 30, 24, 18, 12, and 6.
Expect greater yarn and fiberfill consumption.
Making Eight Lobes Instead of Six
The stuffed body does not have to use the same number of sculpting sections as its increase geometry.
For eight narrower lobes, mark the equator at approximately 45-degree intervals.
Install all eight shaping strands at moderate tension.
The resulting pumpkin will look more finely segmented and less like the broad-lobed reference.
Increasing the Stem Curve
Add one additional round of sc 8, sl st 4 after R13.
Keep the four slip stitches aligned with the existing shortened side.
Test the bend before stuffing that section. Too many shortened rounds can create an abrupt elbow rather than the gradual hook visible in the photograph.
Making a Shorter Stem
Omit R15–R17.
Move directly from the shortened shaping rounds to the nine-stitch reduction.
This removes approximately 2–3 cm without changing the broad 18-stitch attachment base.
Changing the Flower
Burnt orange can replace mustard while retaining the brown center.
Cream creates stronger contrast against the green body.
For the closest reconstruction, keep the mustard petals because their warm value stands apart from both the moss body and olive foliage.
Changing the Leaf Color
Use olive for the photo-inspired result.
Sage produces a softer contrast, while forest green gives less separation from the body.
If the body and leaves are made from the same green yarn, use a smaller hook for the foliage so the tighter stitch definition differentiates the leaf shapes.
Correcting an Overstuffed Body
Reopen the six-stitch crown before tightening the sculpting yarn further.
Remove filling from the central core first rather than from the outer lobe surfaces.
Close the opening and repeat the six shaping passes.
A compressible center allows the exterior channels to move inward without flattening the outermost portions of the lobes.
Correcting Unequal Lobes
Place the pumpkin directly beneath your line of sight and inspect it from above.
Measure between neighboring channels at the equator.
If one lobe is too narrow, loosen one boundary strand and relocate it toward the wider neighboring section.
Changing tension alone alters depth but does not reliably correct a misplaced groove.
Correcting a Loose Stem
Leave the lowest attachment seam intact.
Thread a fresh brown strand through the stem approximately 1–2 cm above the crown.
Anchor that strand into three separate points of the pumpkin.
Spread those anchors around the base rather than stacking them on one side.
Correcting a Flat Leaf
Pin the leaf while lightly damp and lift the final 2 cm of the tip away from the blocking surface.
Allow it to dry completely before attachment.
When sewing, secure only the stem and center vein. Stitching the entire perimeter removes the dimensional edge visible in the reference.
Correcting an Irregular Vine
Run the finished spiral around a 15–20 mm cylindrical object such as a marker barrel.
Arrange each curl in the same direction and release it.
If one section remains nearly straight, check whether three single crochets were actually worked into every designated foundation chain.
Yarn Planning
Make and weigh the body before beginning the accessories.
Reserve at least 60–70 g combined for the brown stem, olive foliage, vine, flower, sewing tails, and any replacement parts.
When substituting yarn, compare meters per 100 g rather than depending only on the #4 label. Two worsted yarns can produce noticeably different body diameters at the same 42-stitch plateau.
Stuffing Strategy
Use small pieces of fiberfill.
Build a consistent layer around the outside wall first, then fill the interior more lightly.
Press opposite sides together periodically. The center should still yield under moderate hand pressure before the closing rounds begin.
Keep the equator full enough that each finished lobe remains rounded after the sculpting strands compress the valleys.
Care and Storage
Follow the yarn manufacturer’s care instructions.
Spot cleaning is practical for a large sculpted decoration because complete immersion can alter stuffing distribution and channel depth.
Store the pumpkin upright with no pressure on the hooked stem.
After storage, massage the six lobes outward, reshape the crown leaves by hand, and wind the vine gently around a marker barrel if its spiral has relaxed.
Sources
Ravelry — Fall Pumpkins by Laura Brian — worsted-weight yarn, 5 mm hook, third-loop texture, and published finished dimensions for two pumpkin sizes.
ChristaCoDesign — Zucca Textured Pumpkin — #4 medium worsted yarn, 5 mm hook, published yarn information, and multiple pumpkin-topper options.
ChristaCoDesign — Crochet Pumpkin Stem, Leaf and Vine — #4 worsted yarn, 5 mm hook, 21–23 m material benchmark, continuously crocheted stem, leaf, and spiral-vine construction.
Free Crochet Pumpkin Pattern — #4 worsted yarn, 5 mm hook, approximately 140–160 yards for a stuffed pumpkin body plus published stem and leaf yardage.
Rachel’s Lovely Stitches — Crochet Pumpkin Pattern — #4 worsted yarn, 5 mm hook, fiberfill, and documented ribbed-rectangle pumpkin construction.
CrochetNet — Crochet Pumpkin Pattern in Three Sizes — worsted/bulky yarn benchmark, 5 mm worsted hook, and published size guidance for ribbed pumpkins.
Speedy Crochet — Ribbed Crochet Pumpkin — #4 medium yarn, published yarn quantities, gauge information, and finished-size benchmark.
Conclusion
Establish the broad body before treating the botanical crown as a separate construction problem. The six channels should compress a softer center while leaving enough filling at the equator to keep every lobe rounded, and the stem needs two attachment levels to support its hooked profile. Your next step is to crochet through the 42-stitch plateau and test the body against the 25–28 cm reconstruction target before closing it. Save this large green crochet pumpkin pattern to Pinterest or share the finished centerpiece on Instagram with #GreenHarvestPumpkin. For this specific moss-green pumpkin, would you keep the mustard flower or replace it with a cream one?









