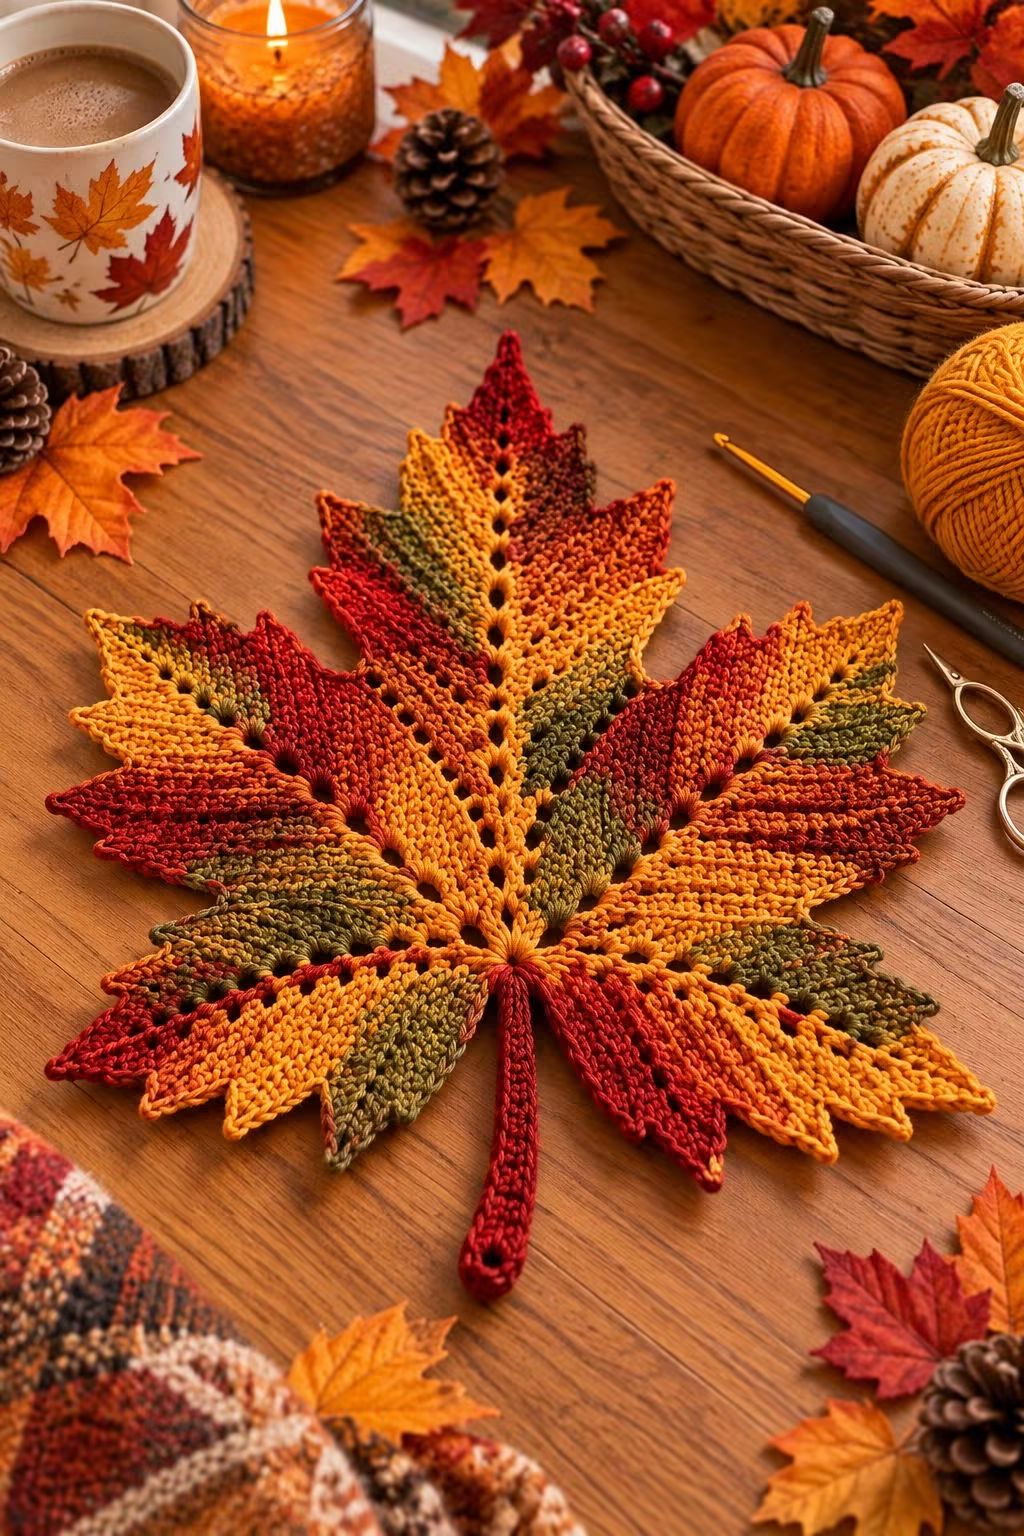
A maple leaf needs five unequal lobes, not five identical points; that proportion is what separates the silhouette from a generic crochet star. This crochet maple leaf pattern guide focuses on the broad center lobe, paired side lobes, pointed tips, visible vein structure, and long stem shown in the reference image. Use autumn shades of burgundy, rust, orange, mustard, and olive to reproduce its color-blocked appearance.
The Design: What Makes This Crochet Maple Leaf Different
The reference image shows one oversized maple leaf composed of multiple colored sections. A long central lobe establishes the vertical axis, two substantial upper side lobes create most of the width, and smaller lower lobes complete the recognizable maple outline.
Color placement follows the direction of the leaf structure rather than forming horizontal stripes. Burgundy, burnt orange, mustard yellow, and olive green appear in separate wedges, which makes the individual lobes and vein-like divisions more visible.
The long stem is another important proportion. Making it too short causes a large autumn crochet leaf to look more like an appliqué than a standalone table decoration.
One common shaping failure is making every point equal in length. Realistic maple-leaf geometry needs a dominant center point and progressively smaller lower sections.
Project Information at a Glance
| Feature | Project Information |
|---|---|
| Skill Level | Intermediate |
| Project Type | Flat crochet maple leaf / autumn decoration |
| Construction | Shaped flat crochet with five lobes and stem |
| Recommended Yarn | DK to worsted-weight cotton or cotton blend |
| Reference Hook Range | 3–4 mm depending on yarn |
| Colors | Burgundy, red, burnt orange, mustard, olive green |
| Gauge | Not critical for decorative use |
Published maple-leaf patterns demonstrate substantial size variation. A sport-weight version by Nicole Riley uses a 3 mm hook and measures approximately 4.5 × 2 inches. Another published worsted-weight design measures about 10 × 10 cm with a 4 mm hook. Larger decorative leaves can be produced by increasing yarn weight, hook size, or the number of shaping rows.
Materials and Tools
Yarn
- Burgundy yarn — DK or worsted weight — for the stem and dark sections
- Rust red yarn — DK or worsted weight — for secondary lobes
- Burnt orange yarn — DK or worsted weight — for warm transition sections
- Mustard yellow yarn — DK or worsted weight — for highlighted sections
- Olive green yarn — DK or worsted weight — for contrasting autumn sections
For a multicolor leaf, scrap quantities can be sufficient for individual color sections. Keep all colors within the same yarn family or match their thickness closely. Mixing a thin DK yarn with a heavy worsted yarn can distort individual lobes.
Tools
- 3.5 mm crochet hook as a practical starting point for DK yarn
- Yarn needle
- Scissors
- Stitch markers
- Blocking pins
- Blocking mat
- Tape measure
Abbreviations
- ch — chain
- sl st — slip stitch
- sc — single crochet
- hdc — half double crochet
- dc — double crochet
- tr — treble crochet
- st/sts — stitch/stitches
- sp — space
- BLO — back loop only
- rep — repeat
Understanding Maple Leaf Construction
A successful crochet maple leaf depends more on shaping than stitch density. The outline needs a clear hierarchy: one long center lobe, two upper side lobes, two smaller lower lobes, and a stem positioned on the same central axis.
Published crochet maple leaves use several construction methods. Some begin with a circular center before building five points. Others use Irish-crochet-style rows worked around a foundation chain. Both methods can produce a recognizable maple silhouette.
The photographed leaf appears considerably larger and more segmented than a small appliqué. Its visible color wedges also suggest that color placement should be planned alongside shaping rather than added after the leaf is complete.
Planning the Five Maple Leaf Lobes
Center Lobe
The center lobe should be the longest section. Its point establishes the overall height and should remain aligned with the stem.
Build the lobe gradually from a wider base toward a narrow point. Changing stitch height is an effective way to create this transition. Short stitches can define recessed areas while double and treble crochet stitches provide additional length around prominent points.
Upper Side Lobes
Make two upper side lobes, one on each side of the center. They should be substantial but slightly shorter than the central point.
Check both sides after completing each major section. The leaf does not need mathematical mirror symmetry, particularly when using different colors, but large differences in lobe length can make the piece appear unbalanced.
Lower Side Lobes
The lower lobes should be visibly smaller than the upper pair. This reduction creates the stepped silhouette associated with a maple leaf.
A common error is extending these lower points too far horizontally. Keep them subordinate to the upper lobes so the finished piece retains a clear top and bottom.
Creating Sharp Leaf Points
Pointed tips can be produced by combining stitches of different heights. A sequence that progresses from sc to hdc, dc, and tr increases the height toward the point. Reverse the order on the opposite side to bring the edge back down.
A small picot can sharpen the tip further. One published maple-leaf method uses picots at the ends of prominent sections, while other designs build points directly from tall stitches.
Do not pull a picot excessively tight. A compressed tip can disappear into the surrounding stitches after blocking.
Creating the Autumn Color Sections
The reference image uses color as part of the leaf anatomy. Instead of arranging colors in simple stripes, place them in sections that move outward from the center and lower vein area.
Begin with a palette of approximately five related colors:
- Burgundy for the darkest structural sections
- Deep red for saturated side lobes
- Burnt orange for transition areas
- Mustard yellow for the brightest sections
- Olive green for contrasting areas
Avoid changing color randomly in the middle of a prominent point. Position transitions where they can follow a lobe boundary or visual vein. This gives the color change a structural purpose.
How to Change Colors Cleanly
Work the final yarn-over of the stitch immediately before the color change with the new color. The new shade will then be ready for the next complete stitch.
Leave enough yarn at every transition for secure finishing. Loose tails at the center of a decorative leaf can become visible when the fabric is moved or blocked.
For a project with many small sections, weaving some ends during construction prevents a large concentration of unfinished tails around the central junction.
Adding the Leaf Vein Effect
The photographed leaf has strong lines radiating from the stem toward the lobes. These divisions are central to the design because they separate the color wedges and reinforce the botanical shape.
Vein lines can be created structurally by working around chains, using slip stitches, changing colors at specific boundaries, or arranging increases and decreases along a central axis.
For an original pattern inspired by the image, establish the main central vein first. Position the secondary divisions so they radiate toward each major lobe rather than running parallel to the outer edge.
Crocheting the Stem
The stem should extend directly from the lower center of the leaf. A separate stem can be sewn on, but working it continuously from the leaf reduces finishing and helps maintain alignment.
A simple stem can begin with a chain of the required length. Work back along the chain using slip stitches or single crochet. Slip stitches produce a thinner, firmer stem; single crochet creates a wider version.
For the oversized appearance in the reference image, make the stem long enough to remain visually significant after the leaf is spread flat.
Keep the stem relatively firm. Loose stitches can cause it to curl or twist away from the center line.
Choosing the Finished Size
There is no universal size for a crochet maple leaf. Published patterns demonstrate how dramatically dimensions change with construction and materials.
A sport-weight pattern using a 3 mm hook has published dimensions of approximately 4.5 × 2 inches. A worsted-weight version with a 4 mm hook measures approximately 4 × 4 inches. A much larger worsted-cotton design worked with a 3.5 mm hook is published at approximately 10 inches tall by 9 inches wide.
For a table centerpiece resembling the scale of the reference image, make a test section before committing to the complete leaf. Measure the center lobe and use it to estimate the eventual width.
Blocking the Crochet Maple Leaf
Blocking has a direct effect on the finished silhouette. Five carefully crocheted points can still appear rounded if the piece is allowed to dry without shaping.
Place the finished leaf on a blocking mat. Align the stem and central point first. Pin the two upper lobes next, followed by the lower pair.
Measure from the center to corresponding points on each side. Adjust the pins until the overall proportions are balanced.
Pin smaller indentations between the lobes separately. Those recessed areas are just as important as the points because they define the five-part outline.
Follow the care requirements of the yarn fiber when wet blocking or steaming. Excessive heat can damage some synthetic fibers.
Using the Leaf as Autumn Table Decor
An oversized crochet fall leaf can function as a table centerpiece without additional construction. Place it flat rather than folding it so the five-lobe silhouette remains visible.
Several smaller leaves can be produced from the same palette for coordinated decorations. Changing which color dominates each leaf creates variation while keeping the collection visually connected.
For a garland, use lighter leaves that do not pull heavily on the joining chain. For placemats or table decorations, cotton or a cotton-rich blend provides useful stitch definition and can produce crisp blocked points.
7 Technical Tips for a Crochet Maple Leaf
- Check the center axis before adding side lobes. If the central point and stem are offset by even several stitches, the finished leaf can lean visibly to one side. Lay the work flat before continuing the second half.
- Do not make all five lobes equal. Equal points create a star-like outline rather than a maple silhouette. Keep the central lobe longest and the lower pair shortest.
- Mark every major color transition. A misplaced change can interrupt the vein-like divisions visible in a multicolor design. Position a marker before beginning each new color wedge.
- Keep the point stitches loose enough to block. Excessively tight picots can collapse into the surrounding stitches. Check each point immediately after completing it.
- Count stitches before starting the opposite lobe. An unnoticed extra stitch can make one side several millimeters wider. Compare corresponding sections before proceeding.
- Block every indentation separately. Pinning only the five outer points produces a rounded perimeter. Place pins in the recessed areas between lobes to establish the characteristic maple outline.
- Keep the stem centered during drying. A stem that dries at an angle makes the entire motif appear rotated. Align it directly below the center lobe before the fabric is left to dry.
Finishing
Weave each yarn tail through stitches of the same or a closely matching color. Avoid carrying a burgundy tail underneath a mustard section where it may become visible through stitch openings.
Change direction at least once while weaving each tail. Trim only after the end is secure.
Lay the leaf flat and examine the five main points, the indentations between them, and the stem alignment. Correct minor irregularities during blocking rather than adding unnecessary stitches to an otherwise balanced shape.
Final Notes
The strongest feature of this design is not simply its autumn palette. It is the combination of five graduated lobes, pointed shaping, radiating vein lines, multiple color wedges, and a long central stem.
Start by selecting five yarn colors with similar thickness, then crochet and block a test leaf before scaling the design into an oversized centerpiece. Record the yarn weight, hook size, finished width, finished height, and stem length so subsequent leaves can be reproduced consistently.
For a larger crochet maple leaf pattern, increase the dimensions systematically rather than merely pulling the points farther during blocking. Share the finished color arrangement on Pinterest or Instagram with #AutumnMapleLeafCrochet. Which section will carry the olive green in your version: the upper lobes or the smaller lower points? “`0









