Introduction
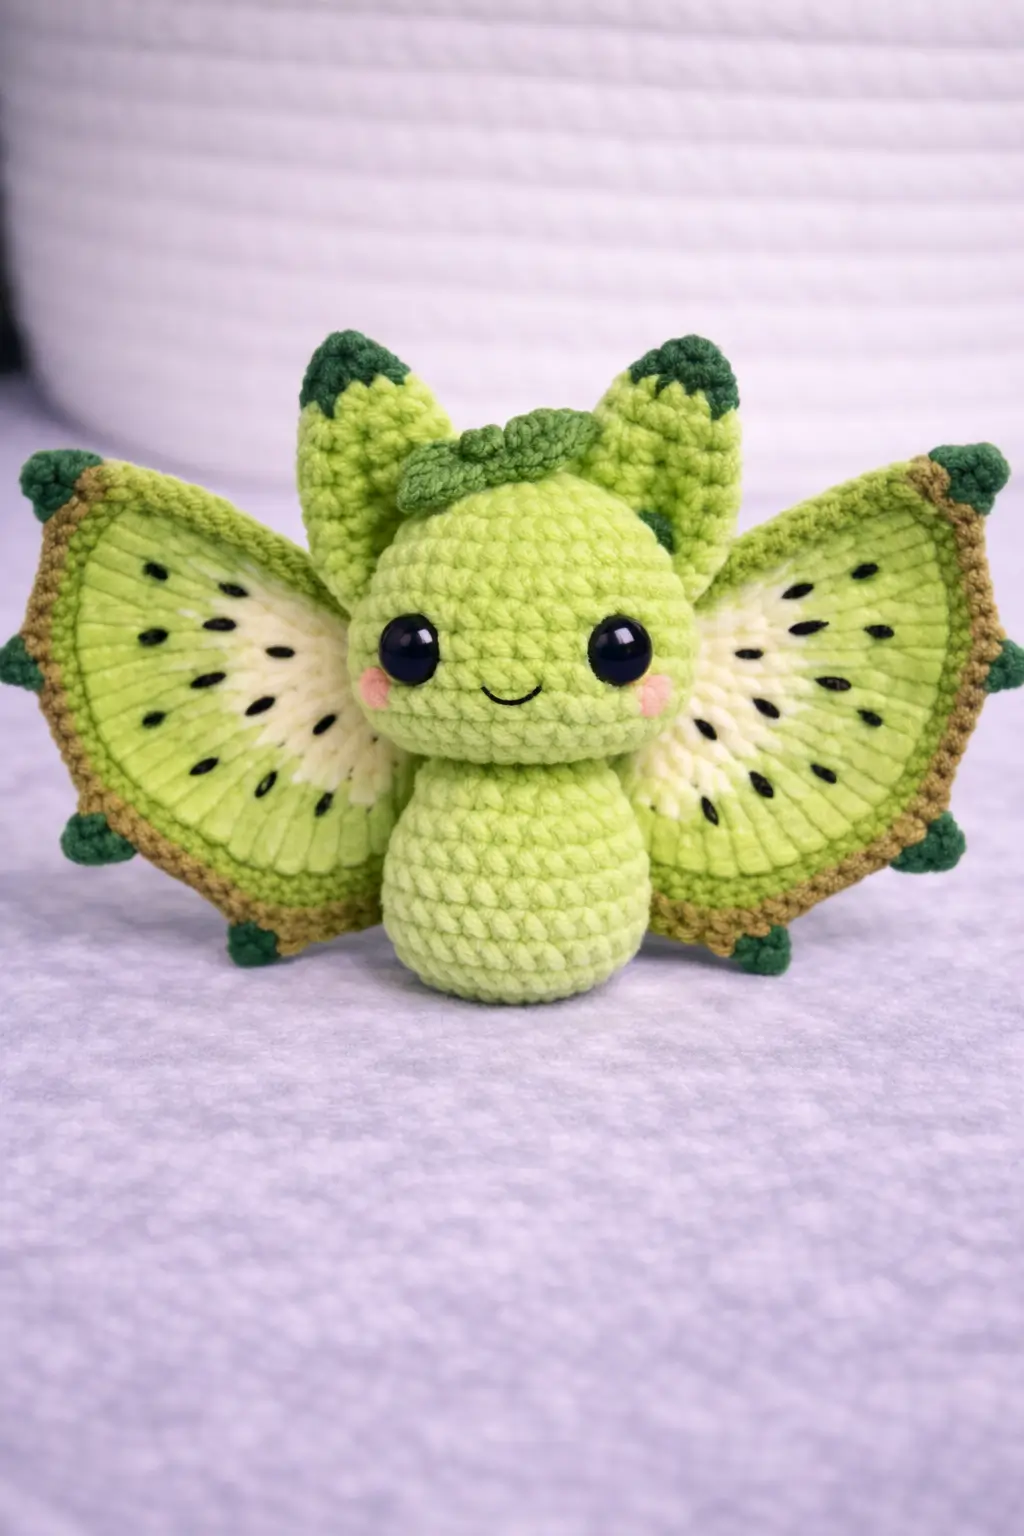
Kiwi wings force the bat pattern to behave like a fruit slice before it behaves like a mammal. This kiwi bat amigurumi uses chunky chenille yarn, a 6 mm hook, and a compact 10–12 cm plush format suited to intermediate makers who want a shelf sample, market display piece, or fruit-themed Halloween variant.
The Design: What Makes Kiwi Bat Different
A kiwi bat works because three structures have to read at once: round bat head, narrow seated body, and flat fruit wings. Miss one and the design slips into generic plush territory. The first decision is the wing geometry. Each wing needs a broad semicircle, not a pointed bat membrane, so the fruit slice stays readable from the front. The second is color zoning. A kiwi bat crochet pattern needs a pale green center, a cream band, and dark seed marks, or the fruit reference disappears. The third is head scale. A slightly oversized head keeps the plush format stable when the wings spread wide. Makers often overstuff the body on this type of fruit bat crochet pattern. That pushes the wings backward and makes the toy tip instead of sit.
Project Info at a Glance
| Skill Level | Time | Finished Size | Hook | Best For |
|---|---|---|---|---|
| Intermediate | 3–5 hours | 10–12 cm | 6 mm | display plush, themed markets, fruit-bat collections |
Materials and Tools
Yarn
- Light kiwi green — chunky chenille — about 70 g — Premier Parfait Chunky Pistachio style
- Cream — chunky chenille or smooth plush — about 15 g — for inner wing band
- Dark green — chunky chenille — about 20 g — for rind edge, ear tips, leaf topper
- Brown/tan — chunky chenille — about 10 g — for outer rind shadow
- Black embroidery yarn — small amount — for kiwi seeds and smile
- Pink yarn or blush thread — small amount — for cheeks
Tools
- Hook 6 mm
- Safety eyes 18–20 mm
- Stuffing
- Yarn needle
- Stitch markers
- Pins
- Fabric glue optional for blush circles
Abbreviations
MR / sc / inc / dec / sl st / ch / BLO / hdc / dc / tr
Use invisible decrease for all shaping rounds on the head and body. It keeps the chenille surface cleaner than a standard two-stitch decrease.
Pattern — Step by Step
Continuous spiral unless noted.
Head (Make 1)
Yarn: light kiwi green
R1: 6 sc in MR (6)
R2: inc x6 (12)
R3: (sc, inc) x6 (18)
R4: (2 sc, inc) x6 (24)
R5: (3 sc, inc) x6 (30)
R6: (4 sc, inc) x6 (36)
R7–11: sc around (36)
R12: (4 sc, dec) x6 (30)
R13: (3 sc, dec) x6 (24)
Insert eyes between R9 and R10, 8 sts apart.
R14: (3 sc, inc) x6 (30)
R15: (4 sc, inc) x6 (36)
R16: sc around (36)
R17: (4 sc, dec) x6 (30)
R18: (3 sc, dec) x6 (24)
R19: (2 sc, dec) x6 (18)
Stuff firmly, especially lower face.
R20: (sc, dec) x6 (12)
R21: dec x6 (6)
Fasten off. Close opening. Leave 12 cm tail.
Body (Make 1)
Yarn: light kiwi green
R1: 6 sc in MR (6)
R2: inc x6 (12)
R3: (sc, inc) x6 (18)
R4: (2 sc, inc) x6 (24)
R5: (3 sc, inc) x6 (30)
R6–10: sc around (30)
R11: (3 sc, dec) x6 (24)
R12: sc around (24)
R13: (2 sc, dec) x6 (18)
R14: sc around (18)
Stuff lower half more firmly than upper neck.
Fasten off. Leave 20 cm tail.
Arms / Front Legs (Make 2)
Yarn: light kiwi green
R1: 6 sc in MR (6)
R2: (sc, inc) x3 (9)
R3–4: sc around (9)
R5: flatten, 4 sc through both layers (4)
Fasten off. Leave 15 cm tail.
Back Legs (Make 2)
Yarn: light kiwi green
R1: 6 sc in MR (6)
R2: inc x6 (12)
R3–4: sc around (12)
R5: (2 sc, dec) x3 (9)
R6: flatten, 4 sc through both layers (4)
Fasten off. Leave 15 cm tail.
Ears (Make 2)
Yarn: light kiwi green with dark green tip
Row 1: ch 7, sc in 2nd ch from hook and across (6)
Row 2: ch 1, turn, dec, 2 sc, dec (4)
Row 3: ch 1, turn, dec, 2 sc together in last st (3)
Row 4: ch 1, turn, sc across (3) in dark green
Work sc evenly around edge to smooth shape.
Fasten off. Leave 18 cm tail.
Kiwi Slice Wings (Make 2)
Yarn: light kiwi green, cream, brown, dark green
Row 1: ch 2, 6 sc in 2nd ch from hook, turn to work rows (6)
Row 2: ch 1, inc x6, turn (12)
Row 3: ch 1, (sc, inc) x6, turn (18)
Row 4: ch 1, (2 sc, inc) x6, turn (24)
Row 5: ch 1, (3 sc, inc) x6, turn (30)
Row 6: ch 1, (4 sc, inc) x6, turn (36)
Row 7: ch 1, (5 sc, inc) x6, turn (42)
Row 8: sc evenly across in BLO (42) with cream
Row 9: sc evenly across in front loop only of Row 8 with light kiwi green (42)
Border round: work one sc in each edge stitch around curved side only with brown, placing 3 sc at both wing corners. Final pass in dark green: 6 small picot bumps spaced evenly along outer curve.
Embroider 7–9 black kiwi seeds radiating from cream band toward center.
Fasten off. Leave 25 cm tail.
Leaf Topper (Make 1)
Yarn: dark green
Ch 6.
Round 1: starting in 2nd ch from hook, sc, hdc, dc, hdc, sc; rotate to other side of chain and work sc, hdc, dc, hdc, sc; sl st to join.
Ch 4 for stem, sl st back down chain.
Fasten off. Leave 10 cm tail.
Cheek Patches (Make 2)
Yarn: pink
R1: 6 sc in MR (6)
Sl st to first sc.
Fasten off. Leave 8 cm tail.
Nose / Smile Detail (Make 1)
Yarn: black embroidery thread
Embroider a shallow curved smile centered one round below eye line.
Assembly
- Sew the head to the top center of the body with the face angled slightly forward.
- Attach the ears on the crown, one round behind the eye line, with the dark green tips pointing outward.
- Sew the leaf topper between the ears.
- Add the cheek patches slightly below and outside each eye.
- Embroider the smile after cheeks are fixed so the curve sits centered between them.
- Sew the front legs low on the body front, just under the head seam.
- Attach the back legs at the lower sides so the plush sits without rocking.
- Pin each kiwi wing first, matching the straight edge to the back seam line.
- Sew the wings from upper shoulder area downward, keeping the fruit face aimed forward.
- Weave in all tails through the body core and trim.
The finished kiwi bat amigurumi should sit upright with both wing slices visible from the front.
7 Technical Tips
- Mark the first stitch of every round on the head. Lose that point once, and the eye line shifts off center by half a stitch column.
- Stuff the head harder than the neck. Soft stuffing under the eyes makes 20 mm safety eyes sink and flatten the face.
- Use invisible decrease on chenille only through front loops. A full-stitch decrease leaves a raised scar that catches light on pale green yarn.
- Install the eyes before the final head decreases. Waiting past the 24-stitch opening makes the washer placement awkward and distorts the face.
- Keep wing tension slightly tighter than body tension. Loose rows let the cream band buckle instead of reading as a clean kiwi ring.
- Pin both wings at three points before sewing: top corner, midpoint, bottom corner. One-point pinning usually causes the slice angle to drift backward.
- Weave every chenille tail at least 4 cm through stuffed sections. Short burying on plush yarn slips out faster than on cotton.
Conclusion
The value in this kiwi bat amigurumi is not just the novelty. It is the way a simple bat base can carry a fruit identity through wing geometry, seed placement, and controlled color bands. Start with the wings first if you want to test scale before committing to the whole plush. Then build the head at the 36-stitch plateau and keep the body narrower so the silhouette stays readable. Share the finished piece on Pinterest and Instagram with a front-facing wing photo, because that angle sells the kiwi effect fastest. Use #KiwiBatPattern. For this character, the useful question is specific: did you place the seeds closer to the cream ring or closer to the center?









