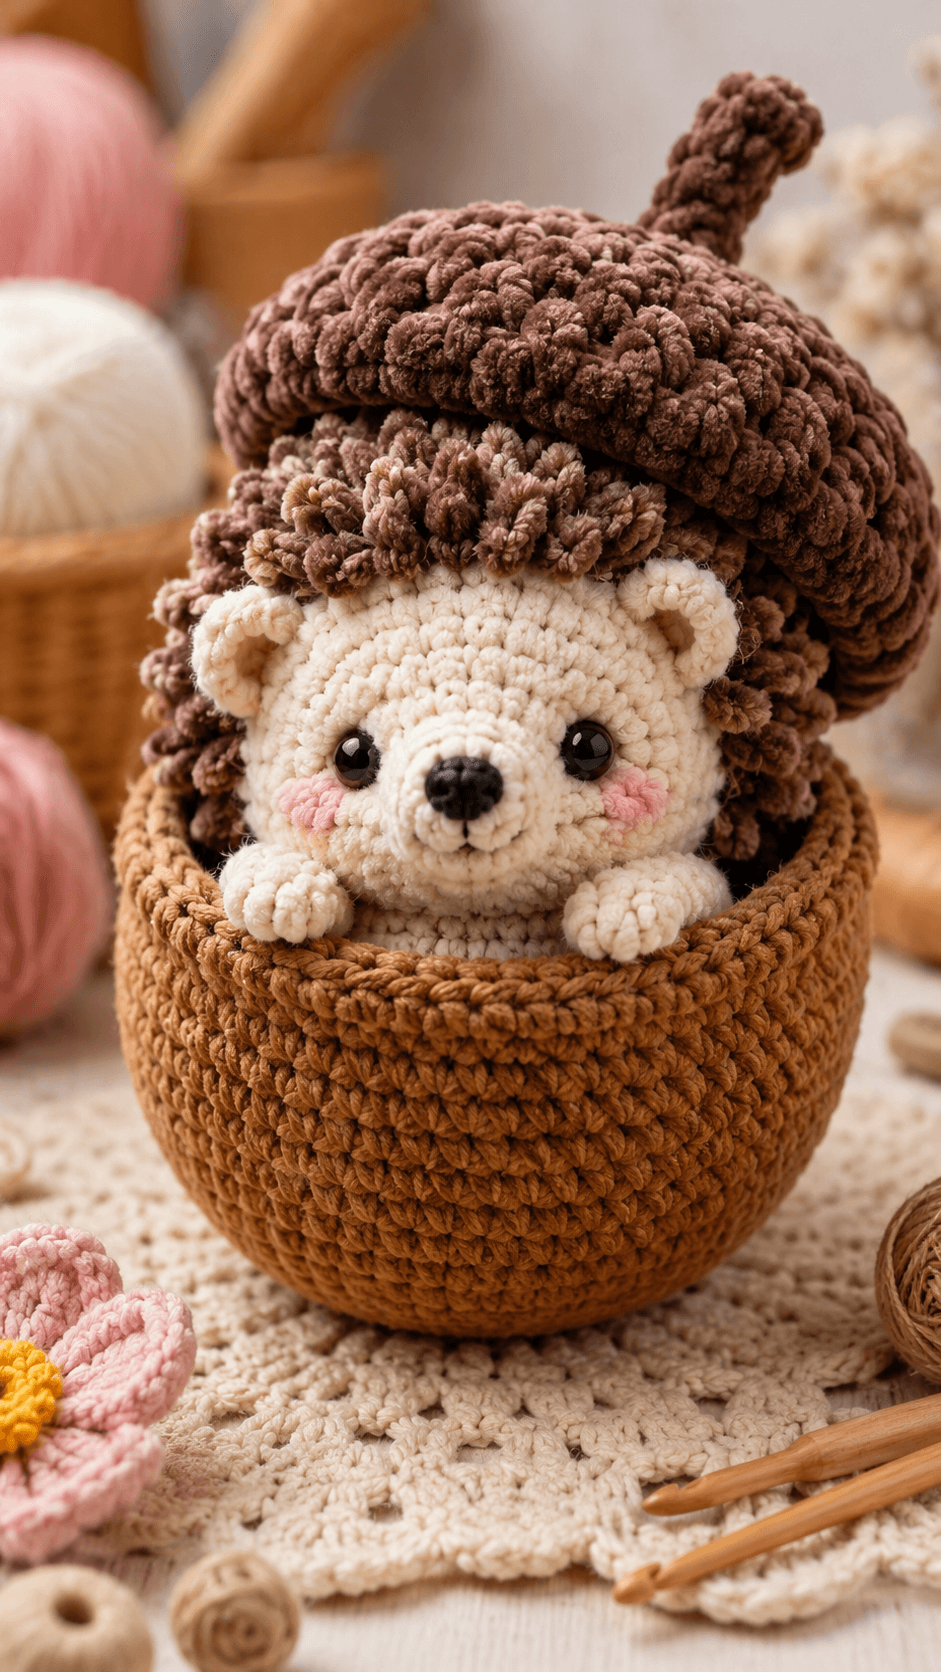
An acorn has to read as an acorn before the hedgehog face is even visible. This hedgehog crochet basket pattern builds the shell first, then adds a peeking plush face under a textured cap lid with stem. It uses mixed yarn textures, medium hook sizes, and a partial-body construction to keep the piece compact. Skill level: intermediate. The result works as woodland decor, gift packaging, or a small yarn and notions holder.
The Design: What Makes This Hedgehog Different
You are not making a standard plush hedgehog and dropping it into a bowl. The acorn shell controls the entire design. That changes the basket math, the visible body length, and the way the quills are handled. A normal hedgehog amigurumi needs a full back and full lower body. This one does not. Most of the torso stays hidden inside the acorn basket, so the visible character depends on head width, paw placement, and a tight line of textured quills under the cap. The lid matters just as much. If the cap is too flat, the piece looks like a brown hat. If it is too tall, the acorn shape disappears. A woodland hedgehog crochet build also needs smaller ears than a bear or mouse at the same scale. Large ears break the silhouette immediately. A common mistake is spacing the paws too far apart on the rim. That makes the face look dropped instead of peeking.
Project Info at a Glance
| Skill Level | Time | Finished Size | Hook | Best For |
|---|---|---|---|---|
| Intermediate | 6–8 hours | Approx. 20–24 cm overall | 4.5 mm body, 5.5–6 mm quills/cap | Woodland decor, nursery shelf, gift basket |
Materials and Tools
Yarn
- Warm brown — worsted or aran cotton/acrylic — approx. 130 g — for acorn basket body
- Dark brown textured yarn — chunky velvet or boucle — approx. 70 g — for acorn cap and quill fringe
- Cream — worsted — approx. 70 g — for face, ears, paws, and visible chest
- Pink — worsted — approx. 10 g — for cheek patches
- Black — small amount — for nose and mouth embroidery or crochet nose accent
Comparable hedgehog patterns in search results use both worsted builds with a 4.25 mm hook and chunky builds with a 6 mm hook, so this mixed-material approach fits the photographed look closely. :contentReference[oaicite:19]{index=19}
Tools
- Hook 4.5 mm for basket body and smooth face parts
- Hook 5.5 mm or 6 mm for textured cap and quills
- Safety eyes 10–12 mm
- Stuffing
- Tapestry needle
- Stitch markers
- Straight pins
- Scissors
Abbreviations
MR = magic ring, sc = single crochet, inc = increase, dec = decrease, sl st = slip stitch, ch = chain, BLO = back loop only.
Invisible decrease reduces bulk where the face narrows into the muzzle and where the lid stem tapers.
Pattern — Step by Step
Work in a continuous spiral unless noted. Use a stitch marker in the first stitch of every round.
Acorn Basket Body (Make 1)
Yarn: warm brown — standard open basket math
R1: 6 sc in MR (6)
R2: inc ×6 (12)
R3: (sc, inc) ×6 (18)
R4: (2 sc, inc) ×6 (24)
R5: (3 sc, inc) ×6 (30)
R6: (4 sc, inc) ×6 (36)
R7: (5 sc, inc) ×6 (42)
R8: (6 sc, inc) ×6 (48)
R9: (7 sc, inc) ×6 (54)
R10: (8 sc, inc) ×6 (60)
R11: BLO sc around (60)
R12-R24: sc around (60)
R25: (8 sc, dec) ×6 (54)
R26: sc around (54)
R27: sl st around loosely (54)
The slight narrowing near the top helps the rim hug the paws and face later.
Fasten off. Weave end inside.
Acorn Cap Lid (Make 1)
Yarn: dark brown textured yarn — custom shallow dome
R1: 6 sc in MR (6)
R2: inc ×6 (12)
R3: (sc, inc) ×6 (18)
R4: (2 sc, inc) ×6 (24)
R5: (3 sc, inc) ×6 (30)
R6: (4 sc, inc) ×6 (36)
R7: (5 sc, inc) ×6 (42)
R8: (6 sc, inc) ×6 (48)
R9: (7 sc, inc) ×6 (54)
R10-R12: sc around (54)
R13: BLO sc around (54)
R14: sc around (54)
Light stuffing is optional. The cap should sit with structure, not collapse flat.
Fasten off. Leave 35 cm tail.
Acorn Stem (Make 1)
Yarn: dark brown textured yarn
R1: 6 sc in MR (6)
R2-R5: sc around (6)
R6: (2 sc, dec) ×2 (4)
R7-R8: sc around (4)
Stuff lightly only at the base.
Fasten off. Leave 18 cm tail.
Head (Make 1)
Yarn: cream — standard amigurumi sphere
R1: 6 sc in MR (6)
R2: inc ×6 (12)
R3: (sc, inc) ×6 (18)
R4: (2 sc, inc) ×6 (24)
R5: (3 sc, inc) ×6 (30)
R6: (4 sc, inc) ×6 (36)
R7-R11: sc around (36)
R12: (4 sc, dec) ×6 (30)
R13: (3 sc, dec) ×6 (24)
Insert safety eyes between R8 and R9, about 8 stitches apart.
R14: (2 sc, dec) ×6 (18)
Stuff firmly.
R15: (sc, dec) ×6 (12)
R16: dec ×6 (6)
Fasten off. Leave 30 cm tail.
Muzzle (Make 1)
Yarn: cream — protruding snout
R1: 6 sc in MR (6)
R2: inc ×6 (12)
R3: (sc, inc) ×6 (18)
R4-R5: sc around (18)
Stuff lightly before sewing. This part should project forward but not droop.
Fasten off. Leave 25 cm tail.
Ears (Make 2)
Yarn: cream — based on small rounded hedgehog ear construction
R1: 4 sc in MR (4)
R2: inc ×4 (8)
R3: (sc, inc) ×4 (12)
Flatten and sc through both sides across 6 sts.
Fasten off. Leave 15 cm tail.
Front Paws (Make 2)
Yarn: cream
R1: 6 sc in MR (6)
R2: inc ×6 (12)
R3-R4: sc around (12)
Flatten and sc through both sides across 6 sts.
Fasten off. Leave 20 cm tail.
Body Insert / Chest Base (Make 1)
Yarn: cream — partial hidden torso
R1: 6 sc in MR (6)
R2: inc ×6 (12)
R3: (sc, inc) ×6 (18)
R4: (2 sc, inc) ×6 (24)
R5-R7: sc around (24)
R8: (2 sc, dec) ×6 (18)
R9: sc around (18)
Stuff lightly. This section props the head above the basket rim.
Fasten off. Leave 25 cm tail.
Quill Fringe (Make 1 section)
Yarn: dark brown textured yarn — custom looped quill layer based on photo
Cut 28 strands at 10 cm each if using smooth yarn, or 20 shorter textured strands if using boucle.
Attach along the top back edge of the head in two staggered rows.
Keep the fringe dense at the crown and shorter near the ears.
The quills should fill the gap between face and cap without hanging over the eyes.
Cheek Patches (Make 2)
Yarn: pink — flat circle
R1: 6 sc in MR (6)
R2: inc ×6 (12)
Sl st to close.
Fasten off. Leave 12 cm tail.
Nose (Make 1)
Yarn: black
R1: 6 sc in MR (6)
R2: sc around (6)
Fasten off. Leave 12 cm tail.
Assembly
- Sew the muzzle to the lower center of the head and attach the nose at the muzzle tip.
- Embroider a short vertical mouth line directly under the nose.
- Sew the ears low on the side of the head, keeping them small and slightly rounded outward.
- Attach the cheek patches below the eyes and outside the muzzle width.
- Sew the partial body insert under the head so the torso can sit down inside the basket opening.
- Sew the front paws to the upper front of the hidden torso, then tack the paw tops onto the basket rim so they rest over the edge.
- Add the quill fringe to the back and crown of the head, filling the space behind the ears.
- Place the finished hedgehog inside the acorn basket and anchor the torso to the inner back wall and base.
- Sew the acorn stem to the center top of the cap lid.
- Set the cap lid at a backward angle so the face remains visible and the acorn silhouette stays readable.
The piece is complete when the hedgehog head stays above the rim and the lid sits without covering the eyes.
7 Technical Tips
- Mark the BLO transition on the basket body. Miss that wall turn and the acorn shell will bell outward instead of rising vertically.
- Keep the muzzle lightly stuffed. Too much filling pushes the nose up and the hedgehog starts to read like a bear cub.
- Set the eyes before the quills go on. Once the textured fringe is attached, it becomes harder to judge an even 8-stitch spacing.
- Use a smaller hook for the smooth cream face than for the textured cap. Matching one large hook across both fabrics usually makes the face looser than the basket.
- Pin the paws on the rim before sewing. A shift of even 1 cm downward changes the expression from peeking to sinking.
- Do not let the cap lid sit flat on the head. Tilt it back enough that at least the full eye line and top half of the ears remain visible.
- Anchor the hidden torso to both the basket base and back wall. One anchor point is not enough, and the head will rotate after handling.
Conclusion
This hedgehog crochet basket pattern works because the acorn shape and the peeking face support each other instead of competing for attention. The basket provides the structure, the cap supplies the woodland cue, and the hedgehog only needs a controlled amount of visible body to read clearly. Comparable hedgehog patterns in current search results span smaller 13 cm designs through chunkier versions using 15 to 20 mm eyes and larger hooks, which makes this medium mixed-texture approach a practical middle ground. :contentReference[oaicite:20]{index=20} Next step: crochet the basket and cap first, then test head scale against the opening before making the paws. Share the finished piece on Pinterest and Instagram with #HedgehogAcornBasketPattern. Did your acorn cap still look balanced after the quill layer was attached?









