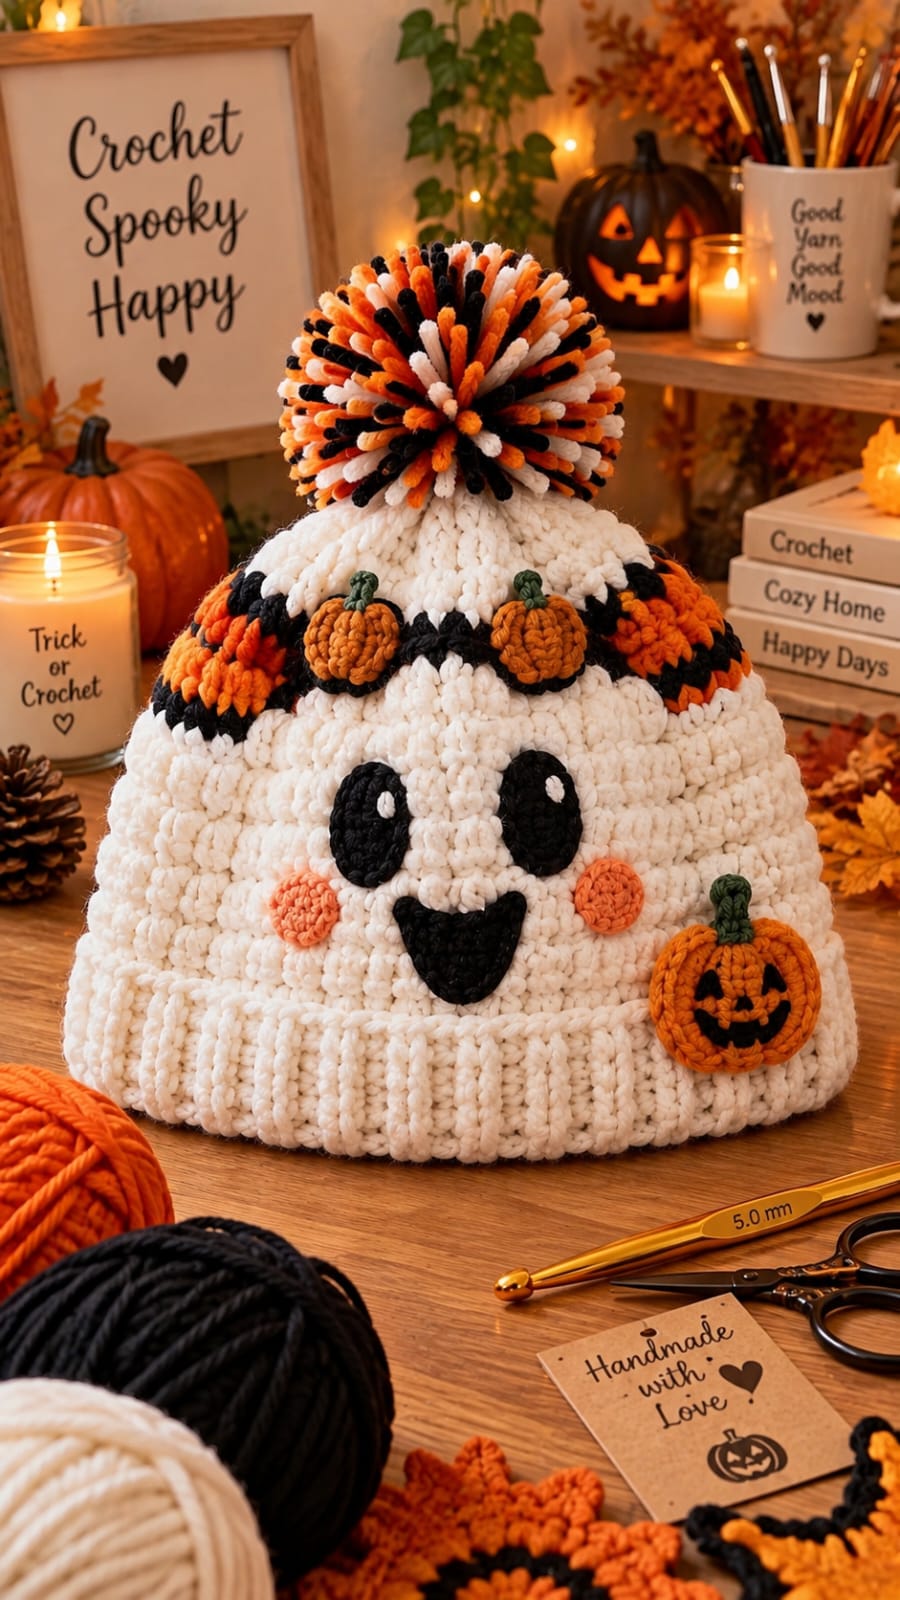
A ghost hat loses its expression if the black eyes sit even one stitch too far apart. This Halloween ghost crochet beanie pattern uses an ivory crown, ribbed brim, oversized appliqué eyes, smiling mouth, orange cheeks, pumpkin decorations and an orange-black-white pom-pom. The adult version targets a 20–22 inch head circumference and uses worsted/Aran yarn with a 5 mm hook. Intermediate skills are useful for shaping, appliqué placement and finishing.
The Design: What Makes This Ghost Beanie Different
The face occupies most of the lower crown rather than sitting near the top. Large vertical eyes create the ghost expression, while small white highlights stop the black appliqués from reading as flat patches. The mouth sits low between the cheeks so the expression remains visible above the ribbed brim.
A second structural feature is the decorative Halloween band. Orange and black motifs interrupt the ivory crown without competing with the face. Two dimensional pumpkin appliqués provide the strongest detail.
The crown finishes with an oversized tricolor pom-pom. Its diameter should be substantial enough to balance the broad face below.
The common mistake with a crochet ghost hat is attaching facial pieces before checking the hat on a rounded form. Flat-table placement can make the eyes appear too widely spaced when worn.
Project Info at a Glance
| Skill Level | Time | Finished Size | Hook | Best For |
|---|---|---|---|---|
| Intermediate | Approx. 5–7 hours | 20–22 in / 51–56 cm head circumference | 5.0 mm | Halloween costumes and seasonal wear |
Materials and Tools
Yarn
- Warm ivory — worsted/Aran #4 — approximately 150–180 g
- Black — worsted/Aran #4 — approximately 30–40 g
- Pumpkin orange — worsted/Aran #4 — approximately 40–50 g
- Dark green — worsted/Aran #4 — approximately 10 g
The ivory quantity includes a reserve for the brim and pom-pom. Exact consumption changes with gauge and pom-pom density, so keep part of the main skein uncut until finishing.
Tools
- 5.0 mm crochet hook
- 4.0 mm crochet hook for appliqués
- Tapestry needle
- Locking stitch marker
- Scissors
- Pom-pom maker approximately 10–12 cm
- Tape measure
- Round hat form or bowl for appliqué positioning
Abbreviations
- MR — magic ring
- ch — chain
- sc — single crochet
- hdc — half double crochet
- dc — double crochet
- inc — increase
- dec — decrease
- sl st — slip stitch
- BLO — back loop only
- st/sts — stitch/stitches
For an invisible decrease, insert the hook through the front loops of the next two stitches and complete one single crochet through both loops.
Pattern — Step by Step
The hat is constructed from the crown downward. The facial pieces and pumpkin motifs are made separately and sewn on after the main hat is complete.
Ghost Hat Crown
Yarn: warm ivory.
R1: 6 sc in MR. (6)
R2: Inc ×6. (12)
R3: (1 sc, inc) ×6. (18)
R4: (2 sc, inc) ×6. (24)
R5: (3 sc, inc) ×6. (30)
R6: (4 sc, inc) ×6. (36)
R7: (5 sc, inc) ×6. (42)
R8–R20: Sc around. (42)
Measure the crown after R20. The hat should reach approximately 16–17 cm from the crown center before the decorative band and brim are added.
Halloween Color Band
Yarn: ivory, orange and black.
R21: With ivory, sc around. (42)
R22: Change to black. Sc around. (42)
R23: Change to orange. Sc around. (42)
R24: Change to black. Sc around. (42)
R25: Return to ivory. Sc around. (42)
The pumpkins will later cover selected areas of this stripe, producing the more decorative band visible in the reference.
Lower Ghost Section
R26–R31: With ivory, sc around. (42)
Do not fasten off if the brim will be worked directly from the lower edge.
Ribbed Crochet Brim
The photographed hat has a broad vertical rib rather than a flat single-crochet edge.
From the final crown stitch, ch 9.
Row 1: Starting in second ch from hook, sc in 8 chains. Sl st into the next 2 crown stitches. Turn. (8)
Row 2: Skip the 2 sl sts. Sc BLO in 8 stitches. Ch 1, turn. (8)
Row 3: Sc BLO in 8 stitches. Sl st into the next 2 unworked crown stitches. Turn. (8)
Repeat Rows 2–3 around the complete lower edge.
When the first and final rib sections meet, slip stitch their corresponding loops together.
Fasten off and weave in the tail.
Large Black Ghost Eyes — Make 2
Yarn: black. Use the 4 mm hook.
R1: 6 sc in MR. (6)
R2: Inc ×6. (12)
R3: (1 sc, inc) ×6. (18)
R4: Sc in next 6, hdc in next 6, sc in final 6. (18)
Fasten off, leaving approximately 30 cm for sewing.
Gently stretch the circle vertically to create an oval approximately 5–6 cm high.
White Eye Highlights — Make 2
Yarn: ivory or white.
R1: 6 sc in MR. (6)
Fasten off.
For the smaller highlight shown in the photo, use only 4 sc in an MR.
Sew one highlight toward the upper inside area of each black eye.
Ghost Mouth
Yarn: black.
R1: 6 sc in MR. (6)
R2: Inc ×6. (12)
R3: (1 sc, inc) ×6. (18)
Fold the circle slightly so the upper edge forms a shallow curve.
Sew the folded edge to the hat first, then secure the lower curve to produce the open smiling mouth visible in the reference.
Fasten off with a 30 cm sewing tail.
Orange Cheek Patches — Make 2
Yarn: pumpkin orange.
R1: 6 sc in MR. (6)
R2: Inc ×6. (12)
R3: (1 sc, inc) ×6. (18)
Fasten off with a sewing tail.
These circles should measure approximately 3–4 cm across depending on gauge.
Pumpkin Appliqué — Make 2
Yarn: orange, green and black.
The pumpkin motifs are worked separately so they can be positioned after the hat has been fitted.
Pumpkin Body
R1: With orange, 6 sc in MR. (6)
R2: Inc ×6. (12)
R3: (1 sc, inc) ×6. (18)
R4: (2 sc, inc) ×6. (24)
Fasten off with a long sewing tail.
Gently compress the circle at the top and bottom while sewing so it forms a pumpkin-like oval rather than a perfect circle.
Pumpkin Stem
Join dark green yarn at the upper center.
Ch 5.
Starting in the second chain from the hook, sl st in each chain back toward the pumpkin.
Fasten off.
Jack-O’-Lantern Face
Using black yarn and a tapestry needle, embroider two small triangular eyes.
Add a tiny triangular nose.
Embroider a curved mouth with two small upward points to imitate the jack-o’-lantern expression in the reference.
Keep all black yarn ends on the back of the appliqué.
Optional Orange Floral Motifs for the Band
The reference contains additional orange textured areas between the pumpkin motifs.
With orange yarn:
R1: 6 sc in MR. (6)
R2: In each stitch work sl st, ch 2, 2 hdc, ch 2, sl st.
Repeat around to create six compact petals.
Fasten off with approximately 20 cm for sewing.
Make 4–6 motifs and place them around the black-and-orange band.
Large Halloween Pom-Pom
The pom-pom is a major proportion of the photographed hat rather than a small finishing detail.
Use a pom-pom maker approximately 10–12 cm in diameter.
Hold one strand each of orange, black and ivory yarn together.
Wrap the pom-pom maker densely until the center opening becomes difficult to fill.
Cut around the outer channel.
Tie the center with a doubled strand of strong yarn and make several tight knots.
Remove the pom-pom from the maker.
Trim only enough to produce a balanced sphere. Excessive trimming reduces the long multicolor strands that create the firework-like appearance.
Face Placement
Put the finished hat on a rounded hat form or bowl before pinning the face.
Position the eyes vertically with approximately 4–5 cm between their inner edges.
The lower ends of the eyes should sit several centimetres above the brim.
Place the mouth centrally beneath them.
Pin one orange cheek on each side of the mouth.
Step back and inspect the expression before sewing.
A difference of even one stitch in eye height can make the face appear tilted.
Pumpkin Placement
Pin one pumpkin appliqué toward the front-left section of the Halloween band.
Position the second toward the front-right section.
Leave enough space between them for the ghost face below to remain visually dominant.
Sew around the orange body perimeter using matching yarn.
Add several stitches through the green stem so it cannot fold downward during wear.
Assembly
- Complete the ivory crown, Halloween stripe and ribbed brim, then weave in all structural yarn tails.
- Place the hat over a rounded form and mark the vertical center of the front with a removable stitch marker.
- Pin both black eyes approximately 4–5 cm apart and check that their lower edges sit at the same height.
- Sew the white highlights to the eyes before permanently attaching the black eye pieces to the hat.
- Position the black smiling mouth beneath the eyes and attach it through the outer edge only.
- Add one orange cheek on each side of the mouth with equal spacing from the central face line.
- Pin the two pumpkin appliqués over the decorative stripe and attach their orange bodies and green stems.
- Add the optional orange floral motifs between the pumpkins if a denser Halloween band is required.
- Center the tricolor pom-pom over the crown and sew through the crown several times using a doubled yarn strand.
- Weave all remaining tails through at least 5 cm of matching fabric and inspect the finished face on a rounded form.
The completed hat should have a centered ghost expression, broad ribbed brim, contrasting Halloween stripe, two pumpkin appliqués and one oversized tricolor pom-pom.
7 Technical Tips for the Ghost Crochet Beanie
- Off-center face: mark the exact front center before attaching either eye. A one-stitch placement error becomes obvious once the mouth and cheeks are added.
- Widely spaced eyes: keep approximately 4–5 cm between their inner edges on the adult version. Larger spacing weakens the compact cartoon expression visible in the reference.
- Loose appliqués: sew around each pumpkin perimeter at intervals of approximately 5–8 mm. Large gaps allow the orange edge to curl away from the hat.
- Stretched brim: attach each rib to the next two available crown stitches without pulling the slip stitches tight. Excess tension produces a brim narrower than the crown.
- Unstable pom-pom: pass the attachment yarn through the crown at least four times before knotting inside. A 10–12 cm pom-pom places considerably more force on the crown than a small pom-pom.
- Distorted cheeks: sew only through the outer round of each orange circle. Pulling stitches across the center creates puckering and turns the flat circle into a cup.
- Visible yarn tails: weave black tails through black appliqués for at least 5 cm before trimming. Carrying black yarn through the ivory crown can create visible dark lines from the front.
Adjusting the Hat Size
Measure the intended wearer’s head around the widest point above the ears.
The photographed proportions suit an adult-style beanie, and published ghost hat patterns include approximately 20–22 inch adult sizing.
For a smaller hat, use a thinner yarn or reduce the crown diameter before beginning the straight rounds.
For a larger hat, add another standard increase round before working the crown sides.
Do not judge size from the ribbed brim alone. The crown circumference controls the fit, while the brim adds elasticity around the lower edge.
Making the Ghost Face Read Clearly
The black components need strong separation from the decorative band.
Keep the eyes entirely within the ivory section of the hat rather than allowing their upper edges to overlap the black stripe.
Place the cheeks near the mouth, not directly beneath the eyes.
The white highlights should occupy only a small part of each black eye. Oversized highlights reduce the black area and alter the expression.
After pinning the complete face, rotate the hat approximately 30 degrees in each direction. The expression should remain readable from both angles.
Making the Ribbed Brim Fit Correctly
Back-loop single crochet creates the vertical ridges visible around the lower edge.
Keep every rib row at eight stitches unless deliberately changing brim depth.
Do not add extra rows simply because the brim appears short while unstretched. Ribbing expands substantially when worn.
Before joining the final rib to the first, wrap the unfinished brim around the lower crown without stretching it aggressively.
If it reaches comfortably, complete the seam. If it pulls the crown inward, redo the last several attachment rows with looser tension.
Making the Pumpkin Appliqués
Small crochet pumpkins work best when their outer edge remains compact.
Use the smaller 4 mm hook even though the main hat uses 5 mm. The tighter gauge gives the pumpkin enough structure to sit flat against the crown.
Current pumpkin appliqué patterns commonly use worsted-weight yarn and hooks around 4–5 mm, making that combination suitable for this decorative scale.
After crocheting each orange circle, pinch the top and bottom slightly during attachment. That minor distortion creates a more recognizable pumpkin silhouette without adding complicated shaping rounds.
Making the Oversized Pom-Pom
Distribute orange, black and ivory wraps throughout the pom-pom rather than wrapping each color in one separate section.
Mixed wraps create the scattered Halloween color effect visible in the reference.
Tie the center before removing the yarn from the pom-pom maker.
Use a separate doubled yarn strand for attachment rather than relying on one of the trimmed pom-pom strands.
After sewing it to the crown, shake the hat once and inspect the base. The pom-pom should move with the crown rather than pivot independently.
Choosing Yarn for This Halloween Hat
Worsted or Aran yarn is the most practical choice for reproducing the proportions while maintaining wearable flexibility. Existing ghost-hat patterns document both weights with 5–5.5 mm hooks.
Choose a smooth yarn for the facial appliqués. Heavy fuzz obscures the edges of the eyes and jack-o’-lantern embroidery.
Use warm ivory rather than bright optical white for the photo-inspired palette.
A saturated pumpkin orange provides the strongest contrast against both ivory and black, while dark forest green keeps the tiny stems visible without introducing another dominant color.
Finishing the Halloween Ghost Beanie
Place the completed hat on a rounded form for the final inspection.
Check that both eyes are vertical, the cheeks sit at matching heights and the mouth remains centered between them.
Next, inspect the decorative band. Both pumpkin appliqués should be visible from the front without crowding the ghost face.
Pull the ribbed brim downward gently and confirm that no appliqué stitches restrict the crown.
Finally, check the pom-pom attachment from inside the hat. Knot the attachment strands securely and weave them through several crown stitches before trimming.
Final Notes
Finish the complete hat before permanently sewing the facial pieces. A crochet crown curves differently on a head than it does on a table, so final eye and mouth placement should be judged on a rounded form. Keep the pumpkin motifs secondary to the face and reserve the strongest orange-black-white mixture for the pom-pom.
Once the Halloween ghost crochet beanie pattern is complete, photograph the hat from the front and slightly above so both the face and oversized pom-pom remain visible. Save the finished version to Pinterest or share it on Instagram with #GhostPumpkinCrochetBeanie. For this specific ghost, would you keep the smiling mouth or replace it with a small surprised oval?









