Introduction
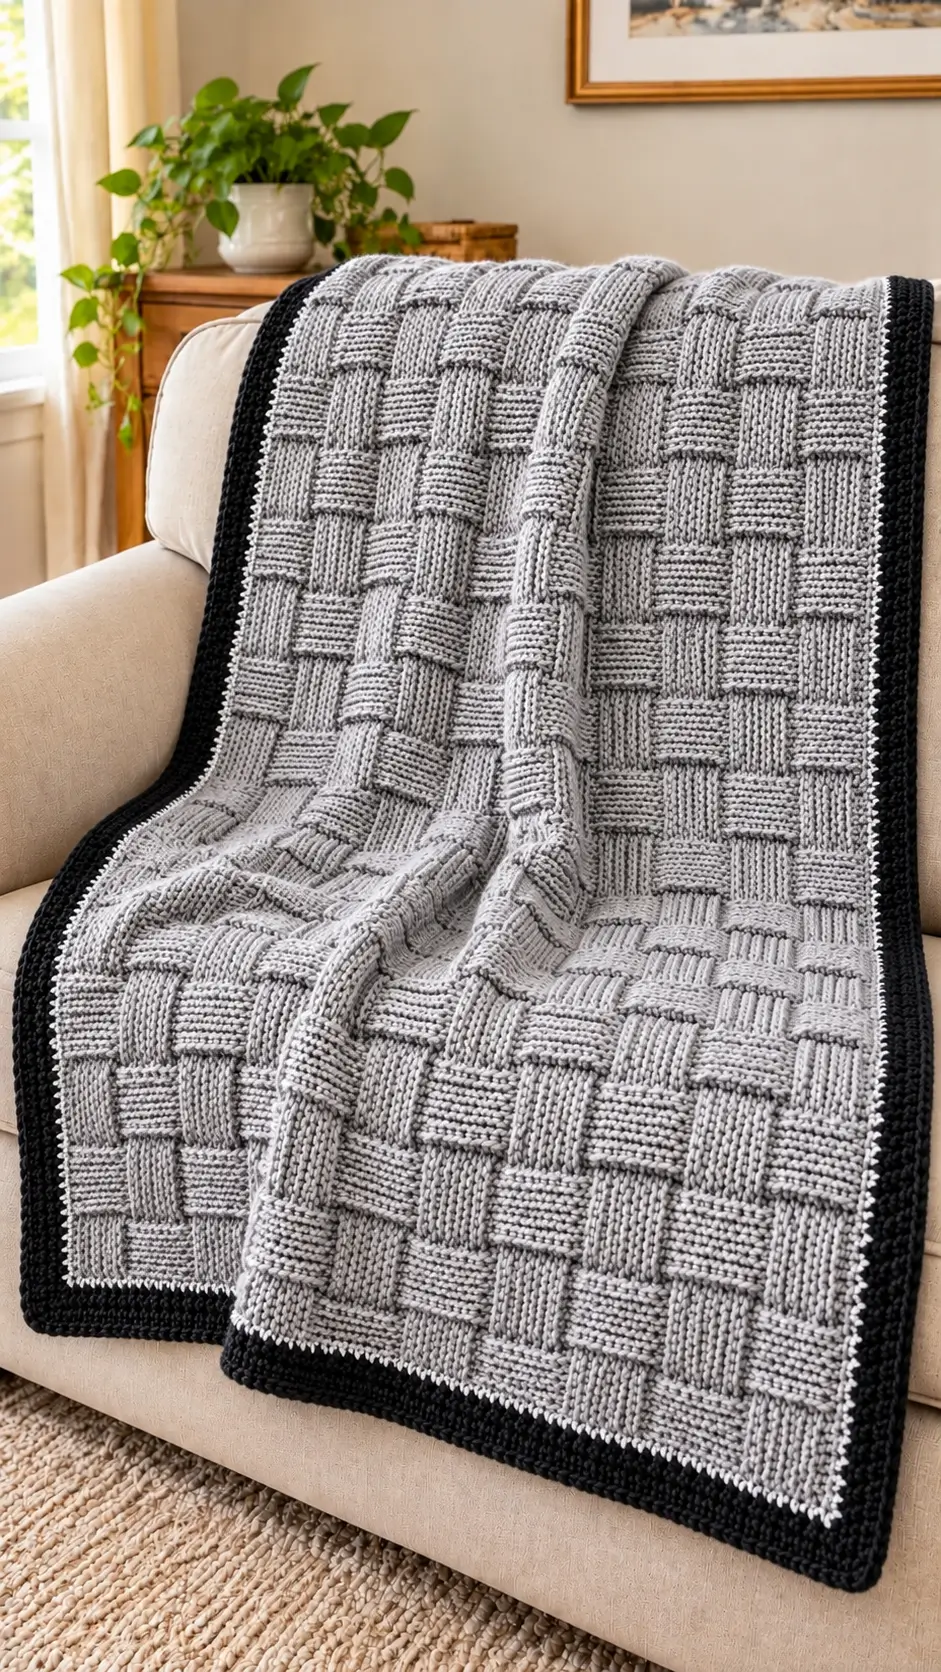
The blanket in the reference photo uses a narrow white line to separate its grey basketweave grid from a substantial black frame. This basketweave crochet blanket pattern translates those visible features into a flat, row-worked design using worsted-weight yarn, a 5 mm hook, and three colors. The planned finished size is approximately 105–110 × 125–135 cm after edging. Intermediate crochet skills are recommended because the panel requires front-post and back-post stitches.
The Design: What Makes This Grey Throw Different
The central panel uses alternating raised and recessed stitch groups to form a woven-looking grid without sewing individual squares. Eight-stitch blocks provide a larger texture than the small four-stitch basketweave commonly used for scarves. Each group stays in place for six rows before the raised direction changes; this produces clearly separated rectangular sections on a grey crochet throw blanket.
A single off-white round acts as a visual separator, while several black rounds form a heavier outer frame. This reflects the photo more closely than a one-color textured crochet blanket with a matching edge. Contrast exposes uneven border tension. A frequent mistake is placing too many single crochets along the long sides, creating waves even when the center panel is flat. You will control that spacing through a washed gauge swatch and corner checks.
Project Info at a Glance
| Project Detail | Specification |
|---|---|
| Skill Level | Intermediate |
| Estimated Finished Size | 105–110 × 125–135 cm, depending on gauge |
| Crochet Hook | 5 mm (US H) |
| Yarn Weight | #4 Medium / Worsted |
| Construction | Flat rows with worked border |
| Main Technique | Front-post and back-post double crochet |
| Colors | Heather Grey, Off-White, Black |
| Best For | Sofa throw, chair blanket, home decor |
Note: The dimensions are estimated. They must be confirmed with a completed gauge swatch and finished blanket.
Materials and Tools
Yarn
- Heather Grey – Worsted Weight – Approximately 1,200–1,350 g: Suggested yarn: Lion Brand Heartland in a grey shade such as Mount Rainier. This is the main yarn for the basketweave body.
- Off-White – Worsted Weight – Approximately 60 g: Suggested yarn: Lion Brand Heartland White Sands or another compatible neutral yarn. This creates the narrow contrast separator.
- Black – Worsted Weight – Approximately 200 g: Suggested yarn: Lion Brand Heartland Black Canyon. This creates the outer border.
These quantities are purchasing estimates for the proposed design rather than measured consumption. Purchase yarn from the same dye lot whenever possible. Basketweave fabric often consumes more yarn than ordinary double crochet because post stitches wrap around the underlying stitches and produce greater thickness.
Tools
- 5 mm crochet hook (US H), adjusted if necessary after checking gauge.
- Six locking stitch markers for corners and row tracking.
- Tapestry needle for weaving in yarn ends.
- Sharp scissors for cutting yarn.
- Measuring tape for checking width and length.
- Row counter for tracking the six-row texture sections.
- Digital kitchen scale for estimating yarn consumption from a sample.
Gauge and Finished Size
Gauge is especially important when working with basketweave stitches. Front-post and back-post double crochets create a dense fabric, and individual crocheting tension changes the finished width substantially.
A comparable published basketweave project using worsted-weight yarn and a 5 mm hook reports approximately 16 post stitches and eight rows per 10 cm. This is a reference measurement rather than a tested gauge for the specific pattern below.
The proposed blanket contains 160 basketweave stitches between two ordinary edge stitches. The foundation row contains 162 double crochets, with a starting chain of 164.
At a stitch gauge of approximately 16 stitches per 10 cm, the main panel approaches 102 cm in width before the border. The completed size may reach approximately 105–110 cm wide, depending on the finished edging and individual tension.
How to Make a Gauge Swatch
- Chain enough stitches to work at least 24 stitches across.
- Work one foundation row of double crochet.
- Continue the basketweave stitch pattern for at least 16 additional rows.
- Wash the sample according to the yarn label.
- Allow it to dry completely on a flat surface.
- Measure a central 10 cm square without stretching the fabric.
- Compare the result with the intended dimensions.
If the sample contains more stitches per 10 cm than expected, the blanket will be narrower. If it contains fewer stitches, the finished panel will be wider.
To change the width while retaining complete basketweave sections, use the foundation-chain formula:
Foundation chain = 16 × N + 4
Here, N represents the number of paired eight-stitch blocks across the blanket. The sample below uses N = 10, giving a foundation chain of 164 and 162 stitches per completed row.
Crochet Abbreviations
- ch: Chain
- sc: Single crochet
- dc: Double crochet
- FPdc: Front-post double crochet
- BPdc: Back-post double crochet
- sl st: Slip stitch
- st: Stitch
- sts: Stitches
- rep: Repeat
- RS: Right side
- WS: Wrong side
- rnd: Round
All instructions use US crochet terminology. The turning chain of two does not count as a stitch in the textured rows. The three skipped chains at the beginning of Row 1 count as the first double crochet.
Understanding the Basketweave Crochet Stitch
The basketweave crochet stitch creates the appearance of overlapping strips of woven fabric. Its raised blocks are produced through groups of front-post and back-post double crochet stitches.
Front-Post Double Crochet (FPdc)
Yarn over and insert the hook from front to back, then back to front, around the vertical post of the next stitch. Yarn over, pull through, and complete the double crochet normally.
The resulting stitch projects toward the working side of the fabric, creating a visible raised ridge.
Back-Post Double Crochet (BPdc)
Yarn over and insert the hook from back to front, then front to back, around the vertical post of the next stitch. Yarn over, draw through, and complete the double crochet normally.
This stitch projects toward the opposite side and creates a recessed appearance on the working face.
Alternating these two stitch types produces the characteristic basketweave texture. Changing the stitch-group order after several rows makes the blocks appear to switch direction.
For this design, each raised section contains eight stitches. Six consecutive rows create one band before the arrangement changes.
Basketweave Crochet Blanket Pattern – Step by Step
Construction: Work the main grey panel in turned rows. After completing the rectangular panel, crochet the off-white separator and black outer border around all four edges.
The main blanket is not worked in a continuous spiral.
Part 1: Main Grey Blanket Panel
Yarn: Heather Grey – Worsted Weight.
Foundation: Chain 164.
Row 1: Work 1 dc into the fourth chain from the hook. Continue working 1 dc into every remaining chain. Turn. The first three skipped chains count as one dc. (162 sts)
Row 2: Ch 2, dc in the first stitch. Work *FPdc around the next 8 stitches, BPdc around the next 8 stitches*. Repeat from * to * 10 times total. Work 1 dc in the final stitch. Turn. (162 sts)
Row 3: Repeat Row 2, maintaining the same groups of eight FPdc and eight BPdc stitches. Turn. (162 sts)
Row 4: Repeat Row 2. (162 sts)
Row 5: Repeat Row 2. (162 sts)
Row 6: Repeat Row 2. (162 sts)
Row 7: Repeat Row 2. (162 sts)
At the end of Row 7, the first six-row textured band is complete. Place a stitch marker at the edge of the final row to record the band boundary.
Part 2: Create the Alternating Basketweave Blocks
The next six rows reverse the order of the raised and recessed groups.
Row 8: Ch 2, dc in the first stitch. Work *BPdc around the next 8 stitches, FPdc around the next 8 stitches*. Repeat from * to * 10 times total. Work 1 dc in the final stitch. Turn. (162 sts)
Row 9: Repeat Row 8. (162 sts)
Row 10: Repeat Row 8. (162 sts)
Row 11: Repeat Row 8. (162 sts)
Row 12: Repeat Row 8. (162 sts)
Row 13: Repeat Row 8. (162 sts)
Rows 2–13 form one complete 12-row basketweave repeat.
The texture now consists of two alternating six-row bands. The front-post groups in one band correspond to back-post groups in the next, producing the overlapping woven appearance.
Part 3: Continue the Basketweave Repeat
Rows 14–25: Repeat Rows 2–13. (162 sts per row)
Rows 26–37: Repeat Rows 2–13. (162 sts per row)
Rows 38–49: Repeat Rows 2–13. (162 sts per row)
Rows 50–61: Repeat Rows 2–13. (162 sts per row)
Rows 62–73: Repeat Rows 2–13. (162 sts per row)
Rows 74–85: Repeat Rows 2–13. (162 sts per row)
Rows 86–97: Repeat Rows 2–13. (162 sts per row)
After Row 97, the main panel contains one foundation row and 96 textured rows. This equals eight complete 12-row pattern repeats.
Check the stitch count at the beginning and end of each basketweave band. The count must remain at 162 stitches throughout the panel.
Fasten off the grey yarn, leaving approximately 15 cm for weaving in.
Lay the blanket flat and inspect the corners. If additional length is required, add complete 12-row repeats before working the edging.
How to Crochet the White and Black Blanket Border
The reference blanket uses a narrow white dividing line between the grey body and a thick black frame. This border treatment defines the outer shape while emphasizing the raised basketweave structure.
Part 4: Off-White Separator Border
Yarn: Off-White – Worsted Weight.
Round 1: Attach the off-white yarn at any corner using a slip stitch. Ch 1 and work sc evenly around all four sides of the blanket.
Across the top and bottom edges, begin with one sc for each stitch of the final or foundation row. Each short edge therefore has 162 stitch positions before corner adjustments.
Along the long sides, begin with approximately two sc around each row end, then adjust the spacing according to the fabric’s actual row height.
Work 3 sc into each corner position to create the turn. Join to the first sc with a sl st.
The exact border count depends on the long-side pickup spacing. Do not force a predetermined total if it makes the edging ripple or gather.
Fasten off the off-white yarn, leaving a 15 cm tail.
Part 5: Black Outer Border
Yarn: Black – Worsted Weight.
The outer border is worked in four rounds of single crochet. Maintain the same stitch spacing along the sides and increase at the four corners.
Round 2: Join black yarn at one marked corner. Ch 1, then work sc into each stitch around. Work 3 sc in the center stitch of each corner group. Join with sl st.
Round 3: Ch 1, sc into every stitch around. Work 3 sc in the center stitch of each corner. Join with sl st.
Round 4: Repeat Round 3, placing 3 sc into each marked corner center. Join with sl st.
Round 5: Repeat Round 3 once more. Join with sl st and fasten off.
Leave a 15 cm tail for weaving in. When a border round is worked with one stitch into every existing stitch and three stitches into each of the four corner centers, the total increases by eight stitches.
The completed black border should rest flat around the entire perimeter. If it begins curling inward, check for overly tight stitches or insufficient pickup stitches along the sides. If it develops waves, remove excess stitches from the first edging round before continuing.
Assembly and Finishing Instructions
- Position the blanket: Place the completed grey panel on a clean, flat surface with the final row at the top.
- Check stitch counts: Confirm that the top and bottom edges each contain 162 working stitches.
- Mark the corners: Place stitch markers at all four corners before beginning the border.
- Inspect the texture: Smooth the raised basketweave sections without stretching the fabric.
- Add the white separator: Crochet the narrow off-white round around the perimeter.
- Begin the black border: Work the first black round while keeping the corner groups correctly positioned.
- Complete the frame: Crochet the remaining three black rounds, checking the edges after each round.
- Weave in yarn ends: Use a tapestry needle to secure the remaining tails through matching-color stitches in more than one direction.
- Wash and dry: Follow the yarn manufacturer’s care instructions. Dry flat to preserve the rectangular shape.
- Measure the finished blanket: Record the actual width, length, and yarn consumption after the fabric has dried completely.
The completed blanket has a textured grey center, a narrow white separator, and a structured black outer frame.
7 Technical Tips for a Better Basketweave Blanket
- Track the six-row bands: Use a removable marker after every sixth textured row. Accidentally changing the stitch-group order after five or seven rows produces uneven blocks.
- Work around the posts correctly: Insert the hook around the vertical post rather than through the top loops when making FPdc or BPdc stitches. Incorrect insertion flattens the texture and interrupts the woven appearance.
- Maintain the edge count: Keep one ordinary dc at each end of every textured row. Counting the turning ch-2 as an additional stitch can gradually increase the width.
- Check your gauge: Measure at least 16 post stitches in the center of a washed swatch. A tighter gauge produces a narrower and denser blanket than the calculated sample size.
- Control border rippling: Start with approximately two sc per row end along the long sides. Remove excessive pickup stitches if the white separator develops waves.
- Shape the black corners: Work three stitches into the central corner stitch on every round. Missing these increases can cause the outer frame to pull inward and round the corners.
- Secure the yarn tails: Leave approximately 15 cm when fastening off and weave the ends through multiple stitches in more than one direction. Short, unsecured tails may loosen during washing.
Frequently Asked Questions
Can beginners crochet a basketweave blanket?
This particular blanket is better suited to crocheters who already understand double crochet and basic row construction. The main challenge is distinguishing front-post double crochet from back-post double crochet while maintaining consistent groups of eight stitches.
Practice both stitches on a small sample before starting the full-width foundation chain. Once the stitch placement becomes familiar, the project relies on predictable repeated rows rather than complicated shaping.
Can I use bulky yarn instead of worsted weight?
Yes, but changing yarn weight affects stitch width, row height, texture definition, and total yarn consumption.
A bulky-weight version generally requires a larger hook and a smaller foundation stitch count for the same dimensions. Make a gauge swatch before adjusting the pattern. The proposed chain count of 164 is intended for the documented worsted-weight reference gauge.
How do I make the basketweave blanket wider?
Increase the number of complete paired eight-stitch blocks. Use the foundation formula of 16 × N + 4 chains.
For example, setting N to 12 creates a foundation chain of 196 and produces 194 working stitches per row. This adds two complete pairs of woven blocks without interrupting the structure.
Why do my basketweave blocks look uneven?
Uneven blocks usually result from inconsistent tension, misplaced post stitches, or changes in the stitch sequence.
Each textured group must contain eight stitches. Maintain the same group order for six consecutive rows before reversing it. Check both edges at the end of every band to detect accidental increases or decreases.
Can I change the black border to another color?
Yes. Dark charcoal, navy, and espresso brown can create a comparable frame around the light grey panel.
The reference design relies on contrast between the central body, the narrow off-white separator, and the outer border. Keep the three yarn shades visually distinct if you want to retain the same framed appearance.
How much yarn does a basketweave blanket use?
Yarn consumption depends on finished dimensions, yarn thickness, hook size, stitch tension, and border width.
For planning, this untested version allows approximately 1,200–1,350 g of grey yarn, 60 g of off-white yarn, and 200 g of black yarn. Actual consumption may be different.
For a more accurate calculation, weigh a washed gauge swatch, calculate the proposed main-panel area, and estimate its total yarn requirement from the sample weight. Estimate the border separately.
Can I make the blanket longer?
Yes. Add complete 12-row basketweave repeats before beginning the border.
Each repeat contains six rows of the first stitch arrangement and six rows of the reversed arrangement. Adding complete repeats preserves the repeated woven-block structure throughout the blanket.
How should I wash a textured crochet blanket?
Follow the care instructions printed on the yarn label. Washing methods differ between acrylic, wool, cotton, and blended yarns.
Avoid excessive heat and unnecessary stretching. Dry the blanket flat when possible, arrange the corners into a rectangle, and allow the fabric to settle before measuring.
Pattern Notes and Technical References
This is an independently drafted, photograph-inspired interpretation. It is not a verified reconstruction of the original blanket or a physically tested finished pattern.
Its basketweave method is based on standard front-post and back-post double crochet construction. Comparable published patterns were consulted for stitch techniques, yarn specifications, and reference measurements.
- Extended Basket Weave Blanket – Purpleneedle
- Basketweave Stitch Blanket – Jo to the World
- Basketweave Crochet Stitch Reference – Floss Field
- Heartland Yarn Specifications – Lion Brand
Before publishing this design as tested, confirm the gauge, finished dimensions, border placement, and measured yarn consumption with a completed sample.
Conclusion
The grey basketweave panel, narrow white separator, and four-round black frame produce a visually defined throw without joining separate motifs. This basketweave crochet blanket pattern keeps the working count constant at 162 stitches per row and uses complete 12-row texture cycles, making progress easier to check. Before publishing finished-project measurements, crochet and wash a gauge swatch, then verify the width of the first two pattern bands. Photograph the central weave and all four border corners for a Pinterest pin, and share the completed throw on Instagram using #GreyBasketweaveThrow. When comparing your result with the reference image, does the white separator read clearly enough against the grey panel and black outer frame?









