Introduction
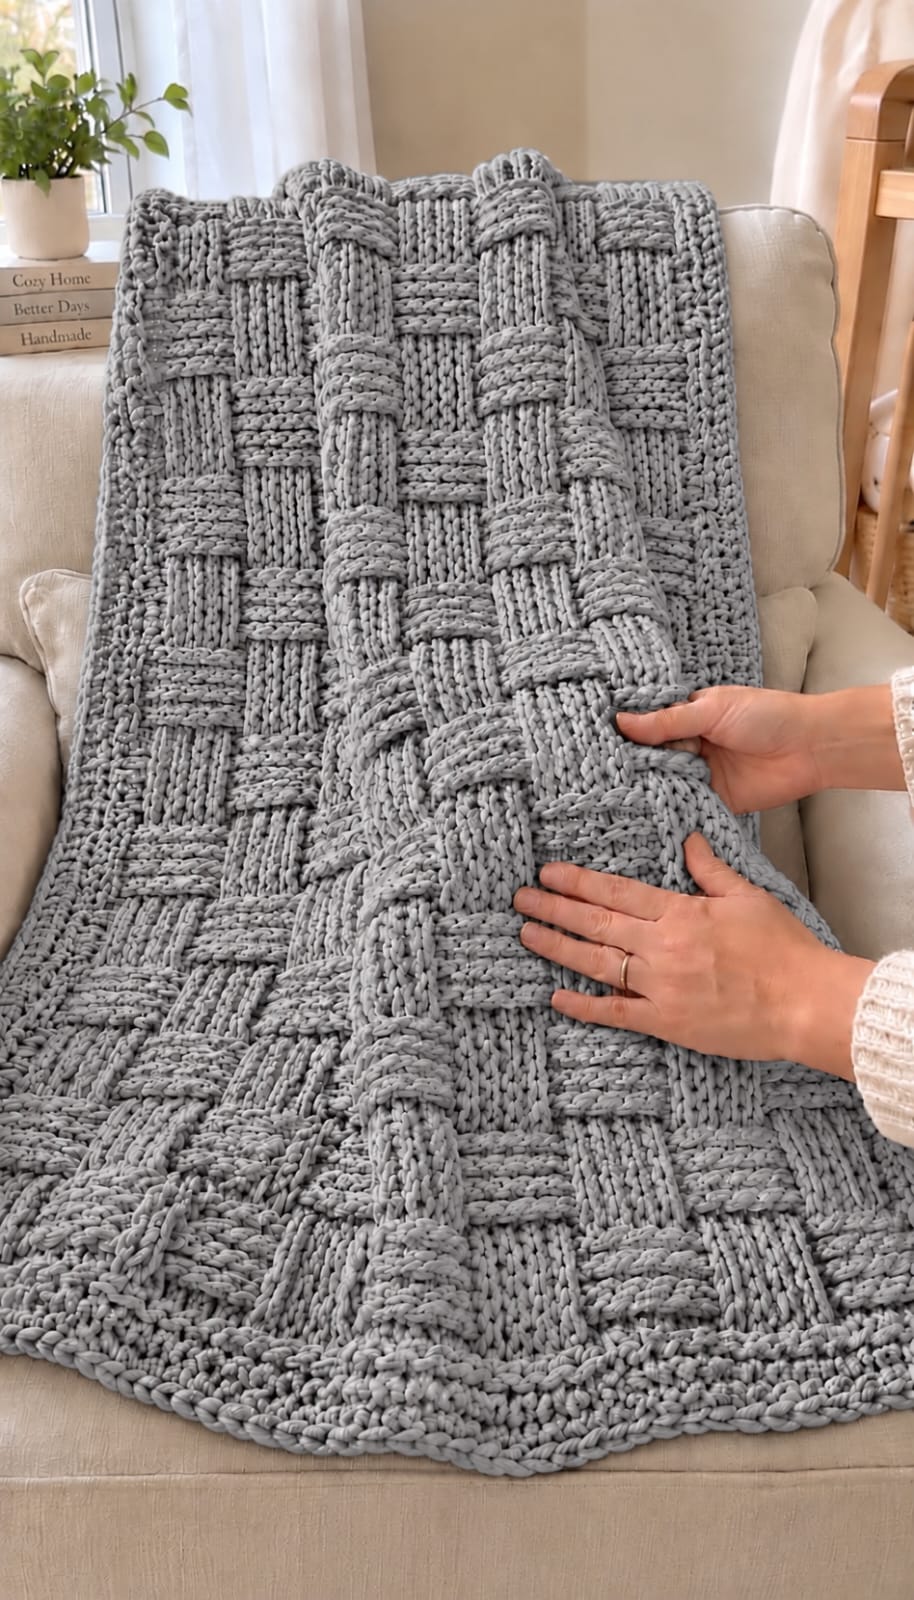
Gray exposes every misplaced basket block because there is no color change available to disguise a broken over-under sequence. This gray chunky basket weave crochet blanket pattern uses super-bulky yarn, a 9 mm hook, and alternating front-post and back-post double crochet to make an approximately 127 × 145 cm throw. The intermediate one-color construction is designed for sofas, armchairs, and substantial lap blankets.
The Design: What Makes This Gray Basket Weave Blanket Different
The photographed blanket uses unusually broad woven-looking sections rather than a fine basketweave texture. Six post stitches form each half of a 12-stitch unit, creating substantial vertical and horizontal-looking blocks. Direction reverses after four rows so the dimensions remain close to square at the verified gauge. That proportion matters: six stitches at eight stitches per 10 cm measure about 7.5 cm, while four rows at five rows per 10 cm measure about 8 cm.
Light gray also changes how the texture reads. Raised stitches catch light while recessed posts form darker channels, making a chunky basket weave blanket visually clear without multiple yarn colors. The common failure is shifting one six-stitch group at a reversal. The total stitch count can remain correct while the woven grid becomes visibly misaligned.
Project Info at a Glance
| Skill Level | Time | Finished Size | Hook | Best For |
|---|---|---|---|---|
| Intermediate | Approx. 12–18 hours | Approx. 127 × 145 cm | 9 mm | Sofa throw, armchair blanket, large lap blanket |
A published Yarnspirations Basket Weave Crochet Blanket uses super-bulky Bernat Blanket Tweeds, a 9 mm hook, and a gauge of 8 stitches × 5 rows per 10 cm. Its finished measurement is approximately 127 × 144.5 cm and its listed yarn requirement is 1,573–1,609 m.
Materials and Tools
Yarn
- Light gray / silver gray — super bulky #6 — approximately 1,573–1,609 m (1,720–1,760 yd)
- Weight benchmark — approximately 2,400 g when using eight 300 g balls comparable to Bernat Blanket Tweeds
- Border reserve — keep approximately 150–200 m unused until the main field is complete
The verified Yarnspirations version specifies eight 300 g balls at 220 yd per ball. A separate chunky basketweave design by Michele Webb uses super-bulky Bernat Blanket, an 8 mm hook, 1,460–1,540 yd, and approximately 75 oz of yarn for a 55 × 45 inch blanket.
Tools
- 9 mm crochet hook
- 10 mm crochet hook — optional for the foundation chain
- Large tapestry needle
- 9 locking stitch markers
- Scissors
- Tape measure
Abbreviations
- ch — chain
- sc — single crochet
- hdc — half double crochet
- dc — double crochet
- FPdc — front post double crochet
- BPdc — back post double crochet
- sl st — slip stitch
- st/sts — stitch/stitches
An invisible decrease is not required because this blanket maintains a constant stitch count from the lower edge to the upper edge.
Gauge
Target 8 stitches × 5 rows = 10 × 10 cm in the established basketweave pattern.
Do not measure only ordinary double crochet. Post stitches use a different amount of yarn and create a different fabric depth.
Make a swatch containing at least two six-stitch blocks. Measure it after the fabric has rested flat for several minutes.
At the target gauge, six stitches measure approximately 7.5 cm. Four rows measure approximately 8 cm. This is why the pattern uses four-row direction sections rather than five-row blocks.
Pattern — Step by Step
Use US crochet terminology. Work the blanket flat in rows. Turning chains do not count as stitches.
Foundation
The main field contains eight complete 12-stitch basketweave units plus two edge stitches.
1 + (12 × 8) + 1 = 98 stitches.
Ch 101.
Row 1: Dc in fourth chain from hook and in every remaining chain. (98 dc)
The three skipped chains do not count as a stitch.
Place one marker after the first edge stitch, then another marker after every 12-stitch repeat. Place the final marker before the last edge stitch.
Basket Weave Section A
Row 2
Ch 2, turn.
Dc in first stitch.
*FPdc around each of the next 6 stitches, BPdc around each of the next 6 stitches.*
Repeat from * to * eight times.
Dc in final stitch. (98 sts)
Row 3
Ch 2, turn.
Dc in first stitch.
*FPdc around next 6 stitches, BPdc around next 6 stitches.*
Repeat eight times.
Dc in final stitch. (98 sts)
Row 4
Repeat Row 3. (98 sts)
Row 5
Repeat Row 3. (98 sts)
The first four-row direction section is complete.
Basket Weave Section B
Row 6
Ch 2, turn.
Dc in first stitch.
*BPdc around each of the next 6 stitches, FPdc around each of the next 6 stitches.*
Repeat from * to * eight times.
Dc in final stitch. (98 sts)
Row 7
Repeat Row 6. (98 sts)
Row 8
Repeat Row 6. (98 sts)
Row 9
Repeat Row 6. (98 sts)
The first complete over-under cycle is finished.
Continue the Main Field
Rows 10–13: Repeat Section A. (98)
Rows 14–17: Repeat Section B. (98)
Rows 18–21: Repeat Section A. (98)
Rows 22–25: Repeat Section B. (98)
Continue alternating four-row Section A and Section B blocks until the main field measures approximately 137–140 cm long.
Stop only after a complete four-row section.
The border will add the remaining length needed to approach the approximately 145 cm finished target.
Final Stabilizing Row
Ch 1, turn.
Hdc in every stitch across. (98 hdc)
Do not fasten off.
Lay the blanket flat before beginning the border. Measure the upper, middle, and lower widths. Large differences should be corrected before more yarn is added.
How the Woven Texture Is Created
No separate strips are made or physically woven together.
Front-post double crochet wraps around the vertical post of the stitch below from the front. The completed stitch projects toward the viewer.
Back-post double crochet wraps around the post from behind. That stitch recedes.
Six raised posts beside six recessed posts create one pair of contrasting blocks.
After four rows, those positions reverse.
The former raised section recedes while the neighboring section moves forward. Repeating that sequence across the entire field produces the oversized basket structure visible in the gray blanket.
Front Post Double Crochet
Yarn over.
Insert the hook from front to back beside the next stitch post.
Bring the hook around the back of the post and return it to the front.
Yarn over and draw up a loop.
Yarn over and pull through two loops.
Yarn over again and pull through the final two loops.
Keep the loop height relaxed. Short FPdc stitches can pull the raised blocks vertically.
Back Post Double Crochet
Yarn over.
Insert the hook from the back toward the front beside the next stitch.
Pass the hook around the front of the post and return it to the back.
Yarn over and draw up a loop.
Complete the double crochet normally.
The working loop should remain approximately the same height as the FPdc loops.
Checking the First Basket Block
Stop after Row 5.
Measure the width of one six-stitch group.
Next, measure the height from Row 2 through Row 5.
The measurements should be close to one another.
At the verified gauge, the expected dimensions are approximately 7.5 cm wide × 8 cm high.
If four rows measure much taller than the six-stitch width, reduce the number of rows per section to three. If they measure substantially shorter, test five rows before continuing the full blanket.
Gray Basket Weave Blanket Border
The photographed blanket has a substantial same-color perimeter that frames the textured field without competing with it.
Border Round 1
Ch 1.
Sc across the top edge.
Work 3 sc in the first corner.
Sc evenly down the first long side.
Start with approximately 2 sc for every 3 row ends, then adjust according to the actual fabric.
Work 3 sc in the second corner.
Sc across the foundation edge.
Work 3 sc in the third corner.
Sc evenly up the remaining long side.
Work 3 sc in the final corner.
Join with sl st.
Border Round 2
Ch 2.
Hdc in every stitch around.
Work 3 hdc in the center stitch of every corner.
Join.
Border Round 3
Ch 1.
Sc around.
Work 3 sc in each corner.
Join.
Border Round 4
Ch 2.
Hdc around.
Work 3 hdc in every corner.
Join.
Final Corded Edge
Ch 1.
Work reverse single crochet around the complete perimeter.
Keep the loops loose enough that the finished edge does not contract.
Join and fasten off with a 20 cm tail.
Assembly
- Complete the 98-stitch foundation row and recount every stitch before starting the post-stitch texture.
- Place markers around each 12-stitch repeat so all eight basketweave units remain correctly aligned.
- Work Rows 2–5 and measure one six-stitch block against the four-row height before extending the pattern.
- Reverse all FPdc and BPdc groups together at Row 6 without changing either plain edge stitch.
- Continue complete four-row sections until the central field reaches approximately 137–140 cm.
- Work the 98-stitch stabilizing hdc row and check the blanket width at the top, center, and bottom.
- Add Border Round 1 and lay the blanket flat before proceeding to check for side ruffling or contraction.
- Complete the remaining gray border rounds while maintaining three stitches at every corner turn.
- Finish with relaxed reverse single crochet and inspect all four edges before cutting the working yarn.
- Weave every tail through at least 8–10 cm of dense matching stitches, change direction once, and trim only after the fabric rests flat.
The finished blanket should display broad alternating gray blocks with a consistent woven-grid effect and an even matching perimeter.
7 Technical Tips
- The basket grid shifts by half a block: place a marker after every 12-stitch repeat during the first textured row. A misplaced group of six posts can leave the 98-stitch total correct while breaking the visual grid.
- The lower edge is narrower than the blanket: make the starting chain with a hook approximately 1 mm larger than the working hook. Super-bulky foundation chains can contract several centimeters across a 98-stitch width.
- The blocks look rectangular: compare six stitches with four textured rows after Row 5. At the verified gauge, the target is approximately 7.5 cm wide × 8 cm high.
- The side edge gradually loses stitches: mark the first and last ordinary double crochet on every row. Missing either edge stitch changes the blanket width even when the internal 12-stitch repeats are correct.
- The texture looks flat: check that the hook passes completely around each stitch post rather than through its top loops. Ordinary double crochet cannot produce the same projecting and recessed blocks.
- The border develops waves: remove side stitches from Border Round 1 before adding later rounds. Too many stitches along the row ends cause progressively larger ruffles.
- A yarn join forms a visible lump: change balls near an outside edge and leave tails approximately 15–20 cm long. Thick knots buried inside a raised gray block remain visible because the surrounding post stitches are already bulky.
Choosing the Right Gray Yarn
The reference is a light neutral gray rather than charcoal.
Useful shade descriptions include silver, pearl gray, dove gray, mist, stone, and light heather gray.
A solid or very lightly heathered color works best for the oversized basket texture.
Strong variegation can divide one six-stitch block into several colors, reducing the clarity of the woven effect.
Choose a smooth category 6 yarn with visible stitch definition. The photographed blanket has clearly separated strands rather than a heavily fuzzy surface.
Verified Yarn and Hook Benchmarks
A published Yarnspirations Basket Weave Crochet Blanket provides the closest technical benchmark for this project. It uses super-bulky Bernat Blanket Tweeds, a 9 mm hook, 1,720–1,760 yd, and a gauge of 8 stitches × 5 rows per 10 cm. The finished measurement is approximately 127 × 144.5 cm.
Michele Webb’s Chunky Basketweave Blanket uses super-bulky Bernat Blanket, an 8 mm hook, 1,460–1,540 yd, and 75 oz of yarn. Its finished size is approximately 55 × 45 inches.
Sirdar’s Basketweave Blanket 10230 uses super-bulky yarn, an 11.5 mm hook, and 1,230 yd for an approximately 107 × 150 cm blanket.
Those published specifications show why the hook cannot be selected by yarn category alone. Super-bulky strands differ substantially in diameter and construction.
How Much Yarn Does the Blanket Need?
For the approximately 127 × 145 cm version, plan on roughly 1,600 m of category 6 yarn.
Eight 300 g balls containing about 201 m each provide approximately 1,608 m total.
That equals roughly 2.4 kg of yarn.
Do not use all available yarn in the central field.
Set aside 150–200 m before beginning. The border has substantial circumference, and post-stitch blankets consume more yarn than plain double-crochet throws of comparable dimensions.
Why Basketweave Uses So Much Yarn
FPdc and BPdc travel around the posts of existing stitches rather than taking the shortest path through the top loops.
That extra distance is repeated across nearly every stitch in the main field.
The fabric is also thicker than ordinary double crochet.
Broad six-stitch blocks magnify that effect.
Compare yarn requirements by finished dimensions and stitch construction rather than assuming that any 127 × 145 cm crochet blanket will use the same quantity.
How to Make the Blanket Narrower
Remove complete 12-stitch repeats.
For seven repeats:
1 + (7 × 12) + 1 = 86 stitches.
Chain 89 when using the same foundation method.
For six repeats:
1 + (6 × 12) + 1 = 74 stitches.
Chain 77.
Do not remove only six stitches unless you intentionally want the left and right edges to begin with different block sequences.
How to Make the Blanket Wider
Add complete 12-stitch repeats.
For nine repeats:
1 + (9 × 12) + 1 = 110 stitches.
Chain 113.
For ten repeats:
1 + (10 × 12) + 1 = 122 stitches.
Chain 125.
Measure the first textured section before estimating total yarn. Each additional repeat runs through the complete length of the blanket and increases yarn consumption substantially.
Lap Blanket Version
Use the 74-stitch field.
Ch 77.
Dc in fourth chain from hook and across. (74)
Work one edge stitch, six complete 12-stitch repeats, and one final edge stitch.
Continue until the field measures approximately 100–110 cm.
Add three to five border rounds according to the desired finished width.
Large Sofa Throw Version
Use the 122-stitch field.
Ch 125.
Work the same six-FPdc/six-BPdc structure.
Continue until the blanket reaches the planned length.
A substantially larger throw requires more than the verified 1,720–1,760 yd benchmark, so calculate yarn from the measured area of the finished swatch rather than purchasing only eight balls.
Changing the Block Size
The photographed blanket uses broad blocks, but the same technique can create a smaller basket pattern.
For four-stitch blocks, use an eight-stitch repeat:
4 FPdc + 4 BPdc.
Reverse after the number of rows required to make the block approximately square.
For three-stitch blocks, use:
3 FPdc + 3 BPdc.
Smaller blocks create more intersections across the blanket and produce a busier surface.
Why Four-Row Sections Work Here
The verified gauge is five rows per 10 cm.
That means one row is approximately 2 cm high.
Four rows therefore measure about 8 cm.
Six stitches at eight stitches per 10 cm measure approximately 7.5 cm.
The two dimensions are close enough to create nearly square blocks.
Five rows would measure approximately 10 cm and make the sections noticeably taller than their six-stitch width unless the individual crocheter’s row gauge differs.
Keeping the Blanket Width Consistent
Measure after every three or four complete basket cycles.
Take one measurement near the active edge and another approximately halfway down the blanket.
A difference greater than approximately 2 cm indicates changing tension or missing edge stitches.
Do not wait until the blanket is finished to investigate narrowing.
Super-bulky post-stitch fabric is difficult to stretch evenly during finishing.
Managing a Heavy Blanket While Crocheting
Support the completed fabric on a table, bed, or your lap.
Do not allow the full weight to hang from the active row.
A 2.4 kg finished throw can place significant downward force on the working loops.
That force can lengthen the upper rows and gradually alter gauge.
Turn the blanket as a supported bundle rather than lifting it by the hook and active edge.
Changing Yarn Balls
Plan yarn changes near one side edge.
On the final yarn-over of the old strand, finish the stitch with the new yarn.
Leave approximately 15–20 cm of both strands.
Continue crocheting normally.
Later, weave each tail independently through dense matching stitches.
Change direction while weaving so the slick surface of chenille-style yarn is less likely to work loose.
Fixing a Reversed Basket Block
Inspect the first row immediately after every direction change.
If a group that should be BPdc has been worked as FPdc, correct it before the next row.
Later post stitches wrap around that mistaken row and make the error more difficult to repair.
Do not attempt to disguise a wrong-direction block with surface crochet. The height and shadow of the fabric will still differ from neighboring sections.
Fixing a Tight Foundation Chain
If Row 1 bows upward while the textured rows lie flat, the foundation is too short.
Use a 10 mm hook for the chain and return to 9 mm for Row 1.
Another option is to work 98 foundation double crochet instead of a chain and first row.
The lower edge should stretch to the same width as the central field without being pulled.
Border Tension
Border Round 1 determines the final perimeter behavior.
Lay the blanket flat immediately after completing it.
Waves indicate too many side stitches.
An inward curve indicates too few stitches or excessive tension.
Correct the first round before working Round 2.
Adding more border rounds over a faulty first round magnifies the distortion rather than correcting it.
Care and Finishing
Follow the washing instructions printed on the yarn label.
Bernat Blanket-type polyester yarns can become very heavy when wet, so check machine capacity before washing a full throw.
Support the blanket when moving it.
Reshape the perimeter while damp.
Do not press the raised post stitches flat with high heat.
For storage, fold the blanket loosely and avoid placing heavy objects on the same fold line for extended periods.
Conclusion
The gray version depends entirely on geometry and relief, so block alignment has to remain consistent from the first reversal to the final row. Start with the 98-stitch field, measure the first six-stitch block, and use four-row direction sections when they match the verified 8-stitch × 5-row gauge. Reserve border yarn before extending the body, and correct shifted post groups as soon as they appear. The next practical step is a two-block gray swatch using the intended 9 mm hook. Save this gray chunky basket weave crochet blanket pattern to Pinterest or share the finished throw on Instagram with #GrayBasketWeaveBlanket. Would you use light silver gray like this reference or move the same oversized texture toward charcoal?









