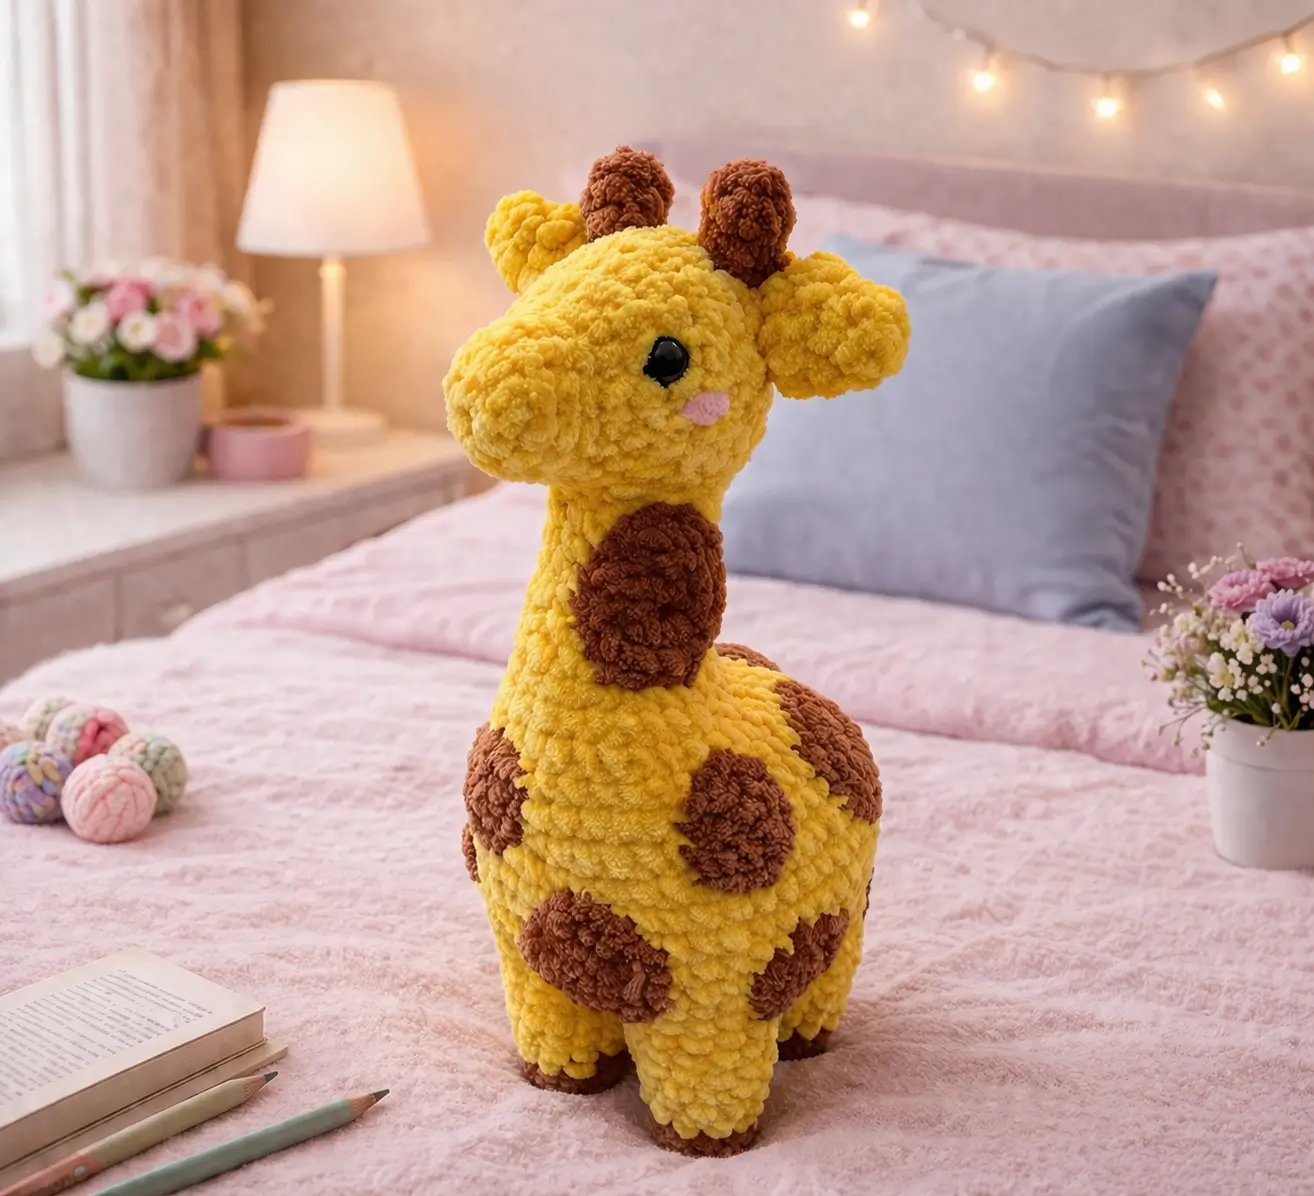
A giraffe only works in yarn when the neck stands without twisting. This giraffe amigurumi crochet pattern uses chunky plush yarn, a 4 mm–5 mm approach scaled from verified giraffe references, 15 mm eyes, and medium-level shaping to produce a standing toy suited to nursery display, market prep, or photo-ready shelf stock.
The Design: What Makes This Giraffe Different
The photo shows three structural priorities. First, the muzzle is oversized and pushed forward, so the head reads as giraffe before the spots do. Second, the neck is long but not thin; it transitions into the body with a steady tube rather than a sharp join, which reduces flop and keeps the centerline vertical. Third, the legs are short relative to the body, making the toy display as a compact standing plush rather than a lanky safari figure. That proportion shift matters.
A common mistake with a crochet giraffe plush is copying horse proportions. The result usually collapses at the throat or leans backward once stuffed. In this giraffe amigurumi pattern, the head stays medium, the body stays broad, and the neck narrows less aggressively. That produces a more stable plush giraffe amigurumi and matches the chenille look in the photo.
Project Info at a Glance
| Skill Level | Time | Finished Size | Hook | Best For |
|---|---|---|---|---|
| Intermediate | 5–7 hours | about 28–32 cm in chunky plush yarn | 4.5 mm for plush yarn | display toy, nursery shelf, handmade market stock |
Verified reference point: Published giraffe examples range from about 18 cm in DK yarn to 25.5 cm in worsted and 41 cm in a larger standing build, so the estimated 28–32 cm range here fits the photo’s chunkier yarn and compact silhouette.
Materials and Tools
Yarn
- Pale yellow chenille/plush yarn — bulky/chunky — about 180 g — Himalaya Dolphin Baby or similar plush substitute
- Medium brown chenille/plush yarn — bulky/chunky — about 60 g — for spots, ossicones, hoof tips, tail tuft
- Light pink chenille or felt scrap — small amount — for muzzle patch
- Black embroidery thread — small amount — optional mouth detail
Tools
- Hook 4.5 mm for plush adaptation
- 15 mm safety eyes
- Polyester stuffing
- Tapestry needle
- Stitch markers
- Pins
- Scissors
Verification note: 15 mm eyes are directly supported by Storyland Amis and Jess Huff. A 4 mm hook is published for worsted giraffe builds, while this article scales slightly upward for chunky plush yarn to match the photo. Jess Huff’s giraffe also provides a concrete yarn-usage benchmark of 137 g main color with 32 g total accents in worsted acrylic.
Abbreviations
- MR = magic ring
- sc = single crochet
- inc = increase
- dec = invisible decrease
- sl st = slip stitch
- ch = chain
- BLO = back loop only
Invisible decrease reduces bulk at the shaping lines and keeps plush yarn from showing open gaps at the cheeks, neck base, and leg tops.
Pattern — Step by Step
Continuous spiral unless noted. Stitch math is adapted to the photo using standard amigurumi shaping.
Head (Make 1)
Yarn: pale yellow — Source: standard amigurumi math adapted to photo proportions
R1: 6 sc in MR (6)
R2: inc x6 (12)
R3: (sc 1, inc) x6 (18)
R4: (sc 2, inc) x6 (24)
R5: (sc 3, inc) x6 (30)
R6: (sc 4, inc) x6 (36)
R7: (sc 5, inc) x6 (42)
R8: (sc 6, inc) x6 (48)
R9-R13: sc around (48)
R14: (sc 6, dec) x6 (42)
R15: (sc 5, dec) x6 (36)
R16: (sc 4, dec) x6 (30)
Insert 15 mm eyes between R10 and R11, about 10 sts apart. Begin stuffing firmly through the cheeks and crown.
R17: (sc 3, dec) x6 (24)
R18: (sc 2, dec) x6 (18)
R19: (sc 1, dec) x6 (12)
R20: dec x6 (6)
Fasten off. Leave a 20 cm tail.
Muzzle Patch (Make 1)
Yarn: light pink — Source: standard amigurumi math adapted to photo proportions
R1: ch 5, starting in 2nd ch from hook: sc 3, 3 sc in last ch, working opposite side sc 2, inc (10)
R2: inc, sc 2, inc x3, sc 2, inc x2 (16)
R3: sc around (16)
Lightly stuff or back with felt for a flatter patch.
Fasten off. Leave 20 cm tail.
Neck (Make 1)
Yarn: pale yellow — Source: standard amigurumi math adapted to photo proportions
R1: 6 sc in MR (6)
R2: inc x6 (12)
R3: (sc 1, inc) x6 (18)
R4-R14: sc around (18)
Stuff very firmly. A thin dowel or rolled foam insert can be added if the plush yarn is extra loose.
Fasten off. Leave 25 cm tail.
Body (Make 1)
Yarn: pale yellow — Source: standard amigurumi math adapted to photo proportions
R1: 6 sc in MR (6)
R2: inc x6 (12)
R3: (sc 1, inc) x6 (18)
R4: (sc 2, inc) x6 (24)
R5: (sc 3, inc) x6 (30)
R6: (sc 4, inc) x6 (36)
R7-R12: sc around (36)
R13: (sc 4, dec) x6 (30)
R14-R16: sc around (30)
R17: (sc 3, dec) x6 (24)
R18-R20: sc around (24)
R21: (sc 2, dec) x6 (18)
Stuff body firmly, especially the lower half.
Fasten off. Leave 30 cm tail.
Front Legs (Make 2)
Yarn: brown, then pale yellow — Source: standard amigurumi math adapted to photo proportions
R1: 6 sc in MR with brown (6)
R2: inc x6 (12)
R3: BLO sc around (12)
Switch to pale yellow
R4-R10: sc around (12)
R11: (sc 4, dec) x2 (10)
R12-R13: sc around (10)
Stuff the foot firmly and the upper leg lightly. Flatten top edge.
Fasten off. Leave 20 cm tail.
Back Legs (Make 2)
Yarn: brown, then pale yellow — Source: standard amigurumi math adapted to photo proportions
R1: 6 sc in MR with brown (6)
R2: inc x6 (12)
R3: BLO sc around (12)
Switch to pale yellow
R4-R8: sc around (12)
R9: (sc 4, dec) x2 (10)
R10-R12: sc around (10)
Back legs sit slightly lower and wider than the front pair.
Fasten off. Leave 20 cm tail.
Ears (Make 2)
Yarn: pale yellow — Source: standard amigurumi math adapted to photo proportions
R1: 6 sc in MR (6)
R2: (sc 1, inc) x3 (9)
R3: (sc 2, inc) x3 (12)
R4-R5: sc around (12)
R6: (sc 2, dec) x3 (9)
R7: sc around (9)
Do not stuff. Flatten.
Fasten off. Leave 18 cm tail.
Ossicones / Horns (Make 2)
Yarn: brown, then pale yellow — Source: photo structure supported by published giraffe horn sections
R1: 6 sc in MR with brown (6)
R2: inc x6 (12)
R3: (sc 2, dec) x3 (9)
Switch to pale yellow
R4-R6: sc around (9)
Stuff only the brown top bulb.
Fasten off. Leave 18 cm tail.
Spot Patches (Make 6–8 mixed sizes)
Yarn: brown — Source: standard amigurumi math adapted to photo proportions
Small spot
R1: 6 sc in MR (6)
R2: inc x6 (12)
Medium spot
R1: 6 sc in MR (6)
R2: inc x6 (12)
R3: (sc 1, inc) x6 (18)
Large belly spot
R1: 6 sc in MR (6)
R2: inc x6 (12)
R3: (sc 1, inc) x6 (18)
R4: (sc 2, inc) x6 (24)
Fasten off each patch with a long sewing tail.
Cheek Patches (Make 2)
Yarn: light pink — Source: standard amigurumi math adapted to photo proportions
R1: 6 sc in MR (6)
R2: inc x6 (12)
Fasten off. Leave 12 cm tail.
Tail (Make 1)
Yarn: pale yellow, then brown — Source: tail placement concept supported by Storyland Amis
R1: 6 sc in MR (6)
R2-R6: sc around (6)
Switch to brown
R7-R8: sc around (6)
Add a short yarn fringe if a fuller tuft is needed.
Fasten off. Leave 18 cm tail.
Assembly
- Sew the neck centered to the bottom of the head.
- Sew the body to the lower end of the neck, matching the front centerline.
- Attach the muzzle patch to the front of the head below the eyes.
- Sew the cheek patches to either side of the muzzle patch.
- Attach the ears near the top side edges of the head.
- Sew the ossicones between the ears, slightly forward of center.
- Attach the front legs to the lower body front, aligned so the toy stands flat.
- Sew the back legs wider apart at the body rear for balance.
- Add the spot patches, starting with one large belly patch and then distributing side and back spots.
- Sew the tail to the lower back, test the toy on a flat surface, and shift the tail a few millimeters upward if the body tips.
The completed giraffe should stand with a slight forward head angle and an even four-point base.
7 Technical Tips
- Marker drift: Plush yarn hides round starts fast. Move the stitch marker every round or the neck seam will rotate off center by the time you close the body.
- Stuffing firmness: The neck needs more density than the belly. Pack the neck until it resists thumb pressure, then stuff the body to about 80% firmness so the toy keeps shape without bowing.
- Invisible decrease failure: Regular decreases open visible gaps in chenille. Use front-loop invisible decreases at the jawline, body taper, and leg tops to keep the surface closed.
- Eye placement timing: Insert safety eyes before the final third of head decreases. In this size, 10 stitches apart gives a narrower face; 12 stitches apart makes the muzzle read too small.
- Velvet tension: Plush yarn exaggerates loose hand tension. If the stuffing shows at R6 or later, drop half a hook size before remaking the head.
- Pinning accuracy: Pin the four legs first and test on a table before sewing. A 3 mm height difference between legs is enough to make the giraffe rock.
- Tail weaving: The tail acts as a visual back-center marker even when it is not structural. Weave the tail end vertically through at least 4 body rounds or it will pull sideways with handling.
Conclusion
This giraffe amigurumi crochet pattern works because the build solves the real issue first: neck stability under a rounded head. Keep the stuffing dense in the neck, place the legs with a flat-base test, and sew the spot patches after the body is balanced. That order matters more than speed. Publish your finished giraffe to Pinterest with a side profile and front view, then post the same pair on Instagram so the neck line and muzzle depth read clearly in both feeds. Use #PlushGiraffePattern. One question remains useful for makers comparing results: did your giraffe stand best with the tail sewn at mid-back or slightly lower?









