Introduction
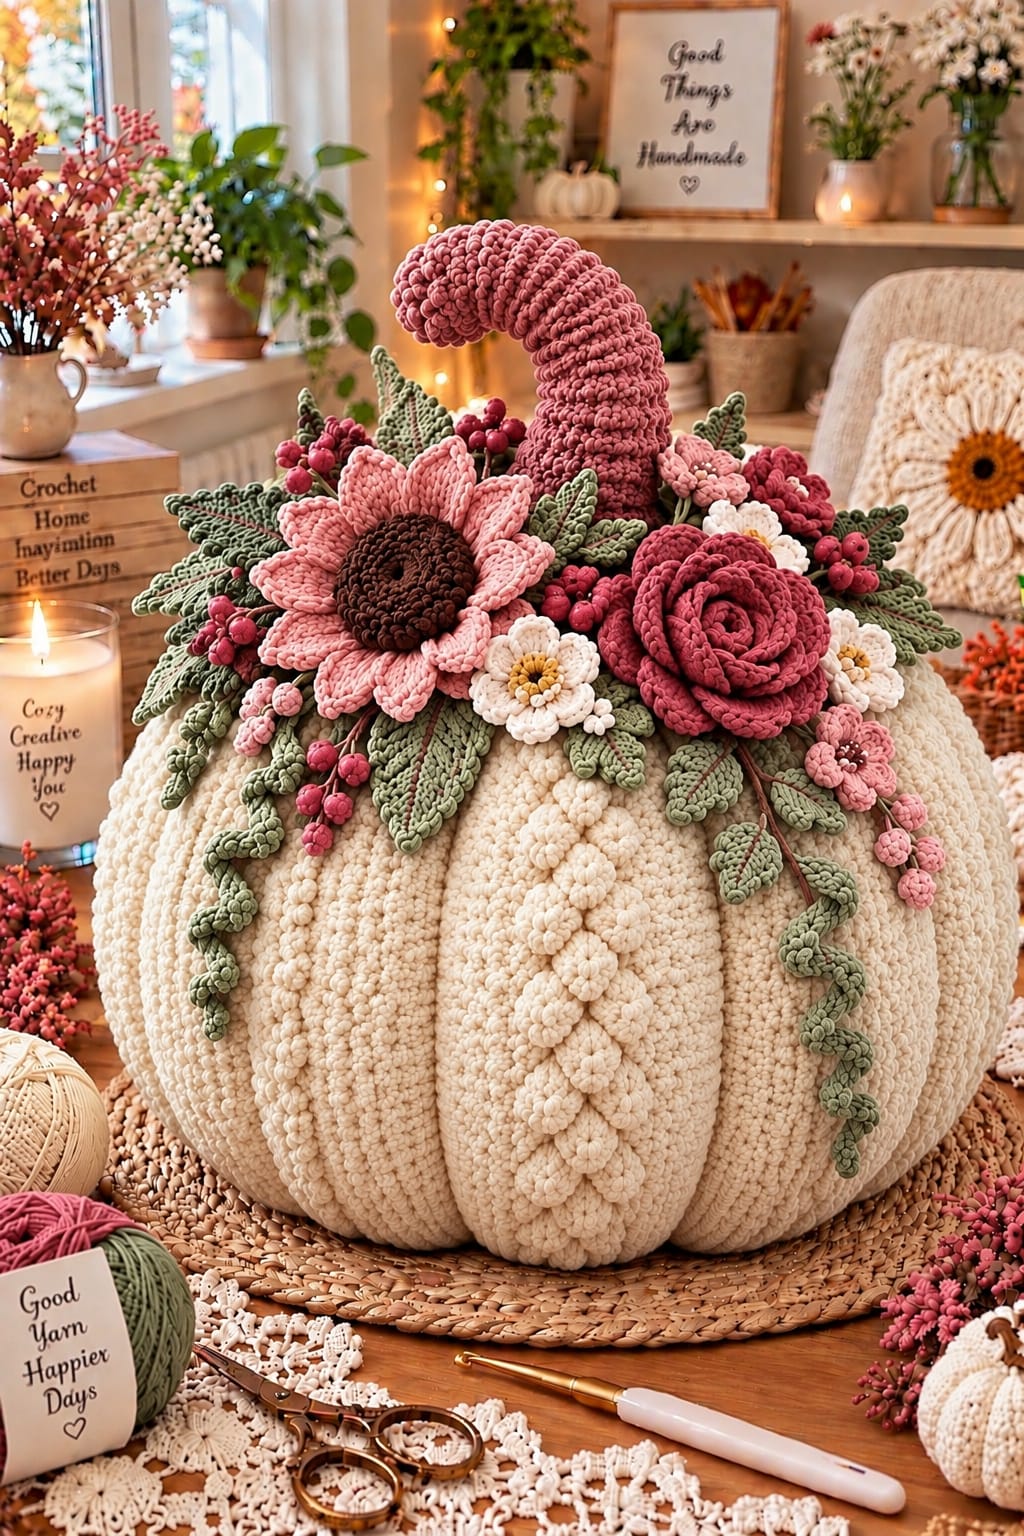
A pumpkin carrying a flower crown this wide needs deep ribs and a tall hooked stem or the botanical work overwhelms its silhouette. This giant white crochet pumpkin pattern combines an oversized ivory body, sculpted vertical sections, a curved dusty-pink stem, layered pink flowers, cream blossoms, berries, sage leaves, and trailing vines. The finished piece is designed as a substantial autumn centerpiece rather than a small shelf pumpkin.
The Design: What Makes This Crochet Pumpkin Different
The body is deliberately wider than it is tall. Eight pronounced channels divide the ivory surface into broad lobes, giving the pumpkin enough structure to support a dense floral crown. Raised decorative lines can be added to selected ribs for additional texture.
The stem provides the second defining feature. Instead of a short brown stalk, this design uses a thick dusty-pink stem that rises above the flowers before bending forward. That height keeps it visible behind the sunflower-style bloom and large rose.
Finally, the flowers are arranged asymmetrically. A large pink sunflower sits left of center, while a deep rose balances the right side. Cream flowers, berries, sage leaves, buds, and curling vines fill the gaps. A common failure with a crochet floral pumpkin is spreading decorations evenly around the entire crown, which removes the intentional focal points.
Project Info at a Glance
| Skill Level | Time | Finished Size | Hooks | Best For |
|---|---|---|---|---|
| Intermediate–Advanced | 12–18 hours | Approx. 40–45 cm wide | 8–9 mm body; 3.5–5 mm flowers | Large fall centerpiece, entry table, seasonal display |
Published super-bulky crochet pumpkins commonly use a 9 mm hook. Smaller chunky examples can measure about 23 cm wide, while the photo-inspired construction here deliberately scales the body substantially larger to support the oversized floral arrangement.
Materials and Tools
Yarn
- Ivory or warm cream — super bulky #6 — approximately 350–500 g for the pumpkin body.
- Dusty pink — bulky #5 or doubled worsted yarn — approximately 80–120 g for the curved stem and large flower.
- Deep rose — worsted #4 — approximately 60–80 g for the large rose, berries, and smaller flowers.
- Sage green — worsted #4 — approximately 80–100 g for leaves and curling vines.
- Dark brown — worsted #4 — approximately 20–30 g for the sunflower center.
- Cream — worsted #4 — approximately 30–40 g for small blossoms.
- Mustard yellow — worsted #4 — small amount for flower centers.
Yarn quantities are estimates for the photo-inspired dimensions. Published super-bulky pumpkins vary considerably in yarn consumption according to circumference, stitch pattern, and stuffing density.
Tools
- 9.0 mm crochet hook for the pumpkin body
- 6.0–7.0 mm crochet hook for the stem
- 4.0–5.0 mm crochet hook for flowers
- 3.5–4.0 mm crochet hook for leaves and berries
- Polyester fiberfill — approximately 600–900 g depending on finished size
- Long upholstery or doll needle
- Large tapestry needle
- Stitch markers
- Scissors
- Flexible craft wire — optional for the curved stem
- Blocking mat and pins for botanical pieces
Abbreviations
- MR — magic ring
- ch — chain
- sc — single crochet
- hdc — half double crochet
- dc — double crochet
- tr — treble crochet
- inc — increase
- dec — decrease
- sl st — slip stitch
- BLO — back loop only
- FLO — front loop only
- st/sts — stitch/stitches
- FO — fasten off
For an invisible decrease, insert the hook through the front loops of the next two stitches, yarn over and pull through both front loops, then complete the single crochet.
Pattern — Step by Step
This is an original photo-inspired construction. The large pumpkin body is crocheted first, stuffed, and sculpted. Flowers, leaves, berries, vines, and the curved stem are made separately and attached after the body shape is complete.
Giant Pumpkin Body
Yarn: ivory super bulky #6. Use a 9.0 mm hook.
Work in continuous rounds. Place a marker in the first stitch of every round.
R1: 6 sc in MR. (6)
R2: Inc ×6. (12)
R3: (Sc 1, inc) ×6. (18)
R4: (Sc 2, inc) ×6. (24)
R5: (Sc 3, inc) ×6. (30)
R6: (Sc 4, inc) ×6. (36)
R7: (Sc 5, inc) ×6. (42)
R8: (Sc 6, inc) ×6. (48)
R9: (Sc 7, inc) ×6. (54)
R10: (Sc 8, inc) ×6. (60)
R11: (Sc 9, inc) ×6. (66)
R12: (Sc 10, inc) ×6. (72)
R13–R25: Sc around. (72)
The long 72-stitch plateau creates the broad body. Measure the work before decreasing. It should already appear wider than a conventional amigurumi sphere.
R26: (Sc 10, dec) ×6. (66)
R27: (Sc 9, dec) ×6. (60)
R28: (Sc 8, dec) ×6. (54)
R29: (Sc 7, dec) ×6. (48)
Begin stuffing. Push filling firmly into the lower and outer sections while keeping the center slightly compressible for later sculpting.
R30: (Sc 6, dec) ×6. (42)
R31: (Sc 5, dec) ×6. (36)
R32: (Sc 4, dec) ×6. (30)
Add more stuffing.
R33: (Sc 3, dec) ×6. (24)
R34: (Sc 2, dec) ×6. (18)
Finish stuffing before closing the remaining opening.
R35: (Sc 1, dec) ×6. (12)
R36: Dec ×6. (6)
Fasten off, leaving a long tail. Thread through the remaining stitches and pull closed.
Sculpting the Pumpkin Ribs
Cut approximately 2.5–3 m of strong ivory yarn. Thread it through a long upholstery needle.
Insert the needle through the bottom center and bring it out through the top center. Carry the yarn down the outside of the pumpkin and insert it through the bottom again.
Pull until a visible channel forms.
Repeat around the body to create eight equal sections. Each shaping strand should run vertically from crown to base.
After all eight channels have been positioned, adjust them individually before tying off. The channels should be deep enough to divide the pumpkin but not so tight that the lobes become narrow cylinders.
Raised Decorative Rib — Make 3 to 5
Yarn: ivory.
Selected pumpkin sections in the reference image contain additional raised botanical-looking texture.
Ch 30–38 depending on the height of the finished pumpkin.
Beginning in second ch from hook, sl st in each ch.
Fasten off with a long sewing tail.
Pin the cord vertically along one pumpkin lobe. Form small side loops every 3–4 cm and tack them into place to create a raised vine-like rib.
Repeat on several lobes rather than decorating every section.
Tall Curved Pumpkin Stem
Yarn: dusty pink. Use a 6.0–7.0 mm hook.
The stem is intentionally oversized. It should remain visible above the flower crown.
R1: 6 sc in MR. (6)
R2: Inc ×6. (12)
R3: (Sc 1, inc) ×6. (18)
R4: (Sc 2, inc) ×6. (24)
R5–R9: Sc around. (24)
R10: (Sc 2, dec) ×6. (18)
R11–R17: Sc around. (18)
R18: (Sc 1, dec) ×6. (12)
R19–R32: Sc around. (12)
Stuff the lower two-thirds firmly. Stuff the upper section lightly so it can curve.
R33: Dec ×6. (6)
Fasten off and close.
For a pronounced hook, insert a length of flexible covered craft wire before closing. Fold both wire ends back on themselves and bury them inside dense stuffing so no sharp end touches the crochet fabric.
Bend the top third forward in a gradual curve rather than creating a single sharp angle.
Large Pink Sunflower-Style Flower
Yarn: dark brown and soft pink. Use a 4.0–5.0 mm hook.
A worsted-weight crochet sunflower can measure roughly 13–14 cm across when worked with a small hook, providing a useful scale for the oversized bloom on this pumpkin.
Flower Center
Dark brown yarn.
R1: 6 sc in MR. (6)
R2: Inc ×6. (12)
R3: (Sc 1, inc) ×6. (18)
R4: (Sc 2, inc) ×6. (24)
R5: (Sc 3, inc) ×6. (30)
Fasten off.
Pink Petals — Make 14
Join pink yarn to one stitch around the brown center.
Petal: Ch 8. Beginning in second ch from hook work sl st, sc, hdc, dc, dc, hdc, sc. Sl st into the next available center stitch.
Repeat evenly around the flower.
For a fuller bloom, make a second layer of shorter petals behind the first:
Short petal: Ch 6, sl st, sc, hdc, dc, hdc; attach at base.
Fasten off and block the petals before attaching the flower to the pumpkin.
Large Deep-Pink Rose
Yarn: deep rose. Use a 5.0 mm hook.
Published worsted-weight crochet roses commonly use approximately a 5 mm hook and are constructed as a flat strip that is rolled and secured. This larger version extends that method for a fuller crown flower.
Ch 48.
Row 1: Beginning in fourth ch from hook, work 2 dc in first ch. *Dc in next ch, 2 dc in next ch.* Repeat across.
Ch 3, turn.
Row 2: Work 5 dc in first suitable stitch, sl st in next. *5 dc in next st, sl st in next.* Repeat across.
Fasten off, leaving approximately 80 cm for assembly.
Beginning at one end, roll the strip tightly for the first several centimeters to form the rose center. Continue rolling more loosely as the outer petals develop.
Thread the long tail through the underside repeatedly, catching every rolled layer.
The finished rose should hold its shape when lifted by the base.
Small Cream Flowers — Make 4 to 6
Yarn: cream and mustard.
Yellow Center
R1: 6 sc in MR. (6)
Change to cream.
Petals
In each stitch around work:
(Sl st, ch 4, 2 dc, hdc, sl st).
Repeat six times to create six rounded petals.
Fasten off, leaving a 20 cm attachment tail.
Small Pink Flower — Make 4 to 6
Yarn: dusty pink.
R1: 6 sc in MR. Join. (6)
R2: In each stitch work (sl st, ch 3, 2 dc, ch 2, sl st).
Repeat around to create six petals.
Fasten off.
Sage Pointed Leaves — Make 16 to 22
Yarn: sage green. Use a 3.5–4.0 mm hook.
Ch 13.
Beginning in second ch from hook:
Side 1: Sl st, sc, hdc, dc, dc, tr, tr, dc, dc, hdc, sc, sl st.
Work (sc, ch 2, sc) into the end of the foundation chain.
Continue along the opposite side:
Side 2: Sl st, sc, hdc, dc, dc, tr, tr, dc, dc, hdc, sc, sl st.
Join and fasten off, leaving a sewing tail.
Raised Leaf Vein
Hold matching green yarn behind the leaf.
Insert the hook at the base and pull a loop to the front. Surface sl st along the center toward the pointed tip.
Add two or three short diagonal branches on each side if a more botanical texture is wanted.
Keep the surface stitches loose enough that the leaf remains flat.
Small Sage Leaves — Make 10 to 14
Ch 8.
Beginning in second chain:
Sl st, sc, hdc, dc, hdc, sc, sl st.
Work 2 sc in the end of the chain.
Repeat the stitch sequence down the opposite side.
Fasten off.
Berry — Make 16 to 24
Yarn: deep rose.
R1: 6 sc in MR. (6)
R2: Inc ×6. (12)
R3: Sc around. (12)
R4: Dec ×6. (6)
Add a small amount of stuffing.
Fasten off and close the opening.
Berry Cluster
Arrange three berries into a triangular group.
Thread a long strand of deep-rose yarn through all three centers twice. Pull just firmly enough to hold the cluster together.
Make approximately five to seven clusters and reserve several individual berries for filling small gaps.
Flower Bud — Make 6 to 10
Yarn: pink.
R1: 6 sc in MR. (6)
R2: Inc ×6. (12)
R3: Sc around. (12)
R4: (Sc 1, dec) ×4. (8)
R5: Dec ×4. (4)
Fasten off.
Attach a short sage chain to the base to create a flower stalk.
Curly Sage Vine — Make 4 to 6
Ch 40.
Beginning in second ch from hook, work 2 sc in each chain.
The strip should curl automatically.
For a tighter spiral, work 3 sc into every fourth chain while keeping 2 sc in the remaining chains.
Fasten off, leaving a 30 cm tail.
Short Tendrils — Make 6 to 10
Ch 18.
Beginning in second ch, work 2 sc in each chain.
Fasten off.
These shorter curls fit between flowers where a long trailing vine would cover the pumpkin surface.
Suggested Botanical Piece Count
| Component | Quantity | Main Color |
|---|---|---|
| Giant pumpkin | 1 | Ivory |
| Curved stem | 1 | Dusty pink |
| Large sunflower-style flower | 1 | Pink / brown |
| Large rose | 1 | Deep rose |
| Small cream flowers | 4–6 | Cream / mustard |
| Small pink flowers | 4–6 | Pink |
| Pointed leaves | 16–22 | Sage |
| Small leaves | 10–14 | Sage |
| Berry clusters | 5–7 | Deep rose |
| Flower buds | 6–10 | Pink |
| Long curly vines | 4–6 | Sage |
Assembly
- Stuff and close the ivory pumpkin before attaching any botanical components.
- Sculpt eight deep vertical channels from the crown to the base and check the pumpkin from every side before securing the shaping yarn.
- Sew the dusty-pink curved stem firmly into the crown, catching a wide area of pumpkin fabric around its base.
- Position the large pink sunflower-style flower to the left of the stem and the deep-rose flower slightly lower on the right.
- Add cream flowers between the two large focal blooms, then place smaller pink flowers around the outside of the crown.
- Slide sage leaves underneath the flowers before sewing them permanently, allowing pointed tips to extend beyond the flower edges.
- Add berry clusters behind and between the main flowers, concentrating several around the base of the stem.
- Attach buds and smaller leaves to fill visible gaps without covering the deep pumpkin channels.
- Sew long sage vines near the crown and allow two or three to trail down the pumpkin sides. Tack them at intervals while leaving the curls raised.
- Set the pumpkin on a flat surface and check that the floral crown remains asymmetrical, the curved stem stays visible, and the pumpkin sits securely before weaving in the final tails.
The completed centerpiece should have eight broad ivory lobes, a tall pink hooked stem, two dominant flowers, smaller blossoms and berries around the crown, and several sage vines extending down the sides.
7 Technical Tips for a Better Giant Crochet Pumpkin
- Shallow pumpkin ribs: A body this large can read as a sphere when the sculpting yarn is loose. Pull each of the eight shaping strands until a clear channel extends continuously from crown to base.
- Narrow distorted lobes: Excessive sculpting tension compresses the pumpkin into eight hard wedges. Stop tightening when the channel is clearly visible but each lobe still has a broad rounded surface.
- Visible stuffing: Large stretched stitches expose fiberfill when the hook is too large for the yarn. Move down 1 mm in hook size if white filling remains visible through the ivory fabric.
- Falling stem: The oversized curved stem creates more leverage than a conventional short pumpkin stalk. Sew around at least 4–5 cm of its lower circumference and pass the attachment yarn through the pumpkin crown several times.
- Collapsed stem curve: Packing the upper stem as firmly as the base prevents a gradual bend. Keep the final third lightly stuffed and shape the curve before closing the top.
- Hidden pumpkin surface: Too many flowers positioned at the same height create a solid ring around the crown. Keep the large pink flower and rose dominant while allowing visible ivory space between smaller elements.
- Flat trailing vines: Sewing every curl against the pumpkin removes its three-dimensional form. Anchor long vines approximately every 5–7 cm and leave the intervening spiral sections free.
How to Arrange the Floral Crown
Begin with the two largest flowers rather than the leaves. Place the pink sunflower-style bloom slightly left of the stem and angle it toward the viewer. Position the deep-rose flower lower and farther right. Those two elements establish the visual weight of the arrangement.
Next, insert cream flowers at different heights. Avoid forming a straight line of blossoms across the pumpkin crown. Some flowers should overlap the large blooms while others remain partly hidden behind leaves.
Sage foliage forms the widest layer. Point several leaves upward beside the stem, direct others horizontally beneath the flowers, and allow a few to hang over the pumpkin ribs.
Berries belong primarily in the gaps. Clusters near the stem create concentrated areas of deep color, while isolated berries can extend outward along narrow stalks.
Attach trailing vines last. This prevents them from becoming trapped underneath flowers during assembly.
Choosing Yarn for an Oversized Crochet Pumpkin
Super-bulky yarn is practical for the body because it builds a large surface with fewer stitches. Published chunky pumpkin patterns use category 6 yarn with 9 mm hooks, and documented finished sizes around 9 inches wide demonstrate how quickly thick yarn produces volume. This project deliberately extends that principle to a substantially larger decorative pumpkin.
Use finer yarn for the botanical components. A flower made from the same super-bulky yarn as the pumpkin can become too heavy to hold its petal definition. Worsted yarn with a 3.5–5 mm hook provides sharper leaves, flowers, berries, and vines.
Using different yarn weights also creates useful depth. The body remains visually heavy, while the smaller stitches of the botanical crown provide the detailed surface work visible in the reference design.
How to Make the Pumpkin Larger or Smaller
For a smaller centerpiece, stop increasing at 60 stitches instead of 72 and shorten the plateau section. Keep the same general increase and decrease sequence so the finished form remains broad rather than tall.
For a larger pumpkin, add another increase round after 72 stitches:
(Sc 11, inc) ×6. (78)
Continue with several additional plateau rounds before reversing the increase sequence with matching decreases.
Changing yarn weight is another scaling method. Published crochet pumpkin patterns commonly offer different sizes by switching between medium, bulky, and super-bulky yarns with corresponding hooks.
Do not enlarge only the pumpkin while leaving every flower unchanged. Increase at least the two focal flowers and stem proportionally so the crown remains substantial enough for the body.
Adding the Raised Ivory Details
The reference pumpkin includes raised decorative structures running vertically along selected lobes. These can be interpreted as crocheted cords, bobble-like details, or narrow botanical vines worked in the same ivory yarn as the body.
Keep these additions concentrated on two or three front-facing lobes. Decorating all eight sections can obscure the deeper structural channels created during sculpting.
A simple surface treatment uses a chain or slip-stitch cord. Pin it vertically, create short side branches at alternating intervals, then sew through the underside of the cord without flattening its raised profile.
Matching ivory yarn makes the texture visible through shadow rather than color contrast.
Making the Floral Crown Removable
The entire botanical arrangement can be assembled as a removable crown instead of sewing every piece directly to the pumpkin.
Crochet a flat sage or ivory circle approximately 15–18 cm across. Sew the flowers, berries, and leaves to that foundation, leaving the center open for the stem. Attach the finished floral circle to the pumpkin with several removable ties hidden beneath the foliage.
This construction makes storage easier and allows the pumpkin body to be displayed separately. It also reduces the number of sewing passes through the super-bulky body.
For a permanent centerpiece, direct attachment provides greater stability, particularly for the large rose and sunflower-style flower.
Displaying the Finished Crochet Pumpkin
The finished pumpkin is intended as decorative home décor rather than a toy. Its large size works best on a sturdy table, sideboard, covered bench, or low display surface.
Keep the bottom free of flowers and vines so the pumpkin can sit directly on its broad base. If one lobe causes the body to lean, redistribute the stuffing from the bottom opening before permanently closing it.
The tall stem also affects placement. Allow clearance above and in front of the curved tip instead of pushing the centerpiece against a wall or shelf.
If wire is used inside the stem, keep the piece away from young children and inspect the crochet periodically to confirm that the wire remains completely enclosed.
Finishing the Giant White Crochet Pumpkin
Inspect the centerpiece from the front, both sides, and directly above before trimming the final attachment tails. The ivory pumpkin should remain clearly visible beneath the floral work, all eight sculpted sections should reach the crown, and the dusty-pink stem should rise above the flowers before curving forward.
For the closest photo-inspired result, combine warm ivory with dusty pink, deep rose, sage green, dark brown, and small amounts of cream and mustard. The final giant white crochet pumpkin pattern can also be adapted to burnt orange, sage, burgundy, or charcoal while retaining the same botanical construction.
Make the pumpkin body first and record its finished width before sizing the floral crown. Share the completed centerpiece on Pinterest or Instagram with #FloralCrochetPumpkin. Would you keep the oversized dusty-pink stem or change it to sage green for your version?









