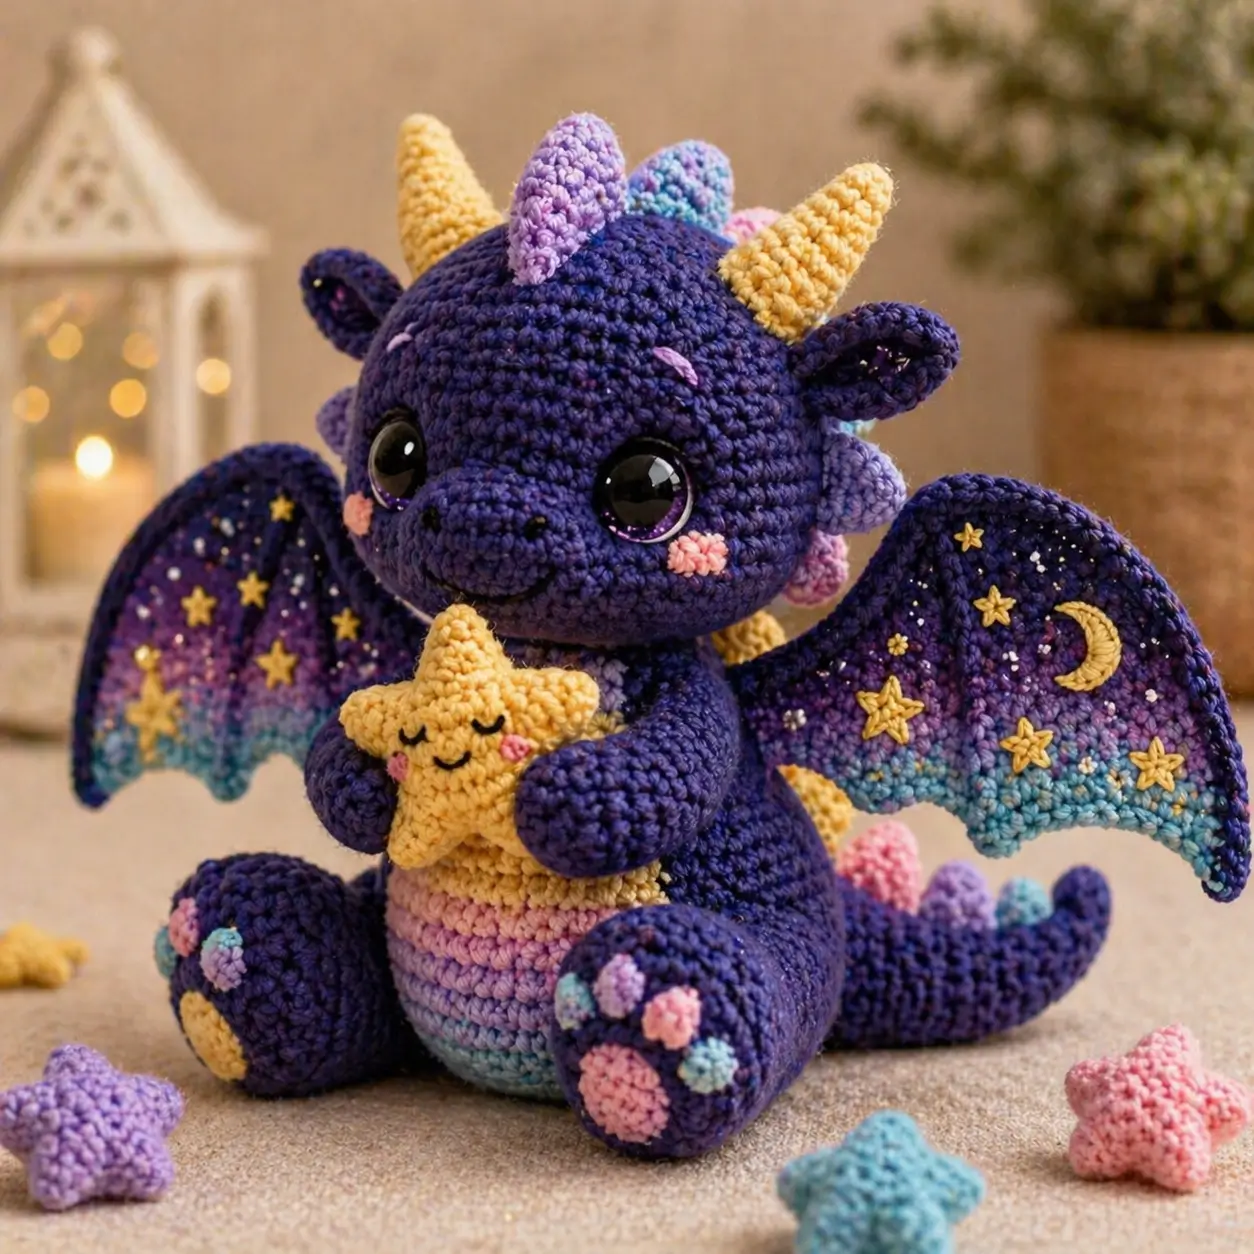
A dragon with two yellow horns, pastel back spikes, galaxy wings, and a sleepy star cannot be built from a dinosaur base alone. This dragon amigurumi crochet pattern uses worsted yarn, a 4 mm hook, safety eyes, and firm shaping to make a 25 cm sitting plush for intermediate makers. The finished toy works well as a fantasy nursery shelf piece.
The Design: What Makes This Dragon Different
This dragon needs a wide head, short muzzle, heavy back legs, and broad wings. Those choices keep the toy seated instead of tipping backward under the wing weight. The horns sit forward of the ears because the photo shows a baby-dragon face, not a reptile silhouette. Place them too far back and the head reads like a dinosaur. The belly panel uses pastel color bands to connect the yellow star accessory with the blue wing edges. A common mistake in a crochet dragon pattern is making the wings full-size but leaving the body narrow. The maker then pins the wings high, and the whole plush leans. Here, the baby dragon amigurumi body reaches a 42-stitch plateau, giving enough width for legs, belly patch, arms, tail, and wing attachment.
Project Info at a Glance
| Skill Level | Time | Finished Size | Hook | Best For |
|---|---|---|---|---|
| Intermediate | 8–10 hours | About 25 cm sitting height | 4 mm | Fantasy plush, display toy, detailed gift crochet |
Materials and Tools
Yarn
- Deep purple — worsted/Aran — 56–60 g — Paintbox Cotton Aran or similar
- Yellow — worsted/Aran — 12 g — horns, star, moon, star appliqués
- Lavender — worsted/Aran — 12 g — spikes and wing gradient
- Sky blue — worsted/Aran — 12 g — wing edge, toe pads, belly stripe
- Pink — worsted/Aran — 12 g — cheeks, belly stripe, toe pads
- Black embroidery thread — small amount — mouth and nostrils
- White embroidery thread — small amount — wing speckles
Tools
- Hook 4 mm
- 12 mm safety eyes, or 18–20 mm safety eyes for the oversized photo style
- Polyester stuffing
- Yarn needle
- Stitch markers
- Pins
- Scissors
Abbreviations
MR = magic ring; sc = single crochet; inc = 2 sc in same stitch; dec = single crochet 2 stitches together; sl st = slip stitch; ch = chain; BLO = back loop only; FO = fasten off.
Invisible decrease means inserting the hook through the front loops of the next two stitches before completing one sc, reducing bulk at the face and body closing rounds.
Pattern — Step by Step
Continuous spiral unless noted. Head and body use a 42-stitch plateau to match the large, rounded photo style.
Head
Yarn: deep purple
R1: 6 sc in MR (6)
R2: inc ×6 (12)
R3: (sc, inc) ×6 (18)
R4: (2 sc, inc) ×6 (24)
R5: (3 sc, inc) ×6 (30)
R6: (4 sc, inc) ×6 (36)
R7: (5 sc, inc) ×6 (42)
R8–R15: sc around (42)
R16: (5 sc, dec) ×6 (36)
R17: sc around (36)
R18: (4 sc, dec) ×6 (30)
R19: (3 sc, dec) ×6 (24)
Insert eyes between R12 and R13, about 10 stitches apart. Begin stuffing firmly after R18.
R20: (2 sc, dec) ×6 (18)
R21: (sc, dec) ×6 (12)
R22: dec ×6 (6)
Fasten off. Close opening and hide tail.
Muzzle
Yarn: deep purple
R1: 6 sc in MR (6)
R2: inc ×6 (12)
R3: (sc, inc) ×6 (18)
R4–R5: sc around (18)
R6: (sc, dec) ×6 (12)
Fasten off. Leave 25 cm tail. Stuff lightly before sewing below the eyes.
Body
Yarn: deep purple with pastel belly panel sewn separately
R1: 6 sc in MR (6)
R2: inc ×6 (12)
R3: (sc, inc) ×6 (18)
R4: (2 sc, inc) ×6 (24)
R5: (3 sc, inc) ×6 (30)
R6: (4 sc, inc) ×6 (36)
R7: (5 sc, inc) ×6 (42)
R8–R14: sc around (42)
R15: (5 sc, dec) ×6 (36)
R16–R18: sc around (36)
R19: (4 sc, dec) ×6 (30)
R20–R21: sc around (30)
R22: (3 sc, dec) ×6 (24)
R23: sc around (24)
R24: (2 sc, dec) ×6 (18)
Stuff base firmly. Keep the neck firm enough to hold the large head.
R25: (sc, dec) ×6 (12)
R26: dec ×6 (6)
Fasten off. Leave 40 cm tail for joining to head.
Belly Patch
Yarn: yellow, pink, lavender, sky blue
Ch 9 in yellow.
R1: sc in 2nd ch from hook, 6 sc, 3 sc in last ch, work other side: 6 sc, inc (18)
R2: inc, 6 sc, inc ×3, 6 sc, inc ×2 (24)
R3: 2 sc, switch to pink, 8 sc, switch to lavender, 8 sc, switch to sky blue, 6 sc (24)
R4: sc around, keeping color blocks aligned (24)
Fasten off. Leave 40 cm tail. Sew to front body from R8 to R19.
Arms / Front Legs
Yarn: deep purple
Make 2.
R1: 6 sc in MR (6)
R2: inc ×6 (12)
R3–R5: sc around (12)
R6: (2 sc, dec) ×3 (9)
R7–R10: sc around (9)
Stuff hand only. Leave upper arm flat for sewing.
Fasten off. Leave 25 cm tail.
Back Legs
Yarn: deep purple
Make 2.
R1: 6 sc in MR (6)
R2: inc ×6 (12)
R3: (sc, inc) ×6 (18)
R4–R7: sc around (18)
R8: (4 sc, dec) ×3 (15)
R9: sc around (15)
R10: (3 sc, dec) ×3 (12)
Stuff firmly at the foot and lightly at the top.
Fasten off. Leave 30 cm tail.
Toe Pads
Yarn: pink, sky blue, lavender
Make 10 small pads and 2 large pads.
Small pad: R1: 6 sc in MR (6), sl st to first sc (6). Fasten off.
Large pad: R1: 6 sc in MR (6); R2: inc ×6 (12), sl st (12). Fasten off.
Sew one large pad and five small pads to each back foot.
Ears
Yarn: deep purple
Make 2.
R1: 6 sc in MR (6)
R2: (sc, inc) ×3 (9)
R3: sc around (9)
R4: (2 sc, inc) ×3 (12)
R5–R6: sc around (12)
Flatten. Do not stuff. Fasten off. Leave 25 cm tail.
Horns
Yarn: yellow
Make 2.
R1: 6 sc in MR (6)
R2: sc around (6)
R3: (sc, inc) ×3 (9)
R4: sc around (9)
R5: (2 sc, inc) ×3 (12)
R6–R7: sc around (12)
Stuff lightly. Fasten off. Leave 25 cm tail.
Back Spikes
Yarn: lavender, sky blue, pink
Make 7.
R1: 6 sc in MR (6)
R2: sc around (6)
R3: (sc, inc) ×3 (9)
R4: sc around (9)
R5: (2 sc, inc) ×3 (12)
R6: sc around (12)
Stuff lightly. Fasten off. Leave 20 cm tail. Make 3 lavender, 2 sky blue, 2 pink.
Tail
Yarn: deep purple
R1: 6 sc in MR (6)
R2: sc around (6)
R3: (2 sc, inc) ×2 (8)
R4: sc around (8)
R5: (3 sc, inc) ×2 (10)
R6: sc around (10)
R7: (4 sc, inc) ×2 (12)
R8–R11: sc around (12)
R12: (5 sc, inc) ×2 (14)
R13–R16: sc around (14)
R17: (6 sc, inc) ×2 (16)
R18–R20: sc around (16)
Stuff lightly, leaving the top flexible. Fasten off. Leave 35 cm tail.
Wings
Yarn: deep purple, lavender, sky blue, pink
Make 2. Work in rows.
Ch 19 in deep purple.
Row 1: sc in 2nd ch from hook, 17 sc (18)
Row 2: ch 1, turn, 6 sc, ch 3, skip 2, 5 sc, ch 3, skip 2, 3 sc (20 including chains)
Row 3: ch 1, turn, 5 sc, 3 sc in chain space, 5 sc, 3 sc in chain space, 4 sc (20)
Row 4: switch to lavender, ch 1, turn, dec, 6 sc, dec, 6 sc, dec (17)
Row 5: ch 1, turn, 5 sc, skip 1, 5 sc, skip 1, 5 sc (15)
Row 6: switch to sky blue, ch 1, turn, dec, 4 sc, dec, 4 sc, dec, sc (12)
Row 7: ch 1, turn, 3 sc, skip 1, 3 sc, skip 1, 4 sc (10)
Row 8: switch to pink, ch 1, turn, dec, 2 sc, dec, 2 sc, dec (7)
Border: switch to deep purple, sc evenly around wing edge, placing 3 sc in each outer corner.
Fasten off. Leave 45 cm tail.
Moon and Star Wing Appliqués
Yarn: yellow
Small star, make 8: R1: 5 sc in MR (5). (sl st, ch 3, sl st in 2nd ch, sc in next ch, sl st into next stitch) ×5. Fasten off.
Crescent moon, make 1: Ch 9, sc in 2nd ch, hdc, dc, dc, hdc, sc, sl st, then work 5 sc along inner curve. Fasten off.
Sew appliqués onto wings after blocking the wings flat.
Cheek Patches
Yarn: pink
Make 2.
R1: 6 sc in MR (6)
R2: inc ×6 (12)
Sl st to first stitch.
Fasten off. Leave 20 cm tail.
Star Pillow Accessory
Yarn: yellow
Make 2 panels.
R1: 10 sc in MR (10)
Point 1: ch 5, sc in 2nd ch, hdc, dc, tr, skip 1 base st, sl st in next base st.
Repeat Point 1 four more times around the center. Each panel has 5 points.
Place panels wrong sides together. Sc through both layers around the edge, adding stuffing before closing the final point. Fasten off. Hide tail. Embroider closed eyes, a small mouth, and pink cheeks.
Assembly
- Sew the head to the body with the head tilted slightly forward; pass around the neck twice so it does not wobble.
- Sew the muzzle between the eyes, centered over R14–R18 of the head; embroider two black nostrils on the upper muzzle.
- Sew cheek patches beside the muzzle, one round lower than the eye line.
- Attach horns on the top front of the head, about 8 stitches apart.
- Attach ears behind the horns, angled outward and slightly down.
- Sew the body belly patch to the front before attaching arms, keeping its lower edge flat against the sitting base.
- Sew arms to the sides of the upper body so they curve toward the star pillow.
- Sew back legs to the lower body in a seated position, then attach toe pads to the front of each foot.
- Sew the tail to the lower back, then add pastel spikes from crown to tail in a centered line.
- Sew wings to the upper back, add moon and star appliqués, place the star pillow between the arms, and secure with two hidden stitches if the toy is for display.
The finished dragon sits upright when the legs, tail, and lower body are stuffed more firmly than the arms and wings.
7 Technical Tips
- Failure mode: head wobble. Leave a 40 cm body tail and sew through both head and neck twice; a single seam round is not enough for a 42-stitch head.
- Failure mode: wings pulling backward. Pin each wing across at least 6 body rounds before sewing; two-point wing attachment makes the plush twist.
- Eye placement timing matters. Install safety eyes before closing R18 of the head; after that point, the neck opening becomes too small for washer pressure.
- Stuffing firmness must vary. Pack the body base to about 90% firmness, but stuff the arms closer to 40% so they can hold the star without sticking out.
- Invisible decreases show on dark yarn. Work front-loop invisible decreases on R18–R22 of the head; standard decreases can leave pale stuffing dots between purple stitches.
- Toe pads need exact scale. Keep small toe pads at 6 stitches and large foot pads at 12 stitches; larger pads crowd the seated foot and hide the round shape.
- Tail weaving needs a long path. After sewing the tail, weave the end through the body for at least 5 cm; short weaving can loosen when the toy is posed on a shelf.
Conclusion
This dragon amigurumi crochet pattern works because the structure supports the details: a broad body for sitting, a wide head for oversized eyes, stable wings, forward horns, and a separate star pillow. Make the head, body, and legs first, then test the balance before sewing on wings or spikes. For a closer match to the photo, keep the body deep purple and reserve yellow for horns, stars, moon, and the pillow. Share the finished dragon on Pinterest and Instagram with #GalaxyBabyDragon. Which wing detail will you change first: the crescent moon, the tiny stars, or the blue lower edge?









