Introduction
A teddy bear’s ears must sit high enough to frame the skull without creating a mouse-like silhouette. This teddy bear amigurumi crochet pattern uses chunky chenille yarn, a 4.5 mm hook and 12 mm safety eyes to make a bear approximately 25 cm tall. The project suits an advanced beginner familiar with spiral rounds. Its separate flat-bottomed legs help the finished bear stand securely on a shelf.
The Design: What Makes This Teddy Bear Different
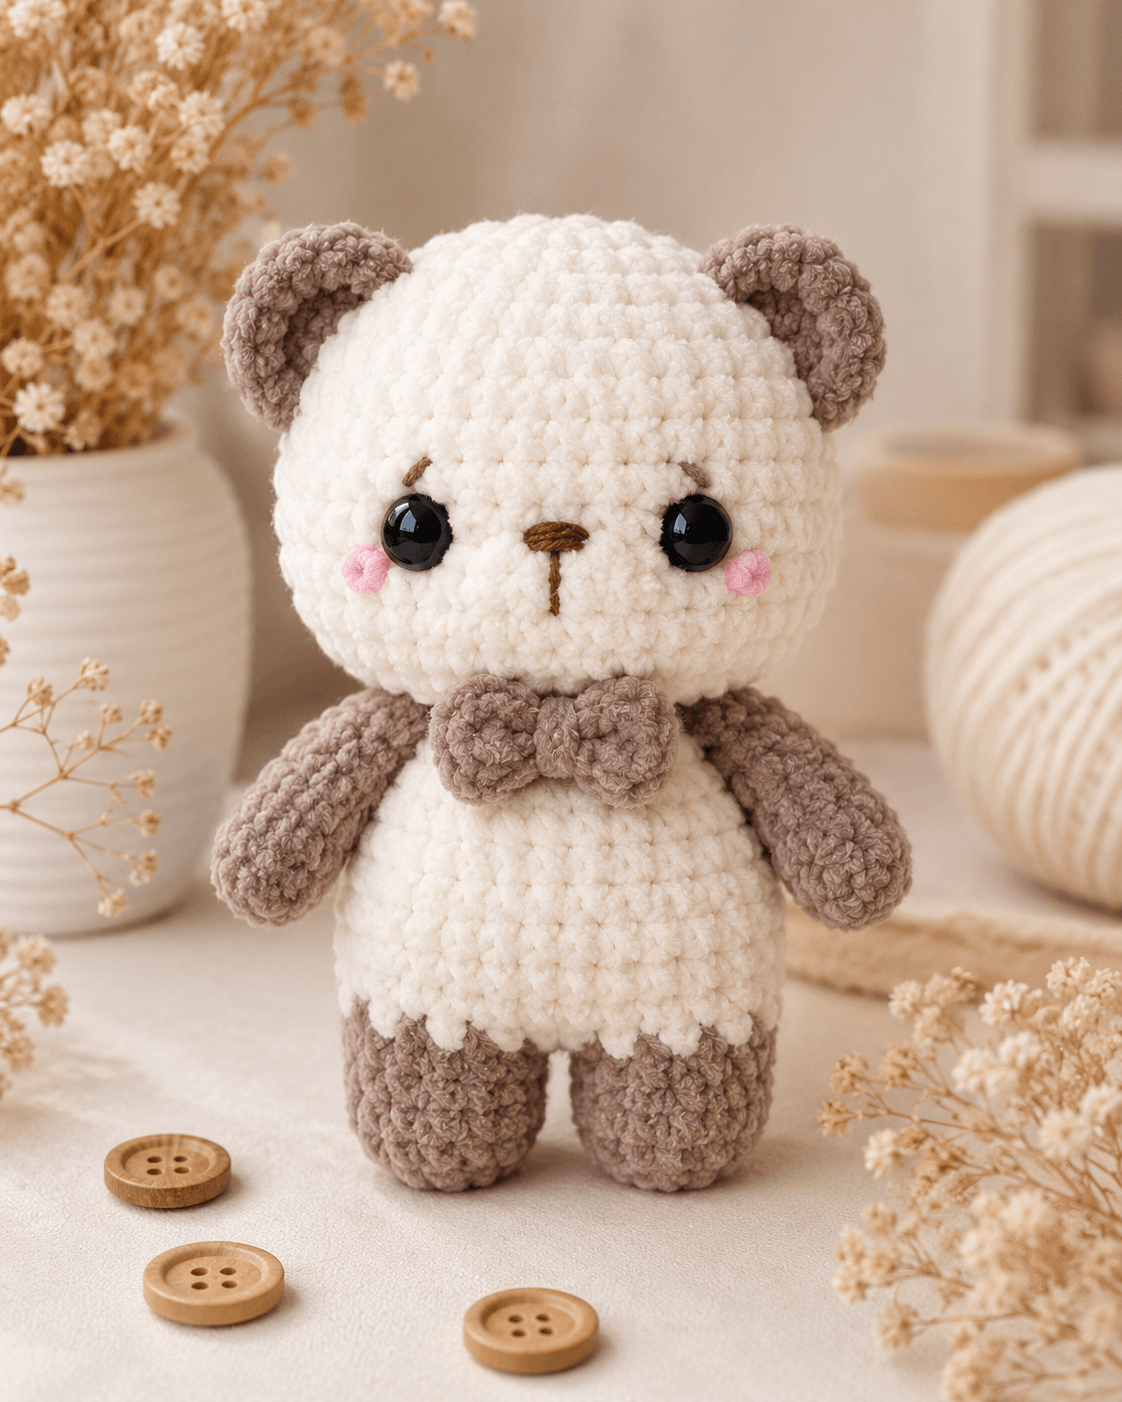
The head reaches a 42-stitch plateau, producing the broad forehead and rounded cheek line shown in the reference bear. A narrower 36-stitch body keeps the torso proportional without competing with the oversized head. Separate cylindrical legs create a stable base, while lightly stuffed arms hang close to the body instead of projecting outward. Taupe yarn repeats across the ears, limbs and bow tie, distributing the accent color from top to bottom. This arrangement keeps the cream face visually dominant. A common mistake when making a plush bear amigurumi is sewing the ears too low. That placement flattens the top of the head and widens the face. Pin both ears before stitching, then check that their upper edges rise above the crown when viewed from the front.
Project Info at a Glance
| Skill Level | Time | Finished Size | Hook | Best For |
|---|---|---|---|---|
| Advanced beginner | 6–8 hours | Approximately 25–26 cm | 4.5 mm | Nursery shelf, handmade gift or craft display |
Materials and Tools
Yarn
- Cream white chunky chenille yarn — approximately 120 g for the head and body
- Taupe chunky chenille yarn — approximately 50 g for the ears, arms, legs and bow tie
- Blush pink DK yarn — less than 5 g for the cheek patches
- Dark brown cotton or embroidery thread — approximately 1 m for the nose, mouth and eyebrows
Use the same chenille yarn brand for the cream and taupe sections. Two yarns labeled as chunky can still differ significantly in strand diameter, which changes the finished proportions.
Tools
- 4.5 mm crochet hook
- 12 mm black safety eyes
- Polyester toy stuffing
- Yarn needle with a wide eye
- Locking stitch marker
- Dressmaking pins
- Small scissors
Safety eyes are not suitable for toys intended for children under three years old. Embroider the eyes with dark yarn when the finished bear will be handled by a young child.
Abbreviations
- MR — magic ring
- sc — single crochet
- inc — two single crochet stitches in one stitch
- dec — single crochet two stitches together
- sl st — slip stitch
- ch — chain
- BLO — back loop only
- FO — fasten off
For an invisible decrease, insert the hook through the front loop of each of the next two stitches, yarn over and complete one single crochet through both loops.
Pattern — Step by Step
Work all amigurumi sections in continuous spirals unless a joined round or row is stated. Place a stitch marker in the first stitch of every round and move it upward after each completed round.
Head
Yarn: cream white. Stuff the head gradually so the filling reaches the outer edges without forming hard lumps.
R1: 6 sc in MR (6)
R2: inc ×6 (12)
R3: (sc, inc) ×6 (18)
R4: (2 sc, inc) ×6 (24)
R5: (3 sc, inc) ×6 (30)
R6: (4 sc, inc) ×6 (36)
R7: (5 sc, inc) ×6 (42)
R8–R16: sc around (42)
R17: (5 sc, dec) ×6 (36)
R18: sc around (36)
Insert the safety eyes between R13 and R14, approximately nine visible stitches apart. Check the placement from the front before attaching the washers.
R19: (4 sc, dec) ×6 (30)
R20: (3 sc, dec) ×6 (24)
R21: (2 sc, dec) ×6 (18)
Add firm stuffing to the forehead, cheeks and lower jaw. Keep the eye area supported from behind so the eyes do not sink into the fabric.
R22: (sc, dec) ×6 (12)
R23: dec ×6 (6)
Fasten off. Thread the yarn tail through the front loops of the remaining six stitches, pull the opening closed and weave the tail into the head.
Body
Yarn: cream white. The base begins at the lower body and the opening closes at the neck.
R1: 6 sc in MR (6)
R2: inc ×6 (12)
R3: (sc, inc) ×6 (18)
R4: (2 sc, inc) ×6 (24)
R5: (3 sc, inc) ×6 (30)
R6: (4 sc, inc) ×6 (36)
R7–R12: sc around (36)
R13: (4 sc, dec) ×6 (30)
R14–R16: sc around (30)
R17: (3 sc, dec) ×6 (24)
R18–R19: sc around (24)
R20: (2 sc, dec) ×6 (18)
R21: sc around (18)
Stuff the lower half firmly enough to support the head. Use less stuffing near the neck so the head can sit flush against the final round.
Fasten off. Leave a 35 cm yarn tail for sewing the body to the head.
Arms — Make Two
Yarn: taupe. Stuff only the lower two-thirds of each arm.
R1: 6 sc in MR (6)
R2: inc ×6 (12)
R3: (sc, inc) ×6 (18)
R4–R6: sc around (18)
R7: (sc, dec) ×6 (12)
R8–R13: sc around (12)
Add a small amount of stuffing to the rounded hand and lower arm. Leave the final three rounds nearly empty so the arm can lie flat against the body.
Flatten the opening and crochet 6 sc through both layers. Fasten off and leave a 25 cm tail for sewing.
Back Legs — Make Two
Yarn: taupe. Each leg is worked from the sole upward.
R1: 6 sc in MR (6)
R2: inc ×6 (12)
R3: (sc, inc) ×6 (18)
R4: BLO sc around (18)
R5–R8: sc around (18)
R9: (sc, dec) ×6 (12)
R10–R12: sc around (12)
Stuff the base firmly, pressing the filling into the lower edge created by the BLO round. Keep the top slightly softer to prevent a bulky seam.
Flatten the opening and crochet 6 sc through both layers. Fasten off and leave a 30 cm yarn tail.
Ears — Make Two
Yarn: taupe. Do not stuff the ears.
R1: 6 sc in MR (6)
R2: inc ×6 (12)
R3: (sc, inc) ×6 (18)
R4: (2 sc, inc) ×6 (24)
R5–R6: sc around (24)
Fold each ear into a shallow semicircle. Flatten the final round and crochet 12 sc through both layers. Fasten off and leave a 30 cm tail for attachment.
Cheek Patches — Make Two
Yarn: blush pink DK yarn. Use a 3 mm hook for smaller, flatter circles when available.
R1: 6 sc in MR (6)
R2: inc ×6 (12)
Join with a sl st in the first stitch. Fasten off and leave a 15 cm sewing tail. The finished cheek circles should measure approximately 2 cm across.
Embroidered Nose and Mouth
Thread a yarn needle with dark brown cotton yarn or embroidery thread.
Mark a horizontal nose approximately 2 cm wide between R15 and R16. Make four or five horizontal stitches over the same area, then add one vertical stitch downward across two rounds. Form the mouth with two short diagonal stitches extending from the bottom of the vertical line.
Add one small eyebrow above each eye. Each eyebrow should cover approximately one stitch width and sit two rounds above the safety eye. Knot the thread inside the head or bury the ends through the stuffed fabric.
Bow Tie Panels — Make Two
Yarn: taupe. Work in turning rows.
Ch 7.
Row 1: Starting in the second ch from the hook, 6 sc (6)
Row 2: ch 1, turn, inc, 4 sc, inc (8)
Row 3: ch 1, turn, sc across (8)
Row 4: ch 1, turn, dec, 4 sc, dec (6)
Row 5: ch 1, turn, sc across (6)
Fasten off the first panel and weave in the tail. After completing the second panel, leave a 25 cm tail.
Place both panels side by side with their narrower ends touching. Sew the inner edges together using two or three secure stitches. The joined piece forms the two loops of the bow.
Bow Tie Center Band
Yarn: taupe. Work in turning rows.
Ch 4.
Row 1: Starting in the second ch from the hook, 3 sc (3)
Rows 2–6: ch 1, turn, 3 sc (3)
Fasten off and leave a 20 cm tail. Wrap the strip around the joined center of the bow panels. Sew the short ends together at the back, then use the remaining tail to anchor the bow below the bear’s head.
Assembly
- Position the body under the head with the body’s final round centered against the lower head. Sew through both pieces twice around the full neckline.
- Check that the head faces directly forward before tightening the final neck stitches. Add a small amount of stuffing through any remaining gap when the neck bends under the head’s weight.
- Pin the ears between approximately R5 and R10 of the head. The inner edges should sit about eight stitches apart across the crown.
- Sew each ear along its flattened lower edge. Add one or two stitches near the back of each ear to maintain the shallow cupped shape.
- Place the pink cheek patches one round below the eyes and slightly toward the outer edge of the face. Sew around each circle with matching pink yarn.
- Position the arms on the sides of the body between approximately R16 and R18. Angle each arm slightly forward before sewing the flattened top edge in place.
- Pin the legs against the lower body between approximately R4 and R8. Leave a narrow gap between them so the cream body remains visible from the front.
- Sew each leg through the flattened top edge and reinforce both outer corners. Place the bear on a level surface before securing the final stitches.
- Center the bow tie below the neck seam. Sew through the back of the center band rather than through the front loops of the bow.
- Hide every yarn tail inside the nearest stuffed section. Shape the head, body and feet by rolling them gently between both hands.
The completed bear should measure approximately 25–26 cm from the bottom of the feet to the top of the head.
7 Technical Tips
- Mark the true first stitch. Chenille yarn can hide the top loops, causing an accidental seventh increase or missed stitch. Insert the locking marker before making the second stitch of each round.
- Limit stuffing compression at the head opening. Packing the final 12 stitches too tightly creates a pointed lower jaw. Leave approximately 1 cm of compression space around the last decrease rounds.
- Use invisible decreases on every shaped surface. Standard decreases can expose horizontal bars across the face and body. Work only through the front loops of the next two stitches when making each decrease.
- Attach the safety eyes before R19. The opening becomes difficult to reach once the head decreases below 30 stitches. Keep approximately nine visible stitches between the eye posts.
- Control chenille tension at the magic ring. Pulling the ring tail too sharply can strip the fuzzy coating from the core thread. Tighten it in two or three gradual pulls instead of one hard motion.
- Pin the legs on a flat surface. A difference of one round between the two attachment points can make the bear lean. Align both leg soles against a ruler or table edge before sewing.
- Weave tails through at least 5 cm of stuffing. Short tails can work back through the loose chenille stitches. Pass each tail through the stuffed piece twice, exiting at two different points before trimming.
Adjusting the Finished Size
The finished dimensions depend on yarn thickness, hook size and personal tension. A 4.5 mm hook with standard chunky chenille should produce a bear close to 25 cm tall. A tighter crocheter may obtain a figure closer to 22 cm, while a looser gauge can increase the height beyond 27 cm.
Do not change the hook size by more than 1 mm without testing the fabric. A hook that is too large creates visible gaps around the safety-eye posts and decrease rounds. A hook that is too small compresses chenille yarn, makes the fabric rigid and may damage the yarn’s surface.
For a smaller bear, substitute worsted-weight cotton yarn and use a 3 mm hook. Keep every stitch count unchanged. The resulting figure will be smaller, but the proportions will remain consistent. Safety eyes should also be reduced to approximately 8–10 mm.
Color and Facial Placement Options
The cream-and-taupe color arrangement creates a clear division between the central body and the outer features. Keep the head and body in the same main color when reproducing the photographed design. Changing the head alone can make the toy appear to wear a hood rather than display natural bear markings.
For a brown bear variation, use medium brown for the head and body, dark brown for the ears and limbs, and beige for the cheeks or muzzle details. A polar-bear version can use white throughout, with pale gray ears and feet. Retain the dark brown embroidered nose because pure black thread can appear visually heavy beside large black safety eyes.
Eye spacing affects the bear’s expression more than eye size. Moving the eyes one stitch closer creates a narrower central face, while placing them farther apart broadens the cheeks. Do not position the eye posts directly above the widest point of the head. They should sit slightly below the midpoint so the forehead remains larger than the lower face.
Conclusion
Complete the bear by checking the neck seam, leg alignment and bow placement from the front, back and both sides. Any uneven attachment is easier to correct before the yarn tails are trimmed. Record the yarn brand, hook size and finished height so a second bear can be reproduced at the same scale. This teddy bear amigurumi crochet pattern can be saved to Pinterest or shared on Instagram with the hashtag #BowTieTeddyPattern. For the next version, decide whether the taupe ear sections should remain solid or include smaller cream inner-ear patches. Which bow color would provide the strongest contrast against this bear’s cream body?









