Introduction
A mouse’s ears can exceed the width of its face, but their attachment points must remain narrow enough to preserve a rounded head. This mouse amigurumi crochet pattern uses chunky chenille yarn, a 4.5 mm hook and 14 mm safety eyes to make a standing mouse approximately 26 cm tall. It suits an advanced beginner familiar with spiral rounds, color changes and sewn appliqués. Broad feet support stable shelf display.
The Design: What Makes This Mouse Different
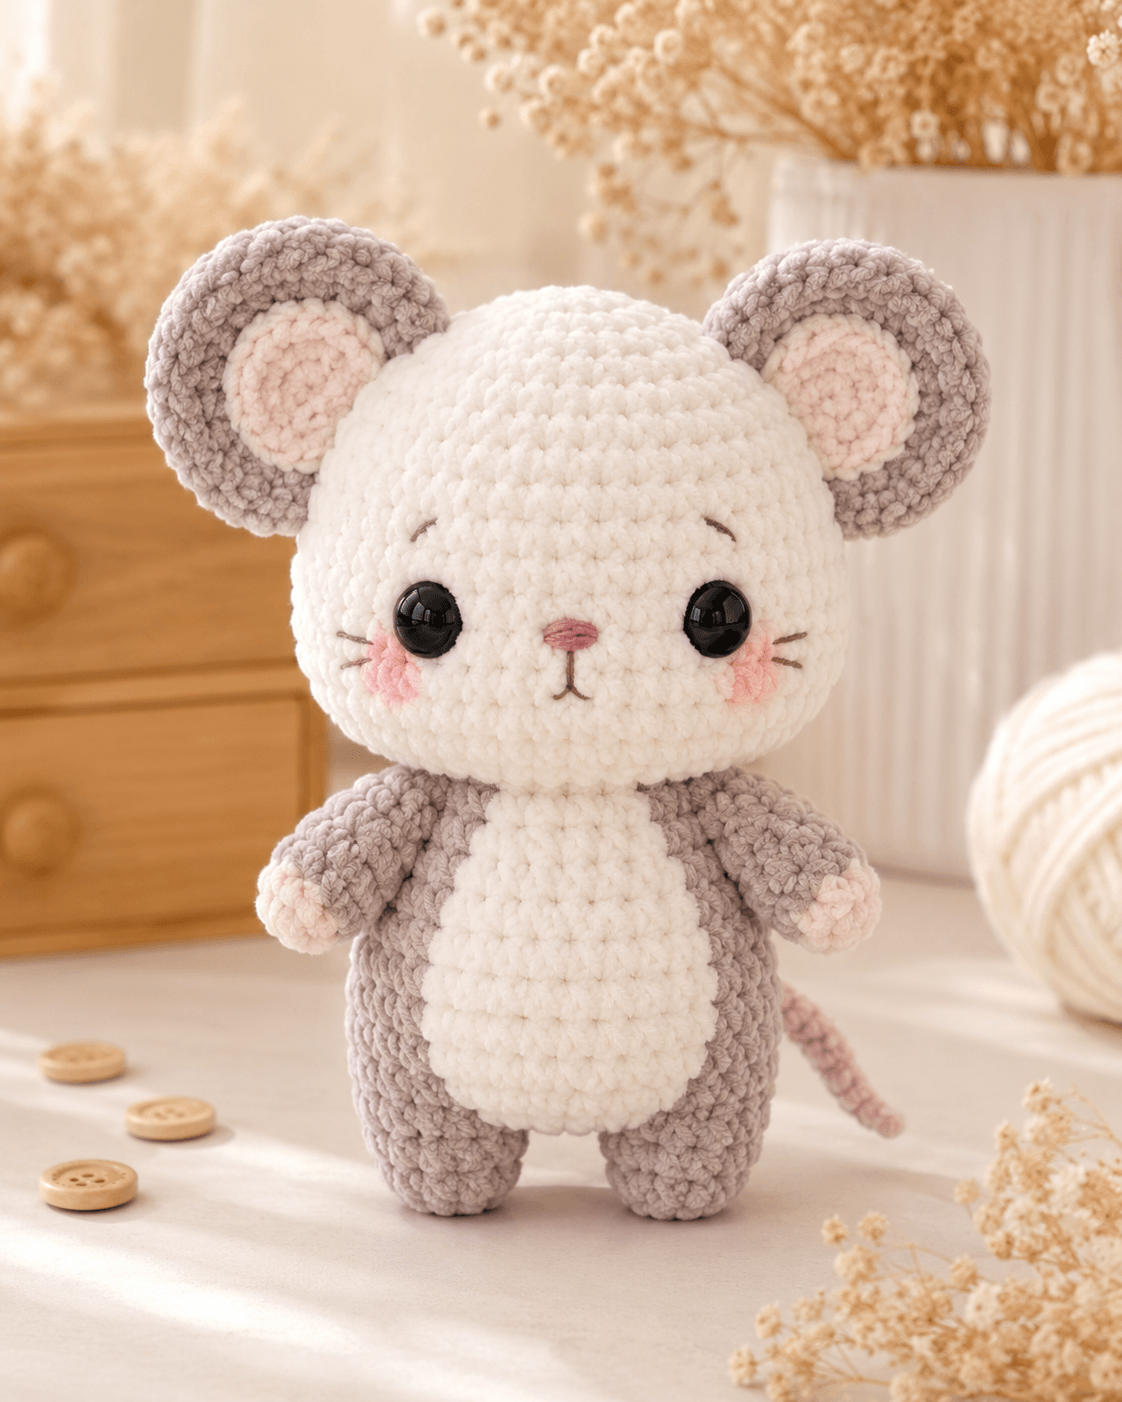
The head expands to a 42-stitch plateau, providing enough width for oversized circular ears without producing a narrow muzzle. Each ear consists of a gray outer disc and a smaller pink insert, which keeps the edge firm while matching the layered construction visible in the reference mouse. The body reaches 36 stitches and carries a separate cream belly patch. Short arms sit high on the torso, while rounded legs create a compact standing base. The thin pink tail identifies the animal without adding excessive weight behind the body. A common mistake in a plush mouse amigurumi is sewing the ears flat against the crown. This reduces their visible diameter and makes the head appear smaller. Attach each ear along its lower third, leaving most of the circle unsupported and visible from the front.
Project Info at a Glance
| Skill Level | Time | Finished Size | Hook | Best For |
|---|---|---|---|---|
| Advanced beginner | 7–9 hours | Approximately 25–28 cm | 4.5 mm | Nursery display, handmade gifts and animal collections |
Published velvet mouse patterns commonly finish near 25–28 cm tall. Smaller versions made with sport or DK yarn may measure only 8–17 cm, so the yarn thickness must be considered when comparing finished dimensions.
Materials and Tools
Yarn
- Cream white chunky chenille yarn — approximately 110 g for the head, belly patch and neck area
- Warm gray chunky chenille yarn — approximately 90 g for the body, ears, arms and legs
- Pale pink chunky or worsted yarn — approximately 15 g for the inner ears, paws and tail
- Blush pink DK yarn — less than 5 g for the cheek patches
- Dusty rose embroidery thread — approximately 50 cm for the nose
- Dark brown embroidery thread — approximately 1 m for the mouth, eyebrows and whiskers
Suitable chenille yarns include Himalaya Dolphin Baby, Premier Parfait Chunky and YarnArt Dolce. Use cream and gray yarn from the same range because differences in strand diameter can change the head-to-body ratio.
Tools
- 4.5 mm crochet hook
- 14 mm black safety eyes
- 3.5 mm crochet hook for the thin tail and facial details
- Polyester toy stuffing
- Wide-eye yarn needle
- Embroidery needle
- Locking stitch marker
- Dressmaking pins
- Small scissors
Plastic safety eyes are not suitable for a toy intended for a child under three years old. Substitute tightly embroidered eyes when the finished mouse will be handled by a young child.
Abbreviations
- MR — magic ring
- sc — single crochet
- inc — two single crochet stitches in one stitch
- dec — single crochet two stitches together
- sl st — slip stitch
- ch — chain
- BLO — back loop only
- FO — fasten off
For an invisible decrease, insert the hook through the front loops of the next two stitches and complete one single crochet through both front loops.
Pattern — Step by Step
Work the three-dimensional pieces in continuous spirals unless rows or joined rounds are specified. Move the stitch marker into the first stitch of every new round. The number in brackets shows the stitch total after completing that round.
Head
Yarn: cream white. Begin at the crown and work toward the lower head.
R1: 6 sc in MR (6)
R2: inc ×6 (12)
R3: (sc, inc) ×6 (18)
R4: (2 sc, inc) ×6 (24)
R5: (3 sc, inc) ×6 (30)
R6: (4 sc, inc) ×6 (36)
R7: (5 sc, inc) ×6 (42)
R8–R17: sc around (42)
R18: (5 sc, dec) ×6 (36)
Insert the safety eyes between R14 and R15 with approximately nine visible stitches between the posts. Check that both eyes remain level before pressing the washers into place.
R19: sc around (36)
R20: (4 sc, dec) ×6 (30)
R21: (3 sc, dec) ×6 (24)
R22: (2 sc, dec) ×6 (18)
Stuff the crown and sides firmly. Place smaller pieces of stuffing behind the eyes to prevent them from sinking into the fabric.
R23: (sc, dec) ×6 (12)
R24: dec ×6 (6)
Fasten off and leave a 15 cm tail. Thread the tail through the front loops of the remaining six stitches, pull the opening closed and bury the yarn inside the head.
Body
Yarn: warm gray. Work upward from the lower body.
R1: 6 sc in MR (6)
R2: inc ×6 (12)
R3: (sc, inc) ×6 (18)
R4: (2 sc, inc) ×6 (24)
R5: (3 sc, inc) ×6 (30)
R6: (4 sc, inc) ×6 (36)
R7–R13: sc around (36)
R14: (4 sc, dec) ×6 (30)
R15–R17: sc around (30)
R18: (3 sc, dec) ×6 (24)
R19–R21: sc around (24)
R22: (2 sc, dec) ×6 (18)
R23: sc around (18)
Stuff the lower body firmly enough to maintain an oval shape. Use less filling near R22 and R23 so the neck seam can sit flat against the head.
Fasten off and leave a 35 cm tail for sewing.
Arms — Make Two
Begin with pale pink for the paw. Change to warm gray after R3.
R1: 6 sc in MR with pink (6)
R2: inc ×6 (12)
R3: sc around (12)
Change to warm gray on the final yarn-over of R3.
R4: (sc, inc) ×6 (18)
R5–R6: sc around (18)
R7: (sc, dec) ×6 (12)
R8–R13: sc around (12)
Place a small amount of stuffing in the paw and lower arm. Leave the top three rounds unstuffed so the arm hangs close to the body.
Flatten the opening and crochet 6 sc through both layers. Fasten off and leave a 25 cm sewing tail.
Legs — Make Two
Yarn: warm gray. The legs begin at the soles.
R1: 6 sc in MR (6)
R2: inc ×6 (12)
R3: (sc, inc) ×6 (18)
R4: BLO sc around (18)
R5–R8: sc around (18)
R9: (sc, dec) ×6 (12)
R10–R13: sc around (12)
Stuff the base firmly and press the filling into the edge created by the BLO round. Leave the upper opening slightly softer to reduce bulk at the body seam.
Flatten the final round and crochet 6 sc through both layers. Fasten off and leave a 30 cm tail.
Outer Ears — Make Two
Yarn: warm gray. Do not stuff the ears.
R1: 6 sc in MR (6)
R2: inc ×6 (12)
R3: (sc, inc) ×6 (18)
R4: (2 sc, inc) ×6 (24)
R5: (3 sc, inc) ×6 (30)
R6: (4 sc, inc) ×6 (36)
R7: sc around (36)
Join with a sl st in the first stitch. Fasten off and leave a 35 cm sewing tail. Each outer ear should form a flat circle approximately 9–10 cm across.
Inner Ears — Make Two
Yarn: pale pink. Use a 4 mm hook when available so the insert remains smaller than the outer ear.
R1: 6 sc in MR (6)
R2: inc ×6 (12)
R3: (sc, inc) ×6 (18)
R4: (2 sc, inc) ×6 (24)
R5: sc around (24)
Join with a sl st. Fasten off and leave a 25 cm tail. Center one pink circle on each gray ear and sew around the outer edge of the insert.
Belly Patch
Yarn: cream white. Work in continuous rounds.
R1: 6 sc in MR (6)
R2: inc ×6 (12)
R3: (sc, inc) ×6 (18)
R4: (2 sc, inc) ×6 (24)
R5: (3 sc, inc) ×6 (30)
R6: (4 sc, inc) ×6 (36)
R7: sc around (36)
Fasten off and leave a 35 cm tail. Stretch the circle vertically while pinning so it forms an oval approximately 12 cm high and 9 cm wide.
Tail
Yarn: pale pink. Use a 3.5 mm hook to create a thinner fabric tube.
R1: 6 sc in MR (6)
R2–R22: sc around (6)
Do not stuff the tail. Insert a doubled strand of matching yarn through the tube when additional firmness is required.
Fasten off and leave a 25 cm tail. The completed piece should measure approximately 15–17 cm long before attachment.
Cheek Patches — Make Two
Yarn: blush pink DK yarn. Use a 3 mm hook.
R1: 6 sc in MR (6)
R2: inc ×6 (12)
Join with a sl st in the first stitch. Fasten off and leave a 15 cm sewing tail. Flatten each patch before attachment.
Embroidered Nose
Use dusty rose embroidery thread.
Mark a horizontal line approximately 1.5 cm wide between R17 and R18 of the head. Pass the thread across the marked line five or six times. Add two short diagonal stitches under the lower edge to create a shallow triangular nose.
Mouth
Use dark brown embroidery thread.
Bring the needle out directly below the center of the nose. Make one vertical stitch extending downward across two rounds. Form the mouth with one curved stitch on each side of the lower endpoint. Each side should measure no more than 1 cm.
Eyebrows and Whiskers
Use dark brown embroidery thread separated into three strands.
Place one short curved eyebrow approximately two rounds above each eye. Add three whiskers on each cheek, beginning near the outer edge of the pink patch. Keep each whisker between 1 and 1.5 cm long.
Do not pull the embroidery thread tightly. Excess tension compresses the chenille surface and creates visible grooves across the face.
Assembly
- Center the body under the head and pin the final 18 body stitches against the lower head. Sew around the neck opening twice, adding stuffing through the final gap when the head tilts.
- Position the assembled ears between approximately R4 and R11 of the head. Leave about ten stitches between their inner attachment edges and confirm that both circles remain visible from the front.
- Sew the lower third of each ear to the head. Add two reinforcing stitches behind each ear without flattening the unsupported upper section.
- Attach the pink cheek patches one round below the eyes and slightly toward the outer face. Complete the nose, mouth, eyebrows and whiskers after the patches are fixed.
- Shape the cream belly patch into a vertical oval and center it on the front of the body. Its upper edge should begin just below the neck seam.
- Sew the belly through the back loops of its outer round. Keep the fabric flat and check that equal amounts of gray remain visible on both sides.
- Attach the arms between approximately R18 and R20 of the body. Angle the pink paws slightly forward before sewing the flattened openings in place.
- Pin the legs to the lower body between R4 and R8. Set the mouse on a flat surface and adjust both legs until the soles touch evenly before completing the seams.
- Sew the tail to the lower back between approximately R7 and R9. Add a second anchor point 3 cm from the base so the tail curves outward rather than hanging vertically.
- Pass every remaining yarn tail through at least 5 cm of stuffing before trimming. Reshape the head, torso and feet after all attachment seams are complete.
The completed mouse should measure approximately 25–28 cm from the bottom of the feet to the highest point of the ears.
7 Technical Tips
- Mark the first stitch before continuing each round. Chenille can conceal the joining area and produce an accidental extra stitch. Recount every 42-stitch head plateau before moving the marker.
- Keep the stuffing lighter behind the muzzle area. Excess filling beneath the nose pushes the face forward and creates a pointed profile. Leave approximately 5 mm of compression space across the lower front of the head.
- Use invisible decreases on every visible surface. Standard decreases leave horizontal bars that become prominent when chenille stretches. Catch only the front loops of the next two stitches for each decrease.
- Install the eyes before the head decreases below 30 stitches. The washer becomes difficult to reach through a smaller opening. Maintain approximately nine visible stitches between the eye posts.
- Reduce tension when closing the ear magic rings. Pulling a chenille tail sharply can strip the pile from its center cord. Tighten each ring in two or three gradual movements.
- Pin both legs against a ruler or table edge. A difference of one round between the attachment points can make the mouse lean. Confirm that both soles rest at the same height before sewing.
- Bury embroidery ends away from the eye posts. Knots placed directly behind a safety eye create a visible bump. Pass each thread end at least 3 cm sideways through the stuffing before trimming.
Controlling Ear Size and Placement
The ears are the widest individual components in this mouse amigurumi crochet pattern. Their finished diameter must relate to the 42-stitch head rather than the body. A gray ear measuring approximately 9 cm across creates the enlarged juvenile proportion shown in the reference image. Reducing the diameter below 7 cm makes the head appear more bear-like, while increasing it beyond 11 cm can cause the fabric to fold under its own weight.
Pin each ear before making permanent stitches. The lower attachment edge should follow the curve of the crown without extending below the top of the eye. When the ears are sewn too low, they widen the cheek area and reduce the visible height of the forehead. Their inner edges should remain nearly vertical, while the outer edges may tilt backward slightly.
The pink inserts must stay centered. An uneven gray border makes one ear appear larger even when both outer circles have matching stitch counts. Count the exposed gray rounds around each insert before sewing the second half.
Shaping the Body and Belly Patch
The body requires firm stuffing in its lower half because the legs are sewn rather than crocheted directly into the torso. Push small pieces of filling toward the lower side edges and test the body on a flat surface before attaching the head. A soft lower torso collapses between the legs, while an overfilled upper body creates a thick neck seam.
The belly patch begins as a circle but is attached as an oval. Stretch it vertically during pinning and compress the sides by approximately 1 cm. Its lower edge should stop above the leg seams so a narrow gray border remains visible. Covering the complete front of the body removes the contrast that defines the torso shape.
Sew through the patch’s back loops when possible. This leaves the outer top loops visible and creates a cleaner raised edge. Match the cream sewing yarn to the patch rather than the gray body because pale stitches are less noticeable along the boundary.
Tail Construction and Position
A mouse tail must remain thinner than the arms and legs. Working six stitches per round with a smaller hook produces a narrow tube without requiring wire. The pictured tail uses pink yarn and curves gently behind the body. Do not pack it with polyester stuffing; filling expands the diameter and can make the tail resemble a short limb.
For a firmer tail, pass several lengths of matching yarn through the finished tube. This method adds structure without introducing a rigid internal component. A toy intended for frequent handling should not contain craft wire because repeated bending can push a sharp end through the crochet fabric.
Attach the tail low on the back and point it toward one side. The base seam carries the weight, while a second anchor stitch controls the direction. Avoid sewing the full tail against the body. Most of its length should remain free so the mouse silhouette is visible from the front and side.
Changing Yarn Weight
Keep the written stitch counts unchanged when substituting yarn. A worsted-weight version worked with a 3.5–4 mm hook will produce a smaller mouse with more defined stitches. Sport-weight yarn and a 2.5 mm hook may reduce the finished height to approximately 10–17 cm, depending on tension and fiber content.
Complete the first six head rounds as a gauge test. Bend the circle over one finger and inspect the spaces between the stitches. Visible stuffing gaps indicate that the hook is too large. A dense disc that resists bending indicates that the hook is too small.
Scale the safety eyes with the finished head. The 14 mm eyes suit chunky chenille and the 42-stitch plateau specified here. Use 8–10 mm eyes for a worsted-weight version and approximately 6 mm eyes for a small sport-weight mouse. Confirm the actual placement with pins before installing the washers.
Conclusion
Check the completed mouse from the front, back and both sides before trimming the sewing tails. Compare ear height, eye spacing, belly alignment and the amount of pink visible on each paw. Place the figure on a level surface and adjust the leg seams until both feet remain flat. Record the yarn brand, hook size and finished height before making a matching second mouse. Save this mouse amigurumi crochet pattern to Pinterest or share the result on Instagram with #RoundEarMousePattern. The next version can use brown, silver or pale lavender for the body while retaining the cream face. Should its tail remain straight or curve upward behind the right arm?









