Introduction
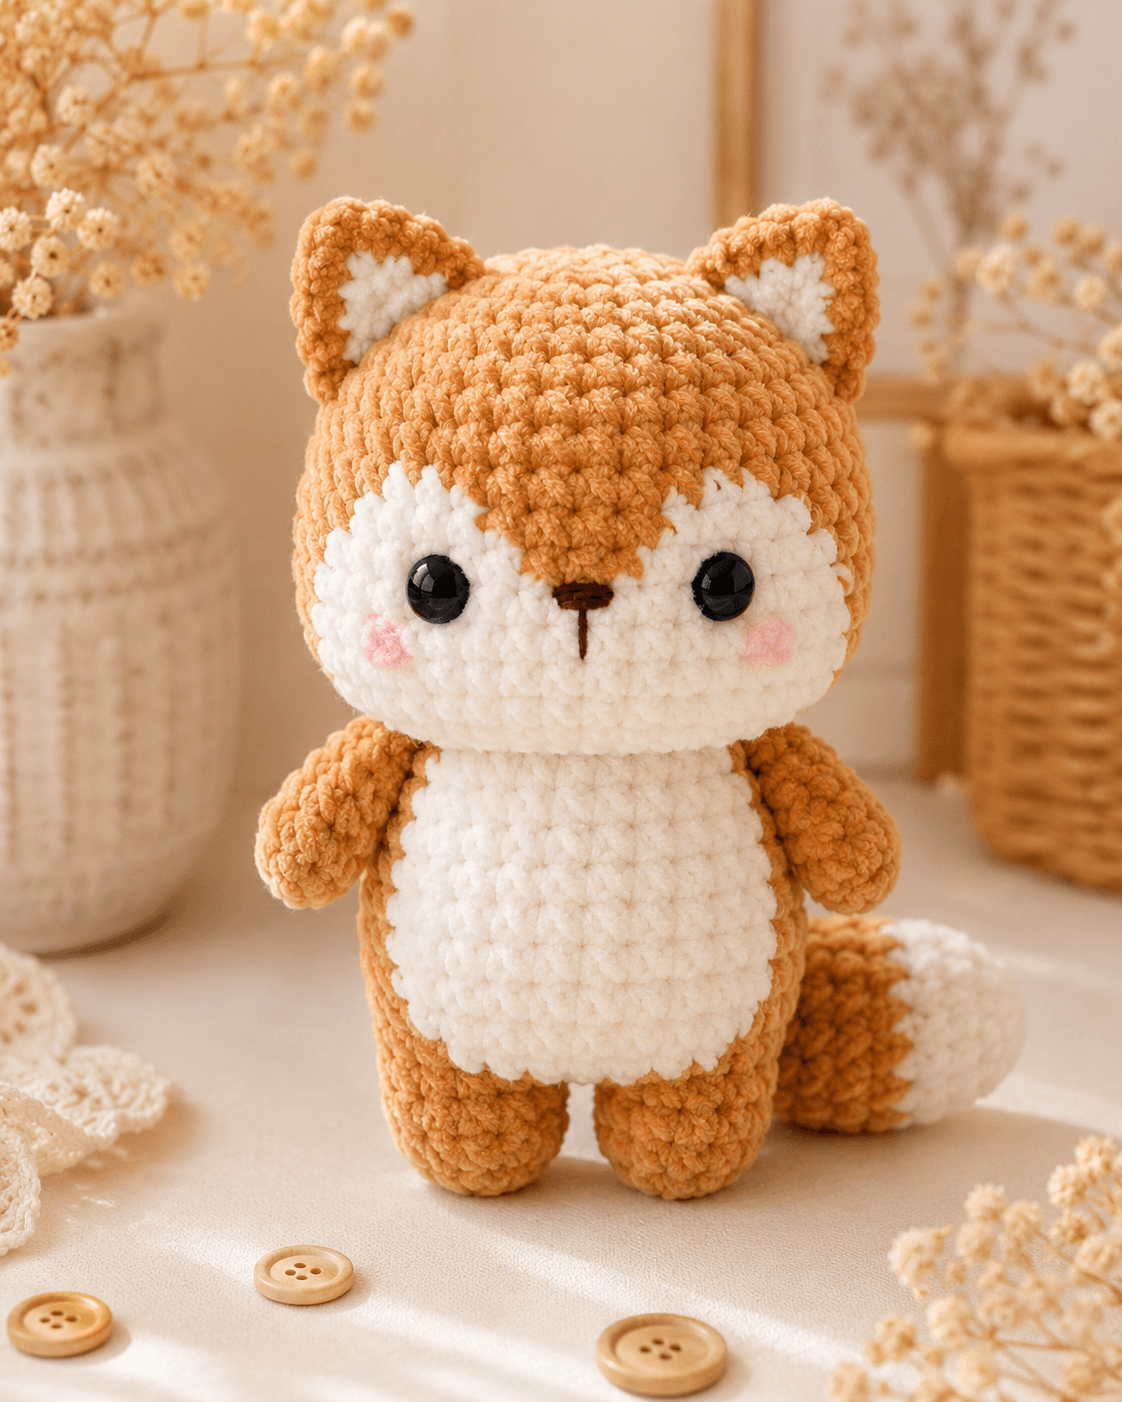
A fox’s tail must counterbalance its narrow ears without pulling the body backward. This fox amigurumi crochet pattern uses chunky chenille yarn, a 4.5 mm hook and 12 mm safety eyes to produce a standing fox approximately 25 cm tall. The pattern is rated advanced beginner because it includes spiral rounds, color changes and sewn facial panels. Its broad feet support upright shelf display.
The Design: What Makes This Fox Different
The head uses a 36-stitch plateau to create a rounded juvenile profile rather than a long realistic muzzle. Two cream facial panels cover the lower front of the orange head, forming the wide mask visible in the reference image. A separate center blaze extends toward the forehead and breaks up the horizontal edge of the mask. The body also reaches 36 stitches, but its longer plateau produces an oval torso beneath the oversized head. Short arms preserve the compact silhouette, while a firmly shaped tail provides the identifying fox feature. A common mistake in a plush fox amigurumi is placing the ears too far toward the sides. Wide ear spacing makes the head resemble a cat. Position the inner ear edges above the inner eye edges and angle the points slightly outward.
Project Info at a Glance
| Skill Level | Time | Finished Size | Hook | Best For |
|---|---|---|---|---|
| Advanced beginner | 7–9 hours | Approximately 25 cm | 4.5 mm | Woodland nursery decor, gifts and craft displays |
Published fox patterns vary considerably with yarn choice. A worsted-weight fox pattern lists a 4.5 mm hook, 12 mm eyes and a standing height near 30 cm, while another published design measures approximately 25 cm tall. The dimensions below are calculated for chunky chenille worked at a firm amigurumi tension.
Materials and Tools
Yarn
- Fox orange chunky chenille yarn — approximately 120 g for the head, body, arms, legs, ears and tail
- Cream white chunky chenille yarn — approximately 55 g for the face, belly, inner ears and tail tip
- Blush pink DK yarn — less than 5 g for the cheek patches
- Dark brown cotton yarn or embroidery thread — approximately 1 m for the nose and mouth
Suitable chenille options include Himalaya Dolphin Baby, Premier Parfait Chunky and YarnArt Dolce. Use orange and cream yarn from the same product line because strand differences can distort the face panels and belly patch.
Tools
- 4.5 mm crochet hook
- 12 mm black safety eyes
- Polyester toy stuffing
- Wide-eye yarn needle
- Locking stitch marker
- Dressmaking pins
- Small scissors
Replace the plastic eyes with embroidered eyes when the fox is intended for a child under three years old.
Abbreviations
- MR — magic ring
- sc — single crochet
- inc — two single crochet stitches in one stitch
- dec — single crochet two stitches together
- sl st — slip stitch
- ch — chain
- BLO — back loop only
- FO — fasten off
For an invisible decrease, insert the hook through the front loops of the next two stitches and complete one single crochet through both front loops.
Pattern — Step by Step
Work in continuous spirals unless the instructions specify rows or a joined round. Move the stitch marker into the first stitch of every new round. All bracketed numbers show the stitch total after completing that round.
Head
Yarn: fox orange. The head begins at the crown and closes underneath.
R1: 6 sc in MR (6)
R2: inc ×6 (12)
R3: (sc, inc) ×6 (18)
R4: (2 sc, inc) ×6 (24)
R5: (3 sc, inc) ×6 (30)
R6: (4 sc, inc) ×6 (36)
R7–R16: sc around (36)
R17: (4 sc, dec) ×6 (30)
Place the safety eyes between R13 and R14 with approximately eight visible stitches between the posts. Do not attach the washers until the cream face panels have been pinned temporarily and the spacing has been checked.
R18: sc around (30)
R19: (3 sc, dec) ×6 (24)
R20: (2 sc, dec) ×6 (18)
Stuff the forehead and outer sides firmly. Add smaller pieces of filling behind the eyes so the posts remain supported.
R21: (sc, dec) ×6 (12)
R22: dec ×6 (6)
Fasten off. Leave a 15 cm tail, thread it through the front loops of the remaining six stitches and pull the opening closed.
Body
Yarn: fox orange. Work from the lower body toward the neck.
R1: 6 sc in MR (6)
R2: inc ×6 (12)
R3: (sc, inc) ×6 (18)
R4: (2 sc, inc) ×6 (24)
R5: (3 sc, inc) ×6 (30)
R6: (4 sc, inc) ×6 (36)
R7–R13: sc around (36)
R14: (4 sc, dec) ×6 (30)
R15–R17: sc around (30)
R18: (3 sc, dec) ×6 (24)
R19–R20: sc around (24)
R21: (2 sc, dec) ×6 (18)
R22: sc around (18)
Stuff the lower body firmly enough to hold its oval shape. Reduce the stuffing pressure near the final two rounds so the neck seam does not bulge.
Fasten off and leave a 35 cm tail for attaching the body to the head.
Arms — Make Two
Yarn: fox orange. Stuff the rounded ends only.
R1: 6 sc in MR (6)
R2: inc ×6 (12)
R3: (sc, inc) ×6 (18)
R4–R6: sc around (18)
R7: (sc, dec) ×6 (12)
R8–R12: sc around (12)
Add a small amount of stuffing through R7. Leave R8–R12 unstuffed so the arm can lie against the torso.
Flatten the opening and crochet 6 sc through both layers. Fasten off and leave a 25 cm sewing tail.
Legs — Make Two
Yarn: fox orange. The BLO round defines the lower edge of each foot.
R1: 6 sc in MR (6)
R2: inc ×6 (12)
R3: (sc, inc) ×6 (18)
R4: BLO sc around (18)
R5–R8: sc around (18)
R9: (sc, dec) ×6 (12)
R10–R12: sc around (12)
Pack the base firmly and press the stuffing into the edge formed by R4. Keep the top third softer to reduce thickness at the attachment seam.
Flatten the opening and crochet 6 sc through both layers. Fasten off and leave a 30 cm tail.
Outer Ears — Make Two
Yarn: fox orange. Work in turning rows to create a triangular outline.
Ch 2.
Row 1: 2 sc in the second ch from the hook (2)
Row 2: ch 1, turn, inc ×2 (4)
Row 3: ch 1, turn, sc across (4)
Row 4: ch 1, turn, inc, 2 sc, inc (6)
Row 5: ch 1, turn, sc across (6)
Row 6: ch 1, turn, inc, 4 sc, inc (8)
Row 7: ch 1, turn, sc across (8)
Crochet one row of sc evenly around both sloping edges and across the base. Fasten off and leave a 30 cm tail.
Inner Ears — Make Two
Yarn: cream white. Use a 4 mm hook when available so the inserts remain smaller than the orange ear panels.
Ch 2.
Row 1: 2 sc in the second ch from the hook (2)
Row 2: ch 1, turn, inc ×2 (4)
Row 3: ch 1, turn, sc across (4)
Row 4: ch 1, turn, inc, 2 sc, inc (6)
Row 5: ch 1, turn, sc across (6)
Fasten off and leave a 20 cm tail. Sew one cream insert to the front of each orange ear, leaving an even orange border around the sloping edges.
Left Face Patch
Yarn: cream white. Work in continuous rounds.
R1: 6 sc in MR (6)
R2: inc ×6 (12)
R3: (sc, inc) ×6 (18)
R4: (2 sc, inc) ×6 (24)
R5: sc around (24)
Fasten off and leave a 25 cm tail. Flatten the circle slightly into an oval during pinning.
Right Face Patch
Yarn: cream white.
R1: 6 sc in MR (6)
R2: inc ×6 (12)
R3: (sc, inc) ×6 (18)
R4: (2 sc, inc) ×6 (24)
R5: sc around (24)
Fasten off and leave a 25 cm tail. The two patches should overlap by approximately four stitches at the center of the face.
Forehead Blaze
Yarn: fox orange. This narrow piece covers the upper center of the cream facial patches and creates the pointed orange marking.
Ch 2.
Row 1: 2 sc in the second ch from the hook (2)
Row 2: ch 1, turn, inc ×2 (4)
Row 3: ch 1, turn, sc across (4)
Row 4: ch 1, turn, inc, 2 sc, inc (6)
Row 5: ch 1, turn, sc across (6)
Row 6: ch 1, turn, inc, 4 sc, inc (8)
Row 7: ch 1, turn, sc across (8)
Fasten off and leave a 20 cm sewing tail. Position the narrow end between the eyes and the wider edge against the orange crown.
Belly Patch
Yarn: cream white. Work in continuous rounds.
R1: 6 sc in MR (6)
R2: inc ×6 (12)
R3: (sc, inc) ×6 (18)
R4: (2 sc, inc) ×6 (24)
R5: (3 sc, inc) ×6 (30)
R6: (4 sc, inc) ×6 (36)
R7–R8: sc around (36)
Fasten off and leave a 35 cm tail. Shape the circle into a vertical oval when attaching it to the front of the body.
Tail
Begin with cream white for the tail tip. Change to fox orange after R6.
R1: 6 sc in MR with cream (6)
R2: inc ×6 (12)
R3: (sc, inc) ×6 (18)
R4: (2 sc, inc) ×6 (24)
R5–R6: sc around (24)
Change to fox orange on the final yarn-over of R6.
R7–R10: sc around in orange (24)
R11: (2 sc, dec) ×6 (18)
R12–R15: sc around (18)
R16: (sc, dec) ×6 (12)
R17–R20: sc around (12)
Stuff the cream tip firmly. Add progressively less filling through the orange section so the narrow end remains flexible.
Flatten the opening and crochet 6 sc through both layers. Fasten off and leave a 35 cm tail.
Cheek Patches — Make Two
Yarn: blush pink DK yarn. Use a 3 mm hook for compact circles.
R1: 6 sc in MR (6)
R2: inc ×6 (12)
Join with a sl st in the first stitch. Fasten off and leave a 15 cm tail. Each patch should measure approximately 2 cm across.
Embroidered Nose and Mouth
Use dark brown cotton yarn or six-strand embroidery thread.
Mark a horizontal line approximately 1.5 cm wide at the center of the overlapping cream face patches. Pass the yarn across this line four or five times to form the nose. Add one vertical stitch extending downward across two rounds. Do not add long mouth curves; the reference fox uses a compact central line.
Assembly
- Center the body beneath the head and pin the 18-stitch neck opening against the lower head. Sew around the opening twice, adding a small amount of stuffing before closing the final gap.
- Pin the cream facial patches over the lower front of the head. Their inner edges should overlap at the center while their upper edges sit partly behind the safety eyes.
- Sew the outer edge of each face patch first. Secure the overlapping center edges after checking that both eyes remain equally exposed.
- Place the orange forehead blaze over the center of the cream patches. Sew around its perimeter with orange yarn, keeping the narrow point directly above the nose.
- Attach the pink cheeks one round below the eyes and slightly outside the eye posts. Add the embroidered nose and vertical mouth line after both cheeks are fixed.
- Pin the ears between approximately R3 and R8 of the head. Angle each tip outward by about 15 degrees, then sew along the base and lower side edges.
- Shape the cream belly patch into a vertical oval and center it across the front of the body. Sew through the back loops of the patch to keep the outer edge rounded.
- Attach the arms at the upper sides of the body between R17 and R19. Position the legs across the lower body between R4 and R8, then test the fox on a flat surface before sewing.
- Pin the tail to the lower back with the cream tip pointing sideways. Stitch the flattened opening to the body and add a second anchor point where the tail touches the back.
- Hide each yarn tail inside the closest stuffed section. Adjust the filling through the fabric until the head, torso, feet and tail hold their intended shapes.
The completed fox should stand approximately 25 cm tall from the bottom of the feet to the tips of the ears.
7 Technical Tips
- Keep the round marker in the true first stitch. Chenille fibers can cover the stitch opening and cause an extra stitch at the join. Count each 36-stitch plateau before starting the next round.
- Do not overfill the lower head. Excess stuffing beneath R18 pushes the cream face patches outward and creates a visible gap along their edges. Leave approximately 5 mm of compression space under the front surface.
- Use invisible decreases on the head and body. A standard decrease leaves a horizontal bar that becomes more visible when the fabric is stretched. Catch only the front loops of the next two stitches for each decrease.
- Check eye placement with the face patches pinned. Installing the washers before testing the cream panels can leave one eye partly covered. Maintain approximately eight visible stitches between the eye posts.
- Reduce hook pressure during color changes. Pulling chenille through a tight final loop can strip the pile from its center cord. Complete the last yarn-over slowly and tighten the new color after the following stitch.
- Pin the feet against a flat edge. A vertical difference of one round between the leg seams can make the fox lean. Align both soles with a ruler before fixing the first sewing stitch.
- Bury each tail through at least 5 cm of stuffing. A short woven end can reappear between loose chenille stitches. Pass the needle through the stuffed section twice and trim only after the yarn exits at a second point.
Controlling the Fox Face Shape
The facial panels determine whether the finished animal reads as a fox rather than a cat or dog. Pin both cream circles before sewing either one. Their outer edges should extend below the eyes and toward the side of the head, while the overlapping center section creates enough width for the embroidered nose. Placing the circles too low produces an isolated muzzle. Raising them until their upper edges sit behind the eyes creates the broad white fox mask shown in the reference image.
The forehead blaze adds the central orange point. Keep its lower tip above the nose rather than extending it over the embroidered stitches. A crooked blaze will make otherwise equal eye placement appear uneven. Measure from each side of the blaze to the nearest eye post before sewing the lower half.
Large black eyes can dominate a cream face. The 12 mm size matches a head with a 36-stitch plateau in chunky chenille. Reduce the eyes to 10 mm when using a thinner bulky yarn or unusually tight tension. Increasing beyond 14 mm leaves limited space for the blaze and cheek patches.
Tail Position and Standing Balance
The tail is wider than the arms and carries more stuffing, so its attachment affects the standing position. Sew the base low on the back and angle the wider section toward the floor. The cream tip may rest lightly on the display surface, creating a third contact point behind the feet. Attaching the tail high makes the body top-heavy and can pull the fox backward.
Use two attachment zones. The first secures the flattened base to the body. A second set of three or four stitches anchors the side of the tail approximately 4 cm above the base. This controls rotation without making the whole tail rigid. The cream tip should remain rounded, while the narrow orange base needs enough flexibility to follow the body contour.
Changing Yarn Weight
Keep every stitch count unchanged when substituting yarn. A worsted-weight version worked with a 3.5–4 mm hook will produce a smaller fox with sharper stitch definition. Published worsted fox patterns use hooks from approximately 3.5 to 4.5 mm and eye sizes from 8 to 12 mm. Chunky chenille generally requires a hook between 4 and 7 mm, depending on the strand and the maker’s tension.
Test the fabric by crocheting the first six head rounds. Bend the resulting circle over one finger and inspect the spaces between stitches. Visible openings indicate that the hook is too large. A fabric that feels hard and resists bending indicates that the hook is too small.
When changing yarn thickness, scale the safety eyes and cheek patches with the head rather than relying on the original measurements. The eye diameter should occupy roughly one-third of the distance from the lower edge of the eye to the top of the cream face panel.
Conclusion
Inspect the fox from the front before trimming any sewing tails. Compare ear height, visible eye area, arm angle and the amount of orange border around the belly patch. Next, place the figure on a level surface and adjust the tail anchor until both feet remain flat. Record the yarn brand, hook size and completed height for a matching second fox. Save this fox amigurumi crochet pattern to Pinterest or share the finished project on Instagram with #WhiteTipFoxPattern. For a color variation, replace the warm orange with rust red, silver gray or pale woodland brown. Should the next fox keep the cream forehead mask or use a narrower white muzzle?









