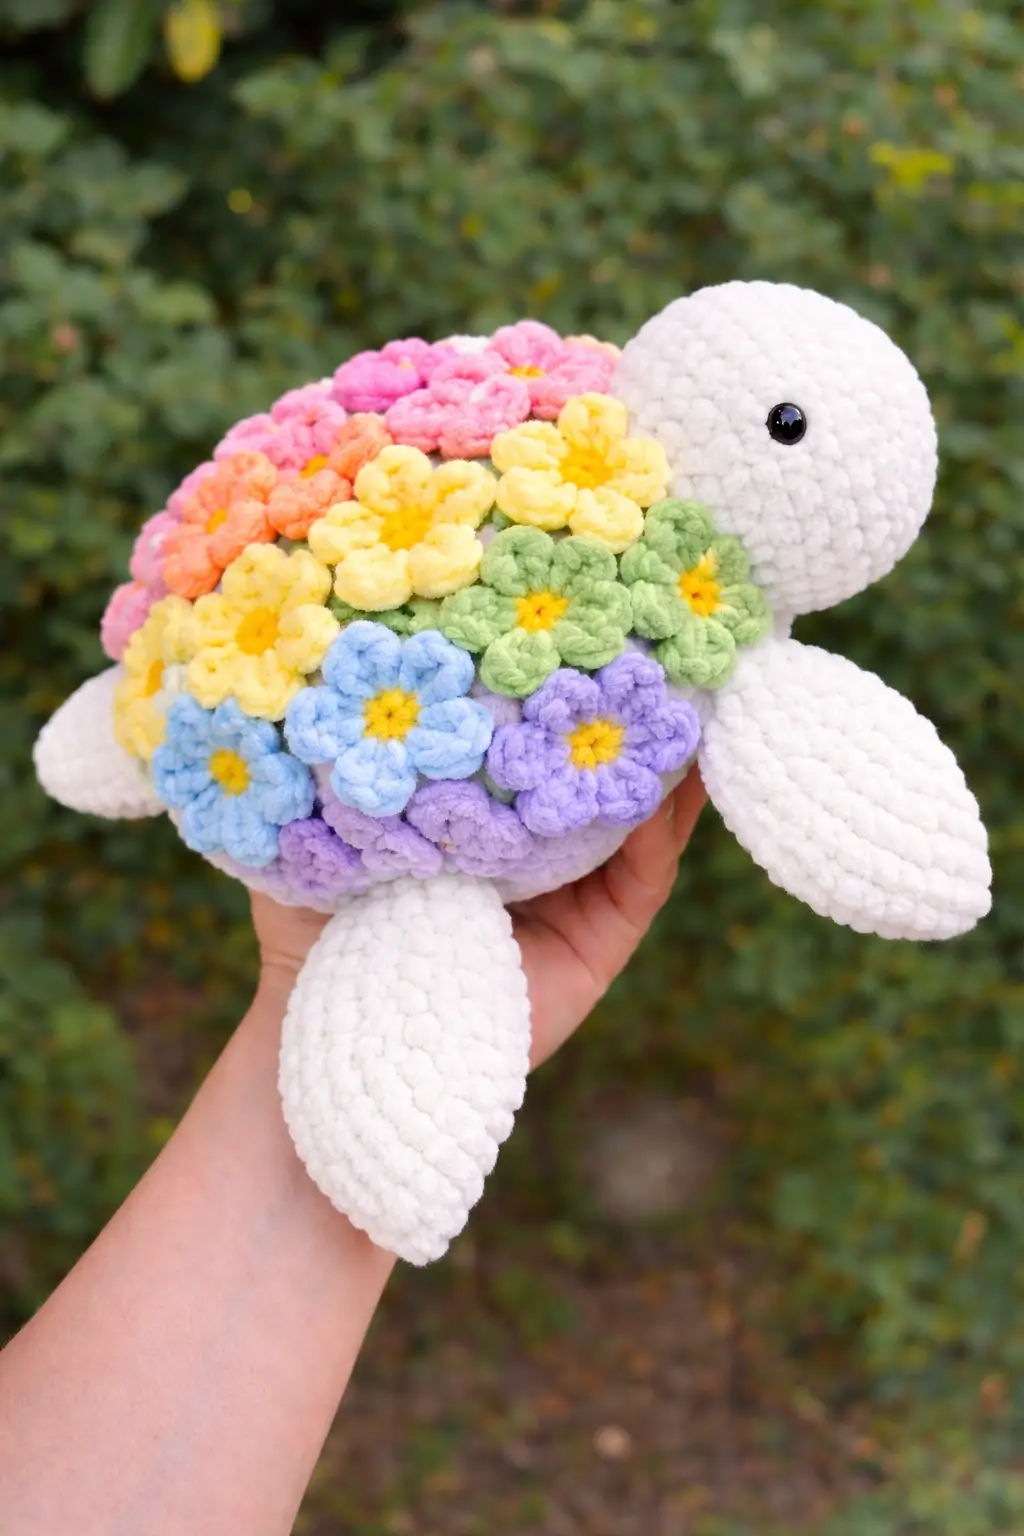
Introduction
A turtle shell covered in concentric plush flowers changes the whole build order. This flower turtle amigurumi crochet pattern uses chenille yarn, a 4 mm hook, oversized safety eyes, and medium plush shaping to make a turtle about 20 cm across for confident beginners who want a display piece that also works as a nursery gift. Verified flower-turtle references cluster around super bulky yarn and an 18 to 20 cm result.
The Design: What Makes This Turtle Different
The shell is not a separate dome with stitched appliqués. It reads better when the flowers are built as part of the shell surface or attached in dense layers, because a sea turtle silhouette stays low and wide rather than stacked upward. That choice keeps the profile broad. It also stops the plush from tipping backward.
Flippers matter more here than legs. A standard round limb makes the toy look like a land tortoise, while elongated oval paddles push it into plush turtle amigurumi territory. The head also needs restraint. Too much height and the flowers lose dominance; too little and the face disappears under the shell line. Many daisy turtle crochet pattern posts focus on no-sew speed, but they spend less time on proportion control for chenille yarn. That is where most distortion starts.
Project Info at a Glance
| Skill Level | Time | Finished Size | Hook | Best For |
|---|---|---|---|---|
| Confident beginner | 4–6 hours | 20 cm | 4 mm | Nursery decor, market sample, gift make |
Materials and Tools
Yarn
- White — super bulky chenille/velvet — about 35 g — Premier Parfait Chunky or similar plush yarn benchmark
- Yellow — super bulky chenille/velvet — about 10–15 g for centers
- Pastel pink — small amount
- Pastel peach — small amount
- Pastel yellow — extra petals if wanted
- Pastel green — small amount
- Pastel blue — small amount
- Pastel lavender — small amount
Tools
- Hook 4 mm
- Safety eyes 20 mm
- Polyfill stuffing
- Yarn needle
- Stitch markers
- Scissors
Abbreviations
MR = magic ring, sc = single crochet, inc = increase, dec = invisible decrease, sl st = slip stitch, ch = chain, BLO = back loop only, FLO = front loop only, hdc = half double crochet, dc = double crochet.
Invisible decrease matters most on white plush yarn because front-facing decreases hold the curve smoother and reduce the pinched seam line.
Pattern — Step by Step
Continuous spiral unless noted.
Head (Make 1)
Yarn: white
R1: 6 sc in MR (6)
R2: inc x6 (12)
R3: (sc, inc) x6 (18)
R4: (2 sc, inc) x6 (24)
R5: (3 sc, inc) x6 (30)
R6–10: sc around (30)
R11: (3 sc, dec) x6 (24)
Insert 20 mm eyes between R7 and R8, about 7 stitches apart.
R12: (2 sc, dec) x6 (18)
Stuff firmly, especially under the eye line.
R13: (sc, dec) x6 (12)
R14: dec x6 (6)
Fasten off. Leave a 25 cm tail.
Body Base (Underside) (Make 1)
Yarn: white
R1: 6 sc in MR (6)
R2: inc x6 (12)
R3: (sc, inc) x6 (18)
R4: (2 sc, inc) x6 (24)
R5: (3 sc, inc) x6 (30)
R6: (4 sc, inc) x6 (36)
R7–9: sc around (36)
Fasten off. Leave a tail for sewing to shell.
Shell Base (Make 1)
Yarn: white or pale lavender underlayer
R1: 6 sc in MR (6)
R2: inc x6 (12)
R3: (sc, inc) x6 (18)
R4: (2 sc, inc) x6 (24)
R5: (3 sc, inc) x6 (30)
R6: (4 sc, inc) x6 (36)
R7: sc around in BLO (36)
R8: sc around (36)
Do not fasten off yet if joining flowers directly. Otherwise fasten off.
Front Flippers (Make 2)
Yarn: white
R1: 6 sc in MR (6)
R2: inc x6 (12)
R3: (sc, inc) x6 (18)
R4–7: sc around (18)
R8: (4 sc, dec) x3 (15)
R9–11: sc around (15)
R12: (3 sc, dec) x3 (12)
R13: flatten, 6 sc through both sides (6)
Do not stuff. Fasten off. Leave 20 cm tail.
Back Flippers (Make 2)
Yarn: white
R1: 6 sc in MR (6)
R2: inc x6 (12)
R3: (sc, inc) x6 (18)
R4–5: sc around (18)
R6: (4 sc, dec) x3 (15)
R7–8: sc around (15)
R9: flatten, 7 sc through both sides (7)
Do not stuff. Fasten off. Leave 18 cm tail.
Tail (Make 1)
Yarn: white
R1: 4 sc in MR (4)
R2: (sc, inc) x2 (6)
R3: sc around (6)
Flatten. Fasten off. Leave 10 cm tail.
Flower Motif (Make 12–14)
Yarn: yellow center + pastel petal color
With yellow:
R1: 6 sc in MR (6)
Change to petal color.
R2: (sl st in next st, ch 2, 2 dc in same st, ch 2, sl st in same st) x6 around
Fasten off. Leave 12–15 cm tail.
Suggested mix for the photographed palette:
- 3 pink
- 2 peach
- 3 yellow
- 2 green
- 2 blue
- 2 lavender
Cheek Patches (Make 2)
Yarn: pale pink or pale lavender
R1: 6 sc in MR (6)
Sl st to first stitch.
Fasten off. Leave 10 cm tail.
Assembly
- Sew the head to the front third of the body base, centered and slightly angled upward.
- Sew the front flippers to each side of the body base, roughly 2 rounds behind the head join.
- Sew the back flippers near the rear curve, keeping them symmetrical when viewed from above.
- Sew the tail to the center back edge.
- Lightly stuff the shell base so it domes but does not rise into a ball.
- Sew the shell base to the body base through the outer rounds, adding stuffing gradually before closing.
- Stitch the flower motifs across the top shell in overlapping rows, starting at the front edge and working backward.
- Add the cheek patches just below and slightly outside the eyes.
- Weave all tails inward through the stuffing, then trim after one internal direction change.
- Check that the turtle rests flat on all four flippers and adjust any twist with a few hidden anchoring stitches.
The completed turtle should sit low, broad, and stable, with the flower layer reading as the dominant surface.
7 Technical Tips
- Use one marker on the shell front and one on the shell back. Plush yarn loses orientation fast, and off-center flower placement shows immediately once the second row starts.
- Stuff the head firmer than the shell. A soft head collapses behind 20 mm eyes, while an overstuffed shell turns the turtle into a sphere instead of a dome.
- Work invisible decreases with deliberate tension. Loose dec stitches on white chenille create gray-looking holes where the stuffing shadows through.
- Insert the eyes before the final third of head shaping. On plush yarn, forcing eye posts through late rounds stretches the fabric and leaves a widened slit around the washer.
- Flatten flippers before sewing and measure both front flippers to the same seam length. Even a 1 cm difference makes the turtle lean when it sits.
- Pin or clip every flower before stitching permanently. The shell looks balanced when color clusters are distributed, not when all cool tones drift to one side.
- Weave tails through at least two direction changes. Velvet yarn can slide back out of a single straight pass, especially on separate flower motifs handled by children.
Conclusion
The shell determines everything on this build. Once the dome stays low and the flippers stay flat, the rest of the flower turtle amigurumi crochet pattern becomes a matter of spacing, not guesswork. Keep the flower motifs loose until the palette looks balanced from above, then secure them in overlapping rows. After finishing, photograph the turtle from top view and side view so the shell profile reads clearly on Pinterest and Instagram. Use #FlowerTurtlePattern when posting. One question remains worth testing on the next version: does this turtle look better with six large flowers across the crown, or with smaller flowers packed tighter near the neck?









