Introduction
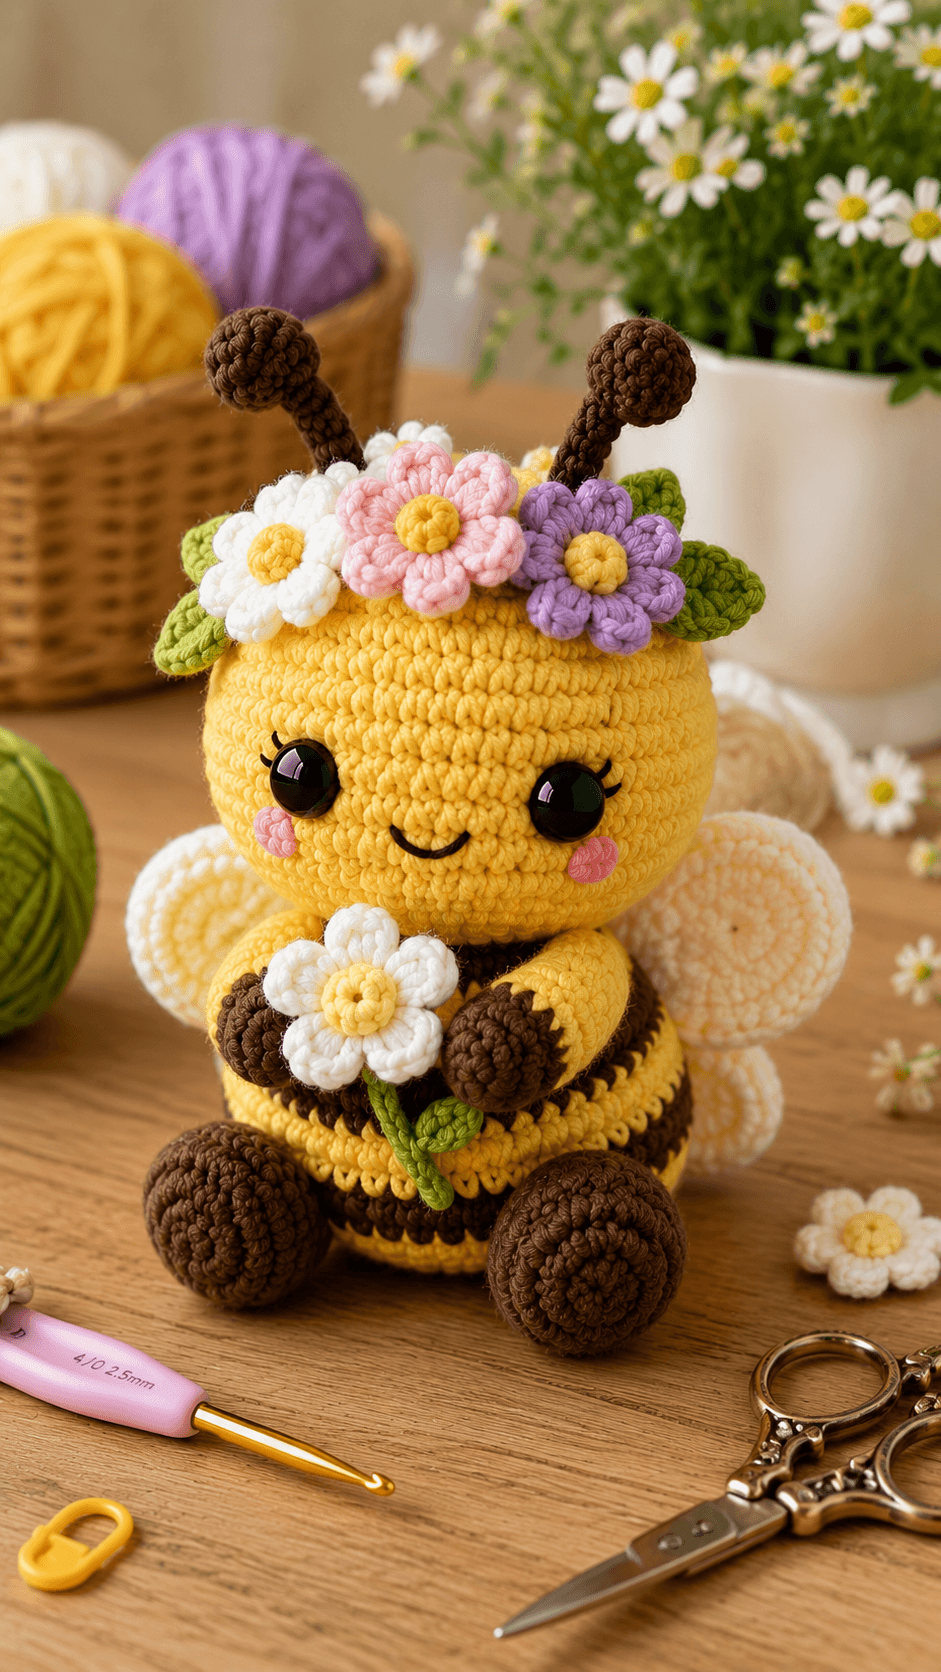
A bee carrying a daisy needs its antennae to rise above the flower crown or the insect silhouette disappears behind the petals. This flower bee amigurumi crochet pattern uses worsted or light chunky yarn, a 4 mm hook and 12–14 mm safety eyes to make an approximately 23 cm seated bee. The intermediate build includes striped body sections, four wings, floral headwear and a separate stemmed flower.
The Design: What Makes This Flower Bee Different
The head reaches a 36-stitch plateau because the photographed bee has a large spherical face that is wider than the upper torso. A second 36-stitch plateau forms the striped body, but extra straight rounds create a longer abdomen rather than another sphere. Brown hands and feet repeat the stripe color without extending the dark bands into the face. Four cream wing panels sit behind the body in overlapping pairs, giving this flower crown bee crochet a fuller silhouette than a two-wing design. The antennae are tall enough to remain visible behind the crown flowers. One common mistake with floral bee amigurumi is centering every flower across the forehead. The supplied character uses uneven scale and placement: the large pink flower is the anchor, while white and lavender flowers fill the sides.
Project Info at a Glance
| Skill Level | Time | Finished Size | Hook | Best For |
|---|---|---|---|---|
| Intermediate | 10–12 hours | Approx. 23 cm seated including antennae | 4.0 mm | Spring displays, bee collections and floral amigurumi projects |
Materials and Tools
Yarn
- Golden yellow — worsted / light chunky yarn — approximately 85–100 g — used for the head, torso stripes, arms and flower centers.
- Dark chocolate brown — matching yarn — approximately 45–55 g — used for body stripes, hands, feet and antennae.
- Warm cream — matching yarn — approximately 25–35 g — used for four wing panels and the handheld daisy.
- Blush pink — approximately 8–10 g — used for the crown flower and cheek patches.
- Lavender — approximately 5–8 g — used for one crown flower.
- Olive green — approximately 8–10 g — used for crown leaves, flower stem and leaf.
- Black or very dark brown embroidery floss — small amount — used for the smile and eyelashes.
Tools
- 4.0 mm crochet hook
- 12–14 mm safety eyes
- Polyester stuffing, approximately 100–120 g
- Yarn needle
- Embroidery needle
- Locking stitch marker
- Dressmaking pins
- Scissors
Published bee patterns use eye sizes from 6 mm for small Aran bees to 12 mm for plush constructions. Replace plastic eye fittings with securely embroidered features when making the character for a child under three.
Abbreviations
- MR — magic ring
- sc — single crochet
- inc — two single crochet stitches in one stitch
- dec — invisible single crochet decrease
- sl st — slip stitch
- ch — chain
- hdc — half double crochet
- dc — double crochet
- tr — treble crochet
- BLO — back loop only
- FLO — front loop only
An invisible decrease is worked through the front loops of the next two stitches before completing one single crochet through both loops.
Pattern — Step by Step
Work stuffed components in continuous spirals unless a joined round or row is specified. Mark the first stitch of every round and count the complete round before moving the marker.
Head
Yarn: golden yellow — Source: standard six-stitch amigurumi math.
R1: 6 sc in MR (6)
R2: inc ×6 (12)
R3: (sc, inc) ×6 (18)
R4: (2 sc, inc) ×6 (24)
R5: (3 sc, inc) ×6 (30)
R6: (4 sc, inc) ×6 (36)
R7–R12: sc around (36)
R13: (4 sc, dec) ×6 (30)
R14: (3 sc, dec) ×6 (24)
R15: (2 sc, dec) ×6 (18)
R16: sc around (18)
R17: (sc, dec) ×6 (12)
R18: dec ×6 (6)
Insert the eyes between R9 and R10 with approximately eight visible stitches between the posts. Begin stuffing after R13 and fill the cheek areas before packing the crown.
Fasten off. Leave a 30 cm tail and close the remaining six front loops.
Striped Body
Yarn: golden yellow and dark chocolate brown — original striped 36-stitch body reconstruction.
R1: with yellow, 6 sc in MR (6)
R2: inc ×6 (12)
R3: (sc, inc) ×6 (18)
R4: (2 sc, inc) ×6 (24)
R5: (3 sc, inc) ×6 (30)
R6: (4 sc, inc) ×6 (36)
R7–R8: yellow, sc around (36)
R9–R10: change to brown, sc around (36)
R11–R12: change to yellow, sc around (36)
R13–R14: change to brown, sc around (36)
R15–R16: change to yellow, sc around (36)
R17: (4 sc, dec) ×6 (30)
R18: brown, sc around (30)
R19: (3 sc, dec) ×6 (24)
R20: yellow, (2 sc, dec) ×6 (18)
R21: (sc, dec) ×6 (12)
R22: dec ×6 (6)
Begin stuffing after R17. Keep the lower body firm enough to support the seated legs while leaving the final rounds slightly softer at the neck.
Fasten off. Leave a 35 cm sewing tail.
Arms (Make 2)
Begin with chocolate brown for the rounded hand, then change to yellow.
R1: with brown, 6 sc in MR (6)
R2: inc ×6 (12)
R3–R4: sc around (12)
R5: change to yellow, BLO sc around (12)
R6–R10: sc around (12)
R11: (sc, dec) ×4 (8)
R12: sc around (8)
Stuff the hand firmly and the yellow arm lightly. Keep R9–R12 compressible so the arms can bend toward the flower.
Fasten off. Leave a 25 cm sewing tail.
Legs and Feet (Make 2)
Begin with chocolate brown, then change to yellow.
R1: with brown, 6 sc in MR (6)
R2: inc ×6 (12)
R3: (sc, inc) ×6 (18)
R4: (2 sc, inc) ×6 (24)
R5–R6: sc around (24)
R7: (2 sc, dec) ×6 (18)
R8: change to yellow, BLO sc around (18)
R9–R11: sc around (18)
R12: (sc, dec) ×6 (12)
R13: sc around (12)
Stuff the brown foot firmly. Reduce filling through the yellow section so each leg can angle forward in the seated position.
Fasten off. Leave a 30 cm sewing tail.
Antenna Stalks (Make 2)
Yarn: dark chocolate brown.
R1: 6 sc in MR (6)
R2–R9: sc around (6)
Do not stuff the full stalk. Add a very narrow amount of fiber only through the lower four rounds if more stiffness is required.
Fasten off. Leave a 25 cm sewing tail.
Antenna Tips (Make 2)
Yarn: dark chocolate brown.
R1: 6 sc in MR (6)
R2: inc ×6 (12)
R3–R4: sc around (12)
R5: dec ×6 (6)
Add a small pinch of stuffing. Sew one round tip to each stalk.
Fasten off. Leave a 15 cm tail.
Large Wings (Make 2)
Yarn: warm cream.
R1: 6 sc in MR (6)
R2: inc ×6 (12)
R3: (sc, inc) ×6 (18)
R4: (2 sc, inc) ×6 (24)
R5–R7: sc around (24)
R8: (2 sc, dec) ×6 (18)
R9: (sc, dec) ×6 (12)
Do not stuff heavily. Add only enough filling to separate the front and back surfaces, then flatten the lower opening.
Fasten off. Leave a 30 cm sewing tail.
Small Wings (Make 2)
Yarn: warm cream.
R1: 6 sc in MR (6)
R2: inc ×6 (12)
R3: (sc, inc) ×6 (18)
R4–R5: sc around (18)
R6: (sc, dec) ×6 (12)
R7: dec ×6 (6)
Add very little stuffing and flatten the piece. These wings sit slightly below and behind the larger pair.
Fasten off. Leave a 25 cm sewing tail.
Cheek Patches (Make 2)
Yarn: blush pink.
R1: 6 sc in MR (6)
R2: inc ×6 (12)
Do not stuff. Flatten the circles and place them below the outside edge of each eye.
Fasten off. Leave a 12 cm sewing tail.
Large Pink Crown Flower
Yarn: yellow center and blush-pink petals.
R1: with yellow, 6 sc in MR (6)
R2: inc ×6 (12)
Change to pink.
Repeat six times: sl st in next stitch, ch 4, 3 dc in next stitch, ch 4, sl st in same stitch.
Shape the six petals outward and keep the yellow center visible.
Fasten off. Leave a 25 cm sewing tail.
White Crown Flower
Yarn: yellow center and warm cream petals.
R1: with yellow, 6 sc in MR (6)
R2: inc ×6 (12)
Change to cream.
Repeat six times: sl st in next stitch, ch 3, 2 dc in next stitch, ch 3, sl st in same stitch.
Fasten off. Leave a 20 cm tail.
Lavender Crown Flower
Yarn: yellow center and lavender petals.
R1: with yellow, 6 sc in MR (6)
R2: inc ×6 (12)
Change to lavender.
Repeat six times: sl st in next stitch, ch 3, 2 dc in next stitch, ch 3, sl st in same stitch.
Fasten off. Leave a 20 cm sewing tail.
Crown Leaves (Make 5)
Yarn: olive green.
Row 1: ch 7
Row 2: starting in second ch from hook: sl st, sc, hdc, dc, hdc, sc; work 2 sc in final chain, then continue along the opposite side with sc, hdc, dc, hdc, sc, sl st.
Pinch the foundation chain slightly to create a center vein.
Fasten off. Leave a 12 cm sewing tail.
Handheld Daisy Center
Yarn: golden yellow.
R1: 6 sc in MR (6)
R2: inc ×6 (12)
Fasten off. Leave a 15 cm tail.
Handheld Daisy Petals (Make 6)
Yarn: warm cream.
R1: 6 sc in MR (6)
R2: inc ×6 (12)
R3–R4: sc around (12)
R5: dec ×6 (6)
Do not stuff. Flatten each petal completely and pinch its closed end.
Fasten off. Leave a 15 cm sewing tail.
Daisy Stem
Yarn: olive green.
Ch 27.
Starting in the second chain from the hook, sl st through all 26 chains.
The finished stem should measure approximately 9–11 cm. Add or remove chains when yarn thickness changes the length.
Fasten off. Leave tails at both ends.
Daisy Leaf
Yarn: olive green.
Row 1: ch 7
Row 2: starting in second ch from hook: sl st, sc, hdc, dc, hdc, sc; work 2 sc in final chain, then continue along the opposite side with sc, hdc, dc, hdc, sc, sl st.
Fasten off. Leave a 12 cm sewing tail.
Smile and Eyelashes
Yarn: black or very dark brown embroidery floss.
Work a shallow curved smile approximately 18–20 mm wide between the lower inner edges of the eyes.
Add two short eyelash stitches at the outer upper corner of each eye, keeping each stitch under approximately 5 mm.
Secure all embroidery ends inside the head.
Assembly
- Sew the head to the striped body first, centering the yellow face over the upper yellow body section and adding a small amount of stuffing into the neck gap before closing.
- Attach the pink cheek patches beneath the eyes, then embroider the curved smile and short eyelashes before the crown limits access to the head interior.
- Sew the two arms high on the torso and angle both brown hands toward the center so they can hold the daisy stem.
- Pin both legs low on the body, place the bee on a level surface and adjust the brown feet until the seated figure remains upright.
- Attach the two large wings behind the upper body, then place the smaller pair slightly lower and farther outward so all four wing shapes remain partly visible.
- Sew one round antenna tip to each stalk, attach both stalks near the upper rear head and keep approximately 5–6 cm between their bases.
- Position the large pink crown flower slightly left of center, add the white and lavender flowers beside it, then place the five olive leaves behind the petals.
- Arrange six cream daisy petals around the yellow center, sew them together, attach the green stem to the back and add the leaf approximately halfway down.
- Place the daisy stem between both brown hands and secure it with one or two hidden stitches through each hand so the flower remains centered on the chest.
- Weave all structural tails through at least 4 cm of dense crochet, reverse direction once and trim only after each tail retracts beneath the stitches.
The completed bee should sit on both brown feet with all four wings partly visible, the antennae extending above the floral crown and the daisy centered between the hands.
7 Technical Tips
- Hidden antennae: Crown flowers placed more than about 2 cm above the natural forehead line can cover the antenna bases and shorten their apparent height. Pin the antennae first and keep their tips at least 4–5 cm above the tallest flower.
- Rotated stripe bands: Color changes made after the round marker drifts can produce diagonal brown bands. Check the first stitch position after every two rounds and correct any accumulated spiral shift before the next color change.
- Visible decrease holes: Loose decreases expose pale stuffing through yellow fabric. Work through the two front loops and keep the decrease tension equal to neighboring single crochet stitches.
- Late eye installation: Fitting 12–14 mm washers after the head decreases below 24 stitches leaves restricted working space. Install both eyes after R12 and verify approximately eight visible stitches between the posts first.
- Wing stacking: Four wings sewn at exactly the same height read as one thick pair. Position the small wings approximately 15–20 mm below the large pair and rotate them outward by several degrees.
- Flower crown imbalance: Three same-size flowers form a rigid horizontal band. Keep the pink anchor flower about 20–25 percent larger than the white and lavender motifs and offset it from the center line.
- Daisy stem collapse: A plain foundation chain bends sharply between the hands. Slip stitch back through all 26 chains and fix the stem to each hand at points approximately 2–3 cm apart.
Conclusion
Check the antennae and floral crown together before burying the final head tails because both components compete for the same upper silhouette. Next, place the bee on a level surface and compare the wing overlap, foot height and flower position from the front and both three-quarter views. Adjust any hidden wing or tilted crown before fixing the last seams. Share the finished flower bee amigurumi crochet pattern project on Pinterest with a vertical photograph, then post a close view of the crown and handheld daisy on Instagram using #FlowerCrownBeeAmigurumi. For this bee specifically, would you keep the pink-white-lavender crown or make every flower daisy-white with yellow centers?









