Introduction
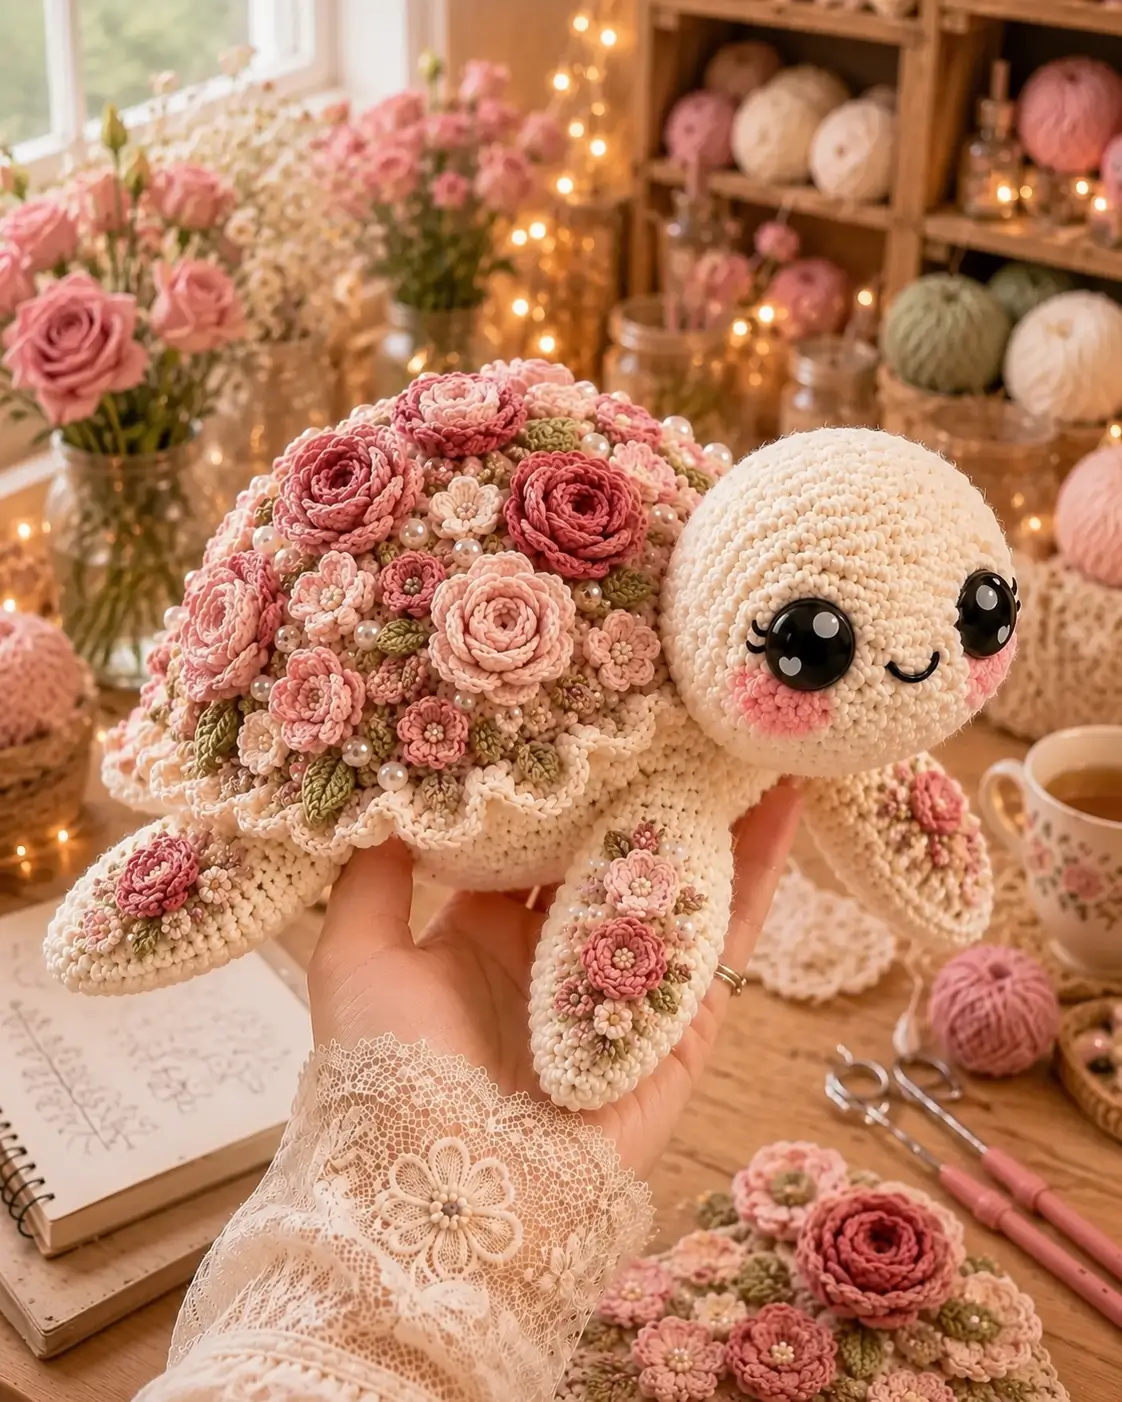
Sea turtles wear their ribs as architecture; this floral sea turtle amigurumi crochet pattern must keep that shell stable under roses. Work it in worsted-weight cream yarn with blush, dusty rose, and olive accents. The finished turtle measures about 23 cm, uses a 3.5 mm hook, and suits an intermediate maker who can sew appliqués cleanly. The flat underside makes it display well on shelves.
The Design: What Makes This Turtle Different
This turtle needs a broad shell, not a tall ball. The body is built to 42 stitches, then covered by a separate domed top shell so the flowers can sit on a firm surface instead of sinking into stuffing. That shell choice keeps the floral turtle crochet silhouette low and sea-turtle-like. The head is oversized because the photo relies on large eyes and visible cheeks; a small head would make the shell look like a bouquet with flippers. Front flippers are longer than the back legs, matching a sea turtle amigurumi rather than a land turtle. The usual mistake is placing all flowers in the shell center. That makes the dome top-heavy, while the photo spreads rosettes toward the rim and repeats small blossoms on the flippers.
Project Info at a Glance
| Skill Level | Time | Finished Size | Hook | Best For |
|---|---|---|---|---|
| Intermediate | 7–9 hours | 23 cm nose to tail | 3.5 mm | Display plush, nursery shelf, market sample |
The size target follows a 9-inch sea turtle plush benchmark, while the hook and yarn choice follow worsted turtle references using 3.5 mm hooks for tight amigurumi fabric. Source: Sweet Softies Sea Turtle Pattern
Materials and Tools
Yarn
- Cream / ivory — worsted #4 — 60 g — cotton or acrylic such as WeCrochet Brava Worsted, Paintbox Cotton Aran, or similar.
- Dusty rose — worsted #4 — 12 g — large roses.
- Blush pink — worsted #4 — 12 g — small roses, cheeks, blossoms.
- Muted olive — worsted #4 — 8 g — leaves and shell filler.
- Pearl white — 6 mm sew-on pearl beads, 18–24 pieces, or pearl-colored yarn for embroidered knots.
- Black embroidery floss — lashes and mouth.
Tools
- Hook 3.5 mm
- Safety eyes 20–24 mm, black or glossy doll-style
- Polyester stuffing
- Yarn needle
- Stitch markers
- Pins
- Scissors
- Strong sewing thread for pearl beads
Use embroidered eyes and yarn knots instead of plastic eyes or beads for toys intended for children under 3.
Abbreviations
MR = magic ring; sc = single crochet; inc = 2 sc in same stitch; dec = invisible decrease; sl st = slip stitch; ch = chain; BLO = back loop only; FLO = front loop only; hdc = half double crochet; dc = double crochet.
Invisible decrease is worked through the front loops of the next 2 stitches before completing one sc, which reduces bulk on the visible surface.
Pattern — Step by Step
Continuous spiral unless noted. Mark the first stitch of every round.
Head
Yarn: cream — Source: standard 6-stitch amigurumi sphere math, benchmarked against turtle head count examples. Source: All About Ami Turtle Pattern
R1: 6 sc in MR (6)
R2: inc ×6 (12)
R3: (sc, inc) ×6 (18)
R4: (2 sc, inc) ×6 (24)
R5: (3 sc, inc) ×6 (30)
R6: (4 sc, inc) ×6 (36)
R7: (5 sc, inc) ×6 (42)
R8–R15: sc around (42)
R16: (5 sc, dec) ×6 (36)
R17: (4 sc, dec) ×6 (30)
R18: (3 sc, dec) ×6 (24)
R19: (2 sc, dec) ×6 (18)
R20: (sc, dec) ×6 (12)
R21: dec ×6 (6)
Place eyes between R11 and R12, 10 stitches apart across the front curve. Add stuffing from R16 onward so the cheeks stay round.
Fasten off. Leave a 20 cm tail and close the final opening.
Body
Yarn: cream — Source: standard large 42-stitch amigurumi body math, with turtle body construction compared to published turtle patterns. Source: Sir Purl Grey Sea Turtle Pattern
R1: 6 sc in MR (6)
R2: inc ×6 (12)
R3: (sc, inc) ×6 (18)
R4: (2 sc, inc) ×6 (24)
R5: (3 sc, inc) ×6 (30)
R6: (4 sc, inc) ×6 (36)
R7: (5 sc, inc) ×6 (42)
R8–R13: sc around (42)
R14: (5 sc, dec) ×6 (36)
R15: (4 sc, dec) ×6 (30)
R16: (3 sc, dec) ×6 (24)
R17: (2 sc, dec) ×6 (18)
R18: (sc, dec) ×6 (12)
R19: dec ×6 (6)
Stuff firmly but keep the bottom slightly flattened against the table before closing.
Fasten off. Leave a 25 cm tail and close.
Top Shell
Yarn: cream — Source: standard amigurumi dome math; turtle shell sizing checked against shell and body examples. Source: Sweet Softies Sea Turtle Pattern
R1: 6 sc in MR (6)
R2: inc ×6 (12)
R3: (sc, inc) ×6 (18)
R4: (2 sc, inc) ×6 (24)
R5: (3 sc, inc) ×6 (30)
R6: (4 sc, inc) ×6 (36)
R7: (5 sc, inc) ×6 (42)
R8–R12: sc around (42)
R13: BLO sc around (42)
R14: (5 sc, dec) ×6 (36)
Do not close the shell. The 36-stitch opening is sewn to the upper body, leaving the dome raised.
Fasten off. Leave a 40 cm tail for sewing.
Shell Scallop Edge
Yarn: cream — Source: photo feature plus shell-edge loop concept from textured turtle patterns. Source: Sweet Softies Sea Turtle Pattern
Join yarn to any unworked front loop from Top Shell R13.
R1: (sl st in next FLO, 5 dc in next FLO, sl st in next FLO) ×14 (14 scallops)
Fasten off. Leave a 15 cm tail and weave it into the underside of the shell.
Front Flippers — Make 2
Yarn: cream — Source: sea turtle flipper construction from published patterns; proportions adjusted for the photo. Source: Loops & Love Crochet Mini Sea Turtle
R1: 6 sc in MR (6)
R2: inc ×6 (12)
R3: (sc, inc) ×6 (18)
R4–R10: sc around (18)
R11: (sc, dec) ×6 (12)
R12: sc around (12)
R13: flatten opening; sc through both layers across (6)
Stuff the widest end lightly only. Leave the outer half flatter so it reads as a paddle, not an arm.
Fasten off. Leave a 25 cm tail on each flipper.
Back Legs — Make 2
Yarn: cream — Source: standard small amigurumi appendage math, compared to turtle back-flipper examples. Source: Sir Purl Grey Sea Turtle Pattern
R1: 6 sc in MR (6)
R2: inc ×6 (12)
R3–R5: sc around (12)
R6: flatten opening; sc through both layers across (6)
Do not overstuff. Back legs should sit lower and shorter than the front flippers.
Fasten off. Leave a 20 cm tail on each leg.
Tail
Yarn: cream — Source: sea turtle tail feature found in free turtle pattern references. Source: Sweet Softies Sea Turtle Pattern
R1: 6 sc in MR (6)
R2–R3: sc around (6)
Flatten the tail slightly with your fingers before sewing.
Fasten off. Leave a 15 cm tail.
Cheek Patches — Make 2
Yarn: blush pink — Source: photo feature and flat-circle amigurumi math.
R1: 6 sc in MR (6)
R2: inc ×6 (12)
R3: sl st around loosely (12)
Fasten off. Leave a 20 cm tail for sewing.
Large Rose Shell Flowers — Make 7
Yarn: dusty rose and blush pink — Source: photo feature; floral shell demand confirmed by Etsy and flower-shell search results. Source: Etsy Crochet Sea Turtle Search
Ch 31.
Row 1: sc in 2nd ch from hook and across (30)
Row 2: (sl st in next st, 5 dc in next st, sl st in next st) ×10 (10 petals)
Roll from one short end to form a rose. Stitch through the base several times so the coil cannot open.
Fasten off. Leave a 30 cm tail for sewing to the shell.
Small Rose Shell Flowers — Make 8
Yarn: blush pink and dusty rose — Source: photo feature.
Ch 19.
Row 1: sc in 2nd ch from hook and across (18)
Row 2: (sl st in next st, 5 dc in next st, sl st in next st) ×6 (6 petals)
Roll tightly. Use the smaller roses near the shell rim and on the flippers.
Fasten off. Leave a 25 cm tail.
Tiny Blossoms — Make 10
Yarn: blush pink or cream — Source: photo feature and standard flat blossom construction.
R1: 6 sc in MR (6)
R2: (sl st, ch 2, 2 hdc, ch 2, sl st) in each st around (6 petals)
Keep the center flat. Add one pearl bead or one olive French knot to the middle after sewing.
Fasten off. Leave a 20 cm tail.
Leaves — Make 18
Yarn: muted olive — Source: photo feature.
Ch 8.
Row 1: sc in 2nd ch from hook, hdc, dc in next 3 ch, hdc, sc; rotate and work along the opposite side: sc, hdc, dc in next 3 ch, hdc, sc, sl st to base (14)
Fasten off. Leave a 20 cm tail for sewing.
Pearl Beads or Yarn Pearl Knots
Material: 6 mm pearl beads or pearl yarn — Source: photo feature.
Place 18–24 pearl beads across the shell, with 3–5 extra beads around the flipper flowers.
If beads are used, sew each bead twice with strong thread and knot on the shell underside. For a child-safe version, make 3-wrap French knots with pearl-colored yarn instead of beads.
Mouth and Lashes
Material: black embroidery floss — Source: photo feature.
Cut one 45 cm strand of black floss. Embroider a shallow curved mouth under the eyes, then add three short lashes at the outside edge of each eye.
Tie the floss inside the head seam area or bury it through the head twice before trimming.
Assembly
- Pin the head to the front of the body with the eye line angled slightly upward.
- Sew the head to the body using a ladder stitch around a 4 cm contact area.
- Center the top shell on the body and pin it at front, back, left, and right.
- Sew the shell opening to the upper body through R14, keeping the scallop edge free.
- Attach the front flippers at the front-left and front-right underside, angled 25–35 degrees outward.
- Attach the back legs lower on the rear body, with each leg partly tucked under the shell rim.
- Sew the tail between the back legs and align it with the shell center line.
- Sew cheek patches below and slightly outside the eyes, then embroider the mouth and lashes.
- Arrange large roses first, then small roses, blossoms, and leaves across the shell before sewing.
- Add pearl beads or yarn knots last, placing them between flowers rather than on top of petals.
The completed turtle measures about 23 cm from nose to tail when worked at the listed gauge.
7 Technical Tips
- Shifted stitch marker: If the marker drifts behind the eye line by more than 3 stitches, the face will twist. Move the marker back to the visual side seam after R7 and keep counting from the written round total.
- Stuffing firmness: An underfilled neck makes the head drop after assembly. Pack the head until it rebounds slowly, then add an extra thumb-sized tuft at the lower front before closing.
- Invisible decrease holes: Standard decreases can leave six visible gaps on R16–R21 of the head. Work only through front loops for every decrease round and pull the next stitch snug.
- Eye placement timing: Eyes must go in before R18, while your fingers can still reach the washers. Place them between R11 and R12, 10 stitches apart, or the cheeks will crowd the mouth.
- Velvet tension substitute: Chenille or velvet yarn can turn the shell into a loose dome if tension opens by more than 2 mm between stitches. Drop to a smaller hook and reduce bead use because heavy pearls can pull through plush yarn.
- Pinning failure mode: Sewing the shell without quarter pins often rotates the flower field to one side. Pin at 12, 3, 6, and 9 o’clock before adding any stitch, then check that the tail sits on the same line as the shell center.
- Tail weaving: Short flower tails can loosen when the shell is handled. Leave at least 20–30 cm on every rose and weave through the flower base, shell fabric, and flower base again before trimming.
Conclusion
This pattern is built around the shell, because the shell carries the weight, shape, and decoration. Work the turtle body first, then test the flower layout with pins before sewing any rose in place. That one step prevents a crowded center and keeps the scalloped rim visible. The floral sea turtle amigurumi crochet pattern also gives you a clear way to scale the decoration: fewer roses for a cleaner shell, more blossoms for a bouquet effect. Save the finished turtle to Pinterest and share the front, side, and shell-top views on Instagram with #FloralSeaTurtle. Which shell zone will you leave open so the cream scallop edge still shows?









