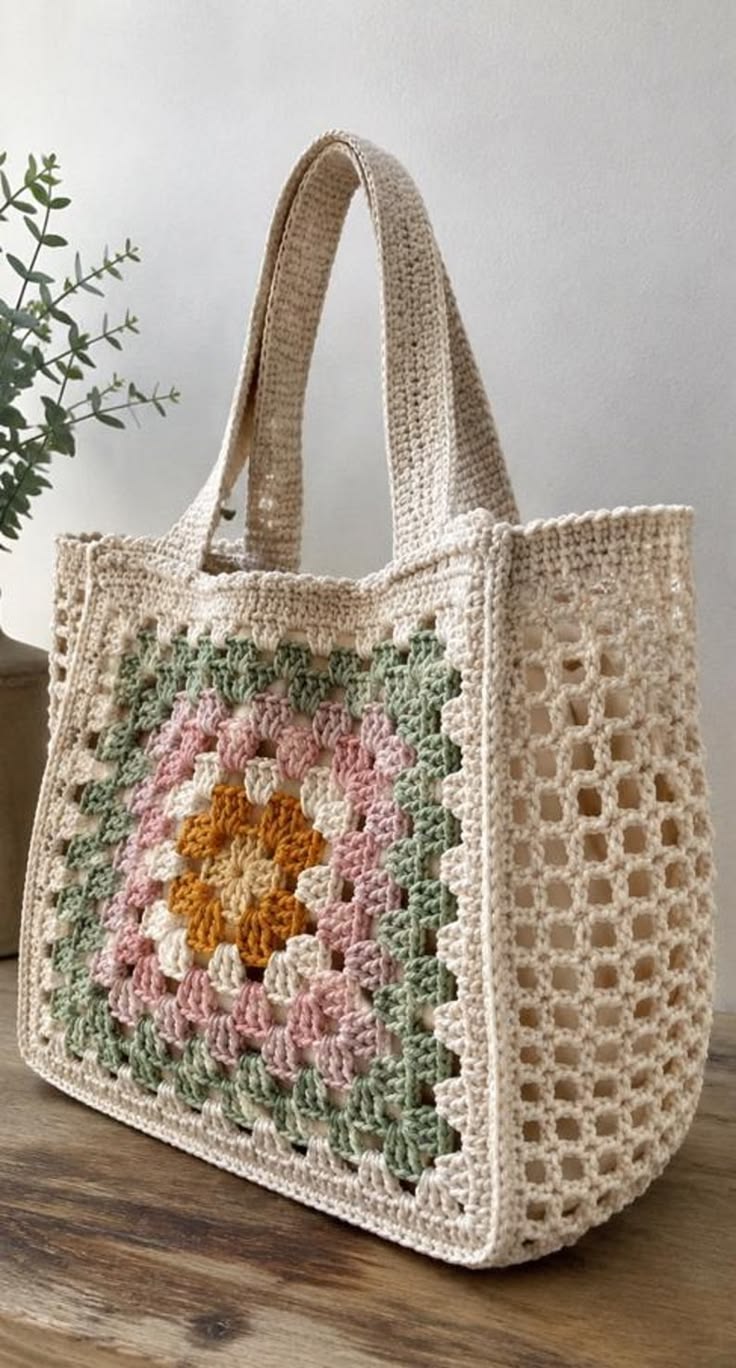
A single oversized flower changes the engineering of a granny square bag because the panel must support the entire tote rather than share the load across dozens of small motifs. This floral granny square crochet tote bag pattern combines large botanical panels with cream mesh gussets, a structured base, reinforced upper edges, and two long shoulder straps. DK or light-worsted cotton with a 4.0 mm hook gives the bag useful stitch definition and moderate structure.
What Makes This Floral Crochet Tote Different
The front panel is one large flower square rather than a patchwork of small motifs. Mustard forms the central flower, ivory introduces contrast around it, blush pink expands the floral section, and sage green transitions the motif into the cream outer frame. Each color occupies enough area to remain visible after the panel reaches bag dimensions.
The side construction is equally important. Open cream mesh gussets add approximately 10–12 cm of depth without making the finished crochet flower tote bag excessively heavy. A denser lower section supports the contents while the mesh sides reduce yarn consumption.
Long flat handles distribute weight more effectively than narrow chain straps. One common failure with a large granny square market bag is handle stretch. Cotton has less elastic recovery than wool, so strap width, attachment depth, and stitch density need to be planned before assembly.
Project Information
| Skill Level | Construction | Finished Size | Hook | Yarn |
|---|---|---|---|---|
| Intermediate | Two panels + gusset + straps | Approx. 38 × 33 × 10–12 cm | 4.0 mm | DK / light-worsted cotton |
The measurements exclude the handles. The finished dimensions will vary with yarn, tension, blocking, and the number of expansion rounds added to the two floral panels.
Materials and Tools
Yarn
- Warm cream — DK/light-worsted cotton — main quantity for panel borders, gussets, base, top edging, seams, and handles.
- Sage green — DK/light-worsted cotton — outer floral rounds.
- Blush pink — DK/light-worsted cotton — middle flower section.
- Mustard gold — DK/light-worsted cotton — flower center.
- Ivory — DK/light-worsted cotton — contrasting petal section.
Allow approximately 250–350 g total yarn for a medium tote of this construction. The cream yarn should account for the largest share because it forms the structural parts of the bag. Actual consumption depends on gauge, strap length, panel dimensions, and whether a lining is added.
Tools
- 4.0 mm crochet hook
- Yarn needle
- Scissors
- Locking stitch markers
- Tape measure
- Blocking mats
- Rust-resistant blocking pins
- Optional cotton fabric for lining
- Optional sewing needle and matching thread
Abbreviations
- MR — magic ring
- ch — chain
- sc — single crochet
- hdc — half double crochet
- dc — double crochet
- tr — treble crochet
- sl st — slip stitch
- st/sts — stitch/stitches
- sp — space
- ch-sp — chain space
- RS — right side
- WS — wrong side
Keep chain spaces consistent throughout the panel and gusset. Loose chains enlarge the openings and can cause the sides of the finished tote to stretch more than the front and back panels.
Floral Granny Square Crochet Tote Bag Pattern
Make two matching oversized floral panels. Block both panels to identical measurements before constructing the base and side gussets.
Oversized Flower Granny Square — Make 2
Begin with mustard gold yarn.
Round 1 — Flower Center
Make an MR.
Ch 1 and work 12 sc into MR.
Pull the ring closed and sl st to the first sc. (12 sts)
Round 2 — Mustard Petal Foundation
Ch 3.
Work 2 dc in the same stitch, ch 1.
Work 3 dc in the next stitch, ch 1.
Continue around, distributing the groups evenly so the center remains flat.
Sl st to the beginning ch-3.
Round 3 — Ivory Flower Section
Change to ivory yarn.
Join in any ch-1 space.
Ch 3 and work 2 dc, ch 2, 3 dc into the same space.
Work a compact dc cluster into the next space.
Continue alternating larger and smaller groups around the flower so the ivory stitches sit outside the mustard center.
Sl st to the beginning ch-3 and fasten off.
Round 4 — Blush Pink
Join blush-pink yarn in any space between the ivory groups.
Ch 3 and work 2 dc in the same space.
Work 3 dc into each available space, using ch-1 spaces between selected groups to prevent the round from tightening.
Join with a sl st.
Round 5 — Establish the Square
Continue with blush pink.
Mark four positions evenly around the motif.
At each marked position work:
(3 dc, ch 2, 3 dc)
These four groups establish the corners.
Between corners, work 3-dc groups into the available spaces.
Sl st to the beginning of the round.
Round 6 — Sage Green
Change to sage green.
Join in any corner ch-2 space.
Work (3 dc, ch 2, 3 dc) in the corner.
Work 3 dc into each space across the side.
At the next corner work (3 dc, ch 2, 3 dc).
Repeat around all four sides.
Sl st to join.
Round 7
Continue with sage green.
Sl st to the next available space.
Work 3 dc into each side space.
At every corner work (3 dc, ch 2, 3 dc).
Repeat around and join.
Round 8 — Cream Transition
Change to warm cream.
Work one granny-style expansion round using 3 dc in each side space and (3 dc, ch 2, 3 dc) in each corner.
Join with a sl st.
Rounds 9–12 — Panel Expansion
Continue with cream.
Repeat the established square construction:
3 dc in each side space; (3 dc, ch 2, 3 dc) in each corner.
Continue until the panel measures approximately 35–38 cm square.
Fasten off.
Make the second panel using the same yarn, hook, number of rounds, and tension.
Blocking the Floral Panels
Block both panels before constructing the rest of the bag. Pin the four corners first, then measure the width and height.
Target approximately 35–38 cm for each panel. More important than the exact measurement is that both panels finish at the same size.
Do not stretch the center flower independently from the outer rounds. Excess tension at the center can distort the surrounding square and pull the corners diagonally.
Allow both panels to dry completely before removing the pins.
Cream Bottom Gusset
The base should be denser than the side mesh because it carries the weight of the bag contents.
Use warm cream yarn.
Ch enough stitches to create a strip approximately 10–12 cm wide.
For DK/light-worsted cotton and a 4.0 mm hook, begin with approximately 25–30 chains and measure before continuing.
Row 1: Sc in the second ch from hook and in each ch across. Turn.
Row 2: Ch 1, sc in each stitch across. Turn.
Repeat Row 2 until the strip measures the same length as the bottom edge of one blocked floral panel.
Fasten off.
The completed base should form a firm rectangle approximately 35–38 cm long × 10–12 cm wide.
Open Mesh Side Gussets — Make 2
Use warm cream yarn.
Each side panel should match the width of the base and the height of the floral panels.
Ch enough stitches for approximately 10–12 cm.
Mesh Row 1
Sc in the second chain from the hook.
Ch 3, skip 2 chains, sc in the next chain.
Repeat across.
Turn.
Mesh Row 2
Ch 3.
Sc into the first ch-3 space.
Ch 3, sc into the next ch-3 space.
Repeat across.
Turn.
Remaining Mesh Rows
Repeat Mesh Row 2 until the side panel measures approximately the same height as the blocked floral panel.
Finish with one row of sc worked evenly across the upper edge.
Fasten off.
Make a second identical mesh side panel.
Joining the Gusset
Place one short end of the bottom strip against the lower edge of the first mesh side panel.
Join with cream yarn using sc or slip stitches.
Attach the second mesh panel to the opposite end of the base strip.
The resulting piece forms a long U-shaped gusset consisting of one mesh side, the solid bottom, and the second mesh side.
Check that the U-shaped piece fits around three edges of one floral panel before proceeding.
Attaching the Front Panel
Place the first floral panel against the U-shaped gusset with the right side facing outward.
Begin at one upper corner.
Join the first mesh side to the panel using cream sc stitches.
Continue around the lower corner and across the solid base.
Turn the next lower corner and join the second mesh side.
Finish at the opposite upper corner.
Keep the stitches evenly distributed. Do not stretch the mesh to force it to match the floral panel.
Attaching the Back Panel
Position the second floral panel against the remaining open edges of the gusset.
Check that both flower centers face outward.
Join from one upper corner down the first mesh side, across the bottom, and up the opposite side.
Fasten off.
The bag should now have a rectangular base, two open mesh sides, and two large floral faces.
Reinforced Top Edge
Join cream yarn at one upper corner.
Round 1: Sc evenly around the complete top opening.
At transitions between floral panels and mesh gussets, reduce or add individual stitches only when needed to keep the opening flat.
Sl st to the first sc.
Round 2: Ch 1, sc in every stitch around.
Sl st to join.
Round 3: Repeat one more round of sc.
Fasten off unless the handles will be worked directly from the top edge.
Long Crochet Shoulder Straps — Make 2
Use warm cream yarn.
For a long shoulder strap, ch enough stitches to measure approximately 55–65 cm without stretching.
The exact chain count depends on gauge, so measure the chain rather than relying on a fixed number.
Row 1: Sc in the second ch from hook and across. Turn.
Row 2: Ch 1, sc across. Turn.
Rows 3–5: Repeat Row 2.
The finished strap should measure approximately 3–4 cm wide.
Fasten off, leaving a long sewing tail at each end.
Make a second identical strap.
Reinforcing the Crochet Handles
Long cotton handles can stretch under repeated loads. An additional slip-stitch edge reduces this movement.
Join cream yarn at one end of a completed strap.
Work slip stitches evenly along the first long edge.
Continue across the short end and along the opposite long edge.
Keep the slip stitches relaxed. Pulling them tightly causes the strap to curve.
Repeat for the second handle.
Attaching the Handles
Lay the bag flat with the front panel facing upward.
Position the first strap ends approximately 8–10 cm inward from the side edges.
Allow approximately 5–7 cm of each strap end to overlap the inside of the bag.
Pin both ends before sewing.
Sew a rectangular outline around each attachment area, then sew an X diagonally through the rectangle. This distributes pulling force over a larger section of crochet.
Turn the bag over and attach the second handle at matching positions on the back panel.
Measure both handle openings before finishing the attachment. Unequal strap placement causes the bag to hang at an angle.
Optional Crochet Handle Construction from the Bag Edge
The straps can also be worked directly from the upper edge.
Mark two attachment sections on the front panel, approximately 8–10 cm from each side.
Join cream yarn at the first marker and sc across approximately 6–8 stitches.
Turn and continue working sc rows over those stitches until the strap measures approximately 55–65 cm.
Join the free end to the second marked position.
Repeat on the back panel.
This construction eliminates separate sewing at one end of each handle but requires careful measurement to keep both straps identical.
Optional Fabric Lining
A lining is useful when the tote will carry keys, pens, cosmetics, or other objects that can pass through the mesh gussets.
Measure the completed bag interior after assembly.
Cut two fabric rectangles slightly larger than the front and back panels, allowing approximately 1–1.5 cm seam allowance.
Add a bottom and side allowance corresponding to the crochet gusset depth.
Sew the fabric into a simple rectangular bag shape.
Fold the upper raw edge toward the wrong side and press it flat.
Insert the lining into the crochet bag with wrong sides facing.
Hand-sew the lining just below the reinforced crochet top edge.
Avoid sewing through the visible outer surface of the granny-square panel.
Assembly
- Complete two oversized floral granny-square panels using identical yarn, hook size, and round counts.
- Block both panels to approximately 35–38 cm square and confirm that their measurements match.
- Make the solid cream bottom strip approximately 10–12 cm wide and equal in length to one panel edge.
- Crochet two cream mesh side gussets matching the base width and panel height.
- Join the side gussets to opposite ends of the solid base to form one U-shaped structural strip.
- Attach the first floral panel around the complete U-shaped gusset using evenly spaced cream stitches.
- Attach the second floral panel to the opposite side and check that all four lower corners align.
- Work three firm rounds around the complete upper opening before positioning the handles.
- Attach two matching 55–65 cm shoulder straps with approximately 5–7 cm of reinforced overlap at each attachment point.
- Weave in all yarn tails, add the optional lining, and block the assembled bag lightly without stretching the mesh sides.
The finished tote should measure approximately 38 cm wide × 33 cm tall × 10–12 cm deep, excluding the shoulder straps.
7 Technical Tips for a Granny Square Tote Bag
- Front and back panels finishing at different sizes: Block both panels to within approximately 5 mm of each other before assembly. A larger back panel forces the side gussets to twist when the second face is attached.
- Mesh sides stretching vertically: Keep every ch-3 opening consistent and stop the gusset at the measured panel height. Stretching the mesh by more than approximately 2 cm during joining weakens the bag’s rectangular profile.
- Base sagging under weight: Work the bottom in solid sc rather than repeating the side mesh. A dense base approximately 10–12 cm wide provides more support for books and everyday contents.
- Handles becoming too elastic: Keep each strap at least 3–4 cm wide and add a slip-stitch edge. A narrow one-row strap concentrates the load and can lengthen substantially after repeated use.
- Handle attachments pulling loose: Overlap each strap end by approximately 5–7 cm. Sew both a rectangle and diagonal X through the attachment area instead of fastening the strap along one short line.
- Top opening becoming wavy: Work the first sc edging round at normal tension and reduce stitches only where excess fabric is visible. Too many stitches around the upper edge create a ruffle that becomes more pronounced after the next two rounds.
- Small objects escaping through the gusset: Keep mesh openings near approximately 1.5–2 cm or add a fabric lining. Larger openings may be decorative but are less practical for keys and other small contents.
Adjusting the Tote Bag Size
The two oversized granny squares determine most of the finished width and height. For a smaller bag, stop the cream expansion rounds when each panel measures approximately 28–30 cm. For a larger market tote, continue the square until it measures 40–45 cm.
Adjust the gusset after the panels have been blocked. Its solid bottom should equal the width of one panel, while each mesh side should equal the panel height.
Depth can be changed independently. A narrow 7–8 cm gusset creates a flatter shoulder bag. Increasing the gusset to 14–15 cm produces considerably more interior capacity.
Handle length should also reflect the finished bag size. Short handles around 35–45 cm suit hand carrying, while approximately 55–65 cm provides a more practical shoulder drop for this image-inspired design.
Choosing Yarn for a Crochet Tote
Cotton is particularly suitable for this construction because it gives the floral stitches definition and creates a relatively stable fabric. Cotton blends can reduce weight while retaining much of that structure.
Very elastic yarn changes the behavior of the bag. Acrylic and wool can stretch under a concentrated load, especially in long handles and open mesh sections.
If using a softer yarn, consider adding a full fabric lining and reinforcing the handles with cotton tape hidden on the inside.
Keep every decorative color within the same yarn-weight category. A thicker sage yarn can make the outer flower rounds buckle even when the written stitch sequence remains unchanged.
Color Placement
The mustard center acts as the focal point of the oversized flower. Ivory stitches around it create separation before the blush section begins.
Sage green occupies a larger outer area and transitions naturally into the cream frame. Because cream also appears in the gussets, seams, top edge, and handles, it visually connects all structural sections.
For an alternate palette, mustard can be replaced with muted terracotta, blush with dusty blue, and sage with olive. Keep the light cream structure unchanged when a clear distinction between the flower and bag construction is preferred.
Blocking and Final Shaping
Most blocking should happen before assembly. Once the bag has a base and gussets, aggressive stretching can distort the three-dimensional structure.
After assembly, lightly dampen or steam according to the yarn manufacturer’s care instructions. Place the bag upright and square the bottom corners by hand.
Align the front and back upper edges. Arrange both handles so they dry without twists.
Do not stretch the mesh gussets beyond their intended width. The open stitches should remain square or slightly rectangular rather than becoming long vertical openings.
Allow the bag to dry completely before adding weight.
Finishing the Floral Granny Square Tote Bag
Inspect all four handle attachment points before using the bag and reinforce any stitches that pull away from the upper edge. Check the lower corners as well, since those areas connect the solid base, mesh gussets, and oversized floral panels. The target finished dimensions are approximately 38 × 33 × 10–12 cm, excluding the straps.
This floral granny square crochet tote bag pattern can be adapted by changing the final panel dimensions, gusset depth, or shoulder-strap length while retaining the same oversized flower construction. Record your blocked panel measurements before making another version. Share the finished tote on Pinterest or Instagram with #FloralGrannySquareTote.
Would you keep the sage, blush, mustard, and cream palette, or replace one of the flower colors for your tote?









