Introduction
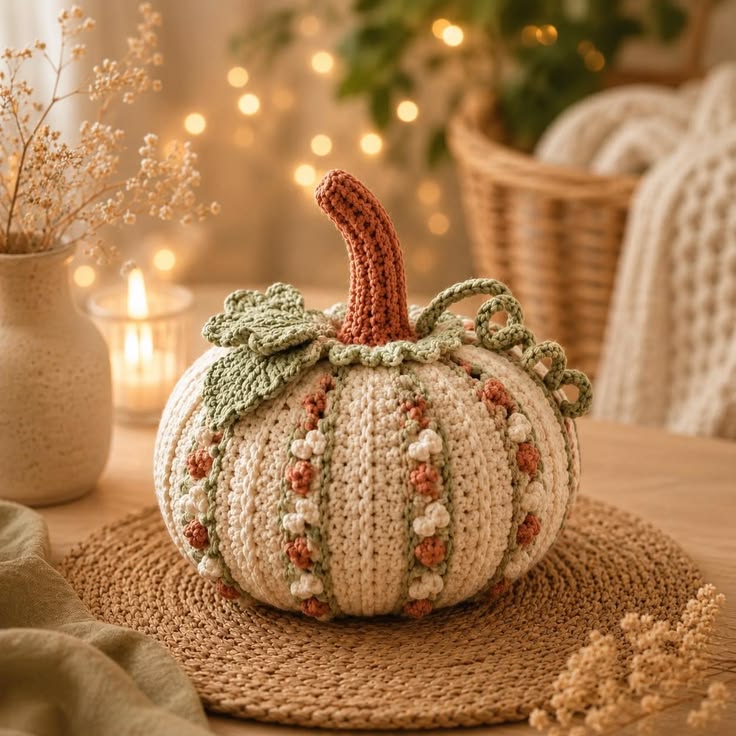
Six flowered grooves make an uneven pumpkin lobe impossible to hide. This floral crochet pumpkin pattern uses DK or light worsted cotton with a 3.5 mm hook to make an approximately 19–22 cm decoration. An ivory body, terracotta stem, sage leaf, two curling vines and raised cream-and-rust buds create the intermediate harvest pumpkin shown in the reference. The finished structure works as freestanding fall table decor.
The Design: What Makes This Pumpkin Different
The ivory body is crocheted first as one smooth stuffed form, then compressed into eight lobes with separate shaping strands. That approach keeps the stitch surface plain enough for the decorative groove work added afterward. Six selected valleys receive narrow sage lines, followed by alternating cream and terracotta buds. Two grooves remain comparatively plain so the floral detail does not cover the entire pumpkin. At the crown, a tall rust-colored stem provides vertical contrast while a broad sage leaf spreads across roughly one-quarter of the upper body. Two spiral tendrils introduce smaller curved lines beside the rigid stem. This crochet pumpkin with flowers depends on sequence. A common maker mistake is adding the floral garlands before the body has been fully sculpted; tightening the later shaping strands then shifts the buds away from the center of their grooves.
Project Info at a Glance
| Skill Level | Time | Finished Size | Hook | Best For |
|---|---|---|---|---|
| Intermediate | 7–9 hours | Approx. 19–22 cm wide × 23–26 cm high | 3.5 mm | Fall tables, shelves and harvest centerpieces |
Materials and Tools
Yarn
- Warm ivory / oatmeal — DK or light worsted cotton — approximately 110–140 g — pumpkin body.
- Sage green — matching DK or light worsted cotton — approximately 35–45 g — groove garlands, leaf and two vines.
- Muted terracotta / rust — matching yarn — approximately 20–25 g — stem and decorative buds.
- Soft cream — matching yarn — approximately 10–15 g — alternating decorative buds.
Choose yarns with similar thickness and twist. A noticeably thicker green strand can force the groove garlands to sit above the buds instead of reading as narrow stems between them.
Tools
- 3.5 mm crochet hook
- Polyester fiberfill — approximately 160–200 g
- Long tapestry or doll needle
- Standard yarn needle
- Eight removable stitch markers
- Dressmaking pins
- Scissors
- Measuring tape
Abbreviations
- MR — magic ring
- sc — single crochet
- inc — two single crochets in one stitch
- dec — invisible decrease
- sl st — slip stitch
- ch — chain
- hdc — half double crochet
- dc — double crochet
- tr — treble crochet
- BLO — back loop only
An invisible decrease is worked through the front loops of the next two stitches before completing one single crochet through both loops.
Pattern — Step by Step
Work the main body in a continuous spiral. Move a stitch marker to the first stitch of every new round.
Pumpkin Body
Yarn: warm ivory — reconstruction based on standard six-stitch amigurumi shaping.
R1: 6 sc in MR (6)
R2: inc ×6 (12)
R3: (sc, inc) ×6 (18)
R4: (2 sc, inc) ×6 (24)
R5: (3 sc, inc) ×6 (30)
R6: (4 sc, inc) ×6 (36)
R7: sc around (36)
R8: sc around (36)
R9: sc around (36)
R10: sc around (36)
R11: sc around (36)
R12: sc around (36)
R13: sc around (36)
R14: sc around (36)
R15: sc around (36)
R16: sc around (36)
R17: sc around (36)
R18: sc around (36)
R19: (4 sc, dec) ×6 (30)
R20: sc around (30)
R21: (3 sc, dec) ×6 (24)
R22: sc around (24)
R23: (2 sc, dec) ×6 (18)
R24: sc around (18)
R25: (sc, dec) ×6 (12)
R26: sc around (12)
R27: dec ×6 (6)
Begin stuffing after R19. Pack fiberfill against the outer wall first and leave the vertical core approximately 15–20 percent softer than the perimeter. Add the final stuffing before R27.
Fasten off with a 50 cm tail.
Close the Body
Thread the ivory tail through the front loops of all six remaining stitches.
Pull the opening closed.
Pass the needle through the body once and bury the yarn.
The piece should now look like a broad stuffed sphere without permanent grooves.
Vertical Compression
Yarn: matching ivory.
Cut approximately 130 cm of yarn.
Enter through the bottom center with a long needle.
Exit through the crown center.
Return through the same vertical axis.
Pull in small increments until the body loses approximately 2 cm of height.
Stop if the top recess becomes narrower than approximately 12–15 mm. The stem, leaf and vines require usable attachment space around the crown.
Mark Eight Lobes
View the compressed pumpkin from directly above.
Place eight stitch markers around its widest circumference at approximately 45-degree intervals.
Pair each marker with its opposite:
1 with 5.
2 with 6.
3 with 7.
4 with 8.
Measure the sections before tightening any groove.
Reposition markers when neighboring lobe widths differ by more than approximately 10 mm.
Sculpting Groove 1
Yarn: matching ivory.
Cut approximately 170 cm of yarn.
Anchor at the bottom center.
Run the strand over the outer surface through the first marked valley.
Insert through the crown center.
Pass through the body and exit at the lower center.
Pull until the valley measures approximately 12–16 mm below the fullest point of the neighboring lobes.
Leave the strand temporarily unsecured.
Sculpting Groove 2
Work the exact opposite valley.
Match visible groove depth rather than matching tension by feel.
The stuffing may be slightly denser on one side.
Sculpting Grooves 3 and 4
Move to the second opposing pair.
Form Groove 3, rotate the pumpkin 180 degrees, then form Groove 4.
Press filling gently toward whichever neighboring lobe looks narrower.
Sculpting Grooves 5 and 6
Repeat with the third opposite pair.
Set the pumpkin on a level surface after both strands have been tightened.
The bottom center should remain recessed rather than touching the table before the surrounding lobes.
Sculpting Grooves 7 and 8
Complete the fourth pair.
Check all eight lobe widths from above.
Correct the tension until opposing lobes differ by no more than approximately 10–12 mm.
Secure all structural strands under the pumpkin and bury their tails.
Sage Groove Garlands — Make 6
Yarn: sage green.
Cut six strands approximately 35–40 cm long.
Using a yarn needle, work a narrow chain-style surface line from near the crown down through six selected sculpted grooves.
Stop approximately 2–3 cm above the bottom center.
Each green line should remain inside the deepest part of its groove.
Leave two grooves plain or sparsely decorated. The reference does not require every valley to carry equal floral density.
Terracotta Bobble Bud — Make 12
Yarn: muted terracotta.
R1: 6 sc in MR (6)
R2: sc around (6)
R3: dec ×3 (3)
Fasten off with a 12 cm sewing tail.
Do not stuff.
Roll the piece lightly between the fingers to create a small rounded bud.
Target approximately 12–15 mm diameter.
Cream Bobble Bud — Make 12
Yarn: soft cream.
R1: 6 sc in MR (6)
R2: sc around (6)
R3: dec ×3 (3)
Fasten off.
Make the cream buds the same diameter as the terracotta pieces within approximately 2 mm.
Attach the Bud Garlands
Pin alternating terracotta and cream buds along each sage groove line.
Place approximately four buds on the most visible front grooves.
Use two or three buds on side and rear grooves.
Leave approximately 15–22 mm between neighboring bud centers.
Sew each bud through its rear half only so it remains visibly raised.
Do not pull the green line inward while attaching a bud. The groove depth should come from the structural ivory strand, not the decoration.
Terracotta Stem
Yarn: muted terracotta.
R1: 6 sc in MR (6)
R2: sc around (6)
R3: sc around (6)
R4: sc around (6)
R5: sc around (6)
R6: sc around (6)
R7: sc around (6)
R8: sc around (6)
R9: sc around (6)
R10: (2 sc, inc) ×2 (8)
R11: sc around (8)
R12: (3 sc, inc) ×2 (10)
R13: sc around (10)
R14: (4 sc, inc) ×2 (12)
R15: sc around (12)
R16: (sc, inc) ×6 (18)
Stuff R10–R16 lightly. Leave the upper six-stitch tube mostly empty so the stem can develop the slight curve visible in the reference.
Fasten off with a 45 cm sewing tail.
Shape the Stem
Bend the upper section gradually across approximately 5–6 cm.
Move the tip about 15–20 mm away from the vertical center line.
If the stem springs upright, take one concealed terracotta stitch along the inside of the curve.
Avoid folding one round sharply.
Large Sage Leaf
Yarn: sage green.
R1: 6 sc in MR (6)
R2: inc ×6 (12)
Do not fasten off.
Make the first large lobe:
Ch 11.
Starting in second ch: sl st, sc, hdc, dc, 3 tr, dc, hdc, sc.
Sl st into the next two stitches of the center.
For the second lobe, ch 9.
Work sl st, sc, hdc, 2 dc, hdc, sc, sl st.
Sl st into the next two center stitches.
For the middle lobe, ch 8.
Work sl st, sc, hdc, 2 dc, hdc, sc.
Continue around with another 9-chain lobe and another 11-chain lobe.
Fasten off with a 35 cm tail.
Target approximately 10–12 cm across. The finished leaf should spread over roughly one-quarter of the crown.
Leaf Edging
Join sage yarn at the leaf base.
Work loose sc around the outside.
At each lobe point work (sc, ch 1, sc).
Fasten off.
The edging should emphasize the lobed shape without making the leaf curl strongly upward.
Leaf Veins
Yarn: sage green.
Embroider one central vein from the base toward the middle lobe.
Add four shorter lines toward the side lobes.
Leave each surface stitch relaxed.
Curly Vine 1
Yarn: sage green.
Ch 28.
Starting in the second chain from the hook, work 3 sc in every chain.
The strip will coil as it is worked.
Fasten off with a 20 cm attachment tail.
Curly Vine 2
Yarn: sage green.
Ch 22.
Starting in second chain, work 3 sc into every chain.
Fasten off with a 20 cm tail.
The two vines should not finish at identical lengths. The reference uses irregular curls around the stem rather than a mirrored pair.
Check the Finished Proportions
Measure the ivory body before attaching the crown pieces. Target approximately 19–22 cm across and 15–17 cm high.
Each lobe should bulge outward through the middle and return smoothly toward both centers. The green garlands should sit inside the valleys rather than climbing across the fullest part of a lobe.
Place the stem in the crown temporarily. Target approximately 7–9 cm of visible stem above the pumpkin. Position the leaf beside it and direct the two vines toward different sides.
Assembly
- Complete and stuff the ivory pumpkin through R27, keeping the central stuffing approximately 15–20 percent softer than the outer wall.
- Compress the body vertically by approximately 2 cm, then mark eight lobe positions at roughly 45-degree intervals.
- Sculpt the grooves as four opposite pairs and target approximately 12–16 mm of valley depth before securing the shaping strands.
- Add six sage groove lines only after the pumpkin shape is final, keeping every line centered inside its structural valley.
- Pin alternating cream and terracotta buds along the sage lines with approximately 15–22 mm between neighboring centers.
- Sew the terracotta stem over the crown recess through an attachment area approximately 3–4 cm wide.
- Place the sage leaf beside the stem and sew mainly through its center and lower 15–20 mm, leaving the five outer lobes raised.
- Attach the longer vine near the rear-left stem base and allow the spiral to curl freely across the crown.
- Attach the shorter vine on the opposite side, directing its final curl away from the leaf so the three green elements remain distinct.
- Set the pumpkin on a level surface, correct any rocking or compressed buds, then weave every structural yarn tail through at least 4 cm of matching crochet.
The finished pumpkin should show eight ivory lobes, raised floral groove garlands, a tall curved terracotta stem, one broad sage leaf and two free spiral tendrils.
7 Technical Tips
- Floral rows drifting onto the lobes: Surface decoration added before shaping has no fixed valley to follow. Complete all eight grooves first, then position each sage garland within approximately 5 mm of the groove center.
- Pumpkin remaining too round: Dense stuffing through the central core blocks vertical compression. Keep the center approximately 15–20 percent softer and compress the body by roughly 2 cm before sculpting individual valleys.
- Buds pulling the grooves sideways: Tight attachment stitches transfer tension from the bud into the body. Sew through only the rear half of each 12–15 mm bud and leave the sage line relaxed beneath it.
- Stem leaning at the base: A tall stem attached only to the six-stitch closure behaves like a hinge. Spread its 18-stitch base across approximately 3–4 cm of the pumpkin crown.
- Leaf covering the stem and vines: Sewing the complete leaf perimeter removes its raised structure and consumes too much crown space. Fix only its center and lower 15–20 mm, then position the tips after the vines are attached.
- Curly vines becoming weak waves: Working only one or two stitches per foundation chain gives insufficient spiral tension. Use 3 sc in every chain and avoid stretching the finished tendril during sewing.
- Pumpkin rocking on the table: A projecting closure can become the single lowest point. Push the bottom center upward approximately 3–5 mm until at least three neighboring lobes share contact with the surface.
Conclusion
Check all six floral groove lines from above before attaching the stem because the raised buds make small alignment errors more visible. The next practical step is to finish the eight structural grooves, pin the green garlands and compare their spacing before sewing any flower bud permanently. Add the stem first, then fit the leaf and both tendrils around its base without covering the crown. Share the completed floral crochet pumpkin pattern project on Pinterest with an overhead photograph that shows the decorated valleys, then post a side view of the leaf and vines on Instagram using #FloralHarvestCrochetPumpkin. For this pumpkin specifically, would you keep the alternating cream and terracotta buds or make every bud terracotta?









