Introduction
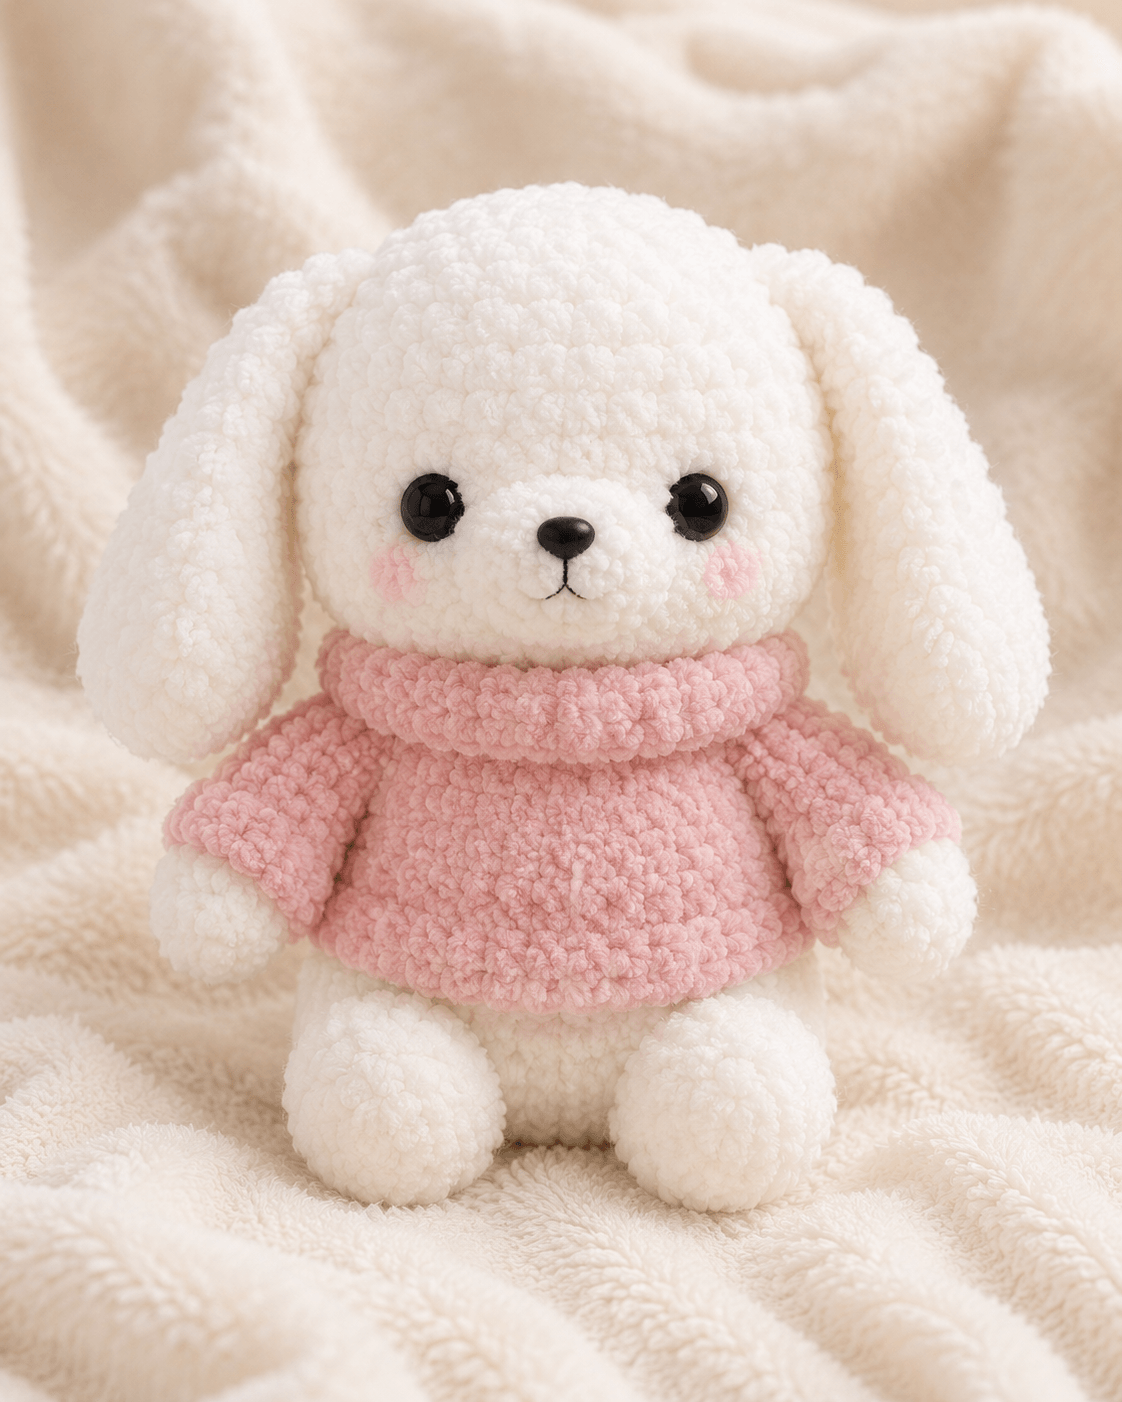
A rabbit ear this long cannot stand without changing the character’s entire head shape. This bunny amigurumi crochet pattern uses super-bulky chenille, a 5 mm hook, 14 mm safety eyes, and a separate pink dress to make a seated toy about 29 cm tall. The project is rated intermediate because the face, sleeves, collar, and skirt must align across several assembled pieces.
The Design: What Makes This Bunny Different
The head expands to 42 stitches because the photograph shows a skull considerably wider than the body. That extra width supports the long ears without making their attachment points crowd the eyes. Each ear remains unstuffed and narrows slowly toward its base, allowing it to drop beside the cheeks rather than project sideways. The body uses a 36-stitch plateau and a broad lower section so the seated rabbit does not tip forward under the head’s weight. A separate dress covers the torso, while the flared skirt extends beyond the hips and partly overlaps the arms. This crochet bunny in a dress also uses large rounded feet as front supports. A common failure in a floppy-eared bunny crochet pattern is attaching the ears too close together; the result resembles a standing-ear rabbit even when the fabric bends downward.
Project Info at a Glance
| Skill Level | Time | Finished Size | Hook | Best For |
|---|---|---|---|---|
| Intermediate | 8–10 hours | About 29 cm seated | 5.0 mm | Nursery display and seasonal decoration |
Materials and Tools
Yarn
- Warm white — category 6 super-bulky chenille — approximately 170 g — Premier Parfait Chunky, Himalaya Dolphin Baby, or a comparable plush yarn.
- Blush pink — category 6 super-bulky chenille — approximately 95 g — use the same yarn family as the white yarn to keep the dress gauge consistent.
- Black embroidery yarn — smooth DK cotton — less than 1 g — for the nose and mouth.
Tools
- 5.0 mm crochet hook
- Two 14 mm safety eyes
- Polyester stuffing, approximately 120–150 g
- Large-eye yarn needle
- Locking stitch markers
- Long assembly pins
- Sharp scissors
Replace plastic eyes with tightly embroidered eyes when the finished rabbit is intended for a child under three or for an animal.
Abbreviations
- MR — magic ring
- sc — single crochet
- inc — two single crochets in one stitch
- dec — invisible single-crochet decrease
- sl st — slip stitch
- ch — chain
- hdc — half double crochet
- dc — double crochet
- BLO — back loop only
- FLO — front loop only
Work an invisible decrease through the front loops of the next two stitches before completing one single crochet through both loops.
Pattern — Step by Step
Work stuffed pieces in continuous spirals unless joined rounds or turned rows are specified. Mark the first stitch of every round.
Head
Yarn: warm white — original shaping based on standard six-stitch amigurumi expansion.
R1: 6 sc in MR (6)
R2: inc ×6 (12)
R3: (sc, inc) ×6 (18)
R4: (2 sc, inc) ×6 (24)
R5: (3 sc, inc) ×6 (30)
R6: (4 sc, inc) ×6 (36)
R7: (5 sc, inc) ×6 (42)
R8–R15: sc around (42)
R16: (5 sc, dec) ×6 (36)
Insert the 14 mm eyes between R12 and R13. Leave approximately ten visible stitch holes between the posts before fitting the washers.
R17: sc around (36)
R18: (4 sc, dec) ×6 (30)
R19: (3 sc, dec) ×6 (24)
Stuff the head firmly. Add extra filling above and beside the eyes, but keep the muzzle area slightly flatter.
R20: (2 sc, dec) ×6 (18)
R21: (sc, dec) ×6 (12)
R22: dec ×6 (6)
R23: close the opening.
Fasten off and weave the tail through the head.
Muzzle
Yarn: warm white — make one.
R1: 6 sc in MR (6)
R2: inc ×6 (12)
R3: (sc, inc) ×6 (18)
R4: sc around (18)
R5: (sc, dec) ×6 (12)
Place a small amount of stuffing inside the muzzle. Do not form a projecting sphere.
Fasten off, leaving a 30 cm sewing tail.
Body
Yarn: warm white — medium 36-stitch plateau.
R1: 6 sc in MR (6)
R2: inc ×6 (12)
R3: (sc, inc) ×6 (18)
R4: (2 sc, inc) ×6 (24)
R5: (3 sc, inc) ×6 (30)
R6: (4 sc, inc) ×6 (36)
R7–R13: sc around (36)
R14: (4 sc, dec) ×6 (30)
R15–R17: sc around (30)
R18: (3 sc, dec) ×6 (24)
R19–R20: sc around (24)
R21: (2 sc, dec) ×6 (18)
R22: sc around (18)
Stuff the lower body firmly. Pack the final 3 cm more densely to support the large head.
Fasten off, leaving a 45 cm tail for joining.
Arms (Make 2)
Yarn: warm white.
R1: 6 sc in MR (6)
R2: inc ×6 (12)
R3–R5: sc around (12)
R6: (2 sc, dec) ×3 (9)
R7–R12: sc around (9)
Stuff the lower half only. Flatten the opening and work 4 sc through both layers.
Fasten off, leaving a 25 cm tail.
Back Legs and Feet (Make 2)
Yarn: warm white — the broad feet stabilize the seated body.
R1: 6 sc in MR (6)
R2: inc ×6 (12)
R3: (sc, inc) ×6 (18)
R4: (2 sc, inc) ×6 (24)
R5–R7: sc around (24)
R8: (2 sc, dec) ×6 (18)
R9: sc around (18)
R10: (sc, dec) ×6 (12)
R11–R13: sc around (12)
Stuff the foot firmly through R9. Use less filling in the ankle section so it can sit against the body.
Flatten the opening and work 6 sc through both layers. Fasten off, leaving a 30 cm sewing tail.
Long Ears (Make 2)
Yarn: warm white — do not stuff.
R1: 6 sc in MR (6)
R2: inc ×6 (12)
R3: (sc, inc) ×6 (18)
R4: (2 sc, inc) ×6 (24)
R5–R11: sc around (24)
R12: (2 sc, dec) ×6 (18)
R13–R16: sc around (18)
R17: (sc, dec) ×6 (12)
R18–R21: sc around (12)
Press each ear flat without adding stuffing. Align the round transition along the back edge.
Work 6 sc through both layers. Fasten off, leaving a 40 cm tail.
Cheek Patches (Make 2)
Yarn: blush pink — flat circles.
R1: 6 sc in MR (6)
R2: inc ×6 (12)
Join with a sl st. Fasten off, leaving a 15 cm tail for sewing.
Tail
Yarn: warm white.
R1: 6 sc in MR (6)
R2: inc ×6 (12)
R3: (sc, inc) ×6 (18)
R4–R5: sc around (18)
R6: (sc, dec) ×6 (12)
R7: dec ×6 (6)
Stuff firmly enough to hold a rounded shape.
Fasten off, leaving a 25 cm sewing tail.
Dress Bodice
Yarn: blush pink — worked in joined rounds from the lower edge upward.
R1: ch 37, join without twisting, sc around (36)
R2–R5: ch 1, sc around, join with sl st (36)
R6: ch 1, (4 sc, dec) ×6, join (30)
R7–R9: ch 1, sc around, join (30)
R10: ch 1, (3 sc, dec) ×6, join (24)
R11–R12: ch 1, sc around, join (24)
Fasten off and weave in the tail. The upper opening should fit closely around the body beneath the head.
Flared Skirt
Yarn: blush pink — attach to the lower loops of dress R1.
R1: join yarn to any foundation loop, ch 2, 2 hdc in each stitch around, join (72)
R2: ch 2, hdc around, join (72)
R3: ch 2, (5 hdc, inc) ×12, join (84)
R4–R6: ch 2, hdc around, join (84)
R7: ch 1, sc around, join (84)
Fasten off and weave the tail along the inside of the skirt.
Dress Sleeves (Make 2)
Yarn: blush pink — worked as shallow caps.
R1: 6 sc in MR (6)
R2: inc ×6 (12)
R3: (sc, inc) ×6 (18)
R4–R5: sc around (18)
R6: (sc, dec) ×6 (12)
Do not stuff. Flatten each sleeve and work 6 sc through both layers. Fasten off, leaving a 25 cm tail.
Raised Collar
Yarn: blush pink — ribbed strip worked in turned rows.
Row 1: ch 5, sc in the second ch from the hook and across (4)
Rows 2–30: ch 1, turn, BLO sc across (4)
Wrap the strip around the neck to test its length. Join the short ends with four slip stitches, then fasten off and hide the tail inside the collar.
Assembly
- Center the body’s 18-stitch opening beneath the head and sew through each body stitch twice, keeping the head level.
- Pin the muzzle between and slightly below the eyes, with its upper edge approximately one round below the eye posts.
- Sew around the muzzle while adding the final pinch of stuffing, then embroider a triangular black nose about 1.2 cm wide.
- Take one vertical stitch down from the nose and form two short curved mouth lines that separate at the center.
- Place the cheek patches below the outer halves of the eyes and sew them flat without pulling the head fabric inward.
- Attach the ears between head R7 and R10, leaving approximately twelve head stitches between their inner edges.
- Pull the dress over the body, position its upper edge beneath the neck seam, and tack it to the body at four hidden points.
- Sew the arms to the body through the dress between body R16 and R18, then place one sleeve over each upper arm and stitch its flattened edge to the bodice.
- Attach the feet to the lower front of the body with approximately four visible body stitches between them; set the bunny on a flat surface before tightening the seams.
- Sew the tail to the center back, position the collar over the head-to-body seam, and tack the collar’s join at the rear.
The finished rabbit should sit without hand support and measure approximately 29 cm from the base to the top of the head.
7 Technical Tips
- Round drift: Losing the first-stitch position moves the head decreases toward one eye and produces an asymmetric jaw. Insert a locking marker before making the second stitch of every round.
- Collapsing neck: A loosely packed upper body allows the 42-stitch head to lean forward. Add stuffing until the final 3 cm of the torso resist firm thumb pressure.
- Decrease ridges: Conventional decreases produce visible bars across pale chenille. Catch only the front loops of the next two stitches and complete the decrease without enlarging the working loop.
- Incorrect eye spacing: A difference of two stitch holes noticeably shifts the muzzle on this wide face. Test both eye posts with ten holes between them before securing either washer.
- Twisted ears: Sewing an ear before flattening its round transition can make the tip turn backward. Position the transition along the rear edge and pin the entire 6-stitch base before sewing.
- Unstable feet: Feet attached more than one round above the body base cannot act as front supports. Pin their lowest curves level with the body’s lowest stuffed round and test the seated balance on a table.
- Stretched skirt: Pulling the 84-stitch hem while sewing sleeves can distort the dress into an oval. Support the skirt on a folded towel and keep pins at quarter points until assembly is complete.
Conclusion
Check the rabbit from the front before burying the final sewing tails. Both feet should contact the surface, the cheek circles should sit at matching heights, and the ear bases should begin on the same head rounds. Rotate the collar seam to the center back and steam-block only the skirt if the yarn label permits low heat. Record the final ear length and actual yarn consumption before making a second bunny amigurumi crochet pattern. Save the project image to Pinterest and share the finished rabbit on Instagram with #BlushDressBunny. For the next version, should the dress remain plain pink or have a contrasting white hem?









