Introduction
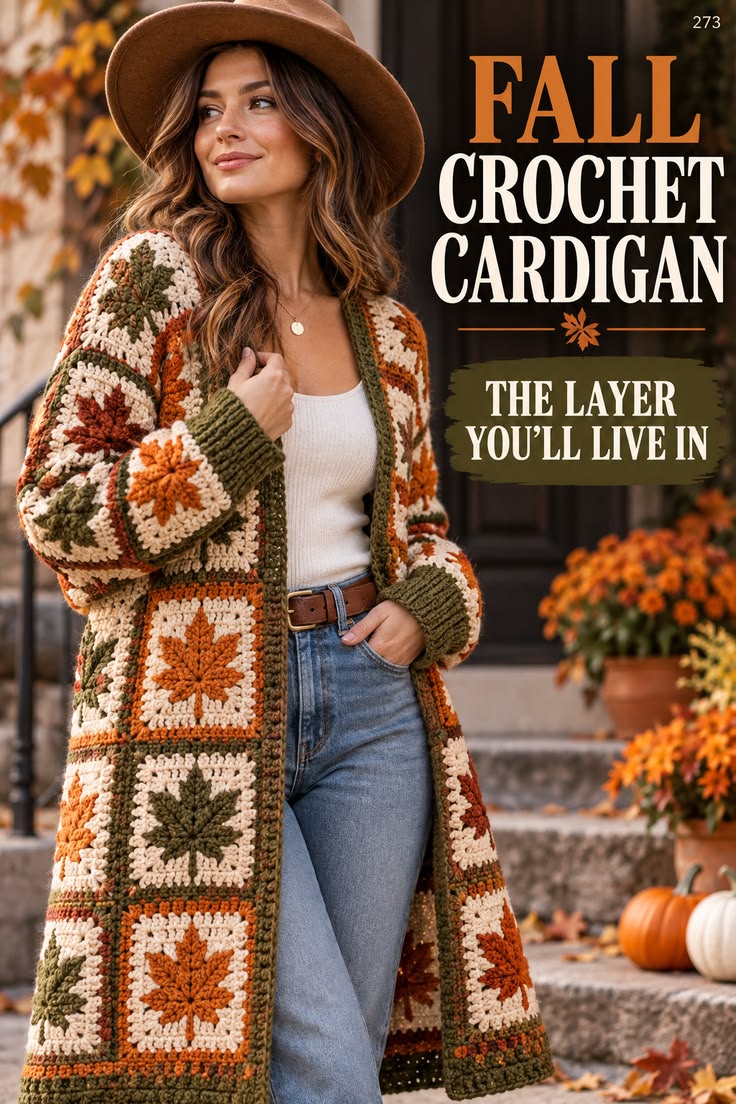
A maple leaf on a cardigan has to keep five recognizable points while the square beneath it bends around shoulders, elbows and hips. This fall maple leaf granny square crochet cardigan pattern uses cream modular squares, raised autumn leaves, olive framing, wide ribbed cuffs and an open front. Worked in worsted-weight yarn with a 5.0 mm hook, the construction can be adjusted by changing square size and panel count.
The Design: What Makes This Cardigan Different
The garment combines three structures that need different tension. The cream granny-square background provides flexibility, the maple-leaf appliqué needs firmer stitches to preserve its pointed silhouette, and the olive edging controls the finished garment shape.
Rather than crocheting a complicated leaf directly into every square, the leaf is made separately and attached to a finished cream block. This keeps the decorative motif independent from garment sizing. Terracotta, burnt orange, rust and olive leaves can then be distributed across the cardigan without changing the underlying construction.
The sleeves use the same modular language, while deep olive ribbed cuffs reduce the wrist opening. A common construction error is sizing from an unblocked square. Even a 1 cm difference per motif becomes several centimeters across a full cardigan panel.
Project Info at a Glance
| Skill Level | Construction | Target Square | Hook | Fit |
|---|---|---|---|---|
| Intermediate | Modular granny squares with maple leaf appliqués | Approx. 15–17 cm | 5.0 mm | Relaxed long cardigan |
Materials and Tools
Yarn
- Warm cream — worsted #4 — main square backgrounds
- Olive green — worsted #4 — leaves, square frames, front bands and cuffs
- Burnt orange — worsted #4 — autumn leaves and accent rounds
- Rust / brick — worsted #4 — alternate maple leaves and accents
- Dark brown — optional — small joining or edging accents
Use yarns from the same range or yarns with closely matched gauge. The cardigan depends on all finished squares reaching the same blocked measurement regardless of leaf color.
Tools
- 5.0 mm crochet hook
- 4.5 mm hook for firmer ribbing if required
- Yarn needle
- Scissors
- Locking stitch markers
- Tape measure
- Blocking mats
- Rust-resistant pins
Abbreviations
- MR — magic ring
- ch — chain
- sl st — slip stitch
- sc — single crochet
- hdc — half double crochet
- dc — double crochet
- tr — treble crochet
- BLO — back loop only
- sp — space
- st/sts — stitch/stitches
- RS — right side
- WS — wrong side
- FO — fasten off
Pattern — Step by Step
This is an original photo-inspired modular construction. Make and block one complete maple-leaf square before calculating the number of motifs required for the cardigan.
Cream Granny Square Foundation
With warm cream, make a MR.
Round 1
Ch 3, which counts as the first dc.
Work 2 dc into MR, ch 2.
Repeat:
(3 dc, ch 2)
three more times.
Join to the top of the beginning ch 3.
Round 2
Sl st to the first corner.
Work:
(ch 3, 2 dc, ch 2, 3 dc)
in the first corner.
Ch 1.
In each remaining corner work:
(3 dc, ch 2, 3 dc), ch 1.
Join.
Round 3
Sl st to the first corner.
In each corner work:
(3 dc, ch 2, 3 dc).
Work 3 dc into every side ch-1 space.
Ch 1 between groups.
Join.
Round 4
Continue the established granny-square structure.
Work:
(3 dc, ch 2, 3 dc)
in each corner.
Work 3 dc into every side space with ch 1 between groups.
Join.
Cream Structural Round
Ch 1.
Sc in every stitch and ch-1 space.
At each corner work:
(2 sc, ch 2, 2 sc).
Join.
Olive Frame Round
Change to olive green.
Ch 2.
Hdc in every stitch.
At each corner work:
(2 hdc, ch 2, 2 hdc).
Join.
Final Square Round
Continue in olive.
Ch 1.
Sc in every stitch.
At each corner work:
(sc, ch 2, sc).
Join and FO.
Target Square Size
Block the finished foundation square to approximately 15–17 cm.
Choose one measurement and use it for every motif.
If additional size is required, add one hdc round before the final sc round rather than stretching the block aggressively during blocking.
Maple Leaf Appliqué
The leaf is worked separately so its stitch density does not alter the square gauge.
Use burnt orange, rust or olive.
Leaf Center
Make a MR.
R1: Work 10 sc into MR. Join. (10)
Mark five attachment zones around the center.
Center Maple Lobe
Join at the upper attachment zone.
Ch 12.
Starting in the second chain from the hook, work:
sl st, sc, hdc, dc, tr, tr, dc, dc, hdc, sc, sl st.
At the outer tip work:
ch 2, sl st into the first ch.
Work back along the opposite side of the foundation chain using corresponding stitch heights.
Return to the center.
Upper Right Lobe
At the next attachment zone, ch 10.
Starting in the second chain from the hook, work:
sl st, sc, hdc, dc, tr, dc, hdc, sc, sl st.
Add a ch-2 point.
Work back along the opposite side.
Return to the center.
Upper Left Lobe
Repeat the upper-right lobe on the opposite side.
Keep the two upper lobes within approximately 5 mm of one another.
Lower Right Lobe
Ch 8.
Starting in the second chain from the hook, work:
sl st, sc, hdc, dc, hdc, sc, sl st.
Add a small ch-2 point.
Work along the opposite side and return to the center.
Lower Left Lobe
Repeat the lower-right lobe on the opposite side.
The lower pair should remain noticeably smaller than the upper lobes.
Maple Leaf Stem
Join at the lower center.
Ch 8.
Starting in the second chain from the hook, sl st in each chain back toward the leaf.
Sl st into the center.
FO.
Leaf Edging
Join matching yarn beside the stem.
Work sc evenly around the first lower lobe.
At each outer point work:
(sc, ch 2, sc).
At each valley between lobes, use one compact sl st.
Continue around all five lobes.
At the top center point use:
(sc, ch 3, sl st in second ch from hook, sc).
Join near the stem and FO.
Blocking the Maple Leaf
Block the leaf separately before sewing it to the square.
Pin the center point first.
Pin the two upper lobes next.
Shape the two smaller lower lobes and the stem last.
Keep the five points crisp and the valleys narrow.
Attaching the Leaf
Place the blocked leaf in the center of the cream square.
Align the stem vertically with the lower edge.
Leave approximately 1.5–2 cm between the leaf tips and the olive square frame.
Pin the center and all five lobes.
Using matching yarn, sew around the central body first.
Add one or two attachment stitches near each lobe point.
Keep the extreme tips slightly free for a subtle raised effect.
Autumn Leaf Color Sequence
Prepare maple squares in several colors:
- Burnt orange leaf on cream
- Olive leaf on cream
- Rust leaf on cream
- Terracotta leaf on cream
Keep the cream background and olive frame consistent so the mixed leaf colors remain visually connected.
Master Square Check
Complete one full square with the leaf attached.
Record:
- Blocked width
- Blocked height
- Both diagonals
- Leaf width
- Leaf height
- Complete square weight
Keep the difference between the two square diagonals within approximately 5 mm.
Cardigan Sizing Method
Measure the wearer around the fullest part of the bust.
Add approximately 15–25 cm of positive ease for the relaxed open-front silhouette shown in the reference.
Divide the required garment circumference by the blocked square size.
Because the cardigan remains open at the front, the two front panels do not need to meet completely at center front.
Example Sizing Calculation
Suppose the bust measurement is 100 cm.
Add 20 cm ease:
100 + 20 = 120 cm.
If each square measures 16 cm:
120 ÷ 16 = 7.5 squares.
Eight square widths around the main body provide approximately 128 cm before the front opening and edging are considered.
Suggested Body Layout
| Fit Range | Back Width | Each Front | Approx. Body Length |
|---|---|---|---|
| Small | 3 squares | 1 square + band | 5–6 squares |
| Medium | 3–4 squares | 1–2 squares | 6 squares |
| Large | 4 squares | 2 squares | 6–7 squares |
| XL | 4–5 squares | 2 squares | 7 squares |
| 2XL+ | 5+ squares | 2–3 squares | Adjust to measurement |
These are layout starting points rather than fixed garment sizes. Use actual blocked-square and body measurements before joining.
Back Panel
Arrange the required squares into a rectangle.
Alternate leaf colors so identical colors do not form unintended vertical columns.
For a long cardigan, use approximately 6–8 rows depending on square size and desired length.
Photograph the arrangement before joining.
Left Front Panel
Arrange a narrower column or set of columns equal to the required front width.
Place the strongest maple-leaf motifs where they remain visible when the cardigan is worn open.
Keep the inside edge straight for the front band.
Right Front Panel
Mirror the left-front dimensions.
The leaf colors do not need to mirror exactly.
A staggered color sequence creates a more natural patchwork effect.
Shoulder Placement
Lay the back and front panels flat.
Join the outer shoulder sections first.
Leave the center back open for the neckline.
Try the joined panels over the shoulders before closing the side seams.
Armhole Measurement
Measure around the upper arm and add approximately 8–12 cm of ease.
Mark the required armhole depth on both side edges.
Do not close the side seam above these markers.
Joining the Squares
Use olive green for visible seams similar to the reference.
Place two squares right sides upward.
Insert the hook through corresponding outer loops.
Work relaxed sl sts from one corner to the next.
Stop after approximately 5 cm and check the seam.
Seam Tension Test
Lay the joined squares flat.
The seam must not shorten either blocked edge.
If the squares pull inward, work more loosely or move up approximately 0.5 mm for joining only.
Joining the Back Panel
Join squares horizontally into rows first.
Measure every row.
Rows containing the same number of squares should remain within approximately 1 cm of one another.
Join the rows vertically only after their measurements agree.
Joining the Front Panels
Use the same seam method.
Keep the center-front edges straight.
Do not allow decorative leaf tips to become trapped in the joining seams.
Sleeve Construction
The reference uses wide patchwork sleeves with an olive cuff.
Construct each sleeve as a rectangle of joined maple-leaf squares.
The upper sleeve must match the armhole circumference before seaming.
Suggested Sleeve Layout
For 15–17 cm squares, begin by testing:
2 squares around × 3 squares long
for a compact sleeve, or:
3 squares around × 3–4 squares long
for a fuller oversized sleeve.
Actual square count must be determined from the wearer’s upper-arm and sleeve-length measurements.
Shaping the Sleeve
A rectangular sleeve produces the relaxed shape visible in the photo.
If less fabric is wanted near the wrist, reduce the opening with the cuff rather than attempting to decrease individual granny squares.
This keeps all maple motifs intact.
Seaming the Sleeve
Fold the sleeve panel lengthwise with right sides outward.
Join the long edges with olive sl sts.
Leave the upper end open.
Check that the tube fits comfortably around the arm before attaching it to the body.
Attaching the Sleeve
Place the sleeve seam at the lower armhole.
Mark the top center of the sleeve.
Match this marker to the shoulder seam.
Join the sleeve evenly around the armhole with olive yarn.
Olive Ribbed Cuff
Join olive yarn at the wrist opening.
Work one round of sc evenly around.
Count the stitches.
If the wrist opening is very wide, decrease evenly during this foundation round.
Ribbing Foundation
Ch 13.
Starting in the second chain from the hook, sc in each chain. (12 sc)
Sl st into the next two stitches of the wrist foundation.
Turn.
Ribbing Row
Skip the two joining sl sts.
Working BLO, sc in each of the 12 ribbing stitches.
Ch 1, turn.
Sc BLO across.
Sl st into the next two wrist stitches.
Repeat around the complete cuff.
Closing the Cuff
When the ribbing reaches the starting edge, place the first and final rows together.
Sl st through corresponding loops.
FO.
Target approximately 8–12 cm cuff depth depending on the desired proportion.
Front Opening Band
Join olive yarn at the lower right front.
Work sc evenly up the right front edge, around the back neckline and down the left front edge.
At the lower corners, work enough stitches to turn cleanly without creating a flare.
Front Band Round 2
Ch 2.
Hdc in every stitch along the complete front opening.
Turn.
Front Band Round 3
Ch 1.
Sc BLO in every stitch.
Turn.
Front Band Round 4
Ch 2.
Hdc in every stitch.
FO if the band has reached the required width.
For a deeper olive band, repeat the final two rows.
Lower Hem
Join olive at one lower front corner.
Work sc evenly across the complete bottom edge.
Turn.
Work one or two rows of hdc.
Finish with one sc BLO row for a subtle raised line.
Optional Ribbed Hem
For a heavier coat-like finish, work attached vertical ribbing around the bottom edge using the same technique as the cuffs.
Use approximately 8–10 stitches per rib instead of 12 if a narrower hem is preferred.
Neckline Stability
The back neckline carries the weight of a long cardigan.
If it stretches after assembly, work one additional row of sc across the back-neck section only.
Do not tighten the complete front band to correct a local neckline problem.
Cardigan Length
For a hip-length version, stop around 65–75 cm.
For a mid-thigh cardigan, target approximately 80–95 cm.
For the long photo-inspired version, approximately 95–110 cm may be appropriate depending on wearer height.
Measure from the shoulder rather than relying only on motif count.
Estimating Yarn
Weigh one complete blocked square with its maple leaf.
Suppose one finished motif weighs 55 g.
If the cardigan uses 40 motifs:
55 × 40 = 2,200 g.
Add yarn for cuffs, seams, front bands and hem.
Then add approximately 10% for swatching, gauge differences and future repairs.
The 55 g value is an example only. Use the actual weight of your master square.
Estimating Yarn by Color
Weigh each yarn before and after making one representative square.
Record the cream background, olive frame and leaf-color usage separately.
Multiply each result by the number of corresponding squares.
Purchase additional olive because it is also required for joining, cuffs, front bands and the lower hem.
Planning Leaf Colors
Lay all finished squares on the floor before joining.
Distribute burnt orange, olive, rust and terracotta motifs across the body.
Avoid placing every dark olive leaf on one side.
Move individual squares until the visual weight is balanced.
Back Color Arrangement
Use a staggered sequence such as:
Orange → Olive → Rust → Orange
followed by:
Olive → Rust → Orange → Olive.
Shift the sequence again on the next row.
Front Panel Color Arrangement
Place contrasting leaf colors in adjacent vertical positions.
Avoid repeating the same leaf color through an entire front column unless a deliberately striped effect is wanted.
Sleeve Color Arrangement
Distribute darker motifs near the elbow or upper arm and brighter orange motifs through the visible outer sleeve.
Keep both sleeves similar in visual weight without making them exact mirror images.
Short Cardigan Version
Reduce the body to approximately 3–4 square rows below the armhole.
Keep the same sleeve and front-band construction.
Finish the hem at or slightly below the hip.
Long Duster Version
Add one or two extra rows of squares before working the hem.
Check the garment weight before extending it.
A long worsted-weight modular cardigan can stretch vertically under its own weight.
Reducing Garment Weight
Use DK yarn and approximately a 4.0 mm hook.
Make a new master square and recalculate the complete panel layout.
Do not use the worsted-yarn square counts automatically because the finished motifs will be smaller.
Alternative Colorway — Burgundy and Mustard
Keep the cream background.
Replace olive framing with deep brown or forest green.
Use burgundy, mustard and burnt orange for the maple leaves.
Alternative Colorway — Forest Green and Rust
Use warm oatmeal instead of cream.
Frame every square in forest green.
Alternate rust, copper and olive leaves.
Alternative Neutral Version
Use oatmeal backgrounds with camel frames.
Work the leaves in taupe, rust and dark brown.
Keep the cuffs and front band in the darkest neutral for visual structure.
Blocking Before Assembly
Block every square before joining.
Do not attempt to correct motif dimensions after the cardigan has been assembled.
Pin all four corners to the master measurement and check both diagonals.
Shape the maple leaf only after the square itself is correctly aligned.
Final Garment Blocking
After assembly, lay the cardigan flat.
Align the front edges.
Measure both side seams from the underarm to the hem.
Check that the two sleeves have equal finished length.
Shape the cuffs and front band without stretching the granny squares.
Assembly
- Make one cream-and-olive master square, block it to 15–17 cm and record its width, height and both diagonal measurements.
- Crochet one maple leaf, block its five lobes separately and attach it to the master square with 1.5–2 cm clearance from the frame.
- Calculate the required back, front and sleeve square counts from the wearer’s measurements and the actual blocked motif size.
- Produce all remaining squares, distribute the autumn leaf colors and photograph the final arrangement before beginning the seams.
- Join the back and front panels with relaxed olive seams, then connect the shoulder sections while leaving the required neckline opening.
- Close the side seams from the hem upward, stopping at the measured armhole markers on both sides.
- Construct the sleeve panels, seam them into tubes and attach each sleeve with its seam positioned at the lower armhole.
- Add the olive ribbed cuffs, reducing the wrist opening evenly before beginning the attached ribbing if necessary.
- Work the continuous olive front and neckline band, followed by the lower hem, and check both front edges for equal length.
- Weave structural tails through dense seams, block the assembled garment flat and re-shape every maple-leaf point after the cardigan has dried.
The completed cardigan should hang as a relaxed open-front layer with a regular cream patchwork field, visible autumn maple leaves, olive structural lines and deep fitted cuffs.
7 Technical Tips
- Block every square to within approximately 5 mm of the master measurement. A repeated 5 mm difference across four motifs changes a panel width by 2 cm.
- Keep each maple leaf at least 1.5 cm from the square’s joining edge. Leaf points trapped in seams curl and make the patchwork intersections bulky.
- Test every olive joining seam after approximately 5 cm. A tight seam shortens the modular edge and can make the finished front panels twist.
- Add 8–12 cm of ease to the upper-arm measurement. A sleeve built exactly to body circumference becomes restrictive once the thick square seams are included.
- Reduce the wrist opening before adding the cuff. Asking attached ribbing to remove more than several centimeters of excess width creates puckering above the cuff.
- Measure both front edges before working the opening band. A difference greater than approximately 1 cm should be corrected before additional edging locks the length in place.
- Weave joining tails through at least 6–8 cm of dense olive or cream crochet. Do not hide structural ends beneath the maple appliqués because garment movement can pull them back into view.
Care and Final Blocking
Follow the washing instructions for the selected yarn. A long modular cardigan can become heavy when wet, so support the entire garment rather than lifting it by the shoulders.
Lay the cardigan flat and align the back panel first. Position both front panels symmetrically, then straighten the side seams and sleeves.
Shape the front band and cuffs without stretching them. Finally, arrange each maple leaf and sharpen the five points by hand. Allow the garment to dry completely in a flat position before hanging or wearing it.
Conclusion
The maple motifs provide the autumn character of this fall maple leaf granny square crochet cardigan pattern, but accurate blocked squares determine whether the finished garment fits correctly. Make one complete 15–17 cm master motif first, weigh it, measure it and use that number to calculate every body and sleeve panel. Keep the leaf appliqués independent from the joining edges, use olive seams to connect the patchwork and reduce the wrist openings before adding the ribbed cuffs. Your next step is to make one cream-and-olive square and test a burnt-orange maple leaf against its center. Save the cardigan to Pinterest or share the finished version on Instagram with #FallMapleLeafCardigan. Which leaf combination would you use most: burnt orange and olive, or rust and burgundy?









