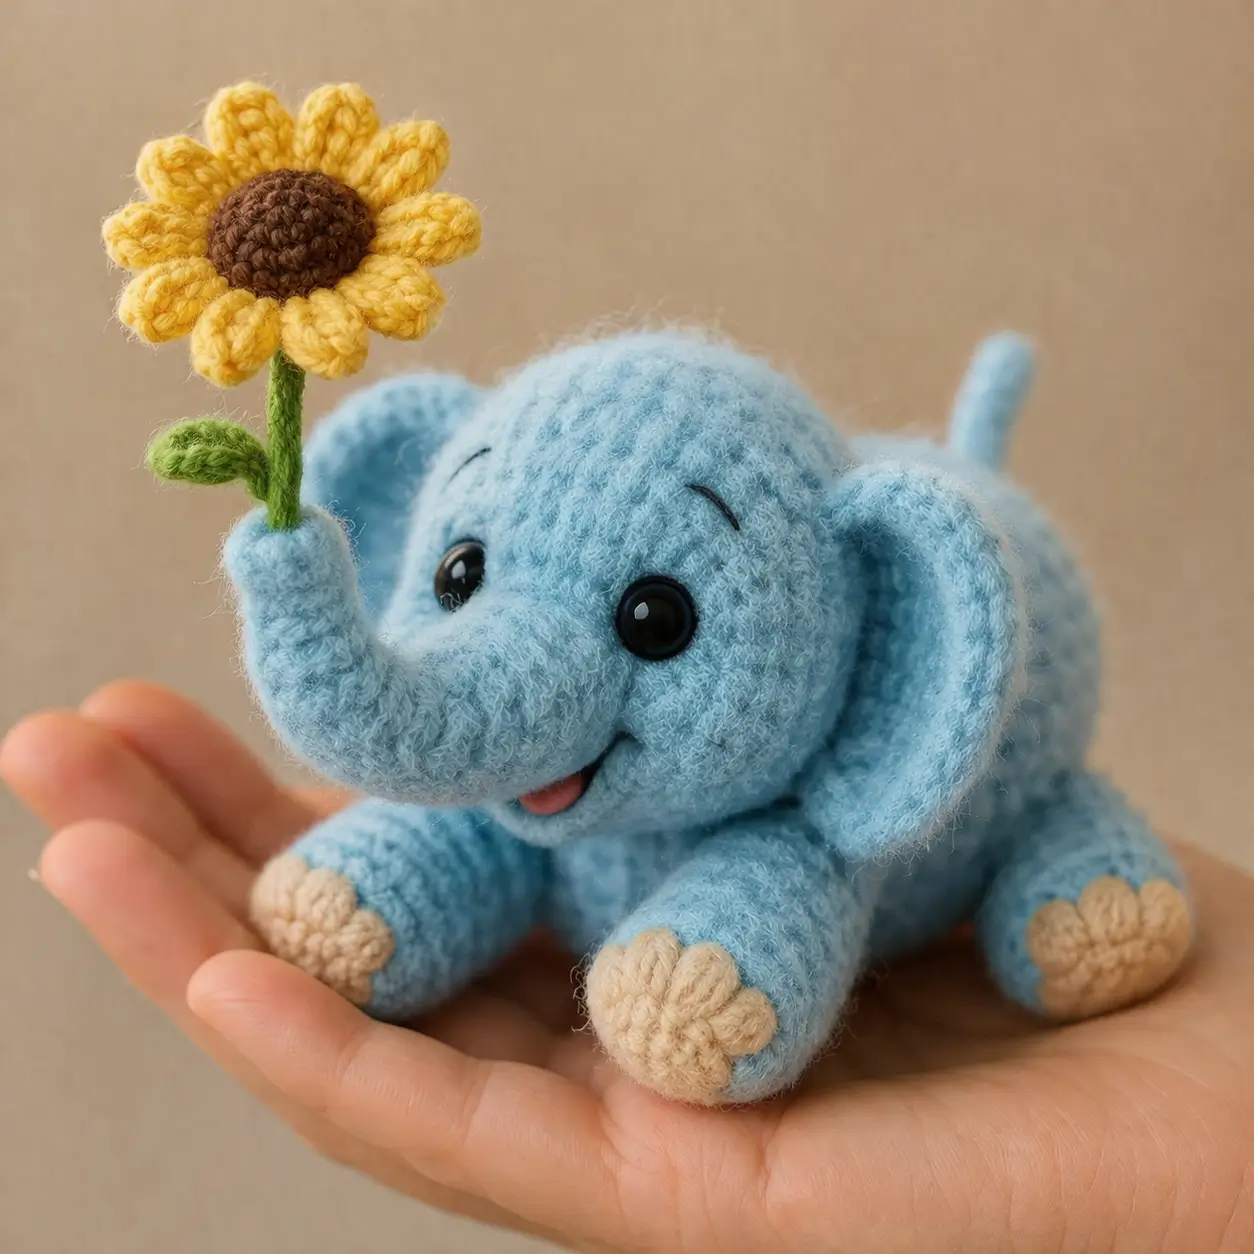
An elephant trunk can wreck the center of gravity in six stitches. This elephant amigurumi crochet pattern fixes that with a compact 12 cm body, sport-weight yarn, a 2.5–2.75 mm hook, and an intermediate construction order that keeps the raised trunk stable enough to hold a small sunflower. It suits gift making, shelf display, or a nursery prop where the toy must stay upright in a crouched pose.
The Design: What Makes This Elephant Different
The trunk is the first structural decision. It curves up, not forward, so the head needs extra visual mass low on the cheeks or the toy reads top-heavy. You see that in many baby elephant amigurumi designs: the head or ear placement carries the balance problem.
Here, the ears stay oversized and slightly rear-set to widen the silhouette without adding bulk to the snout. Second, the body sits low between four short cylinders. That matters because a small elephant crochet pattern can tip backward once a tail, ears, and prop are attached. Third, the paw pads use a contrast cap rather than embroidered toenails, which matches the photo better and gives cleaner front-facing feet. The common mistake with this animal type is undersizing the ears. The result looks like a generic plush mammal with a long nose instead of an elephant.
Project Info at a Glance
| Skill Level | Time | Finished Size | Hook | Best For |
|---|---|---|---|---|
| Intermediate | 4–6 hours | 12 cm sitting | 2.5–2.75 mm | Palm-size gift, nursery shelf, photo prop |
Materials and Tools
Yarn
- Pale blue — sport/fine — about 35–45 g for this scaled version — brushed cotton blend or halo yarn substitute
- Cream/beige — sport/fine — about 8 g — paw pads
- Yellow — sport/fine — about 5 g — sunflower petals
- Brown — sport/fine — about 3 g — sunflower center
- Green — sport/fine — about 4 g — stem and leaf
- Pink-red — sport/fine — less than 1 g — tongue
Tools
- Hook 2.5–2.75 mm
- 6 mm safety eyes
- Polyester stuffing
- Tapestry needle
- Stitch markers
- Black embroidery thread
Abbreviations
- MR = magic ring
- sc = single crochet
- inc = 2 sc in same stitch
- dec = invisible decrease
- sl st = slip stitch
- ch = chain
- BLO = back loop only
- FLO = front loop only
Invisible decrease reduces bulk on a rounded toy and keeps the face cleaner around the head and trunk junction.
Pattern — Step by Step
Continuous spiral unless noted.
Head (Make 1)
Yarn: pale blue — photo adaptation using standard amigurumi math; 30-stitch plateau matches a small palm-size elephant head benchmark.
- R1: 6 sc in MR (6)
- R2: inc x6 (12)
- R3: (sc, inc) x6 (18)
- R4: (2 sc, inc) x6 (24)
- R5: (3 sc, inc) x6 (30)
- R6–10: sc around (30)
- R11: (3 sc, dec) x6 (24)
- R12: (2 sc, dec) x6 (18)
Insert safety eyes between R7 and R8, 6 sts apart. Add stuffing.
- R13: (sc, dec) x6 (12)
- R14: dec x6 (6)
Fasten off. Leave 20 cm tail.
Trunk (Make 1)
Yarn: pale blue — derived from verified elephant trunk count logic, then lengthened to match the raised photo silhouette.
- R1: 6 sc in MR (6)
- R2–5: sc around (6)
- R6: (2 sc, inc) x2 (8)
- R7: sc around (8)
- R8: (3 sc, inc) x2 (10)
- R9–11: sc around (10)
- R12: (3 sc, dec) x2 (8)
- R13: sc around (8)
Flatten top opening. Fasten off. Leave 25 cm tail.
Body (Make 1)
Yarn: pale blue — custom crouched body sized to support the raised trunk visually.
- R1: 6 sc in MR (6)
- R2: inc x6 (12)
- R3: (sc, inc) x6 (18)
- R4: (2 sc, inc) x6 (24)
- R5–8: sc around (24)
- R9: (2 sc, dec) x6 (18)
- R10: sc around (18)
Stuff firmly at belly and chest, lighter at back.
- R11: (sc, dec) x6 (12)
- R12: dec x6 (6)
Fasten off. Leave 20 cm tail.
Front Legs (Make 2)
Yarn: cream then pale blue.
- R1: With cream, 6 sc in MR (6)
- R2: inc x6 (12)
- R3: BLO sc around (12)
- Change to pale blue.
- R4–7: sc around (12)
- R8: (4 sc, dec) x2 (10)
- R9–10: sc around (10)
Lightly stuff. Flatten top. Fasten off. Leave 18 cm tail.
Back Legs (Make 2)
Yarn: cream then pale blue.
- R1: With cream, 6 sc in MR (6)
- R2: inc x6 (12)
- R3: BLO sc around (12)
- Change to pale blue.
- R4–6: sc around (12)
- R7: (2 sc, dec) x3 (9)
- R8–9: sc around (9)
Lightly stuff. Flatten top. Fasten off. Leave 18 cm tail.
Ears (Make 2)
Yarn: pale blue — widened to keep the head readable as elephant, not bear.
- R1: 6 sc in MR (6)
- R2: inc x6 (12)
- R3: (sc, inc) x6 (18)
- R4: (2 sc, inc) x6 (24)
- R5: sc around (24)
Fold slightly at base to cup the ear. Fasten off. Leave 20 cm tail.
Tail (Make 1)
Yarn: pale blue — based on short chain-style elephant tail construction.
- Ch 7
- Row 1: sl st in 2nd ch from hook, sl st 5
Fasten off. Fray end lightly or knot a tiny tassel. Leave 8 cm tail.
Cheek Patches (Make 2)
Yarn: pale blue, one shade lighter if available.
- R1: 6 sc in MR (6)
- R2: inc x6 (12)
Fasten off. Leave 10 cm tail.
Tongue (Make 1)
Yarn: pink-red.
- Ch 4
- Row 1: sc in 2nd ch from hook, sc 2, turn. (3)
- Row 2: dec, sc. (2)
Fasten off. Leave 8 cm tail.
Sunflower Center (Make 1)
Yarn: brown.
- R1: 6 sc in MR (6)
- R2: inc x6 (12)
- R3: (sc, inc) x6 (18)
- R4: sc around (18)
Fasten off. Leave 15 cm tail.
Sunflower Petals (Make 10)
Yarn: yellow.
- Ch 6
- Row 1: sl st in 2nd ch, sc, hdc, sc, sl st
Fasten off. Leave 8 cm tail.
Stem (Make 1)
Yarn: green.
- Ch 16
- Row 1: sl st in 2nd ch from hook and in each ch across
Fasten off. Leave 12 cm tail.
Leaf (Make 1)
Yarn: green.
- Ch 7
- Row 1: sl st in 2nd ch, sc, hdc, sc, sl st
Fasten off. Leave 10 cm tail.
Paw Pads (Make 4)
Yarn: cream.
- R1: 6 sc in MR (6)
- R2: inc x6 (12)
Fasten off. Leave 10 cm tail.
Assembly
- Sew the trunk to the lower center of the head, angling it upward before closing the final seam.
- Attach the ears to the sides of the head, with the top edge around R5–R6 and the lower edge near the cheek line.
- Sew the cheek patches low on the face, one on each side of the trunk base.
- Stitch the tongue under the trunk seam so only the rounded edge shows.
- Embroider short brows one round above each eye.
- Sew the head to the front half of the body, slightly pitched forward.
- Attach the front legs under the chest, flush with the body base.
- Attach the back legs slightly wider than the front pair so the elephant stays stable.
- Sew the tail to the rear centerline.
- Assemble the sunflower, stitch the stem and leaf to the flower, then tack the stem along the side of the trunk.
The finished piece should rest on all four feet with the trunk acting as a visual vertical, not a load-bearing support.
7 Technical Tips
- Mark the first stitch of every round on the head and trunk. A one-stitch drift will pull the trunk seam off center and the face will read crooked.
- Stuff the head firmer than the body. Soft stuffing in the head makes the 6 mm eyes sink and the cheeks collapse under the trunk line.
- Use invisible decreases on the head from 24 to 18 and from 18 to 12. Standard decreases leave ridges that show through halo yarn.
- Insert the eyes before the final two decrease rounds. On a 30-stitch head, placing them after closure usually forces the eye posts too close together.
- Reduce hand tension by roughly 5 to 10 percent if you substitute velvet or brushed yarn. Tight stitches in fuzzy yarn make the trunk too stiff to curve cleanly.
- Pin both ears before sewing and check their top edge sits level. Even a 2 mm height mismatch changes the whole character of the elephant face.
- Weave each limb tail back through the body twice. Single-pass tails can loosen at the shoulder or hip when the toy is handled often.
Conclusion
This version keeps the body short, the ears wide, and the trunk lifted so the elephant amigurumi crochet pattern matches the photo instead of drifting into a generic plush animal. Work the head first, test the eye spacing before closure, then assemble the sunflower last so the pose stays adjustable. Share the finished elephant on Pinterest and Instagram with #ElephantWithSunflower, and photograph it in the palm of your hand to show scale clearly. One practical question remains: did you angle your trunk high enough that the sunflower reads upright from the front?









