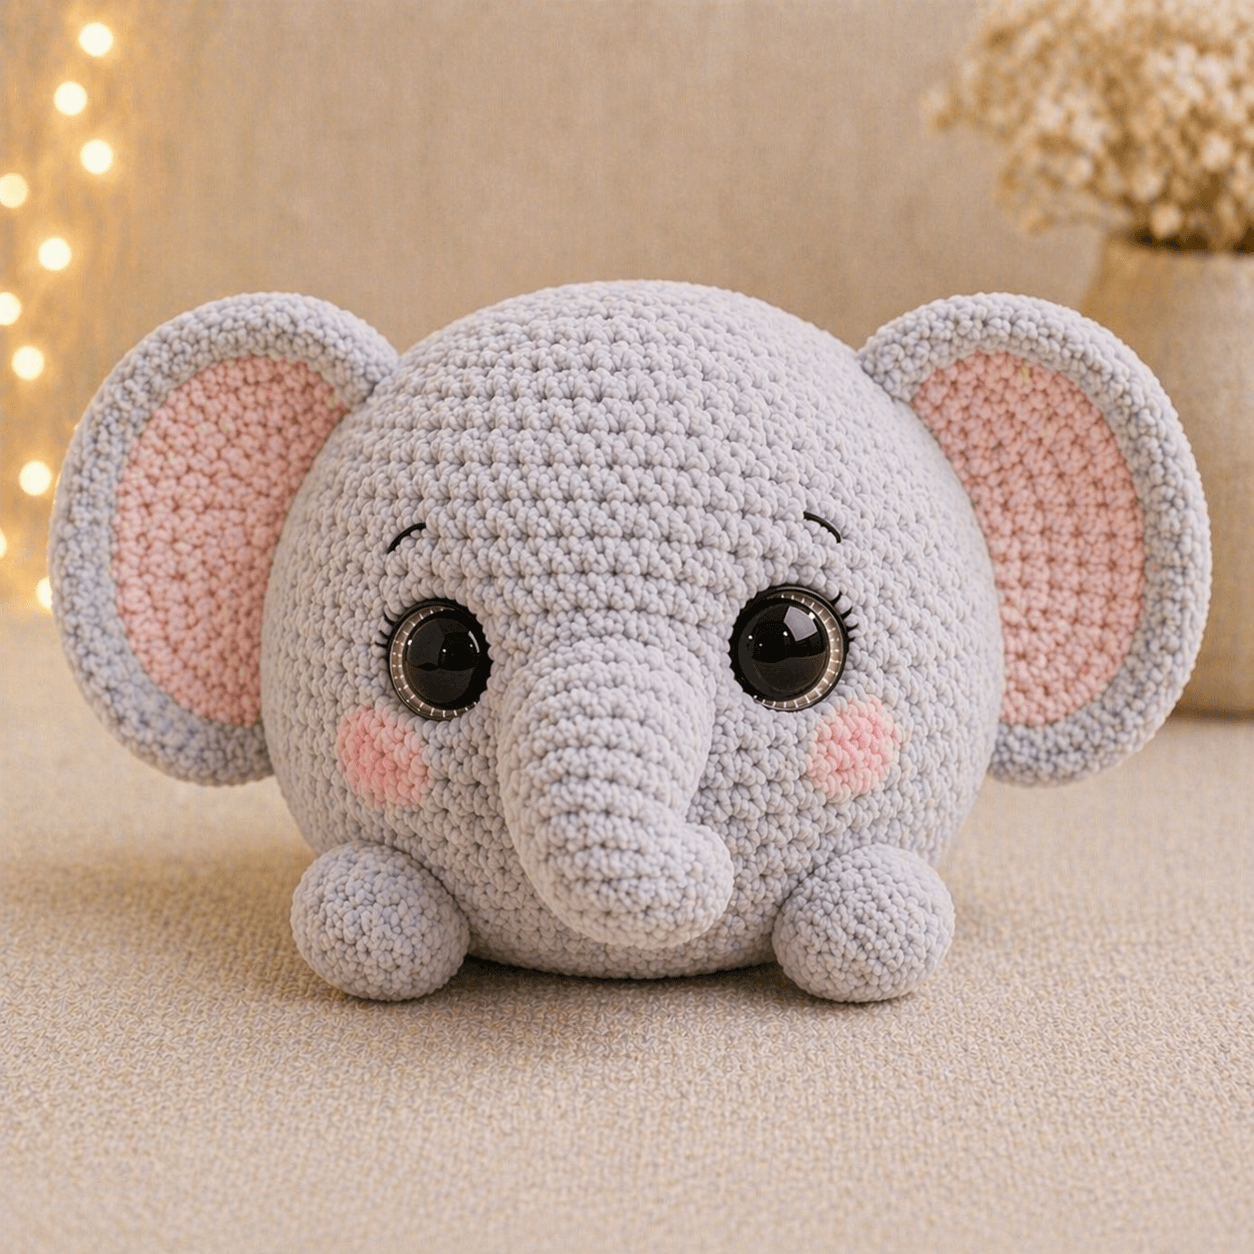
An elephant trunk is a front-heavy cylinder. This elephant amigurumi crochet pattern uses chenille yarn, a 4.5–5.0 mm hook range, and a compact 14–15 cm seated format to build a stable plush with oversized ears and a blunt baby-elephant profile. It suits an easy-intermediate maker and works well for nursery shelf décor, baby-gift baskets, or a soft display toy that stays upright without wire.
The Design: What Makes This Elephant Different
This elephant keeps the head almost as wide as the body because the photo reads from the front as a near-sphere, not a tall seated toy. You need the ears oversized and slightly cupped; otherwise the silhouette shifts toward mouse or koala before the trunk even enters the frame. The trunk is short, tapered, and attached low on the face so the eyes stay open and dominant. That choice matters in a baby elephant amigurumi, where the eye-to-trunk ratio carries most of the character. A common failure in a plush elephant crochet pattern is making the trunk too long and stuffing it too hard. Then the face drops forward, the cheeks disappear, and the toy stops reading as compact.
Project Info at a Glance
| Skill Level | Time | Finished Size | Hook | Best For |
|---|---|---|---|---|
| Easy–Intermediate | 1–2 sessions | 14–15 cm seated | 4.5–5.0 mm | Shelf plush / baby gift |
Materials and Tools
The photo reads closer to chenille than cotton. Current chenille elephant patterns commonly use Himalaya Dolphin Baby or similar plush polyester yarns, and official product specs place Dolphin Baby in the very-thick category with 100 g / 120 m balls.
Yarn
- Light gray chenille — weight 6 / very thick polyester — 60–100 g — brand suggestion: Himalaya Dolphin Baby
- Soft pink chenille — weight 6 / very thick polyester — 13–16 g for ear insets and cheeks — brand suggestion: Himalaya Dolphin Baby
- Black embroidery thread — small amount — brows and lashes
Tools
- Hook 4.5 mm
- 16 mm safety eyes
- Polyester stuffing
- Tapestry needle
- Stitch markers
- Sharp scissors
Abbreviations
MR / sc / inc / dec / sl st / ch / BLO / FLO
Use invisible decrease on visible shaping rounds so chenille gaps stay closed and the gray surface does not split around the face.
All parts below are worked in a continuous spiral unless noted. Counts are shown in brackets at the end of every round, and the shaping follows standard amigurumi math sized to the photo’s round baby-elephant proportions.
Pattern — Step by Step
This build separates head and body even though the finished toy should read as one front-facing mass. That split gives you better control over stuffing pressure, trunk angle, and base balance. Keep the stitch marker locked to the first stitch of each round; chenille loops hide the seam line fast.
Head
Yarn: light gray chenille
R1: 6 sc in MR (6)
R2: inc x6 (12)
R3: (1 sc, inc) x6 (18)
R4: (2 sc, inc) x6 (24)
R5: (3 sc, inc) x6 (30)
R6: (4 sc, inc) x6 (36)
R7: sc around (36)
R8: sc around (36)
R9: sc around (36)
R10: sc around (36)
R11: sc around (36)
R12: sc around (36)
R13: (4 sc, dec) x6 (30)
R14: (3 sc, dec) x6 (24)
R15: (2 sc, dec) x6 (18)
Insert 16 mm safety eyes between R9 and R10, 10 sts apart. Stuff firmly before the next round.
R16: (1 sc, dec) x6 (12)
R17: dec x6 (6)
Fasten off. Leave a 20 cm tail.
Body
Yarn: light gray chenille
R1: 6 sc in MR (6)
R2: inc x6 (12)
R3: (1 sc, inc) x6 (18)
R4: (2 sc, inc) x6 (24)
R5: (3 sc, inc) x6 (30)
R6: (4 sc, inc) x6 (36)
R7: sc around (36)
R8: sc around (36)
R9: sc around (36)
R10: sc around (36)
R11: sc around (36)
R12: (4 sc, dec) x6 (30)
R13: (3 sc, dec) x6 (24)
R14: (2 sc, dec) x6 (18)
Stuff the body firmly at the base and slightly less at the top so the head can sit low.
R15: (1 sc, dec) x6 (12)
R16: dec x6 (6)
Fasten off. Leave a 20 cm tail.
Front Legs (Make 2)
Yarn: light gray chenille
R1: 6 sc in MR (6)
R2: inc x6 (12)
R3: sc around (12)
R4: sc around (12)
R5: (1 sc, dec) x4 (8)
R6: sc around (8)
Stuff lightly. Keep the bottom rounder than the top.
Fasten off. Leave a 15 cm tail.
Back Legs (Make 2)
Yarn: light gray chenille
R1: 6 sc in MR (6)
R2: inc x6 (12)
R3: sc around (12)
R4: BLO sc around (12)
R5: (1 sc, dec) x4 (8)
R6: sc around (8)
Stuff lightly. Flatten the BLO edge with your fingers to make a steadier rear support.
Fasten off. Leave a 15 cm tail.
Ears (Make 2)
Yarn: light gray chenille with pink insert
Outer ear in gray
R1: 6 sc in MR (6)
R2: inc x6 (12)
R3: (1 sc, inc) x6 (18)
R4: (2 sc, inc) x6 (24)
R5: (3 sc, inc) x6 (30)
R6: sc around (30)
Fasten off. Leave a 20 cm tail.
Inner ear panel in pink
R1: 6 sc in MR (6)
R2: inc x6 (12)
R3: (1 sc, inc) x6 (18)
R4: (2 sc, inc) x6 (24)
Do not stuff. Sew the pink panel inside the gray ear, leaving a visible gray border of about 3 stitches around the edge.
Fasten off. Leave a 12 cm tail.
Trunk (Make 1)
Yarn: light gray chenille
R1: 6 sc in MR (6)
R2: sc around (6)
R3: sc around (6)
R4: (2 sc, inc) x2 (8)
R5: sc around (8)
R6: (3 sc, inc) x2 (10)
R7: sc around (10)
R8: (4 sc, inc) x2 (12)
R9: sc around (12)
R10: sc around (12)
R11: sc around (12)
R12: sc around (12)
Stuff the tip and middle only. Leave the top 2 rounds empty so the trunk can curve downward instead of projecting straight out.
Fasten off. Leave a 25 cm tail.
Cheek Patches (Make 2)
Yarn: soft pink chenille
R1: 6 sc in MR (6)
R2: inc x6 (12)
Flatten into small blush circles. Do not stuff.
Fasten off. Leave a 10 cm tail.
Eyebrows and Lashes
Yarn: black embroidery thread
Stitch one short brow above each eye, 2 stitches wide. Add 2–3 downward lash stitches at the outer edge of each eye.
Keep both brows shallow; a high arch turns the face from baby elephant to cartoon surprise.
Assembly
- Close the head and body openings with the yarn tails and shape both pieces with your hands before sewing anything together.
- Pin the head to the body so the lower head edge sits slightly forward, not centered like a snowman.
- Sew the head to the body with tight whip stitches, adding extra stuffing to the neck area if the face leans down.
- Pin the trunk between the eyes, centered vertically on the lower half of the head, then sew around the full trunk base.
- Attach the cheek patches one stitch below and one stitch outside each eye.
- Embroider the brows and lashes after the cheeks are attached so the face balance is visible in full.
- Sew the ears to the upper side seams of the head, with the top edge starting roughly at the eye line and the lower edge ending near the cheek level.
- Attach the front legs to the lower body front so they frame the trunk when viewed head-on.
- Sew the back legs slightly behind the side midpoint and flatten them so the elephant sits without rocking.
- Weave all tails through at least three direction changes inside the body, trim close, and brush the chenille nap lightly with your fingers.
The finished elephant should sit flat, with the trunk centered between the front feet and the ears extending beyond the head width.
7 Technical Tips
- Stitch markers: Chenille hides the first stitch almost immediately. Miss one round marker change and the seam can drift a full stitch by round 6.
- Stuffing firmness: Press the head with your thumb after round 15; a compression of about 1 cm is enough. Softer than that, the trunk will drag the face inward once sewn on.
- Invisible decrease: Regular decreases leave visible slits in plush polyester. Use invisible decrease on every face and body closing round so the gray surface stays dense.
- Eye placement timing: Insert the safety eyes before the final stuffing pass, between rounds 9 and 10. Waiting until closure often twists the washers against loose fill and tips the pupils unevenly.
- Velvet tension: If body holes open wider than 2 mm when stretched, drop one hook size. Chenille expands after stuffing, and the first gaps usually appear on increase rounds.
- Pinning: Use three anchor pins per ear: top, outer edge, and lower edge. One pin at the center lets the ear rotate and flattens the baby-elephant silhouette.
- Tail weaving: Leave at least 6 cm of tail inside every sewn part before trimming. Slick polyester cores can work loose unless the tail changes direction inside the stuffing at least three times.
Conclusion
This build works because the trunk stays short, the ears overscale the head, and the body holds a low center of gravity. Gather the gray chenille, cut the pink accents first, and begin with the head so the eye spacing can be checked before assembly. When your toy is finished, post one front view and one side view on Pinterest and Instagram so the trunk curve and ear cup are visible. Use the tag #RoundElephantPattern and note your hook size in the caption. That makes comparisons useful for other makers searching this exact elephant amigurumi crochet pattern. Did you set the ears at eye level, or did you move them one round higher?









