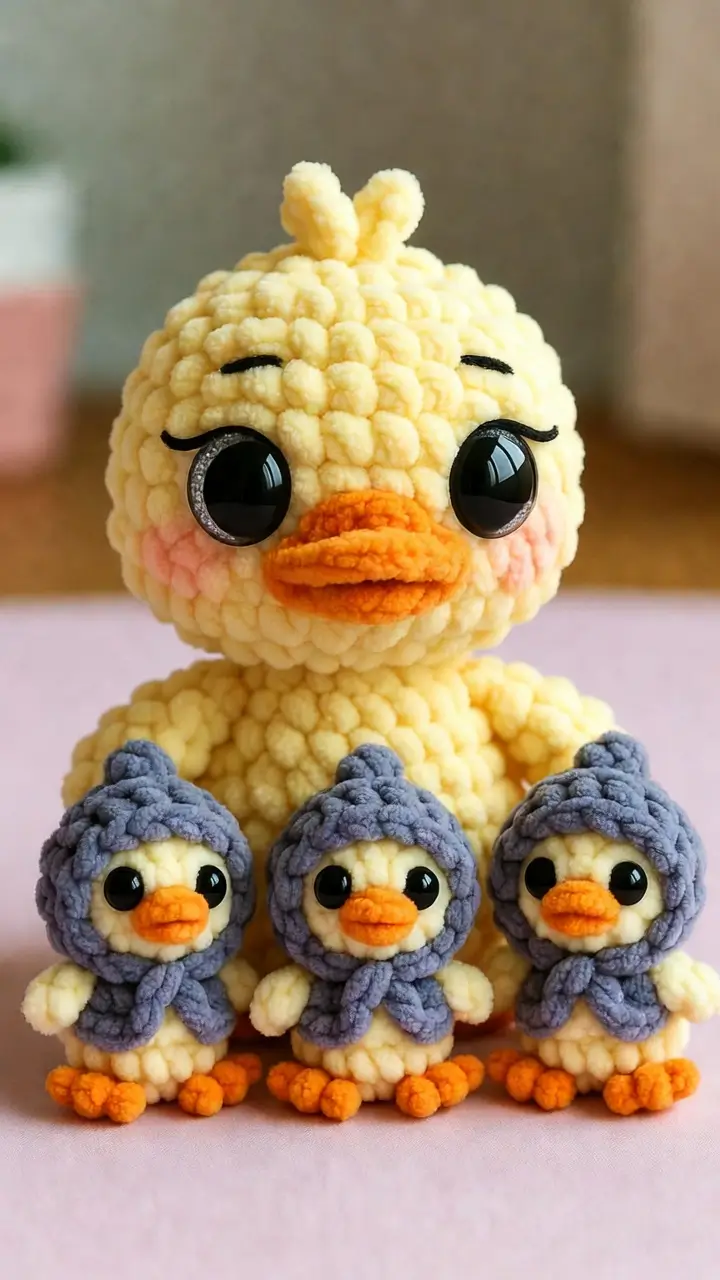
A duck bill is wider than the head seam wants to allow, so this duck amigurumi crochet pattern builds the face around a folded orange oval before any blush goes on. Use super bulky chenille, a 5 mm hook, 12–15 mm eyes for mini ducklings, and intermediate shaping. The finished hooded duckling is about 14 cm, made as a shelf flock with a larger display duck behind it.
The Design: What Makes This Duck Family Different
The main design decision is the beak. A duck face fails when the bill is too narrow, so the orange piece is made as a flattened circle rather than a cone. That keeps the profile horizontal and gives the face the broad, flat line visible in the photo. The second decision is scale. The large duck uses a 42-stitch head plateau, while the ducklings use a 30-stitch head plateau; this gives the family contrast without changing the construction system.
Published duck patterns often use 36–42 stitch body or head plateaus, so the sizing stays inside familiar plush amigurumi math. The third feature is the gray hood. Most crochet duck pattern free results focus on plain duck shapes, but this plush duck amigurumi needs a separate hood shell so the face opening stays round. The common mistake is sewing the beak after the head is closed; eye spacing and beak width need to be checked before the washer backs go on.
Project Info at a Glance
| Skill Level | Time | Finished Size | Hook | Best For |
|---|---|---|---|---|
| Intermediate | 3–5 hours per hooded duckling | 13–14 cm duckling; 24 cm display duck reference | 5.0 mm for chenille | Shelf flock, photo prop, nursery display with embroidered eyes for children under 3 |
Materials and Tools
Yarn
- Butter yellow — super bulky chenille #6 — 80 g for the large duck or 30–40 g per duckling — Himalaya Dolphin Baby, Premier Parfait Chunky, or similar.
- Bright orange — chenille or DK held double — 10–25 g — beaks and feet.
- Slate gray — super bulky chenille #6 — 25 g per set of hoods and ties.
- Soft pink — chenille scraps — cheek patches.
- Black embroidery thread — 1–4 m — eyebrows, lashes, and optional sewn eyes.
Tools
- Hook 5.0 mm
- Safety eyes 12–15 mm for ducklings; 20–24 mm for the large display duck if making the adult scale
- Polyester stuffing
- Tapestry needle
- Locking stitch markers
- Pins
- Scissors
- Black thread or yarn needle for embroidery
Abbreviations
MR = magic ring; sc = single crochet; inc = 2 sc in one stitch; dec = single crochet decrease; sl st = slip stitch; ch = chain; BLO = back loop only. Invisible decrease is worked through the front loops of the next two stitches to reduce bumps in closing rounds.
Pattern — Step by Step
Continuous spiral unless noted. Counts are written in brackets. The ducklings use a small 30-stitch head plateau; the large duck uses a 42-stitch head plateau.
Large Display Duck Head
Yarn: butter yellow — Source: standard amigurumi math, checked against published 36–42 stitch duck head/body structures.
R1: 6 sc in MR (6)
R2: inc ×6 (12)
R3: (sc, inc) ×6 (18)
R4: (2 sc, inc) ×6 (24)
R5: (3 sc, inc) ×6 (30)
R6: (4 sc, inc) ×6 (36)
R7: (5 sc, inc) ×6 (42)
R8–R13: sc around (42)
R14: (5 sc, dec) ×6 (36)
R15: (4 sc, dec) ×6 (30)
R16: (3 sc, dec) ×6 (24)
R17: (2 sc, dec) ×6 (18)
Place large eyes between R10 and R11, about 12 stitches apart. Embroider brows and lashes before adding washers. Stuff firmly.
R18: (sc, dec) ×6 (12)
R19: dec ×6 (6)
Fasten off. Leave a 20 cm tail.
Large Display Duck Body
Yarn: butter yellow — Source: standard amigurumi math.
R1: 6 sc in MR (6)
R2: inc ×6 (12)
R3: (sc, inc) ×6 (18)
R4: (2 sc, inc) ×6 (24)
R5: (3 sc, inc) ×6 (30)
R6: (4 sc, inc) ×6 (36)
R7–R10: sc around (36)
R11: (4 sc, dec) ×6 (30)
R12: sc around (30)
R13: (3 sc, dec) ×6 (24)
R14: (2 sc, dec) ×6 (18)
R15: (sc, dec) ×6 (12)
Stuff the lower body firmly enough to hold the large head upright.
R16: dec ×6 (6)
Fasten off. Leave a 30 cm sewing tail.
Mini Hooded Duckling Head
Make 3. Yarn: butter yellow — Source: standard amigurumi math.
R1: 6 sc in MR (6)
R2: inc ×6 (12)
R3: (sc, inc) ×6 (18)
R4: (2 sc, inc) ×6 (24)
R5: (3 sc, inc) ×6 (30)
R6–R9: sc around (30)
R10: (3 sc, dec) ×6 (24)
R11: (2 sc, dec) ×6 (18)
Insert 12 mm eyes between R7 and R8, 6 stitches apart. Stuff before the opening becomes tight.
R12: (sc, dec) ×6 (12)
R13: dec ×6 (6)
Fasten off. Leave a 15 cm tail.
Mini Hooded Duckling Body
Make 3. Yarn: butter yellow — Source: standard amigurumi math.
R1: 6 sc in MR (6)
R2: inc ×6 (12)
R3: (sc, inc) ×6 (18)
R4: (2 sc, inc) ×6 (24)
R5–R7: sc around (24)
R8: (2 sc, dec) ×6 (18)
R9: sc around (18)
R10: (sc, dec) ×6 (12)
Stuff the body. Keep the top flat enough for the head seam.
R11: dec ×6 (6)
Fasten off. Leave a 20 cm tail.
Wings / Front Legs
Make 8: 2 large, 6 mini. Yarn: butter yellow — Source: standard amigurumi math.
For mini wings:
R1: 6 sc in MR (6)
R2: inc ×6 (12)
R3: sc around (12)
R4: dec ×6 (6)
Flatten; do not stuff.
For large wings:
R1: 6 sc in MR (6)
R2: inc ×6 (12)
R3–R4: sc around (12)
R5: dec ×6 (6)
Flatten; pinch the top edge before sewing.
Fasten off. Leave a 15 cm tail.
Orange Feet / Back Legs
Make 8: 2 large, 6 mini. Yarn: orange — Source: standard amigurumi math plus chain-toe shaping.
R1: 6 sc in MR (6)
R2: inc ×6 (12)
R3: sc around (12)
Flatten through both layers. Work along the front edge only: ch 3, sl st into same stitch, sl st into next stitch; repeat 3 times for toe bumps.
Fasten off. Leave a 15 cm tail.
Folded Beaks
Make 1 large upper beak, 1 large lower beak, and 3 mini beaks. Yarn: orange — Source: comparable duck beaks use MR circles that are folded flat.
Mini beak:
R1: 6 sc in MR (6)
R2: inc ×6 (12)
Fasten off. Fold into a half circle.
Large beak:
R1: 6 sc in MR (6)
R2: inc ×6 (12)
R3: (sc, inc) ×6 (18)
R4: sc around (18)
Fasten off. Fold flat. Make a second large piece if you want the raised two-lip bill shown in the photo.
Leave 20 cm tails for sewing.
Cheek Patches
Make 8: 2 large, 6 mini. Yarn: soft pink — Source: standard flat-circle math.
Mini cheek:
R1: 6 sc in MR (6)
Sl st to first stitch. Fasten off.
Large cheek:
R1: 6 sc in MR (6)
R2: inc ×6 (12)
Sl st to first stitch. Fasten off.
Leave a fine sewing tail; bulky chenille tails can distort the face.
Top Tuft
Make 1 for the large duck. Yarn: butter yellow — Source: chain shaping.
Ch 5, sc in second ch from hook and next 3 ch. Sl st into the starting point. Repeat twice more from the same base to form three short loops.
Fasten off. Leave a 20 cm tail for sewing to the head crown.
Gray Hood
Make 3. Yarn: slate gray — Source: original hood shell using standard increase rounds.
R1: 6 sc in MR (6)
R2: inc ×6 (12)
R3: (sc, inc) ×6 (18)
R4: (2 sc, inc) ×6 (24)
R5: (3 sc, inc) ×6 (30)
R6–R7: sc around (30)
R8: sc in next 20 sts only, ch 1, turn (20)
R9: sc across, ch 1, turn (20)
R10: dec, sc 16, dec, ch 1, turn (18)
R11: sc across (18)
Fasten off. Leave a 25 cm tail. The open edge frames the duckling face.
Gray Hood Ties and Neck Wrap
Make 3 wraps and 6 ties. Yarn: slate gray — Source: chain-row accessory construction.
Neck wrap: ch 24. Row 1: sc in second ch from hook and across (23). Fasten off.
Tie: ch 8. Row 1: sl st in second ch from hook and across (7). Fasten off. Make 6.
Assembly
- Sew the large head to the large body first, using the body tail and a full circular seam.
- Attach the mini duckling heads to the mini bodies, keeping the face centered over the belly.
- Pin all beaks before sewing; the adult bill sits between the eyes, and mini beaks sit one round below the eyes.
- Sew the cheek patches under the outer corner of each eye, with one stitch of yellow space beside the beak.
- Attach wings at the side seam line, angled slightly forward on the ducklings.
- Sew orange feet to the bottom front edge of each duckling body so the toe bumps face outward.
- Add the adult top tuft to the crown and tack each loop down at the base.
- Slide each gray hood over a duckling head, then sew only around the back and lower sides.
- Wrap the gray neck strip around the duckling body and attach two short ties at the front.
- Weave all tails into the plush fabric, trim only after pulling the yarn end into the body.
The finished piece is a large plush duck with three hooded ducklings in front.
7 Technical Tips
- Stitch-marker drift: A missed first stitch on R6 of the large head shifts the beak off center by 1–2 stitches. Move the marker up every round rather than counting from the yarn tail.
- Stuffing firmness: The adult head needs a firm center, not a soft edge. Add stuffing in 2 cm pieces so the safety-eye washers do not form dents.
- Invisible decrease gaps: Chenille shows holes when a normal decrease is pulled tight. Use front-loop invisible decreases on every 24 → 18 and 12 → 6 closing round.
- Eye placement timing: Install mini duckling eyes between R7 and R8 before R10 starts narrowing. Waiting until after R11 makes the washer hard to press flat.
- Velvet tension failure: A 5.0 mm hook with #6 chenille should make fabric with no visible stuffing holes. If yellow fiberfill shows through, drop to 4.5 mm.
- Pinning the hood: The gray hood can rotate and cover one eye if sewn without pins. Place one pin at the crown, one behind each cheek, and one at the lower back before stitching.
- Tail weaving: Chenille tails shed when cut too close. Weave each tail through at least 4 cm of fabric, tug once, then trim below the surface.
Conclusion
This duck amigurumi crochet pattern works because the construction separates face width, body balance, and hood placement instead of forcing every feature into one no-sew shape. Make the ducklings first, then build the large display duck after checking eye size and beak width against the smaller heads. The practical next step is to crochet one mini head, pin the beak and cheeks, and confirm the gray hood opening before making the full flock. Share the finished duck family on Pinterest and Instagram with #HoodedDucklingFamily. Which duckling should sit in the center: the one with the widest hood, the smallest beak, or the tallest orange feet?









